Home>Renovation & DIY>Tools & Equipment>How Big Of A Hole Can You Spackle
Tools & Equipment
How Big Of A Hole Can You Spackle
Published: December 19, 2023
Learn how to choose the right tools and equipment for spackling, and discover the best techniques for filling holes of any size. Expert tips and advice!
(Many of the links in this article redirect to a specific reviewed product. Your purchase of these products through affiliate links helps to generate commission for Storables.com, at no extra cost. Learn more)
Introduction
Read more: How To Spackle Holes
Introduction
Welcome to the world of home improvement, where little imperfections can make a big difference. Whether it's from accidentally knocking a doorknob into the wall or removing a picture frame, small holes and cracks can detract from the overall aesthetics of your living space. This is where spackling comes to the rescue.
Spackling is a versatile and essential component of any DIY enthusiast's toolkit. It's the magical paste that allows you to repair and conceal those unsightly blemishes on your walls with ease. However, the question often arises: how big of a hole can you spackle?
In this comprehensive guide, we'll delve into the intricacies of spackling, exploring the factors that determine the size of the hole you can effectively spackle, the types of spackle available, and the step-by-step process of applying and finishing spackle. By the end, you'll be equipped with the knowledge and confidence to tackle those wall imperfections like a seasoned pro. Let's embark on this spackling journey together!
Key Takeaways:
- Spackling is best for small to medium-sized holes and cracks, with lightweight spackle for small holes and heavyweight spackle for larger imperfections. Understanding the size and depth of the hole is crucial for successful spackling.
- Choosing the right spackle and applying it with finesse is essential for achieving professional-quality repairs. Sanding and finishing the spackled area ensures a seamless blend with the surrounding wall, revitalizing the aesthetics of your living space.
Understanding Spackling
Before delving into the specifics of spackling, it’s essential to grasp the nature of this remarkable substance. Spackle, also known as spackling compound, is a versatile paste primarily used to fill and repair holes, cracks, and imperfections in walls, ceilings, and other surfaces. It serves as a quick and effective solution for achieving a smooth, uniform surface before painting or wallpapering.
One of the key attributes of spackle is its composition. Typically, spackling compound consists of gypsum powder or calcium carbonate mixed with a binding agent, such as glue or latex, to create a pliable paste. This composition allows spackle to dry relatively quickly and form a hard, durable surface that can be sanded and painted over, seamlessly blending with the surrounding area.
Moreover, spackling comes in various formulations to suit different applications. Lightweight spackle, for instance, is ideal for filling small holes and minor cracks, while heavyweight spackle is better suited for larger imperfections and repairs. Understanding the nuances of these formulations is crucial in determining the appropriate type of spackle for the task at hand.
Furthermore, spackling is available in different forms, including pre-mixed paste and dry powder. Pre-mixed spackle is convenient for immediate use, while dry spackle requires mixing with water to achieve the desired consistency. Each form offers distinct advantages, catering to the preferences and expertise of DIY enthusiasts and professionals alike.
By comprehending the properties and variations of spackling, you gain a deeper appreciation for its role in maintaining and enhancing the visual appeal of interior surfaces. With this foundational knowledge in place, we can now explore the factors that dictate the size of the hole suitable for spackling and the subsequent steps involved in the spackling process.
Determining the Size of the Hole
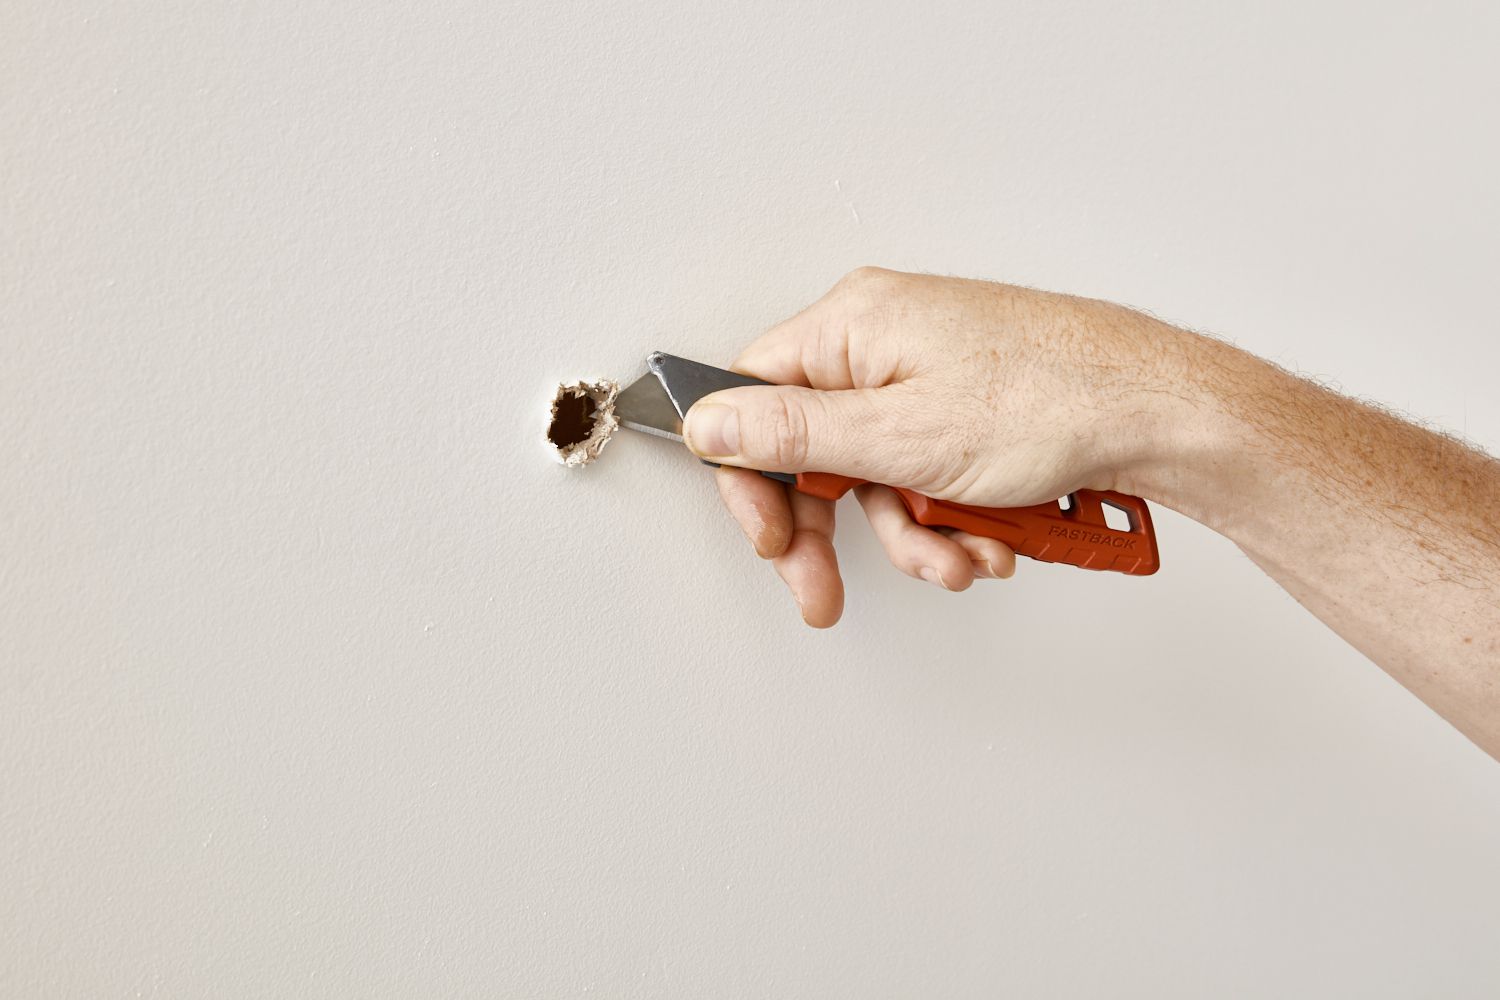
When it comes to spackling, the size of the hole or imperfection plays a pivotal role in determining the feasibility of using spackle as a repair solution. As a general guideline, spackle is best suited for filling relatively small to medium-sized holes and cracks. These may include nail holes, screw holes, dents, and minor dings resulting from everyday wear and tear.
For small holes, typically up to 1/4 inch in diameter, lightweight spackle is the go-to choice. This type of spackle possesses a creamy consistency and is adept at filling and smoothing minor blemishes with minimal shrinkage. As the hole size increases, transitioning to heavyweight spackle becomes necessary to accommodate larger imperfections. Heavyweight spackle offers greater structural integrity and adhesion, making it suitable for repairing holes up to 1 inch in diameter.
It’s important to note that while spackle is effective for addressing a wide range of imperfections, there are limitations to its applicability. Larger holes, such as those resulting from doorknob impacts or substantial wall damage, may require alternative repair methods, such as using wall patches or joint compound. These solutions provide the structural reinforcement needed to restore the integrity of the wall before applying spackle for a seamless finish.
Another consideration in determining the size of the hole suitable for spackling is the depth of the imperfection. Spackle is best applied to shallow indentations and surface-level cracks. Deeper holes may necessitate multiple spackling applications, with each layer allowed to dry and be sanded before applying subsequent coats. Understanding the dimensions and characteristics of the imperfection is crucial in gauging the suitability of spackling as a repair approach.
By recognizing the parameters within which spackle excels, you can make informed decisions about its application, ensuring that your repair endeavors yield professional-quality results. With the size of the hole duly assessed, the next step involves selecting the appropriate type of spackle to match the specific repair requirements, a topic we’ll explore in the following section.
Choosing the Right Spackle
With an understanding of the size and nature of the imperfection to be repaired, the next crucial step is selecting the appropriate type of spackle. Different spackling compounds are tailored to address specific repair needs, ensuring optimal results and long-lasting durability.
For small to medium-sized holes and minor cracks, lightweight spackle is the preferred choice. Its smooth consistency allows for easy application and minimal shrinkage during drying, making it ideal for achieving a seamless finish on shallow imperfections. Lightweight spackle is available in pre-mixed form, offering convenience and ease of use for quick touch-ups and repairs.
When faced with larger holes and deeper imperfections, heavyweight spackle becomes the go-to option. This robust compound provides enhanced structural support and adhesion, making it suitable for filling and reinforcing substantial blemishes. Its thicker consistency ensures that it remains securely in place, facilitating the restoration of the damaged area to its original smooth surface.
Furthermore, the choice between pre-mixed spackle and dry spackle warrants consideration. Pre-mixed spackle is ready for immediate use, eliminating the need for mixing and ensuring consistent quality. This convenience is particularly advantageous for small-scale repairs and touch-ups. On the other hand, dry spackle, which requires mixing with water to achieve the desired consistency, offers flexibility in adjusting the thickness of the compound to suit specific repair requirements.
Another aspect to consider when choosing the right spackle is the intended finish. Some spackling compounds are formulated to dry with a white finish, blending seamlessly with most interior wall colors. However, tinted spackles are also available, catering to specific paint shades and minimizing the need for extensive touch-up painting after the spackling process.
By carefully evaluating the size, depth, and nature of the imperfection, you can make an informed decision regarding the most suitable spackling compound for the task at hand. Armed with the right spackle, you’re ready to embark on the next phase of the spackling process: applying the compound to achieve a flawless repair. This step-by-step process will be explored in the following section, guiding you through the application and finishing of spackle for professional-quality results.
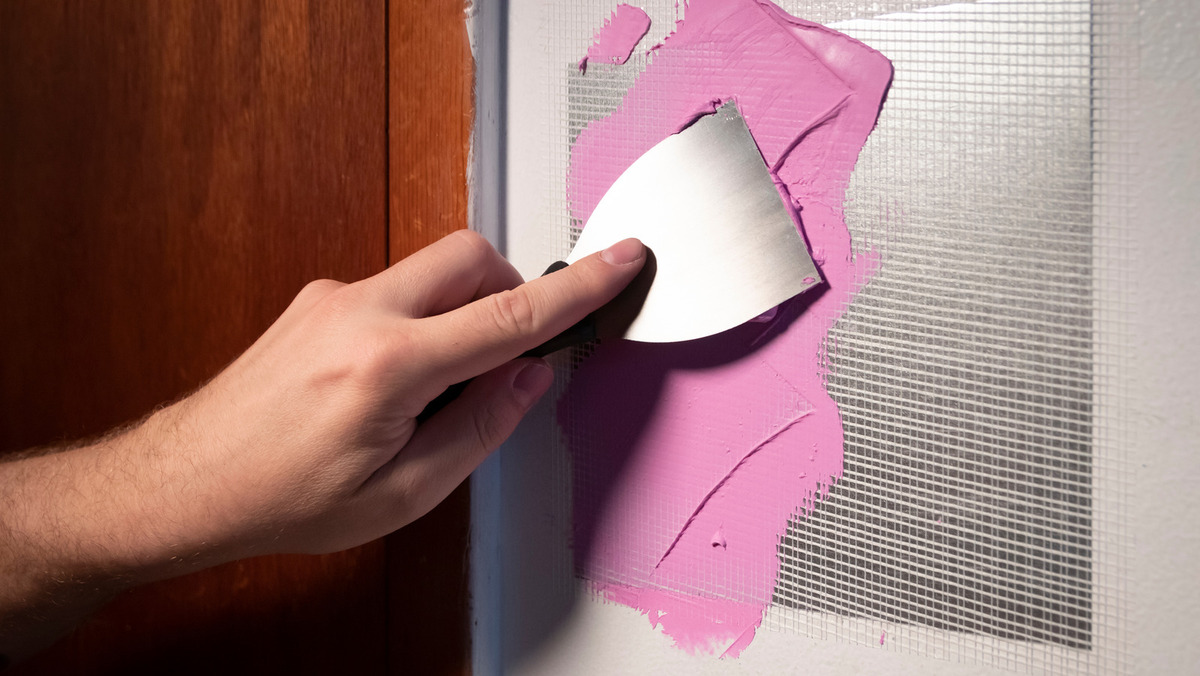
When spackling a hole, make sure it’s no larger than 1/4 inch deep. For larger holes, use a patch or mesh to reinforce the spackle.
Read more: How To Spackle Large Holes
Applying Spackle
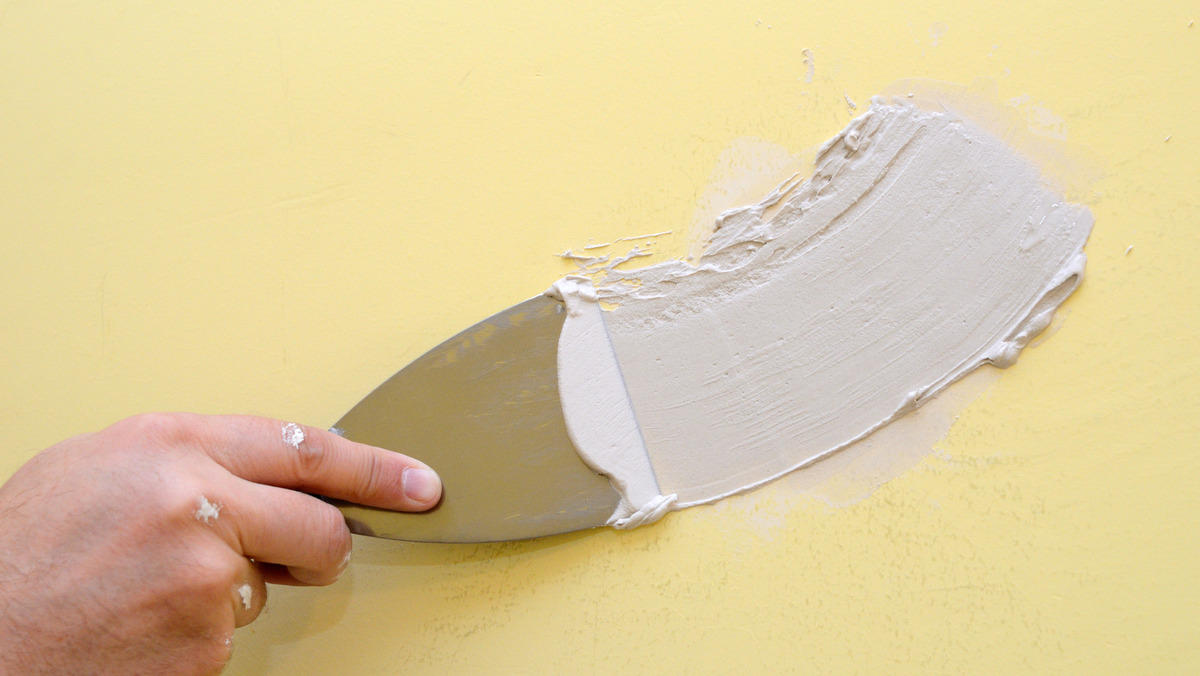
With the appropriate spackling compound selected, it’s time to embark on the application process, a critical step in achieving a seamless and professional repair. Before applying spackle, ensure that the surface to be repaired is clean and free of dust, debris, and loose particles. This sets the stage for optimal adhesion and a smooth, uniform finish.
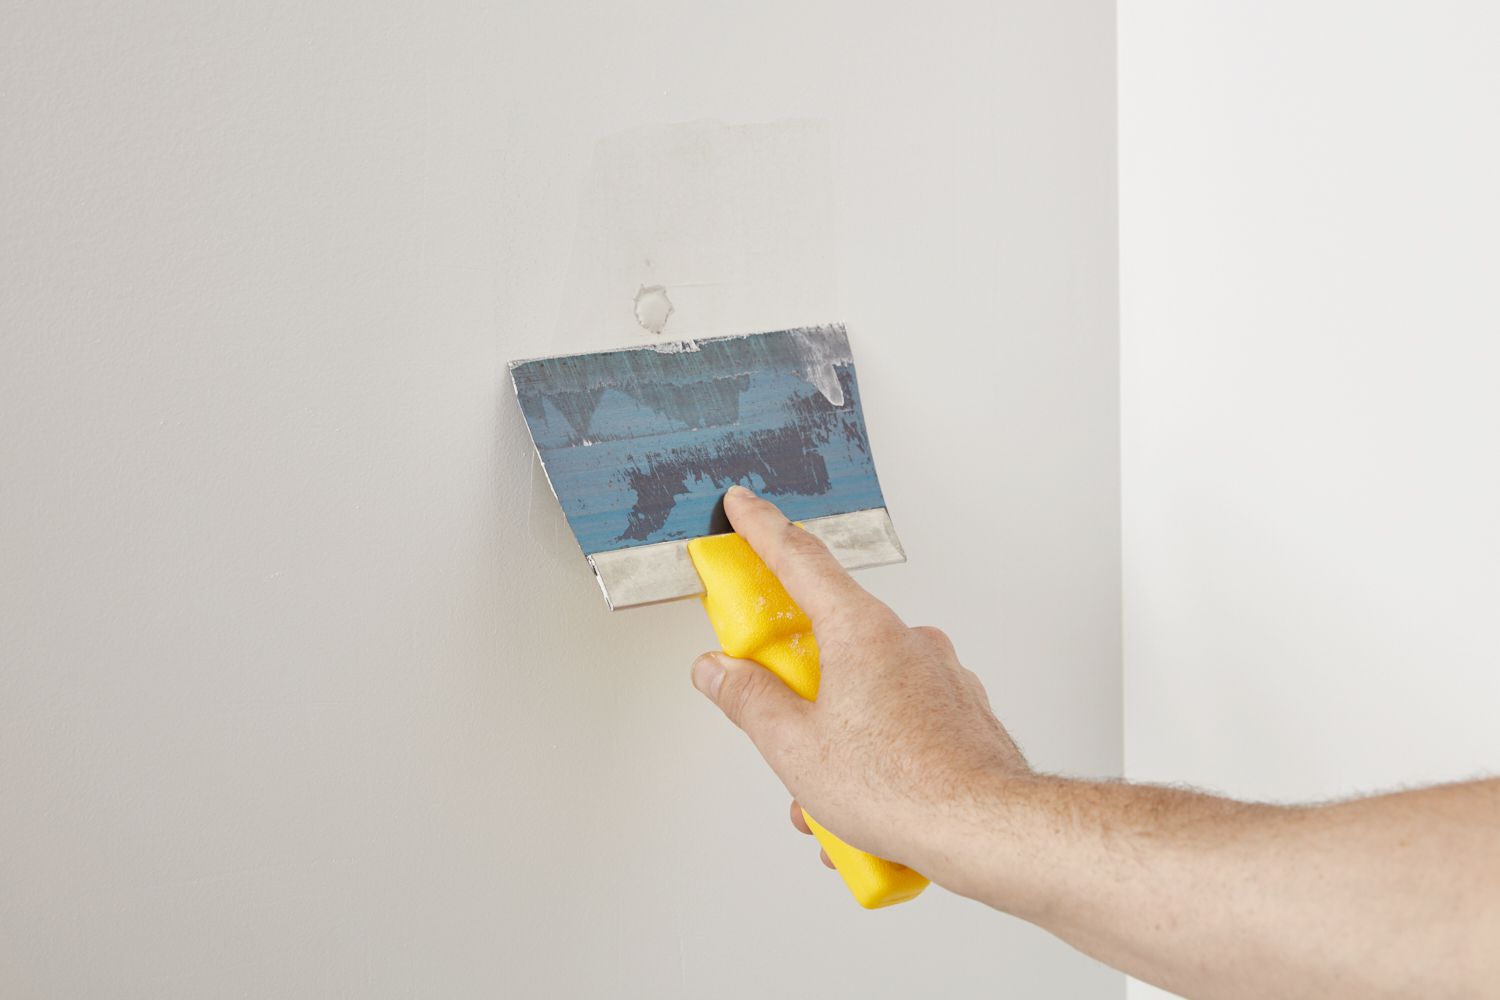
Begin by using a putty knife or a spackling knife to scoop a small amount of spackle from the container. For small holes and minor imperfections, a putty knife with a narrow blade is suitable, allowing for precise application and minimal excess. For larger repairs, a wider spackling knife provides the necessary coverage and control over the compound.
Apply the spackle to the imperfection in a smooth, even manner, ensuring that it fills the hole or crack completely. For shallow indentations, a single application may suffice, while deeper imperfections may require multiple layers of spackle, each allowed to dry and be sanded before the next coat is applied. This incremental approach ensures that the repair is structurally sound and seamlessly integrated with the surrounding surface.
As you apply the spackle, strive to achieve a level surface that aligns with the surrounding area. Excess spackle can be gently smoothed with the putty knife to create a flush finish. Take care to remove any surplus compound to prevent unnecessary sanding and ensure a tidy repair process.
Once the spackle is applied, allow it to dry thoroughly according to the manufacturer’s guidelines. This typically involves a waiting period of several hours, during which the spackle solidifies and prepares for the next phase: sanding and finishing. Patience is key during this stage, as rushing the drying process can compromise the integrity of the repair.
By following these steps, you can effectively apply spackle to address a range of imperfections, from small nail holes to larger cracks, achieving a seamless and professional-quality repair. The subsequent phase involves sanding and finishing the spackled area to refine the surface and prepare it for painting or wallpapering, a topic we’ll explore in the following section.
Sanding and Finishing
Once the spackled area has dried thoroughly, the next crucial step in the repair process is sanding and finishing. This phase is essential for achieving a smooth, uniform surface that seamlessly blends with the surrounding area, preparing the repaired area for painting or wallpapering.
Begin by inspecting the dried spackled area for any irregularities, bumps, or excess compound. Using fine-grit sandpaper, gently sand the repaired surface in a circular motion, gradually smoothing out any imperfections and ensuring a flush finish. Take care to feather the edges of the spackled area to seamlessly blend it with the surrounding wall, creating an imperceptible transition between the repaired section and the rest of the surface.
As you sand the spackled area, periodically run your hand over the surface to gauge its smoothness and detect any remaining rough patches or inconsistencies. This tactile approach allows for precise refinement, ensuring that the repaired area matches the texture and smoothness of the surrounding wall.
Following the sanding process, wipe the spackled area with a damp cloth to remove any residual dust or particles, leaving the surface clean and ready for painting or wallpapering. This step is crucial for achieving optimal adhesion and a flawless finish, as any lingering debris can compromise the quality of the final application.
If necessary, apply an additional coat of spackle to address any remaining imperfections or irregularities, repeating the drying, sanding, and cleaning process as needed. This iterative approach ensures that the repaired area attains the desired smoothness and uniformity, ready to seamlessly integrate with the rest of the wall.
With the spackled area meticulously sanded and cleaned, it’s now primed for painting or wallpapering. The repaired section should blend seamlessly with the surrounding surface, creating a cohesive and visually appealing result that conceals the previous imperfections.
By following these steps, you can effectively sand and finish the spackled area, achieving a professional-quality repair that seamlessly integrates with the surrounding wall. With the repair process complete, you can proceed to paint or wallpaper the surface, revitalizing the aesthetics of your living space and showcasing your adeptness in the art of spackling.
Conclusion
Congratulations on embarking on this spackling journey and gaining valuable insights into the art of repairing and concealing imperfections in interior surfaces. As we conclude this comprehensive guide, it’s evident that spackling is a versatile and indispensable technique for achieving seamless repairs and maintaining the visual appeal of your living space.
By understanding the nuances of spackling, from its composition and variations to the process of determining the size of the hole suitable for spackling, you’ve acquired the knowledge necessary to approach wall repairs with confidence and precision. The ability to discern between lightweight and heavyweight spackle, select the appropriate formulation, and apply the compound with finesse underscores your expertise in the art of spackling.
Furthermore, the meticulous steps involved in sanding and finishing the spackled area exemplify your dedication to achieving professional-quality results. The seamless integration of the repaired section with the surrounding wall reflects your commitment to excellence in home improvement endeavors.
As you apply these newfound skills and insights, consider the transformative impact of spackling on the overall aesthetics of your living space. Whether it’s concealing nail holes, addressing minor dents, or repairing cracks, spackling empowers you to uphold the pristine appearance of your walls and ceilings with ease.
Remember, the art of spackling is not merely about concealing imperfections; it’s about revitalizing and enhancing the visual appeal of your home. With each repair, you contribute to the seamless harmony and immaculate finish of your interior surfaces, creating a welcoming and refined ambiance that reflects your attention to detail and craftsmanship.
As you continue your journey in home improvement, let the knowledge and expertise gained from this guide serve as a steadfast companion, empowering you to tackle future repair projects with confidence and finesse. Embrace the art of spackling as a testament to your dedication to maintaining a beautiful and well-cared-for home.
With the skills and insights acquired, you’re poised to embark on a spackling adventure filled with transformative repairs and visually stunning results. Here’s to elevating the aesthetics of your living space through the artistry of spackling!
Frequently Asked Questions about How Big Of A Hole Can You Spackle
Was this page helpful?
At Storables.com, we guarantee accurate and reliable information. Our content, validated by Expert Board Contributors, is crafted following stringent Editorial Policies. We're committed to providing you with well-researched, expert-backed insights for all your informational needs.


0 thoughts on “How Big Of A Hole Can You Spackle”