Home>Renovation & DIY>Tools & Equipment>What Is A Spackle
Tools & Equipment
What Is A Spackle
Modified: February 25, 2024
Discover the essential tools and equipment needed for spackling. Improve your DIY skills with our comprehensive guide on what is a spackle and how to use it.
(Many of the links in this article redirect to a specific reviewed product. Your purchase of these products through affiliate links helps to generate commission for Storables.com, at no extra cost. Learn more)
Introduction
Welcome to the world of home improvement and maintenance! If you’re a DIY enthusiast or a homeowner looking to tackle small repairs around the house, you’ve probably heard of a product called spackle. In this article, we’ll delve into the wonderful world of spackle and explore what it is, how it’s used, and some helpful tips and techniques for working with it.
Spackle is a versatile and essential tool for any handy person. It’s a type of compound that is commonly used for repairing small holes, cracks, and imperfections in walls, ceilings, and other surfaces. It provides a smooth and seamless finish, making it a go-to solution for maintaining the aesthetic appeal of your home.
Whether you’re preparing your walls for a fresh coat of paint, fixing nail holes left by picture frames, or repairing minor damages caused by accidents, spackle is the go-to product for achieving a flawless surface. It has become a staple in the DIY community due to its ease of use and impressive results.
Spackle is typically made from a mixture of gypsum or another binder, along with fillers to give it body and smoothness. It comes in different forms, including paste, powder, and pre-mixed compounds. Each type has its own advantages and is suitable for various applications.
As we explore the world of spackle, we’ll discuss its common uses, the different types available, and offer practical tips for using it effectively. By the end of this article, you’ll have a solid understanding of spackle and be ready to tackle any small repair or touch-up job that comes your way with confidence and finesse.
Key Takeaways:
- Spackle is a versatile compound used to fill small holes, cracks, and imperfections in walls, ceilings, and other surfaces. It’s essential for achieving a smooth and flawless finish before painting or applying wallpaper.
- Choosing the right type of spackle, applying it in thin layers, and using proper techniques for drying, sanding, and smoothing are crucial for achieving professional-looking repairs and touch-ups in your home.
Read more: What To Do If A Spackle Dries Out
Definition of Spackle
Spackle is a versatile compound used in home improvement and maintenance projects to fill small holes, cracks, and imperfections in walls, ceilings, and other surfaces. Also known as wall putty or patching compound, spackle is commonly used to create a smooth and seamless finish before painting or applying wallpaper.
When walls or other surfaces suffer minor damages such as nail holes, dents, or small cracks, spackle can be applied to repair and restore them. It is specifically designed to be easy to work with and provides excellent adhesion to various materials, including drywall, plaster, wood, and masonry.
Spackle consists of a mixture of a binder, such as gypsum or another type of filler, which gives it its adhesive properties, and fillers which provide a smooth consistency. Depending on the specific product, spackle can come in different forms, such as paste, powder, or pre-mixed compound, each with its own advantages and suitability for specific applications.
The primary purpose of spackle is to create a seamless surface by filling and smoothing out small imperfections. It can be used to repair nail holes, cracks, dents, and minor surface damages caused by accidents or wear and tear. Spackle is also effective for covering seams and joints in drywall installations, ensuring a professional finish.
One of the key benefits of spackle is that it dries relatively quickly, allowing for efficient and timely repairs. Once dried, it can be sanded down to achieve a smooth and even surface, ready for painting or other finishes. This versatility makes spackle a valuable tool for both homeowners and professional painters alike.
Overall, spackle is an indispensable product for anyone looking to achieve a flawless and polished look in their home. Whether you’re repairing small damages, preparing walls for a new paint job, or simply refreshing the appearance of a room, spackle is the go-to solution for achieving a seamless and professional finish.
Common Uses of Spackle
Spackle is a versatile compound that can be used for a wide range of applications in home improvement and maintenance projects. Its ability to fill small holes, cracks, and imperfections makes it an invaluable tool for achieving smooth and flawless surfaces. Let’s explore some of the common uses of spackle:
- Patching Nail Holes: One of the most common uses of spackle is to fill nail holes left behind by picture frames, wall hangings, or other fixtures. Applying a small amount of spackle over the hole, smoothing it out with a putty knife, and allowing it to dry creates a seamless surface ready for painting or touch-ups.
- Repairing Cracks and Dents: Spackle is also excellent for repairing small cracks and dents in walls, ceilings, and other surfaces. It can easily fill in the damaged areas, creating a smooth finish that camouflages any imperfections. This is particularly useful for walls that have experienced settling or minor impact damage.
- Smoothing Wall Imperfections: Even if your walls are in relatively good condition, they may still have minor imperfections such as bumps, divots, or uneven textures. Spackle can be used to fill in these imperfections, providing a smooth and uniform surface before painting. This helps to achieve a more professional and polished look.
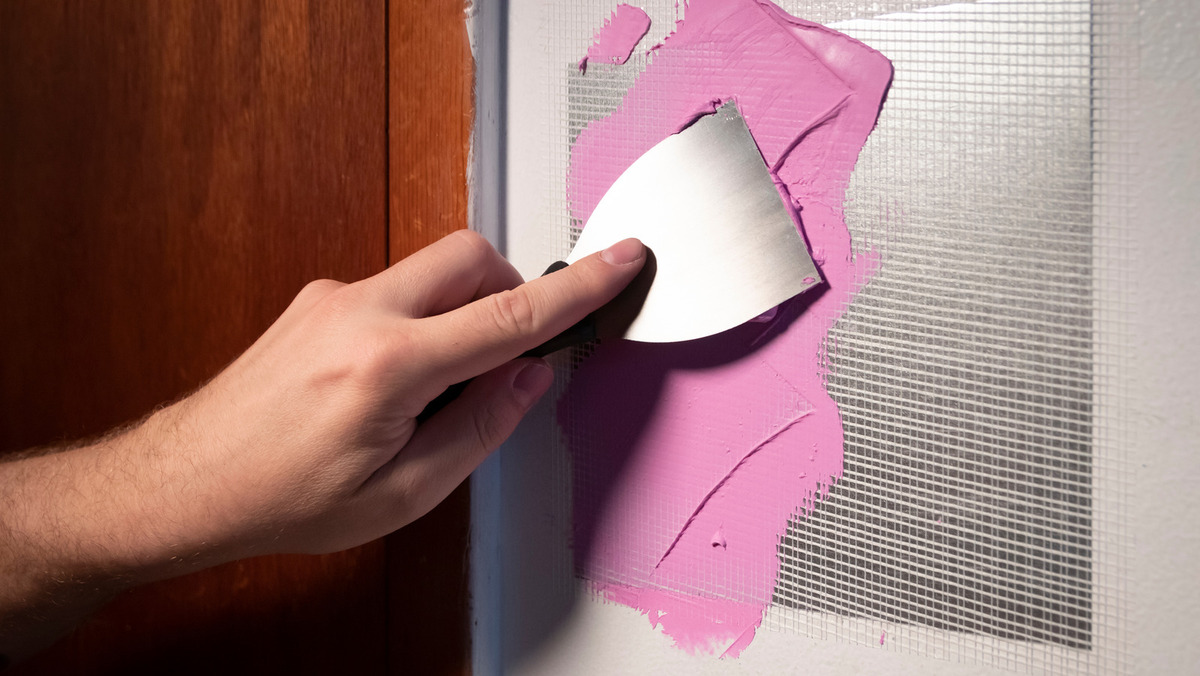
- Covering Seams and Joints: When installing or repairing drywall, spackle is essential for covering the seams and joints between panels. Applying a thin layer of spackle over the joints and smoothing it out helps to create a seamless finish. This is particularly important when preparing walls for wallpaper or other decorative wall coverings.
- Prepping for Paint: Before applying a fresh coat of paint, it’s crucial to prepare the walls properly to ensure a smooth and even finish. Spackle can be used to fill in any holes or cracks, as well as to smooth out any imperfections. Once the spackle is dried and sanded, the surface is ready for primer and paint, resulting in a professional-looking paint job.
- Repairing Damaged Wood: Spackle is not limited to just drywall and plaster surfaces. It can also be used to repair small damages on wooden surfaces such as furniture, trim, or cabinets. Whether it’s a scratch, dent, or small hole, applying spackle allows for easy restoration and a seamless finish.
These are just a few examples of the common uses for spackle. Its versatility and ease of use make it an essential tool for various repair and maintenance tasks around the house. Whether you’re a seasoned DIY enthusiast or just starting to explore the world of home improvement, having spackle on hand will undoubtedly come in handy for achieving smooth and flawless surfaces in your projects.
Types of Spackle
When it comes to selecting the right spackle for your specific project, there are several types available to choose from. Each type has its own unique properties and applications. Here are the most common types of spackle:
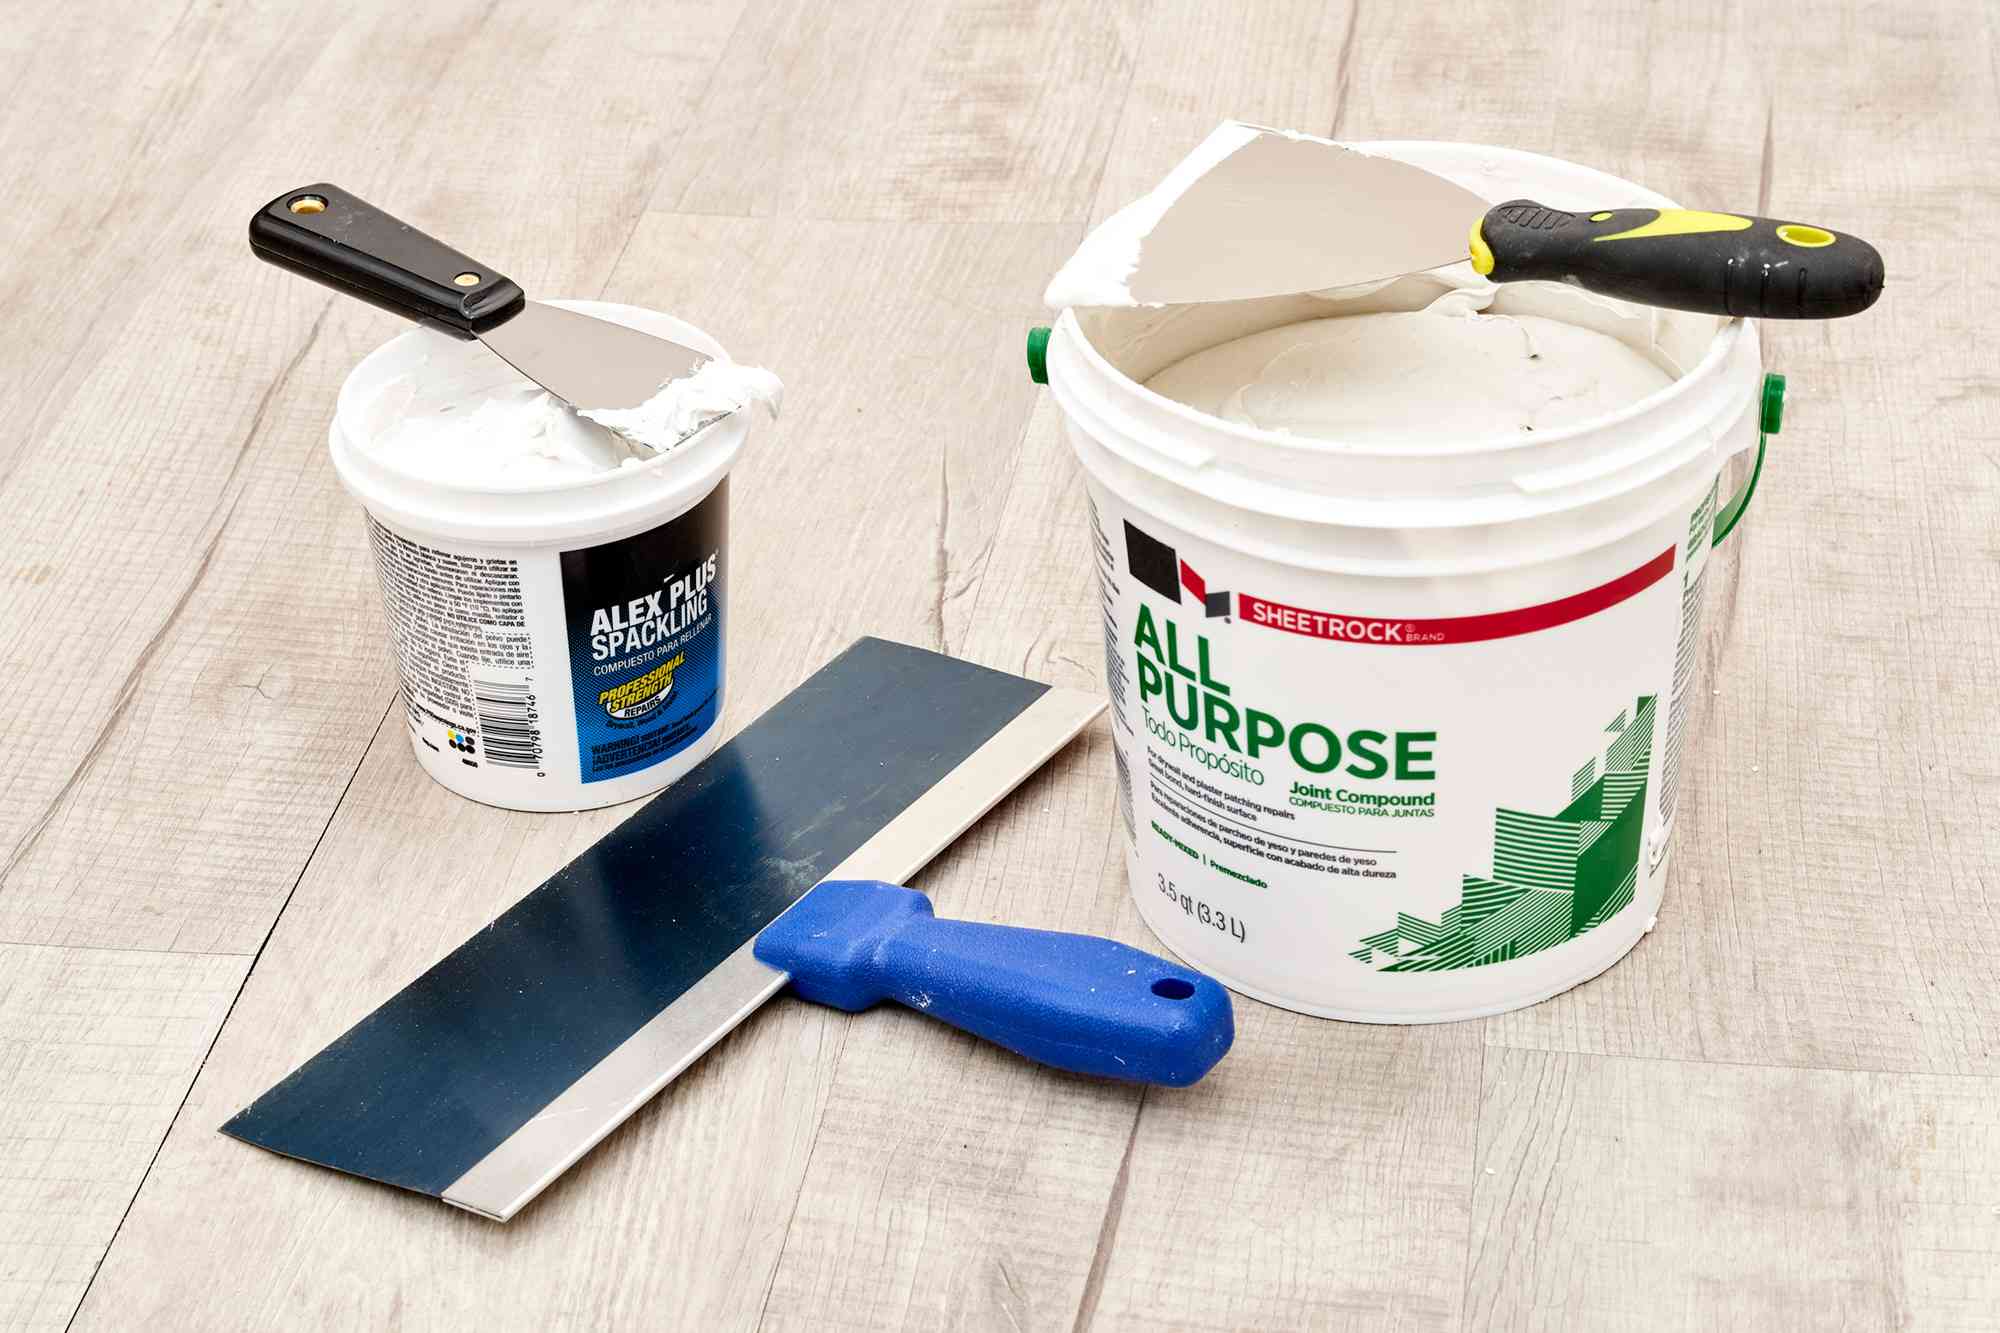
- Paste Spackle: Paste spackle is the most common type and is widely used for general repairs. It comes in a tub or tube and has a smooth, creamy consistency. Paste spackle is ready to use and requires no mixing before application. It is suitable for filling small holes, cracks, and imperfections in various surfaces.
- Lightweight Spackle: As the name suggests, lightweight spackle is a lighter alternative to traditional paste spackle. It is formulated with lightweight fillers that make it easier to spread and sand. This type of spackle is ideal for repairing larger areas or for those who prefer a more lightweight compound to work with.
- Powder Spackle: Powder spackle comes in a powdered form and needs to be mixed with water before use. It offers the advantage of being customizable in terms of consistency and drying time. Powder spackle is usually used for larger repairs or projects that require extended working time, as you can control the thickness by adding more or less water.
- Fast-Drying Spackle: If you’re on a tight schedule or have a time-sensitive project, fast-drying spackle is the ideal choice. This type of spackle is specially formulated to dry quickly, usually within hours. It allows you to complete repairs and move on to the next step of your project without having to wait for extended drying times.
- Pre-Mixed Spackle: For added convenience, pre-mixed spackle is available in stores. It comes ready to use, straight out of the container, without any additional mixing required. Pre-mixed spackle is suitable for small repairs and touch-ups, saving you time and effort in mixing and preparing the compound.
- Spackling Tape: Spackling tape, also known as drywall tape, is not technically a type of spackle but is commonly used in conjunction with spackle. It is a self-adhesive mesh tape that is applied over cracks or joints before applying spackle. The tape helps to reinforce the repair and prevent future cracks from appearing.
When selecting the right type of spackle for your project, consider the scope of the repair, the desired consistency, and the time you have available. Each type of spackle has its own advantages and may be better suited for specific applications. It’s always a good idea to read the packaging instructions and consult with an expert if you’re unsure which type to choose.
Remember, regardless of the type of spackle you choose, proper application techniques and surface preparation are essential for achieving the best results. With the right type of spackle and a little know-how, you’ll be well-equipped to handle various repair and maintenance projects around your home.
How to Apply Spackle
Applying spackle is a straightforward process that requires a few essential tools and some basic techniques. Whether you’re a beginner or an experienced DIYer, here’s a step-by-step guide on how to apply spackle effectively:
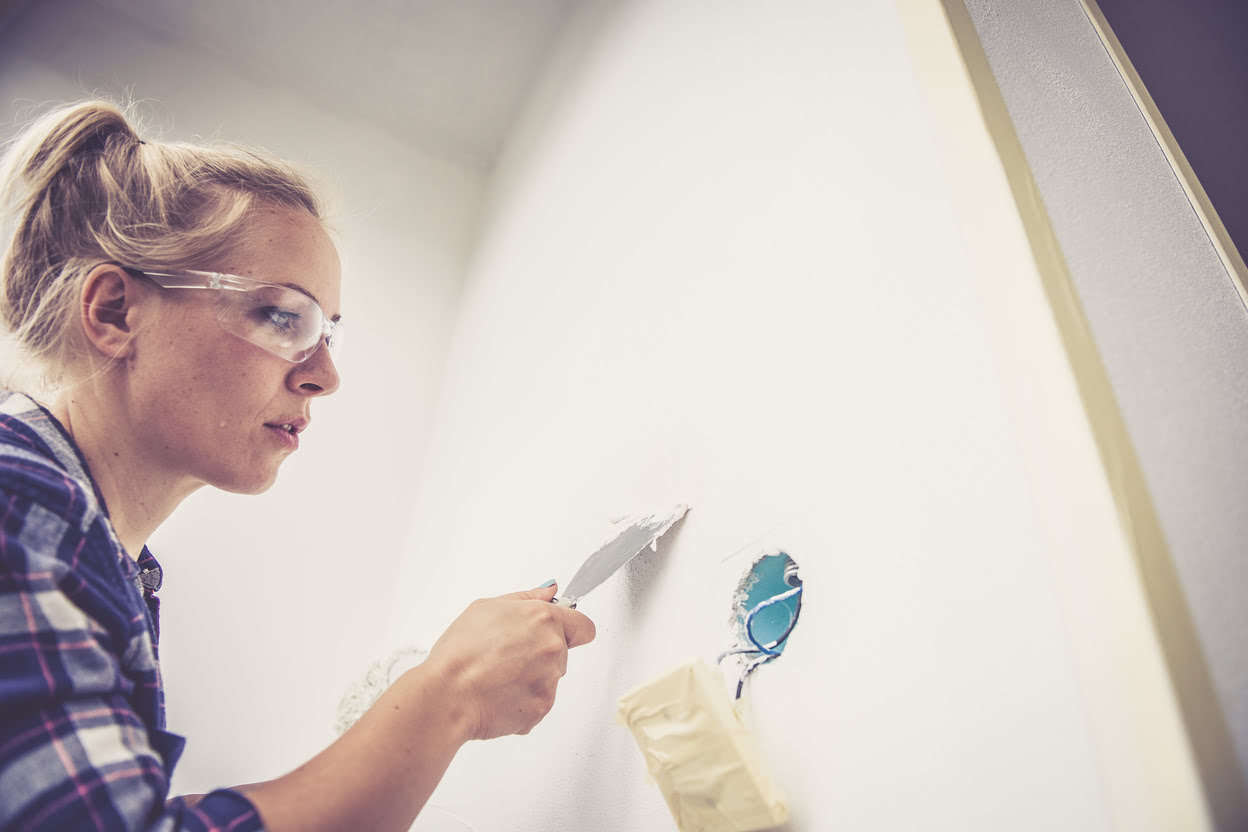
- Gather your supplies: For applying spackle, you’ll need a putty knife, sandpaper, a clean cloth or sponge, and your chosen spackle compound. Make sure the surface you’re working on is clean and dry before you begin.
- Prep the area: If necessary, use sandpaper to smooth any rough edges or remove loose debris around the damaged area. Wipe away any dust with a clean cloth or sponge.
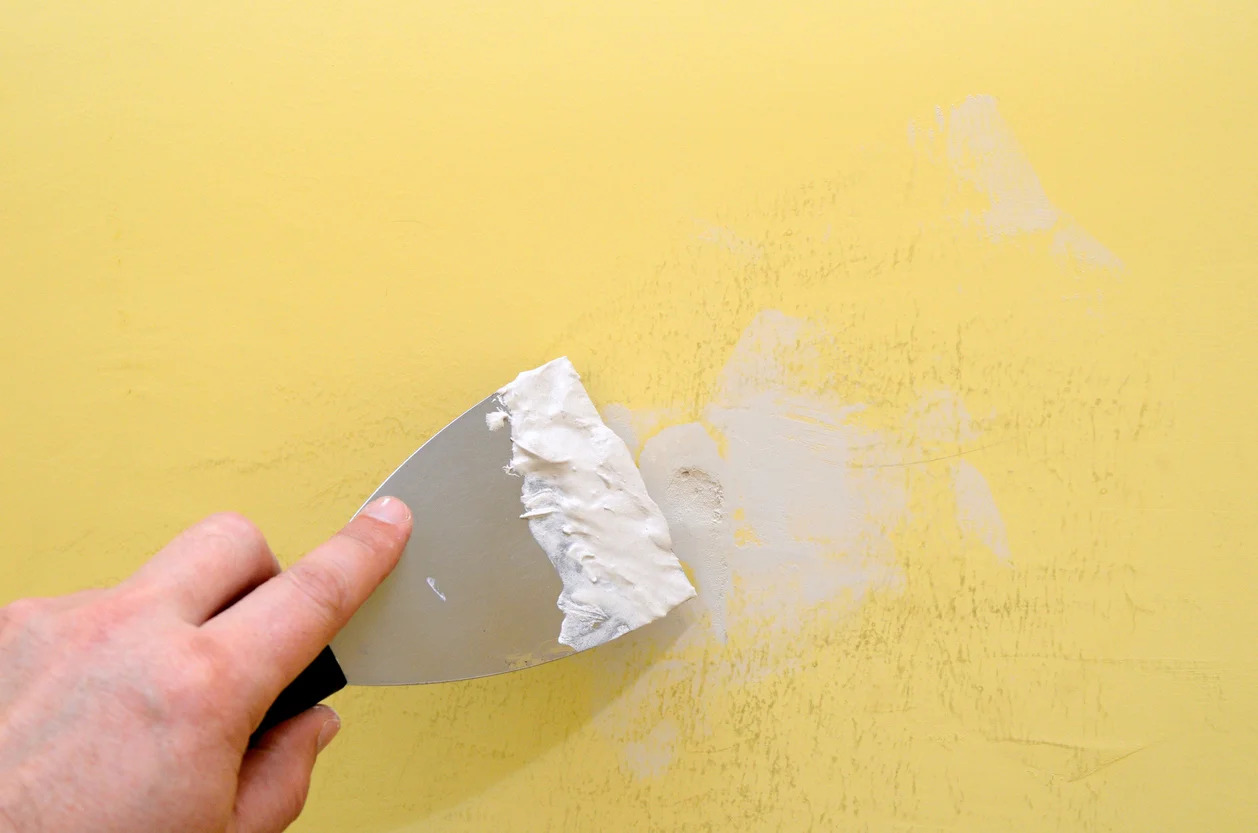
- Apply the spackle: Take a small amount of spackle on the edge of your putty knife and apply it to the damaged area. Start by pushing the spackle into any cracks or holes, ensuring it fills the entire space. For larger repairs, you may need to apply multiple layers, allowing each layer to dry before applying the next.
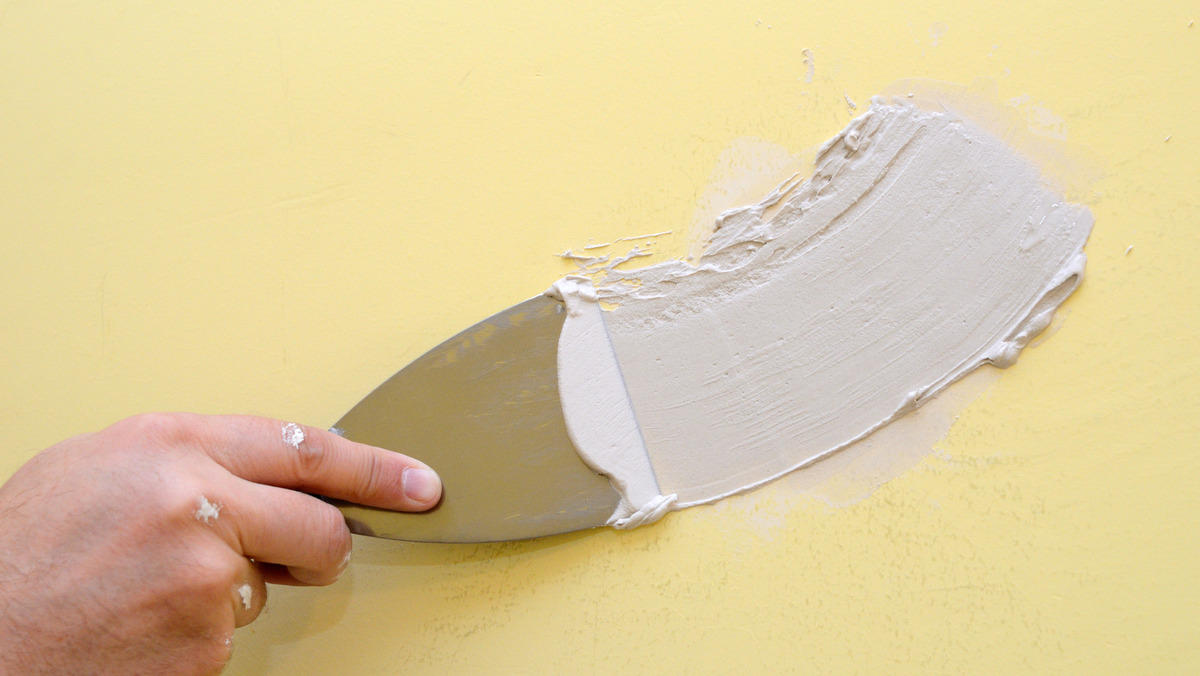
- Smooth the surface: Using the flat edge of the putty knife, smooth the spackle over the damaged area, feathering it outwards to create a seamless transition with the surrounding surface. Remove any excess spackle, but be careful not to dig into the repaired area.
- Let it dry: Allow the spackle to dry completely according to the manufacturer’s instructions. This usually takes a few hours, but drying times may vary depending on the type and thickness of the spackle used.
- Sand the dried spackle: Once the spackle is dry, lightly sand the repaired area with fine-grit sandpaper to achieve a smooth finish. Be gentle to avoid damaging the surrounding surface. Wipe away any dust with a clean cloth.
- Inspect and repeat if necessary: After sanding, carefully examine the repaired area. If needed, apply additional layers of spackle and repeat the smoothing and sanding process to achieve a flawless finish.
- Finish with primer and paint: Once you are satisfied with the repaired surface, prime it with a suitable primer to ensure paint adhesion. After the primer has dried, you can apply paint to match the surrounding area for a seamless appearance.
Remember, proper technique and patience are key when applying spackle. Take your time, work in thin layers, and allow each layer to dry before moving on to the next. This will result in a better repair and a smoother finish.
Additionally, it’s always a good idea to follow the specific instructions provided by the manufacturer of the spackle product you’re using. They may provide additional tips or recommendations for optimal results.
By following these steps and taking care with each application, you’ll be able to effectively repair small holes, cracks, and imperfections using spackle and achieve a professional-looking finish in your home.
When using spackle, make sure to apply it in thin layers and allow each layer to dry completely before adding more. Sand the area smooth before painting for a seamless finish.
Read more: What Grit Sandpaper For Sanding Spackle
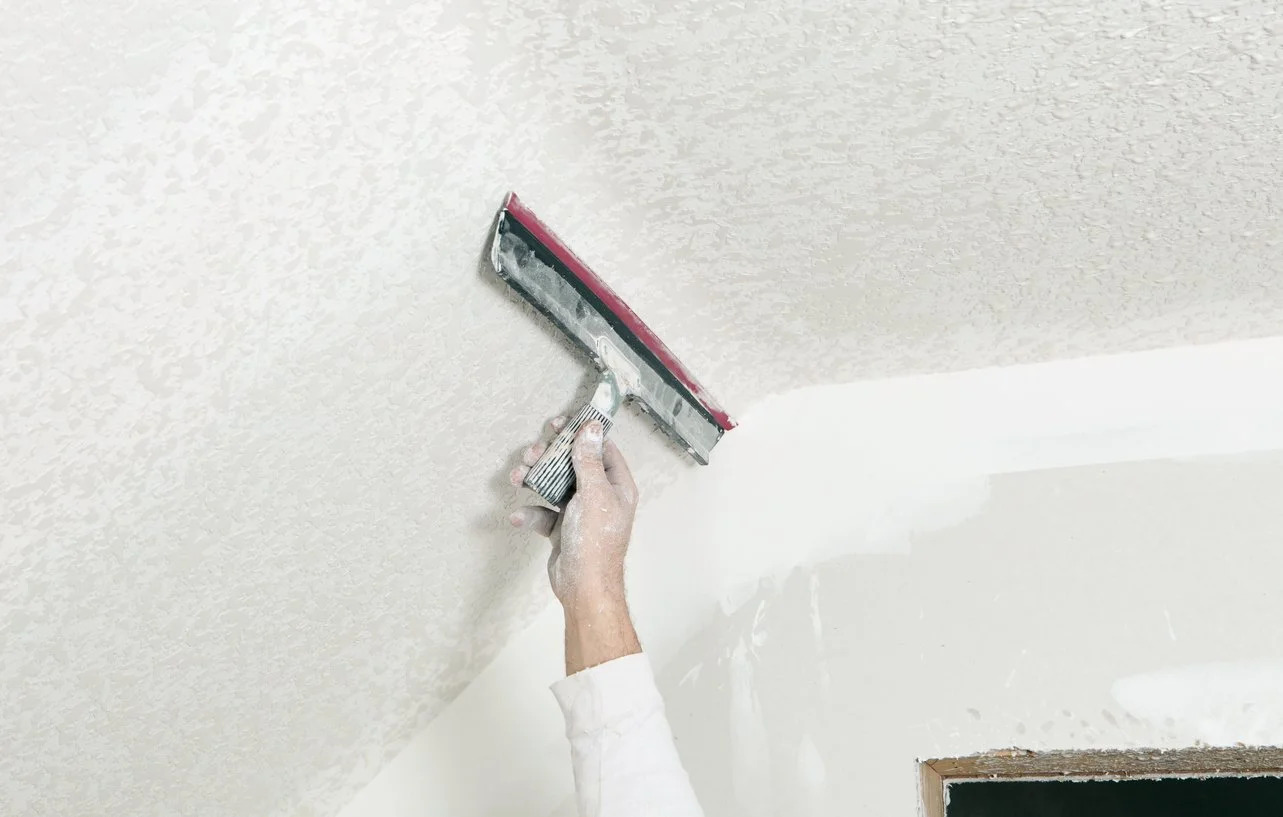
Proper Techniques for Smoothing Spackle
Smoothing spackle is a crucial step in achieving a seamless and professional finish for your repair or touch-up project. Here are some proper techniques to ensure you achieve a smooth and flawless surface:
- Use the Right Tools: Choose a putty knife or a taping knife with a flexible blade that matches the size of the repair area. A wider blade is more effective for larger repairs, while a narrower one works well for smaller touch-ups.
- Apply Thin Layers: When applying spackle, it’s important to work in thin layers rather than trying to fill a deep hole or repair all at once. Applying thin layers allows for better control and makes it easier to achieve a smooth finish. You can always add more layers as needed, allowing each one to dry before applying the next.
- Feather Out the Edges: To blend the repaired area with the surrounding surface, use the blade of the putty knife to feather out the edges of the spackle. Gently, but firmly, press the knife against the surface and drag it outward, gradually decreasing pressure as you go. This technique helps to create a smooth and gradual transition, minimizing the appearance of the repair.
- Keep the Knife Clean: Regularly clean the putty knife to remove any excess spackle during the smoothing process. This prevents the buildup of dried spackle on the blade, which can transfer to the surface and create bumps or imperfections. Wipe the knife with a clean cloth or rinse it with water and dry it thoroughly before continuing.
- Sand Between Layers: If you’re applying multiple layers of spackle, lightly sand the surface between each layer to ensure a smooth and even finish. Use fine-grit sandpaper and gently sand the dried spackle in a circular motion. Wipe away any dust with a clean cloth before applying the next layer.
- Be Patient: Allow ample drying time between each layer and before sanding. Rushing the process can result in an uneven surface or damage to the repair. Follow the manufacturer’s guidelines for drying times, as they may vary depending on the type and thickness of the spackle used.
- Inspect and Touch Up: After smoothing the spackle, carefully inspect the repaired area. Look for any unevenness or imperfections and address them before moving on to the next step. It may be necessary to add a thin additional layer of spackle or sand down any high points to achieve a flawless surface.
Remember, practice makes perfect when it comes to smoothing spackle. It may take a few attempts to get the technique just right. Don’t be discouraged if it’s not perfect on your first try. With patience and attention to detail, you’ll be able to achieve a smooth and seamless finish that blends seamlessly with the surrounding surface.
By following these proper techniques for smoothing spackle, you’ll be well on your way to achieving professional-looking repairs and touch-ups in your home.
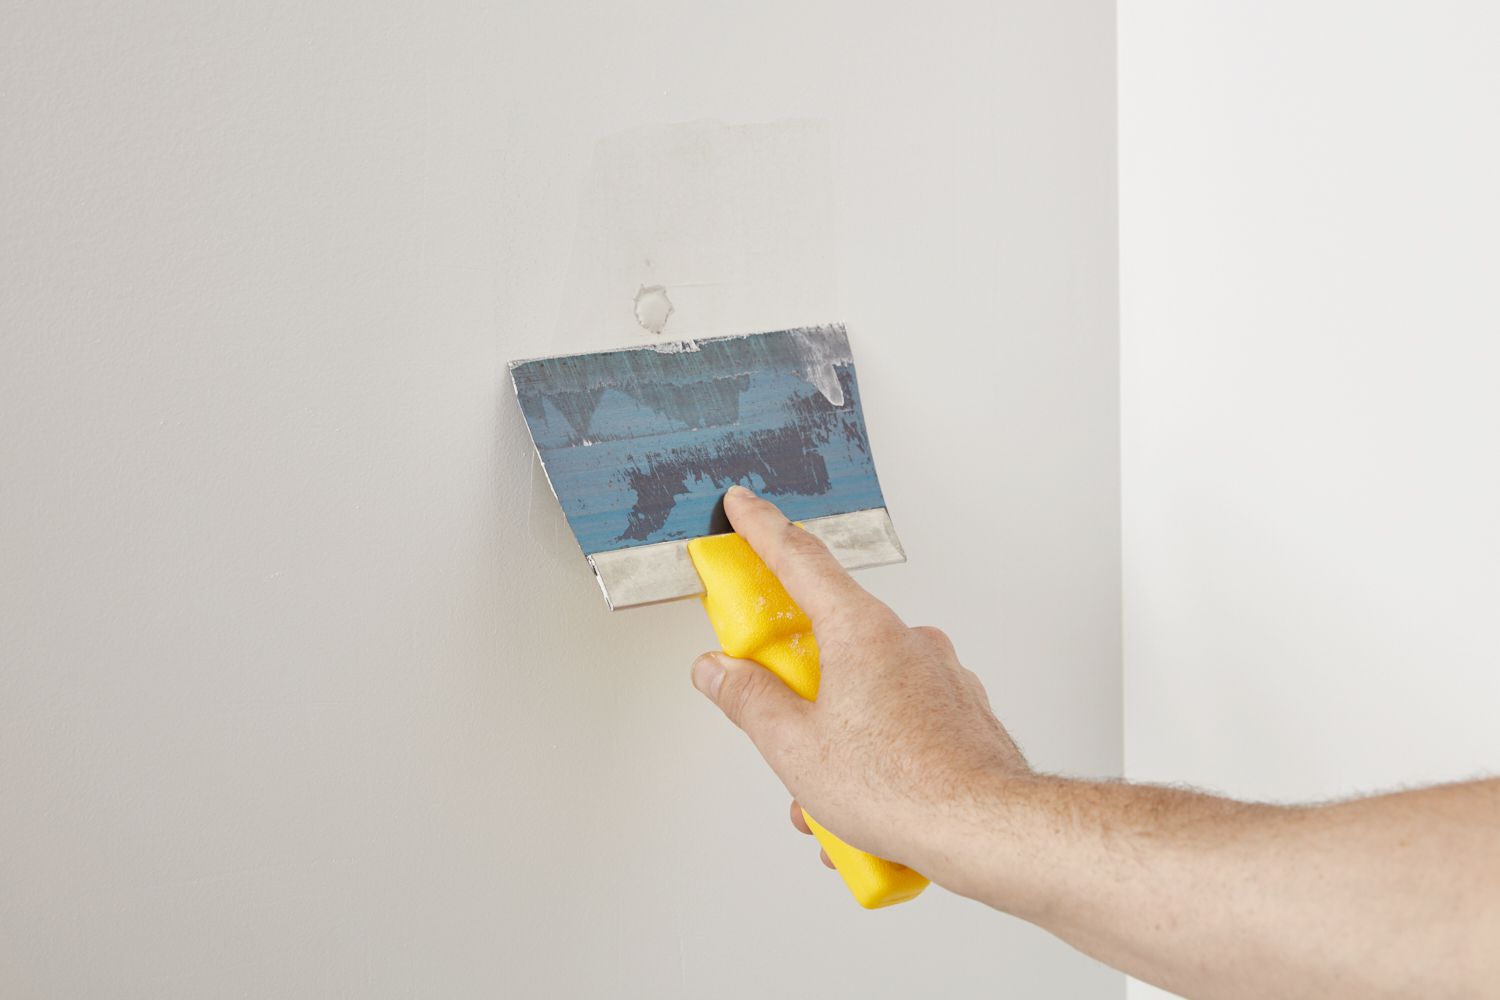
Drying and Sanding Spackle
Once you have applied spackle to repair holes, cracks, or imperfections, the next step is to allow it to dry and then sand it down to achieve a smooth and even surface. Here are some important tips for drying and sanding spackle:
- Follow Drying Time Guidelines: Different types of spackle have varying drying times, so it’s essential to follow the manufacturer’s instructions. Generally, spackle will dry within a few hours, but it’s recommended to wait overnight for optimal results. Trying to sand or paint over wet or partially dried spackle can result in a poor finish.
- Ensure Adequate Ventilation: Proper airflow helps accelerate the drying process of spackle. Open windows or use fans to ensure good ventilation in the room. This will promote faster drying and prevent moisture from becoming trapped in the spackle.
- Avoid Touching or Disturbing the Spackle: While drying, avoid touching or disturbing the spackle as this can cause uneven drying or damage to the repair. Be patient and allow the spackle to dry completely before proceeding to the next step.
- Sand with Fine-Grit Sandpaper: Once the spackle is dry, it’s time to sand it down to achieve a smooth and even finish. Start by using fine-grit sandpaper (around 220 to 320 grit) and sand the repaired area in a circular motion. Apply light pressure and be careful not to oversand or damage the surrounding surface.
- Use a Sanding Block or Sponge: To ensure the sanding is even and consistent, it is recommended to use a sanding block or a sanding sponge. These tools provide a flat and stable surface, allowing for better control and preventing accidental dips or bumps in the repair.
- Check the Surface Regularly: As you sand, periodically wipe away the dust and check the surface for smoothness. Look for any remaining bumps or imperfections that may need further sanding or touch-up. A clean cloth or a sponge can be used to remove dust as you go.
- Gradually Increase Grit for Finishing: If necessary, after sanding with a fine-grit sandpaper, you can gradually move to a higher grit (around 400 to 600 grit) for a finer finish. This will help to achieve a smoother texture, especially if you’re planning to apply paint or other finishes to the repaired area.
- Clean Up the Dust: Once you’re satisfied with the smoothness of the repaired area, make sure to clean up any residual dust. Use a vacuum with a brush attachment or a damp cloth to remove the sanding dust from the repaired area and the surrounding surfaces.
Remember, the goal of sanding is to achieve a smooth and seamless surface. Take your time, be patient, and pay attention to detail. If needed, you can always apply another thin layer of spackle and repeat the drying and sanding process until you achieve the desired result.
By following these drying and sanding techniques, you’ll be able to effectively prepare the spackled area for paint or other finishes, resulting in a professional-looking repair or touch-up that seamlessly blends with the surrounding surface.
Tips and Tricks for Working with Spackle
Working with spackle can be a rewarding experience, especially when you achieve seamless repairs and a smooth finish. To make your spackling projects even more successful, here are some helpful tips and tricks:
- Prep the Surface: Before applying spackle, ensure that the surface is clean and free from dust, dirt, and grease. Clean the area thoroughly and allow it to dry completely before starting your repair or touch-up.
- Use the Right Amount of Spackle: Apply spackle in thin and even layers. Using too much spackle can result in long drying times and a higher possibility of cracking. It’s easier to apply additional layers if needed than to remove excess spackle.
- Smooth Spackle While It’s Still Wet: The best time to achieve a smooth finish on spackle is when it’s still wet. Use a putty knife or a taping knife to gently smooth the spackle, feathering it outwards to blend with the surrounding area. Avoid overworking the spackle as it may cause it to become lumpy or uneven.
- Clean Tools between Applications: To prevent dried spackle from adhering to your tools, clean them between applications. Use a damp cloth or rinse them with water to remove any residual spackle. This will ensure smoother application and a cleaner finish.
- Apply Multiple Thin Layers for Deep Repairs: If you’re filling a deep hole or a larger repair, it’s better to apply multiple thin layers of spackle, allowing each layer to dry before applying the next. This approach provides a more stable and resilient repair that is less prone to cracking or shrinking.
- Feather Out the Edges: When smoothing the spackle, make sure to feather out the edges to create a seamless transition. Gradually decrease the pressure on the putty knife as you move towards the edges, ensuring a gradual blend with the surrounding area. This technique helps to achieve a professional-looking finish.
- Keep a Damp Cloth or Sponge Handy: Having a damp cloth or sponge nearby can be useful for cleaning up any excess spackle, wiping away dust, and making minor adjustments to the repair. It allows for quick and easy cleanup while working, ensuring a neater and more precise result.
- Prime before Painting: If you’re planning to paint over the spackled area, make sure to apply a primer first. Primer helps the paint adhere better and provides a more even finish. It also helps to seal the spackle, preventing it from absorbing moisture from the paint and potentially causing cracking or bubbling.
- Store Spackle Properly: To maximize the shelf life of your spackle, make sure to tightly seal the container or tube when not in use. Store it in a cool and dry place to prevent drying out or becoming unusable. Proper storage will ensure that your spackle is ready for future projects.
Remember, practice makes perfect when it comes to working with spackle. Don’t be discouraged if your first attempt doesn’t achieve the desired result. With time and experience, you’ll become more comfortable and skilled in using spackle effectively.
By following these tips and tricks, you’ll be well-equipped to tackle your spackling projects with confidence and achieve professional-looking repairs and touch-ups in your home.
Frequently Asked Questions about Spackle
Spackle is a versatile product used for repairing and filling small holes, cracks, and imperfections in walls, ceilings, and other surfaces. Here are answers to some common questions about spackle:
- What is the difference between spackle and putty?
- Do I need to sand spackle before painting?
- Can spackle be used on wood surfaces?
- How long does spackle take to dry?
- Can spackle be used outside?
- Can spackle be sanded?
- How long can spackle be stored?
- Can spackle be applied over wallpaper?
Spackle and putty are sometimes used interchangeably, but there is a subtle difference between the two. Spackle is typically used for repairing minor damages on walls, while putty is often used for sealing joints or filling gaps in woodwork or windows.
Yes, sanding spackle before painting is recommended to achieve a smooth and even surface. Sanding helps to remove any excess spackle, smooth out rough edges, and create a seamless transition between the repaired area and the surrounding surface.
Yes, spackle can be used on wood surfaces to repair small holes, dents, or imperfections. Make sure to choose a spackle that is suitable for use on wood and follow the instructions provided. Sand the repaired area before applying paint or finish to achieve a smooth and seamless look.
The drying time of spackle depends on various factors, such as the type of spackle used, the thickness of the application, and environmental conditions. Typically, spackle can take a few hours to dry. However, it is recommended to allow it to dry overnight to ensure it is fully hardened before sanding or applying paint.
Most spackle products are intended for interior use only and may not withstand outdoor conditions. If you have exterior repairs to make, it is recommended to use a patching compound or an outdoor-specific repair product designed for outdoor use.
Yes, spackle can be sanded once it has fully dried. Sanding helps to create a smooth surface and allows for proper adhesion of paint or other finishes. Use fine-grit sandpaper and be gentle when sanding the repaired area to avoid damaging the surrounding surface.
The shelf life of spackle can vary depending on the specific product. It is best to check the packaging or manufacturer’s instructions for recommendations on storage and usage. Properly sealed spackle containers can usually be stored for an extended period, but it’s a good practice to use it within a reasonable time frame to ensure optimal performance.
Spackle is not recommended for use over wallpaper. It is designed to be used on bare surfaces, such as drywall or plaster. If you need to repair an area with wallpaper, it’s best to remove the wallpaper, make the necessary repairs to the wall, and then apply new wallpaper or a suitable patching compound.
These are just a few common questions about spackle. If you have further inquiries or specific concerns, it’s always a good idea to consult with the manufacturer’s instructions or seek advice from a knowledgeable professional.
With the right understanding and proper techniques, working with spackle can be a rewarding experience, allowing you to achieve seamless repairs and maintain the beauty of your home.
Read more: What Spackle Should I Use
Conclusion
Spackle is an indispensable tool in any homeowner’s arsenal, offering a convenient and effective solution for repairing small holes, cracks, and imperfections. With its versatility and ease of use, spackle allows you to achieve smooth and flawless surfaces, ready for paint or other finishes.
In this article, we explored the world of spackle, starting with its definition and common uses. We discussed how spackle can be used to patch nail holes, repair cracks and dents, smooth wall imperfections, cover joints, and prepare surfaces for painting.
We then examined different types of spackle, including paste, lightweight, powder, fast-drying, and pre-mixed options, each with its own advantages and suitable applications. It is important to choose the right type of spackle for your specific project to achieve the best results.
We also provided step-by-step instructions on how to apply spackle correctly, emphasizing the importance of prepping the surface, applying thin layers, and smoothing the spackle for a seamless result. Additionally, we discussed proper techniques for drying and sanding spackle to achieve a smooth and even surface before proceeding with painting or other finishes.
To further enhance your experience working with spackle, we provided some valuable tips and tricks. These included prepping the surface, using the right amount of spackle, feathering out the edges, keeping tools clean, and properly storing spackle for future use.
Lastly, we addressed common questions about spackle, addressing topics such as the difference between spackle and putty, the need for sanding before painting, using spackle on wood surfaces, drying times, and more.
By utilizing the information and techniques outlined in this article, you’ll be well-equipped to tackle spackling projects with confidence and achieve professional-looking repairs and touch-ups in your home.
Remember, practice and patience are key when working with spackle. With each project, you’ll gain more experience and improve your skills. So don’t hesitate to get your hands dirty and enjoy the satisfaction of transforming your walls and surfaces with the magic of spackle!
Frequently Asked Questions about What Is A Spackle
Was this page helpful?
At Storables.com, we guarantee accurate and reliable information. Our content, validated by Expert Board Contributors, is crafted following stringent Editorial Policies. We're committed to providing you with well-researched, expert-backed insights for all your informational needs.


0 thoughts on “What Is A Spackle”