Home>Storage Ideas>Kitchen Storage>Kitchen Wall Storage Ideas: 10 Ways To Make Walls Work Harder
Kitchen Storage
Kitchen Wall Storage Ideas: 10 Ways To Make Walls Work Harder
Modified: January 6, 2024
Looking for kitchen storage ideas? Discover 10 creative ways to maximize wall space and create efficient storage solutions for your kitchen.
(Many of the links in this article redirect to a specific reviewed product. Your purchase of these products through affiliate links helps to generate commission for Storables.com, at no extra cost. Learn more)
Introduction
Introduction
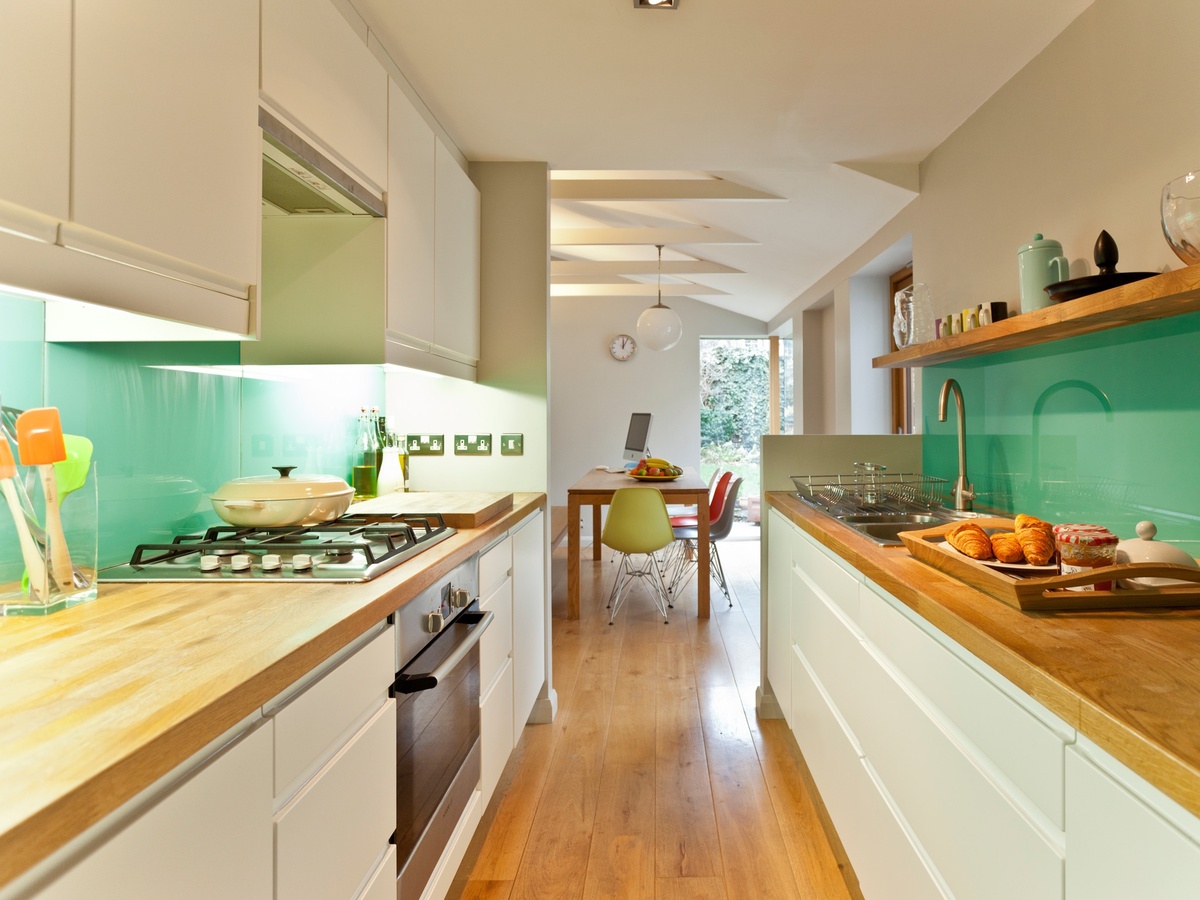
The kitchen is often the heart of the home, and finding efficient storage solutions is essential to keep it organized and functional. When it comes to maximizing storage space in your kitchen, walls are an often overlooked and underutilized resource.
By making use of the vertical space on your kitchen walls, you can create additional storage options that are both practical and visually appealing. From floating shelves to magnetic strips, there are numerous ideas and options available to make your walls work harder for you.
In this article, we will explore 10 creative and practical kitchen wall storage ideas that can help you optimize your space and keep your kitchen organized. Whether you have a small kitchen with limited storage or simply want to make the most of the available space, these ideas will inspire and transform your kitchen.
So, let’s dive into the wonderful world of kitchen wall storage and discover the genius ideas that can revolutionize the way you organize your kitchen. With these ideas at your disposal, you’ll be able to free up valuable counter space, declutter your cabinets, and have everything you need within easy reach.
But before we get into the specific ideas, let’s take a moment to appreciate the benefits of utilizing your kitchen walls for storage.
First and foremost, using your kitchen walls for storage allows you to maximize the available space. Instead of relying solely on cabinets and countertops, you can use vertical surfaces to store items that would otherwise clutter your kitchen.
Additionally, wall storage provides easy accessibility and visibility for your kitchen essentials. With items displayed on the wall, you can quickly and easily locate what you need, saving you time and frustration.
Furthermore, incorporating wall storage into your kitchen allows you to showcase your personal style and creativity. From decorative items to functional tools, you can curate a visually appealing display that reflects your unique taste.
Lastly, utilizing your kitchen walls for storage can help create a sense of openness and organization. By decluttering your countertops and cabinets, you can achieve a clean and spacious look, making your kitchen a more inviting and enjoyable space.
Now that we understand the benefits of using kitchen wall storage, let’s explore the 10 innovative ideas that will transform your kitchen and revolutionize the way you think about storage. From floating shelves to wall-mounted cabinets, we’ll cover everything you need to know to make your kitchen walls work harder for you.
Key Takeaways:
- Maximize kitchen space with innovative wall storage solutions like floating shelves, magnetic strips, and pegboards. Keep essentials organized and within easy reach while adding a stylish touch to your culinary space.
- Utilize vertical space in the kitchen with practical options such as pot racks, open shelves, and wall-mounted cabinets. Free up countertop and cabinet space while creating an organized and visually appealing environment.
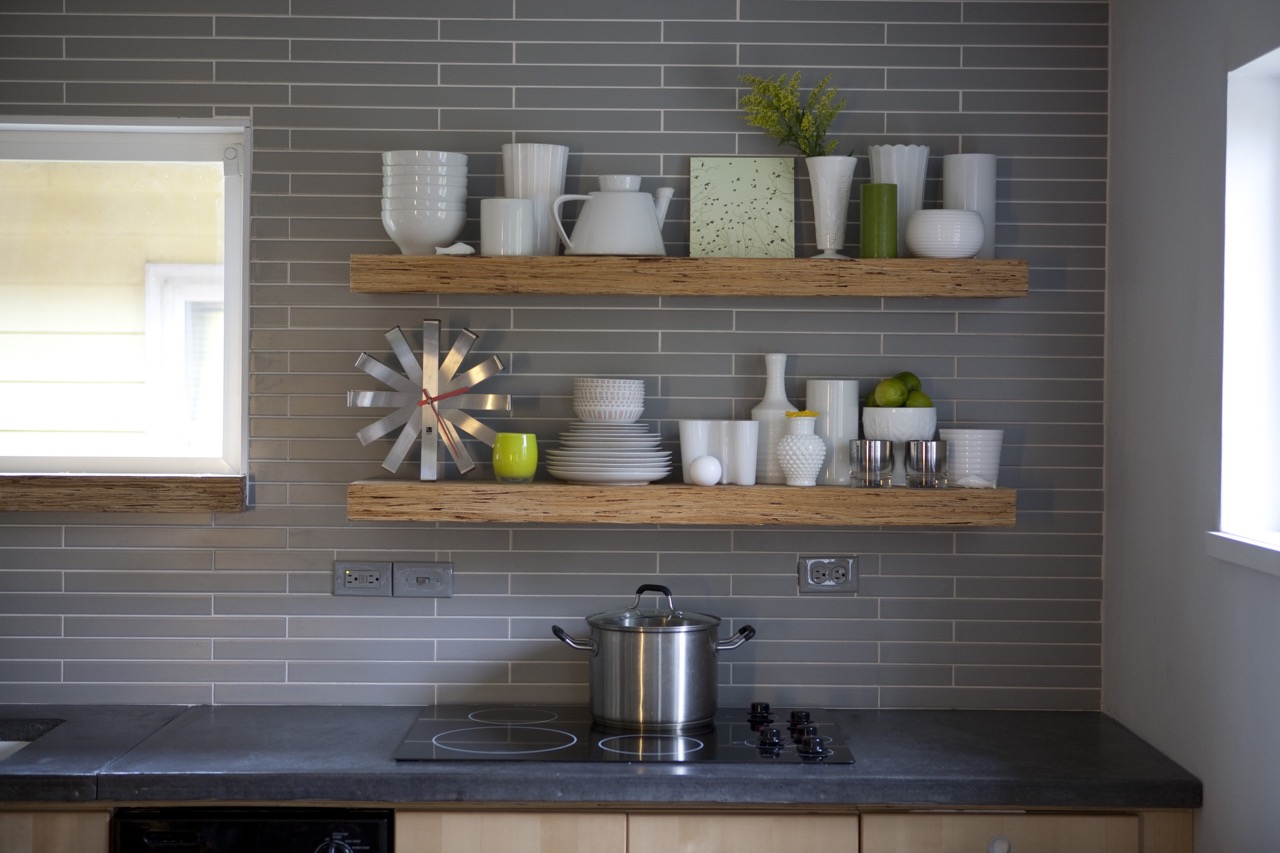
Floating Shelves
Floating shelves are a popular choice for kitchen wall storage due to their sleek and modern design. These shelves are mounted on the wall without any visible brackets, creating a clean and minimalist look. Here are the key benefits of using floating shelves in your kitchen.
Firstly, floating shelves provide an open and airy feel to your kitchen. By replacing bulky cabinets with floating shelves, you can visually expand the space, making it appear larger and more spacious.
Secondly, floating shelves are versatile and can be customized to fit your specific needs. They come in various sizes and materials, allowing you to choose the perfect shelves that complement your kitchen style and accommodate your storage requirements.
Installing floating shelves is relatively simple and can be done with a few tools. Start by locating the studs in your wall with a stud finder. Mark the desired height and use a level to ensure a straight installation. After that, drill holes into the wall and insert wall anchors. Finally, slide the floating shelf onto the wall anchors and secure it in place.
Now, let’s explore some creative ways to use floating shelves in your kitchen:
1. Display your dinnerware: Use floating shelves to showcase your favorite cups, plates, and bowls. Arrange them in an aesthetically pleasing way, creating a visual focal point in your kitchen.
2. Store cookbooks: Utilize floating shelves to store and display your collection of cookbooks. This not only keeps them easily accessible but also adds a personal touch to your kitchen decor.
3. Organize spices: Dedicate a floating shelf to neatly arrange your spice jars. This makes it convenient to find the right spice while cooking and adds a touch of color to your kitchen walls.
4. Create a coffee station: Install a floating shelf near your coffee machine to create a dedicated coffee station. Store mugs, coffee beans, and other related items for easy access during your morning routine.
5. Showcase plants: Bring a touch of nature to your kitchen by placing potted plants on floating shelves. This not only adds a refreshing element but also provides a unique focal point.
6. Store kitchen gadgets: Keep frequently used kitchen gadgets within reach by placing them on a floating shelf. This declutters your countertops and makes them readily available when needed.
Remember to consider the weight-bearing capacity of your chosen floating shelves to ensure they can safely hold the items you plan to display. With their versatile nature and modern aesthetic, floating shelves are an excellent choice for maximizing kitchen wall storage while adding style and functionality to your space.
Magnetic Strips
Magnetic strips are a practical and convenient solution for kitchen wall storage. These strips are typically made of metal and have a magnetic surface that allows you to easily attach and organize metal tools and utensils. Here’s why magnetic strips are useful for kitchen wall storage and how you can install and utilize them effectively.
One of the main benefits of using magnetic strips is that they help to free up valuable drawer and countertop space. By hanging your metal tools and utensils on the wall, you can keep them easily accessible while maximizing your storage capacity.
To install magnetic strips in your kitchen, start by selecting the desired location on your wall. Ensure that it is easily reachable and allows for comfortable access to your tools and utensils while you’re cooking. Use a level to ensure the strips will be installed straight.
Next, mark the placement points for the screws or adhesive tape that will secure the magnetic strip. If you’re using screws, drill small pilot holes to prevent the wall from splitting or cracking. Install the screws or peel off the backing from the adhesive tape and secure the magnetic strip to the wall.
Once the magnetic strip is securely mounted, you can start utilizing it to organize your kitchen tools and utensils. Here are a few ideas to get you started:
1. Knives: Attach magnetic knife holders to the magnetic strip, allowing you to safely display and access your knives while keeping them within reach.
2. Metal utensils: Hang metal cooking utensils such as spatulas, ladles, and tongs on the magnetic strip. This keeps them easily accessible while freeing up drawer space.
3. Measuring spoons and cups: Attach magnetic clips or hooks to the strip to hang your measuring spoons and cups. This ensures they are always within arm’s reach when you need to measure ingredients.
4. Bottle openers and corkscrews: Keep bottle openers, wine openers, and other small metal tools organized on the magnetic strip, preventing them from getting lost in drawers or cluttering your countertops.
5. Small metal containers: Use magnetic containers to store spices, herbs, or other small ingredients on the magnetic strip. This takes advantage of vertical space and keeps frequently used ingredients easily accessible.
Remember to ensure that any sharp edges or points of the tools you hang on the magnetic strip are facing away from where you’ll be reaching to avoid any accidents.
Magnetic strips offer a versatile and space-saving solution for organizing your kitchen tools and utensils. By utilizing the vertical space on your kitchen walls, you can keep your essentials organized and within easy reach, making your cooking experience more efficient and enjoyable.
Pegboards
Pegboards are a versatile and practical option for kitchen wall storage. These perforated boards are designed to hold hooks, shelves, and other accessories, allowing you to create a customized storage solution for your kitchen supplies. Let’s explore the advantages of using pegboards, the steps to install them, and different ways to arrange kitchen supplies and accessories on a pegboard.
One of the significant advantages of using pegboards in the kitchen is their flexibility. They offer a modular storage system that can be easily adjusted and rearranged according to your changing needs. Whether you need to store pots and pans, utensils, or small kitchen gadgets, pegboards provide a versatile solution.
To install a pegboard in your kitchen, follow these simple steps:
1. Choose the location: Select a suitable wall in your kitchen where you want to mount the pegboard. Ensure it is easily accessible and doesn’t obstruct any existing fixtures or appliances.
2. Measure and mark: Measure the dimensions of the pegboard and mark the corresponding area on the wall. Use a level to ensure the markings are straight and level.
3. Mounting: Depending on the weight and size of the pegboard, you can use screws, anchors, or adhesive mounting strips to secure it to the wall. Make sure it is properly aligned with the markings and securely attached.
Once the pegboard is installed, you can start arranging your kitchen supplies and accessories in various ways. Here are a few ideas to get you started:
1. Hanging pots and pans: Attach hooks to the pegboard and hang your pots and pans. This frees up valuable cabinet space and makes them easily visible and accessible while adding a decorative touch to your kitchen.
2. Utensil organization: Use hooks or small baskets to hang and organize your cooking utensils such as spatulas, whiskers, and tongs. This keeps them within reach for quick and easy access while cooking.
3. Cutting board and baking sheets: Install narrow shelves or use hooks to hang cutting boards, baking sheets, and other flat kitchen essentials. This helps to keep them organized and prevents them from cluttering your countertops or cabinets.
4. Spice rack: Attach small containers or shelves to hold your spices and herbs. This creates a functional and easily accessible spice rack, giving you quick and convenient access to your favorite flavors while cooking.
5. Small appliance storage: Hang hooks or install shelves to store small appliances such as blenders, toasters, or coffee machines. This keeps them off your countertops, saving space while still keeping them within reach for daily use.
Remember to arrange your items in a visually appealing manner, ensuring balance and avoiding overcrowding. Regularly reassess and rearrange the arrangement to accommodate any new additions or changes in your kitchen inventory.
Pegboards offer a customizable and efficient solution for kitchen wall storage. They allow you to maximize your space, keep your kitchen tools organized, and add a touch of style to your culinary workspace. With the flexibility of arranging hooks, shelves, and other accessories, you can create a storage system that suits your specific needs and makes your kitchen more functional.
Grid Systems
Grid systems are a popular and efficient solution for kitchen wall storage. These modular systems consist of wire grids that can be easily mounted on the wall, providing a flexible and customizable storage solution for organizing your kitchen supplies. Let’s explore the benefits of using grid systems, the steps to set up a grid system in your kitchen, and some ideas for organizing kitchen items using grid systems.
Grid systems offer several benefits for kitchen wall storage. Here are a few advantages to consider:
1. Versatility: Grid systems provide a versatile storage solution that can be easily customized to fit your specific needs. You can easily adjust the configuration of the grids, adding or removing accessories as required.
2. Maximizes Wall Space: Grid systems make efficient use of unused wall space in your kitchen. By utilizing vertical space, you can free up valuable countertop and cabinet space.
3. Easy Installation: Setting up a grid system is relatively straightforward. The grids can be mounted with screws or adhesive hooks, making installation quick and hassle-free.
To set up a grid system in your kitchen, follow these steps:
1. Plan the Layout: Determine the location and size of the grid system by considering the available wall space and the items you intend to store. Take measurements and visualize how the grids will fit in your kitchen.
2. Install the Grids: Use a level to ensure the grids are mounted straight and even. If using screws, ensure you drill pilot holes to prevent the walls from splitting. If using adhesive hooks, follow the manufacturer’s instructions for proper installation.
3. Customize with Accessories: Grid systems offer a variety of accessories, such as hooks, baskets, and shelves, to further organize your kitchen items. Attach these accessories to the grids based on your specific storage needs.
Once your grid system is installed, you can start organizing your kitchen items in creative and efficient ways. Here are a few ideas:
1. Hang Pots and Pans: Use hooks to hang your pots and pans on the grid system, keeping them easily accessible and creating a visually appealing display.
2. Store Cutting Boards and Baking Sheets: Attach wire shelves to the grid system to store cutting boards, baking sheets, and other flat kitchen essentials.
3. Hang Utensils: Utilize hooks to hang utensils such as spatulas, ladles, and whisks. This keeps them within reach while saving drawer space.
4. Create a Spice Rack: Attach small wire baskets or shelves to the grid system to store and organize your spices. This makes it easy to locate the spices you need while cooking.
5. Display Mugs or Glassware: Use hooks to hang mugs, tea cups, or glasses. This adds a decorative touch to your kitchen and saves cabinet space.
Remember to assess the weight-bearing capacity of your grid system to ensure it can support the items you plan to store. Regularly reassess and rearrange the configuration of your grid system to accommodate any changes in your kitchen inventory.
Grid systems offer a practical and customizable solution for kitchen wall storage. With their versatility and functionality, they help maximize space and keep your kitchen organized. By utilizing hooks, shelves, and other accessories, you can create an efficient and visually pleasing storage system that caters to your specific needs.
Pot Racks
Pot racks are a fantastic addition to kitchen walls, providing both functional storage and decorative appeal. These racks are designed to hold and display pots, pans, and other cookware, making them easily accessible while adding charm to your kitchen. Let’s explore why pot racks are a great addition to kitchen walls, how to install them, and how to effectively organize your pots, pans, and other cookware on a pot rack.
One of the main reasons pot racks are highly regarded in the kitchen is their ability to free up valuable cabinet space. By hanging your pots and pans on a pot rack, you can declutter your cabinets and create additional storage for other kitchen essentials.
Installing a pot rack in your kitchen can be done in a few simple steps:
1. Choose the Location: Determine the ideal location for your pot rack. It should be easily accessible and not obstruct any cabinets or appliances. Consider the height, ensuring that your tallest cookware can fit without touching the ceiling.
2. Locate Hanging Points: Identify the ceiling joists or studs in the chosen area. Use a stud finder to help you locate the appropriate points for installation.
3. Install the Mounting Hardware: Depending on the type of pot rack you have chosen, follow the manufacturer’s instructions for installing the mounting hardware. This may include attaching brackets, hooks, or chains to the ceiling.
4. Hang the Pot Rack: Once the mounting hardware is securely installed, suspend the pot rack from the hooks or chains. Make sure it is level and properly balanced.
Now that your pot rack is installed, it’s time to organize your pots, pans, and other cookware effectively. Here are some tips to help you make the most of your pot rack:
1. Group Similar Items: Arrange your pots and pans based on their size and type. Group similar items together to create an organized and cohesive look.
2. Hang by Frequency of Use: Hang the cookware you use most frequently within easy reach. This ensures convenience while cooking and minimizes the need to dig through cabinets for commonly used items.
3. Stack or Nest Cookware: If you have limited space on your pot rack, consider nesting or stacking smaller pots and pans. This maximizes the available space and allows you to fit more cookware on the rack.
4. Utilize S-Hooks or Grids: Make use of S-hooks to hang utensils or smaller items on the sides of the pot rack. You can also attach grids or wire baskets to store lids or odd-shaped cookware.
5. Consider Displaying Other Kitchen Items: Pot racks are not limited to pots and pans. You can also hang other kitchen items such as colanders, cutting boards, and even decorative kitchen accessories. This adds visual interest and personalizes your pot rack display.
Regularly assess your pot rack arrangement and make adjustments as needed. Consider the weight-bearing capacity of your pot rack and ensure that it can safely hold the cookware you plan to hang.
A pot rack is a practical and aesthetically pleasing solution for storing and organizing your pots, pans, and other cookware. By utilizing your kitchen walls for this purpose, you can free up cabinet space, create easy access to your cookware, and add a touch of charm to your kitchen decor.
Consider using magnetic strips or hooks to hang knives, utensils, and other metal kitchen tools on the wall, freeing up drawer and counter space.
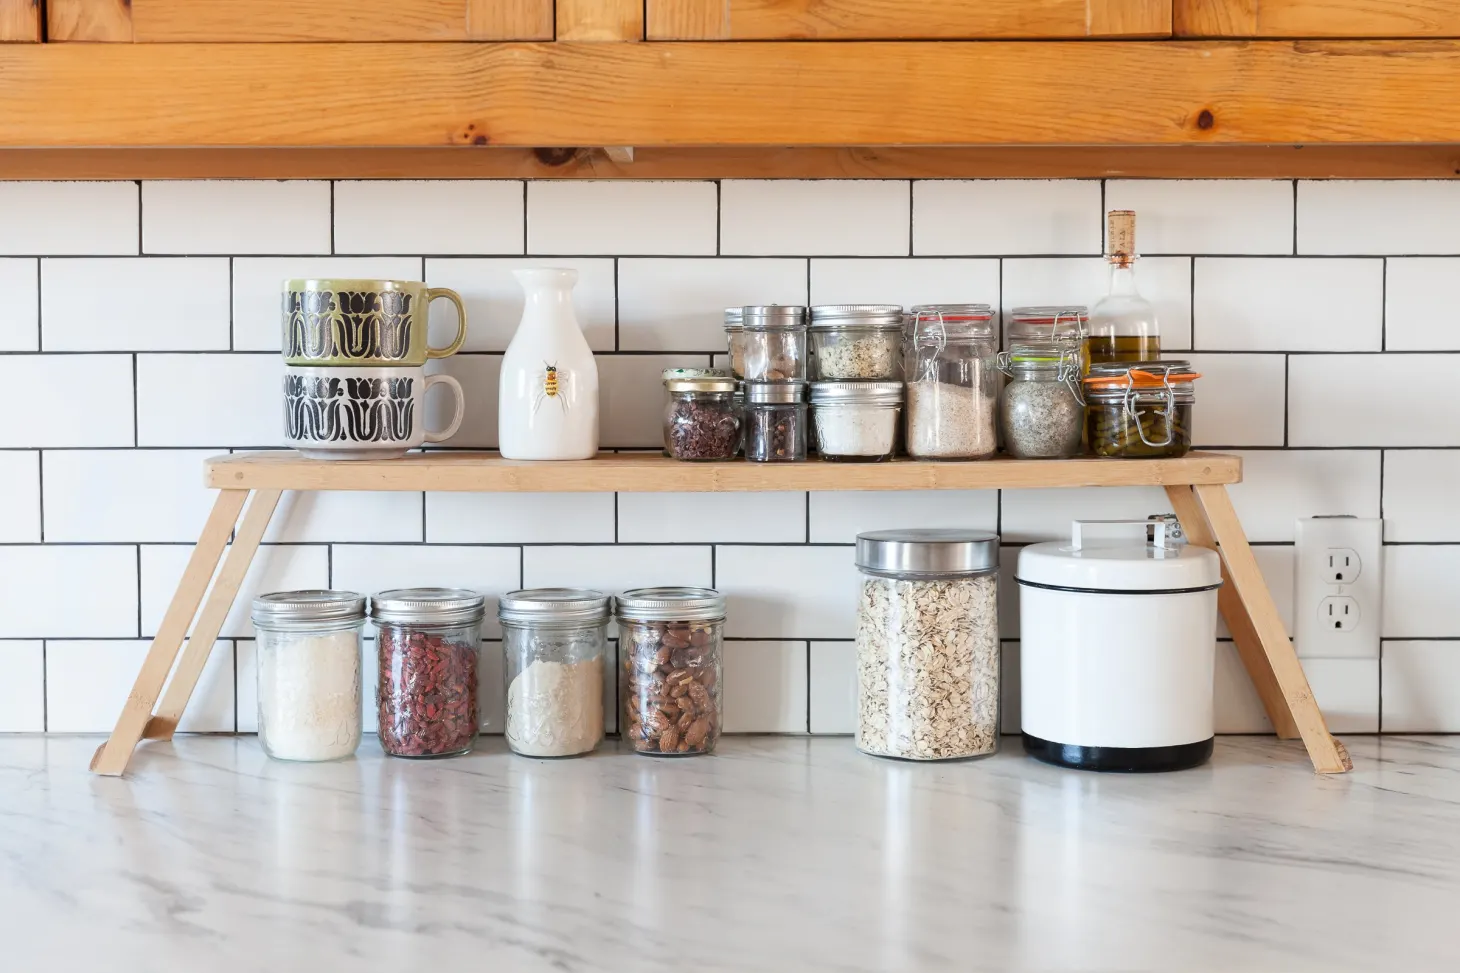
Open Shelves
Open shelves are a popular trend in kitchen design, offering both functionality and aesthetic appeal. These shelves, mounted on the kitchen walls without doors or cabinets, provide a beautiful display area for your kitchen essentials and décor. Let’s explore the advantages of open shelves in the kitchen, how to install them, and how to style them with your kitchen essentials and décor.
One of the significant advantages of open shelves is their ability to create an open and spacious feel in the kitchen. Unlike closed cabinets, open shelves allow you to showcase your items, creating a sense of depth and visual interest.
Installing open shelves on your kitchen walls can be done with a few simple steps:
1. Plan the Layout: Determine the placement and number of shelves based on available wall space and your storage needs. Consider the distance between each shelf and ensure it is practical for the items you plan to display.
2. Locate Wall Studs: Use a stud finder to locate the wall studs along the chosen area for installation. This will provide the necessary support for the weight of the shelves and the items you plan to place on them.
3. Install Shelf Brackets: Attach shelf brackets to the wall studs, ensuring they are level and evenly spaced. Make sure to follow the manufacturer’s instructions for proper installation.
4. Place the Shelves: Once the brackets are securely attached, place the shelves onto the brackets. Ensure they are level and well-balanced. Some open shelves may have adjustable brackets, allowing for flexibility in terms of height and positioning.
Now that your open shelves are installed, it’s time to style them with your kitchen essentials and décor. Here are some tips to help you create a functional and visually appealing display:
1. Organize by Category: Group similar items together for a cohesive and organized look. For example, place your dishes on one shelf, glassware on another, and cooking utensils on a separate shelf.
2. Use Containers and Baskets: Utilize containers or baskets to corral smaller items and reduce visual clutter. This also adds a decorative element to your shelves.
3. Mix and Match Materials and Textures: Introduce a variety of materials and textures on your open shelves to create visual interest. Combine ceramic dishware, wooden cutting boards, and metallic accents for a balanced and eclectic look.
4. Display Cookbooks: Prop up a few of your favorite cookbooks on one of the shelves. This adds a personal touch and makes them easily accessible for culinary inspiration.
5. Incorporate Greenery: Introduce potted herbs or small indoor plants on your open shelves. Not only does this add a fresh and natural element, but it also brings life to your kitchen décor.
6. Keep it Balanced: Remember to distribute the items evenly across the shelves to maintain a sense of balance and harmony. Avoid overcrowding or leaving shelves completely empty. Strive for a visually pleasing arrangement.
Regularly reassess and adjust the display on your open shelves to keep them organized and visually appealing. Consider rotating items from time to time to keep the display fresh and reflective of your kitchen’s evolving style.
Open shelves offer a functional and design-forward solution for kitchen storage. By displaying your kitchen essentials and décor, you can create an inviting and personalized space that showcases your style and enhances the overall ambiance of your kitchen.
Utensil Rails
Utensil rails are a practical and visually appealing addition to kitchen wall storage. These rails, often made of metal or wood, offer a convenient way to store and display your cooking utensils. Let’s explore how utensil rails enhance kitchen wall storage, how to mount them in your kitchen, and how to effectively store and display your cooking utensils on a rail system.
One of the key advantages of utensil rails is their ability to optimize kitchen wall space. By mounting utensil rails, you can keep your cooking utensils within easy reach while freeing up valuable drawer space. Here’s how you can enhance your kitchen wall storage with utensil rails:
1. Mounting Utensil Rails: Start by selecting the location for your utensil rail, considering accessibility and the proximity to your cooking area. Use a level to ensure the rail will be installed straight. Mark the placement points for screws or mounting brackets, based on the length of the rail. If using screws, drill pilot holes. Install the screws or mount the brackets according to the manufacturer’s instructions. Finally, attach the rail securely to the screws or brackets.
2. Storing and Displaying Cooking Utensils: Once your utensil rail is mounted, it’s time to store and display your cooking utensils. Here are some tips to help you make the most of your rail system:
– Group Similar Utensils: Arrange your utensils in groups based on their functionality and size. For example, you can group all the spatulas together, all the ladles together, and so on. This makes it easier to find the utensil you need while cooking.
– Suspend Utensils with Hooks: Hang the utensils from the rail using S-hooks or specialized hooks designed for utensil rails. This allows for easy access and keeps your utensils organized.
– Consider Weight Distribution: Distribute the weight of the utensils evenly across the rail to maintain balance and prevent it from sagging. Be mindful of the weight-bearing capacity of the rail and avoid overloading it.
– Hang Frequently Used Utensils at Eye Level: Place the utensils you use most often at eye level for quick and easy access. This saves you time during meal preparation and cooking.
– Use Small Containers: Place small containers or cups on the rail to hold smaller utensils such as measuring spoons or kitchen gadgets. This helps keep them organized and prevents them from getting lost among larger utensils.
– Incorporate Decorative Items: Add some visual interest to your utensil rail by incorporating decorative items such as a small plant or a kitchen-themed wall art piece. This helps add a personal touch and enhances the overall aesthetic of your kitchen.
Regularly assess your utensil rail arrangement and adjust as needed. Rearrange the utensils to accommodate new additions or changes in your cooking routine.
Utensil rails not only provide a practical storage solution for your cooking utensils but also add a stylish and organized look to your kitchen. By keeping your utensils within reach and on display, you can enhance your cooking efficiency and elevate the aesthetic appeal of your culinary workspace.
Hanging Baskets
Hanging baskets offer a versatile and space-saving solution for kitchen storage. These baskets, typically made of wire or woven materials, can be installed on kitchen walls to hold fruits, vegetables, or other kitchen items. Let’s explore the versatility of hanging baskets for kitchen storage, how to install them on your kitchen walls, and how to effectively organize your fruits, vegetables, or other items in these baskets.
One of the main advantages of hanging baskets is their ability to maximize vertical space in your kitchen. By utilizing your kitchen walls for storage, you can free up valuable counter space and keep frequently used items within easy reach. Here’s how hanging baskets can enhance your kitchen storage:
1. Versatile Storage Solution: Hanging baskets offer versatile storage options in the kitchen. They can be used to store and organize fruits, vegetables, herbs, spices, kitchen gadgets, or even cooking utensils. This flexibility allows you to customize the use of hanging baskets based on your specific needs.
2. Space-Saving: Installing hanging baskets on your kitchen walls helps maximize space by keeping items off the countertops or cabinets. This is especially valuable in smaller kitchens where space is limited. By creating vertical storage, you open up more room for food preparation and other kitchen activities.
3. Enhanced Visibility and Accessibility: With hanging baskets, your stored items are easily visible and accessible. You can quickly identify the fruits or vegetables you need for a recipe, making meal preparation more efficient. Additionally, the open design of the baskets allows for proper air circulation, helping to keep your produce fresh for longer.
Installing hanging baskets on your kitchen walls is a straightforward process. Follow these steps:
1. Choose the Location: Select a suitable wall in your kitchen where you want to install the hanging baskets. Consider the accessibility and visibility of the area.
2. Determine the Number and Size of Baskets: Assess your storage needs and available wall space to determine the number and size of hanging baskets required. Make sure to leave enough space between each basket for easy access.
3. Mark the Placement Points: Use a pencil to mark the desired placement points of the hanging brackets or hooks. Ensure they are level and evenly spaced.
4. Install the Brackets or Hooks: Depending on the type of hanging baskets you have, mount the brackets or hooks on the wall according to the manufacturer’s instructions. Ensure they are securely fastened to support the weight of the baskets and the items you plan to store.
Once your hanging baskets are installed, you can effectively organize your fruits, vegetables, or other kitchen items. Consider the following tips:
– Group similar items together in each basket. For example, keep fruits in one basket and vegetables in another.
– Avoid overcrowding the baskets to allow for proper air circulation and to prevent spoilage.
– Label the baskets if desired to easily locate items or differentiate between different types of produce.
– Consider adding small containers or baskets within the hanging baskets to separate and organize smaller items or loose produce.
– Regularly check and rotate the contents of the baskets to ensure that items are used before spoiling.
Hanging baskets not only add functional storage but also bring a decorative element to your kitchen. The beautiful arrangement of fruits, vegetables, or other kitchen items in the baskets adds an inviting and charming touch to your culinary space while keeping your kitchen organized and efficient.
Wall-Mounted Racks
Wall-mounted racks are a practical and efficient solution for kitchen storage. These racks, typically made of metal or wood, can be installed on your kitchen walls to provide additional space for storing various kitchen items. Let’s explore the benefits of using wall-mounted racks in the kitchen, how to install them, and how to maximize space with these racks for efficient kitchen storage.
Using wall-mounted racks in your kitchen brings several benefits to your storage setup:
1. Maximizes Vertical Space: Wall-mounted racks utilize the often-underutilized vertical space in your kitchen. By mounting racks on your walls, you can take advantage of the empty space and free up your countertops and cabinets.
2. Easy Accessibility: With wall-mounted racks, your kitchen items are easily accessible. You can conveniently grab pots, pans, utensils, or other frequently used items without rummaging through crowded cabinets or drawers. This saves you time and effort while cooking or preparing meals.
3. Efficient Organization: Wall-mounted racks offer an efficient way to keep your kitchen essentials organized. You can categorize and store items, such as cookware, cutting boards, baking sheets, or even spices, in a manner that suits your preferences and cooking style.
Installing wall-mounted racks in your kitchen can be done with a few simple steps:
1. Plan the Layout: Determine the location and arrangement of the wall-mounted racks based on your kitchen layout and storage needs. Consider the size and weight of the items you plan to store on the racks.
2. Locate Wall Studs: Use a stud finder to locate the wall studs where you will be mounting the racks. This ensures proper support and stability for the racks and the items you’ll be storing.
3. Mark the Placement Points: Mark the placement points on the wall for the wall-mounted rack brackets. Use a level to ensure the brackets will be straight and level when installed.
4. Install and Secure the Brackets: Attach the brackets to the wall at the marked placement points. If necessary, drill pilot holes into the wall studs before attaching the brackets. Make sure the brackets are securely fastened for stability and weight-bearing capacity.
After installing the wall-mounted racks, it’s time to maximize the available space for efficient storage:
1. Arrange Utensils and Cookware: Hang pots, pans, and cooking utensils on hooks or racks, adjusting the height and distance between the hooks to accommodate the size of the items. This allows for easy access while keeping your countertops free from clutter.
2. Utilize Shelves or Racks: Install shelves or racks on top of the wall-mounted brackets to store items like spices, oils, cutting boards, or jars. These shelves can help keep your commonly used ingredients and tools within reach.
3. Hang Cutting Boards or Baking Sheets: Mount hooks or racks to hang cutting boards, baking sheets, or other flat kitchen essentials. This not only saves space but also ensures convenient access while cooking or baking.
4. Organize Spices: Install spice racks or small shelves on the wall-mounted racks to keep your spices organized and easily accessible. Categorize them by type or flavor for efficient meal preparation.
Regularly reassess and adjust the arrangement of your wall-mounted racks to accommodate any changes in your kitchen inventory or storage needs. Keep in mind the weight-bearing capacity of the racks and ensure they are properly secured for safety.
Wall-mounted racks offer an efficient and space-saving solution for kitchen storage. By strategically utilizing your kitchen walls, you can maximize vertical space, keep your kitchen items organized, and create a functional and visually pleasing storage system that suits your needs and enhances your cooking experience.
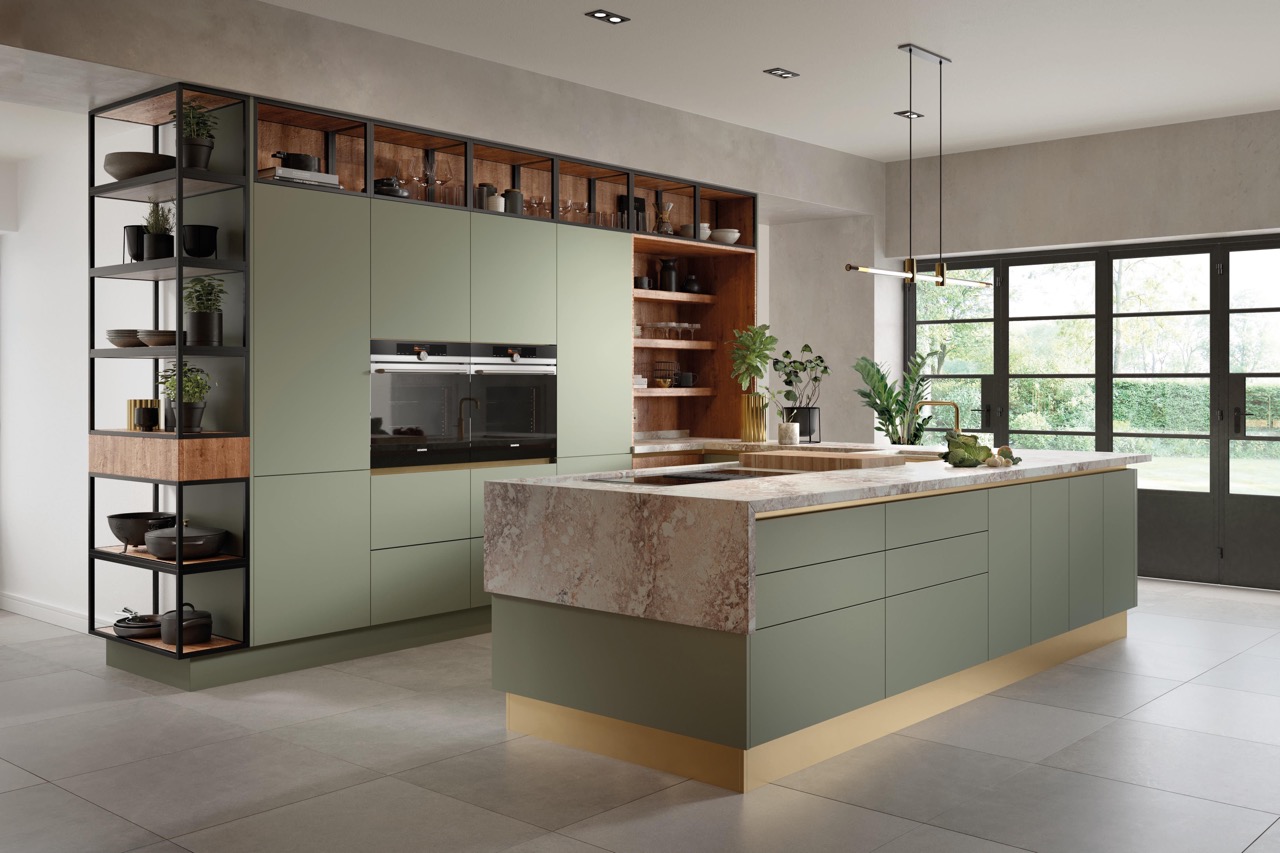
Wall-Mounted Cabinets
Wall-mounted cabinets are a practical and efficient solution for kitchen storage. These cabinets, typically made of wood or other durable materials, are installed on your kitchen walls to provide ample space for organizing and storing kitchen essentials. Let’s explore why wall-mounted cabinets are a practical choice for kitchen storage, how to install them in your kitchen, and how to effectively organize and store your kitchen essentials in these cabinets.
There are several reasons why wall-mounted cabinets are a practical choice for kitchen storage:
1. Utilize Vertical Space: Wall-mounted cabinets utilize the vertical space in your kitchen, allowing you to make the most of your available storage area. By installing cabinets on the walls, you can keep your kitchen items organized and easily accessible while freeing up valuable countertop space.
2. Ample Storage Capacity: Wall-mounted cabinets provide generous storage capacity for your kitchen essentials. With multiple shelves and compartments, you can neatly store dishes, glassware, cookware, pantry items, and more. This helps to keep your kitchen clutter-free and makes it easier to find and access the items you need.
3. Protection and Accessibility: Wall-mounted cabinets provide protection for your kitchen items by keeping them out of reach from pets or children. Furthermore, they offer easy accessibility, allowing you to quickly retrieve ingredients, utensils, or other essentials while cooking or meal preparation.
Installing wall-mounted cabinets in your kitchen can be done by following these steps:
1. Measure and Plan: Measure the available wall space and plan the positioning of the cabinets accordingly. Take into consideration the desired height and depth of the cabinets, ensuring they won’t obstruct any existing fixtures or appliances.
2. Locate Wall Studs: Use a stud finder to locate the wall studs along the chosen area for cabinet installation. Mark the stud locations for proper support.
3. Mark Cabinet Placement: Mark the desired height and position of the cabinets on the wall, using a level to ensure they will be installed straight and even.
4. Install the Cabinets: Attach the cabinets to the wall by screwing them directly into the wall studs for stability. Use a drill and appropriate screws to securely fasten the cabinets in place.
Once your wall-mounted cabinets are installed, it’s time to effectively organize and store your kitchen essentials:
1. Categorize Items: Group similar items together in each cabinet to create an organized system. For example, dedicate one cabinet for dishes, another for glassware, and a separate one for cookware or pantry items.
2. Utilize Adjustable Shelves: Most wall-mounted cabinets come with adjustable shelves, allowing you to customize the space based on the height of your items. Arrange the shelves to accommodate your specific storage needs.
3. Stack and Store: Stack dishes and bowls in a neat and organized manner to maximize vertical space. Consider using dividers or organizers to separate items and prevent them from shifting or breaking.
4. Optimize Door Space: Use the inside of the cabinet doors to hang small organizers or hooks to store lightweight items such as cutting boards, measuring spoons, or pot lids. This helps to free up valuable shelf space and keeps items easily accessible.
5. Label and Arrange: Label the shelves or use clear containers to help keep your items organized and easy to find. Arrange items in order of frequency of use or by category to further enhance organization and efficiency.
Regularly declutter and reassess the contents of your wall-mounted cabinets to ensure they remain organized and accommodate any changes in your kitchen inventory or storage needs.
Wall-mounted cabinets offer a practical and efficient solution for kitchen storage. With their ample storage capacity, they keep your kitchen essentials neatly organized and readily accessible. By utilizing the vertical space in your kitchen, you can create a functional and visually pleasing storage system, enhancing the overall functionality and aesthetic appeal of your culinary space.
Conclusion
In conclusion, optimizing kitchen storage is essential for creating a functional and organized space. By utilizing your kitchen walls, you can maximize storage capacity and keep your essentials within easy reach. From floating shelves to wall-mounted cabinets, there are various options available to enhance kitchen wall storage.
Floating shelves offer a sleek and modern solution, allowing you to display and organize items such as dinnerware, cookbooks, and spices. Magnetic strips provide a convenient way to store and access metal kitchen tools and utensils while freeing up drawer space. Pegboards offer versatility and customization, providing a modular system for arranging kitchen supplies and accessories.
Grid systems help maximize vertical space by creating a customizable storage solution for pots, pans, and other kitchen necessities. Pot racks not only free up cabinet space but also add a decorative element, showcasing your cookware collection. Open shelves create an open and airy feel while providing a platform for displaying kitchen essentials and décor items.
Utensil rails offer a practical and visually appealing option to organize and display cooking utensils. Hanging baskets provide a versatile solution for storing fruits, vegetables, or other kitchen items while adding a decorative touch to your kitchen walls. Wall-mounted racks make efficient use of vertical space, allowing you to hang and store pots, pans, utensils, and other essentials.
Lastly, wall-mounted cabinets offer ample storage capacity and organization for a wide range of kitchen items. By installing cabinets on your walls, you can take advantage of vertical space and keep your kitchen clutter-free.
When implementing these kitchen wall storage ideas, it is important to consider the layout and specific needs of your kitchen. Regularly assess and adjust the organization to accommodate changes and optimize efficiency.
By incorporating these innovative kitchen wall storage ideas, you can transform your kitchen into a functional and visually appealing space. Say goodbye to cluttered countertops and overflowing cabinets, and embrace a well-organized and efficient culinary environment. With these storage solutions, your kitchen will become a seamless blend of functionality and style, making meal preparation and cooking a breeze.
Frequently Asked Questions about Kitchen Wall Storage Ideas: 10 Ways To Make Walls Work Harder
Was this page helpful?
At Storables.com, we guarantee accurate and reliable information. Our content, validated by Expert Board Contributors, is crafted following stringent Editorial Policies. We're committed to providing you with well-researched, expert-backed insights for all your informational needs.


0 thoughts on “Kitchen Wall Storage Ideas: 10 Ways To Make Walls Work Harder”