Home>Storage Ideas>Kitchen Storage>Painted Kitchen Ideas: 17 Ideas For Painting A Kitchen
Kitchen Storage
Painted Kitchen Ideas: 17 Ideas For Painting A Kitchen
Modified: November 1, 2024
Looking for some inspiration to transform your kitchen? Check out these 17 painted kitchen ideas for a fresh and stylish look. Don't forget to also explore our kitchen storage ideas for maximum functionality and organization.
(Many of the links in this article redirect to a specific reviewed product. Your purchase of these products through affiliate links helps to generate commission for Storables.com, at no extra cost. Learn more)
Introduction
Welcome to our guide on painted kitchen ideas! When it comes to transforming your kitchen, painting is a cost-effective and versatile option. It allows you to update the look and feel of your kitchen without breaking the bank. From choosing the right paint color to exploring creative painting techniques, there are plenty of ways to add a pop of color and personality to your kitchen space.
Whether you prefer a bold and vibrant kitchen or a calming and neutral palette, painting can help create the perfect ambiance for your culinary adventures. In this article, we will explore 17 innovative ideas for painting a kitchen, each with the potential to elevate your kitchen aesthetics and functionality.
Key Takeaways:
- Elevate your kitchen with a fresh coat of paint! From cabinets to hardware, painting offers endless possibilities to customize your space and reflect your unique style and personality.
- Infuse creativity and personality into your kitchen with painted accents. Whether it’s a mural, colorful chairs, or updated hardware, painting allows you to make a bold and stylish statement in your culinary oasis.
Choosing the right paint color
The paint color you choose for your kitchen sets the tone for the entire space. It can create a sense of warmth, tranquility, or even make a bold statement. When selecting a paint color for your kitchen, consider the overall style and mood you want to achieve.
If you’re aiming for a bright and airy kitchen, opt for light and neutral colors such as white, beige, or pale gray. These hues help reflect natural light and make the space feel more open and spacious. They also provide a versatile backdrop that pairs well with various kitchen design elements.
For those who prefer a more vibrant and energetic atmosphere, bold and vibrant colors like red, blue, or even a sunny yellow can be excellent choices. These colors can add personality and make a strong visual impact. However, it’s important to use them in moderation to avoid overwhelming the space.
If you’re unsure about committing to a bold color, consider using it as an accent. This could be through painting a single wall or a kitchen island with a contrasting color. It adds visual interest without overpowering the entire space.
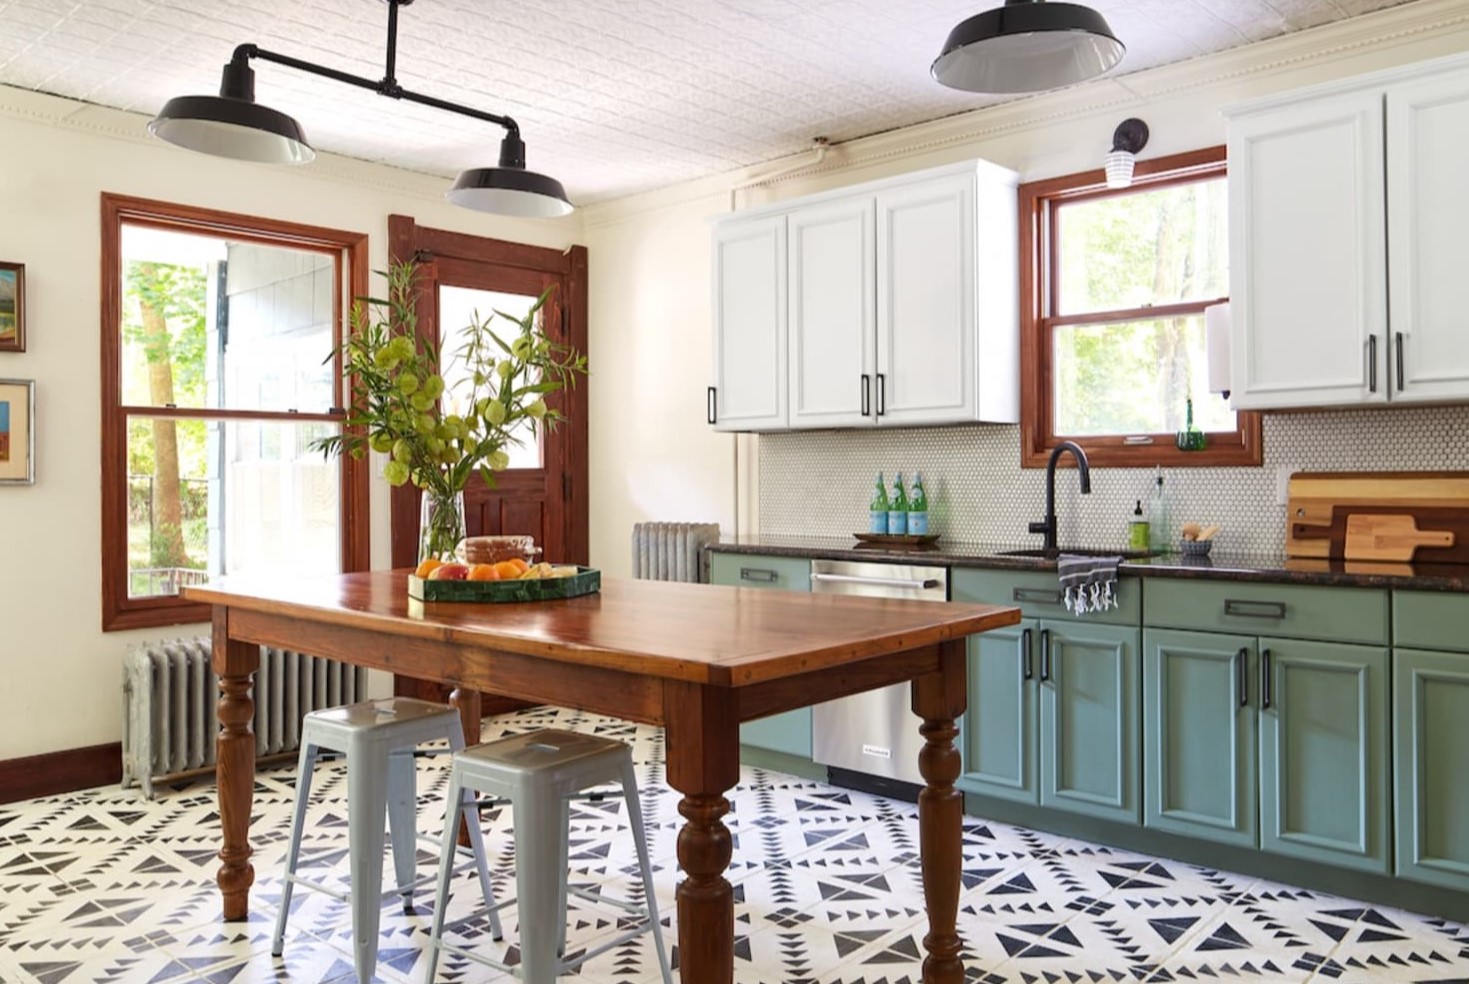
Another trend in kitchen paint colors is the use of earthy tones like olive green, deep terracotta, or warm taupe. These colors evoke a sense of comfort and create a cozy atmosphere in the kitchen. They work well with wooden cabinetry and natural materials, bringing a touch of nature indoors.
Before finalizing a paint color, it’s essential to test it in the kitchen space. Paint swatches on the walls and observe how natural light and artificial lighting affect the color throughout the day. This will help you make an informed decision and ensure the color looks as intended in your kitchen.
Painting the cabinets
If you’re looking for a transformative change in your kitchen, painting the cabinets can make a huge difference. Cabinet painting is a popular and cost-effective way to update the look of your kitchen without the hefty price tag of a full cabinet replacement.
Before getting started, it’s important to properly prepare the cabinets for painting. This typically involves removing all cabinet doors, hardware, and hinges. Clean the surfaces thoroughly to remove any grease or grime, and sand them lightly to create a smooth surface for the paint to adhere to.
When choosing a paint color for your cabinets, consider the overall style and color scheme of your kitchen. If you want a classic and timeless look, white cabinets are an excellent choice. They create a clean and bright appearance and can complement a variety of design styles.
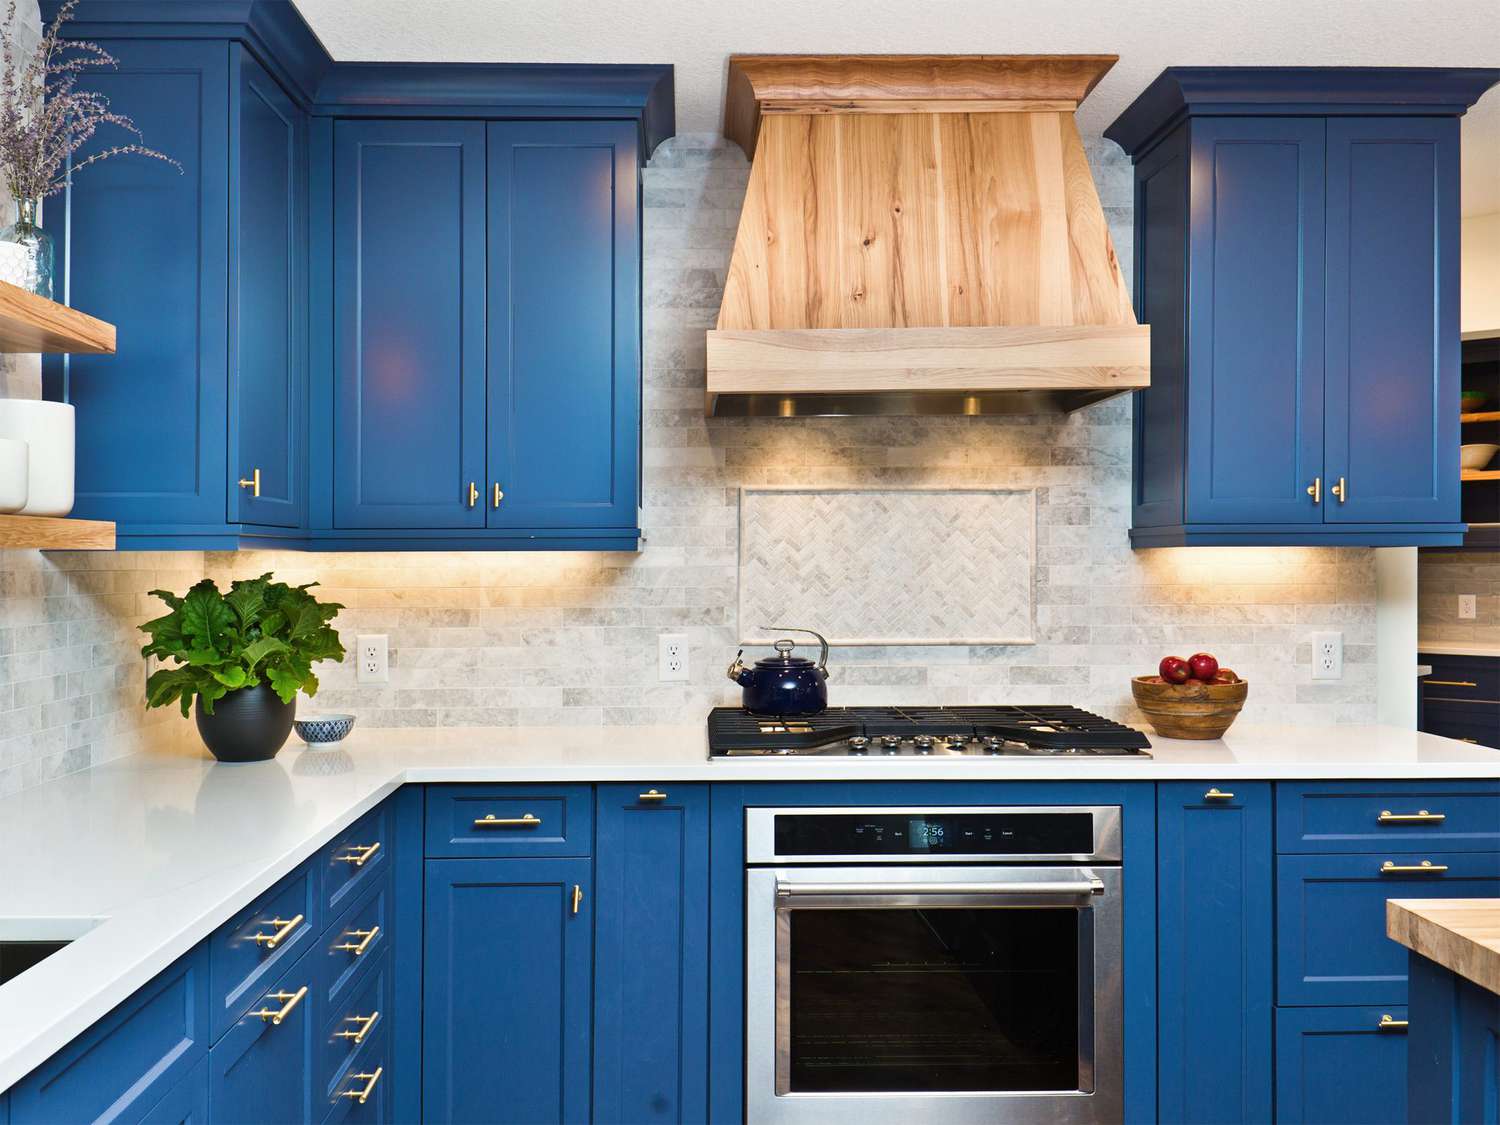
To add a touch of elegance and sophistication, consider painting the cabinets in a rich and deep hue, such as navy blue or charcoal gray. These darker shades can add depth and drama to your kitchen, creating a luxurious and stylish atmosphere.
If you prefer a more eclectic and playful look, you can opt for two-tone cabinets. This involves painting the upper cabinets in one color and the lower cabinets in a complementary or contrasting color. It adds visual interest and can help break up a large kitchen space.
Another popular trend is to paint the kitchen island cabinets in a different color than the rest of the cabinets. This creates a focal point in the kitchen and adds a unique touch to the overall design. Consider using a contrasting color or a shade that complements the surrounding cabinetry.
When it comes to the type of paint finish for cabinets, consider using a semi-gloss or satin finish. These finishes are durable and easy to clean, making them ideal for kitchen cabinets that often encounter spills and splatters.
Before painting the cabinets, make sure to apply a primer to ensure good adhesion and prevent any wood stains from bleeding through the paint. Use a high-quality brush or roller for a smooth and professional finish. Additionally, allow each coat of paint to dry completely before applying the next one.
Painting your kitchen cabinets can truly transform the look and feel of your kitchen. It allows you to customize the space to your preferences and update outdated cabinets without the expense of replacing them entirely.
Adding a colorful backsplash
A backsplash is not only a practical addition to your kitchen but can also serve as a focal point and a perfect opportunity to infuse color into the space. Adding a colorful backsplash can instantly transform the look of your kitchen and create a vibrant and eye-catching feature.
When it comes to choosing a colorful backsplash, consider the overall color scheme and style of your kitchen. Look for colors that complement or contrast with your cabinetry and countertops to create a harmonious and cohesive look.
One popular option is to choose a backsplash tile in a bold and vibrant color, such as bright blue, fiery red, or sunny yellow. These colors can add a pop of energy and create an exciting visual impact in the kitchen. Just be sure to balance the intensity of the color with the rest of the kitchen elements for a cohesive design.
If you prefer a more subtle approach, opt for a backsplash in soft and muted hues. Pastel colors like pale pink, mint green, or light gray can create a calm and soothing ambiance in your kitchen. These colors work particularly well in kitchens with light-colored cabinetry and countertops.
Another option to consider is a patterned backsplash. You can find tiles with intricate patterns or designs in a variety of colors. This adds visual interest and a touch of personality to your kitchen. Remember to choose a pattern that complements the rest of the kitchen design elements and doesn’t overwhelm the space.
If you want to get creative, consider a mosaic backsplash that combines different colors and materials. This allows you to play with various shades and textures, creating a unique and customized look for your kitchen. Mosaic tiles can be arranged in a specific pattern or in a random layout for a more organic and eclectic feel.
In addition to tiles, there are other materials you can use for a colorful backsplash, such as glass or even paint. Glass backsplashes offer a sleek and modern look, and they come in a wide range of colors. They are also easy to clean, making them a practical choice for the kitchen.
Paint is another cost-effective and creative option for a colorful backsplash. Use paint specifically designed for kitchen backsplashes, and choose a color that complements the rest of your kitchen. This allows you to experiment with different colors and even create custom patterns or designs on your backsplash.
Adding a colorful backsplash is a fantastic way to inject personality and style into your kitchen. It can elevate the overall look, create visual interest, and make a lasting impression on anyone who enters your kitchen space.
Painting the kitchen walls
Painting the walls is one of the easiest and most impactful ways to transform your kitchen. The color you choose for your kitchen walls can set the tone for the entire space and create a welcoming and inviting atmosphere.
When selecting a paint color for your kitchen walls, consider the overall style and mood you want to achieve. If you have a small kitchen that lacks natural light, opting for light and neutral colors can help create the illusion of space and make the room feel brighter.
White is a popular choice for kitchen walls, as it creates a clean and timeless look. It can also serve as a versatile backdrop that allows other design elements in the kitchen to shine. If you want to add a touch of warmth, consider using off-white or cream shades instead of pure white.
If you prefer a more playful and vibrant kitchen, consider using bold and saturated colors on the walls. Colors like deep blue, emerald green, or even a rich burgundy can add depth and personality to your kitchen. Just make sure to balance the intensity of the color with other elements in the space to avoid overwhelming the room.
Another option is to create a two-tone look by painting the walls in two complementary colors. This can be achieved by using a different color on the lower half of the wall, such as a darker shade, while keeping the upper half a lighter color. This technique can visually divide the space and add visual interest.
When painting the kitchen walls, consider the existing cabinetry, countertops, and backsplash. Ensure that the chosen wall color complements these elements and creates a cohesive look. For instance, if you have neutral-colored cabinets, you can introduce a pop of color on the walls to add some personality.
When it comes to the finish of the paint, consider using a semi-gloss or satin finish for the kitchen walls. These finishes are easier to clean and more resistant to stains, making them perfect for a high-traffic area like the kitchen.
Before diving into painting the walls, make sure to properly prepare the surfaces by cleaning them and patching up any imperfections. Use painter’s tape to protect the trim and other surfaces you don’t want to paint. Prime the walls if necessary, and apply multiple coats of paint for a smooth and even finish.
By painting the kitchen walls, you can instantly refresh the look of your kitchen, create a new ambiance, and showcase your personal style. It’s a relatively low-cost and impactful way to add color and character to the heart of your home.
Creating a two-tone kitchen
A two-tone kitchen is a trendy and visually appealing design choice that can add depth, interest, and personality to your space. This design technique involves using two different paint colors on your kitchen cabinets, creating a unique and eye-catching look.
When creating a two-tone kitchen, the key is to find a balance between the two colors you choose. You can opt for contrasting colors to create a bold statement, or choose complementary colors to achieve a harmonious and cohesive look. Consider the overall style and color scheme of your kitchen when deciding on the two colors.
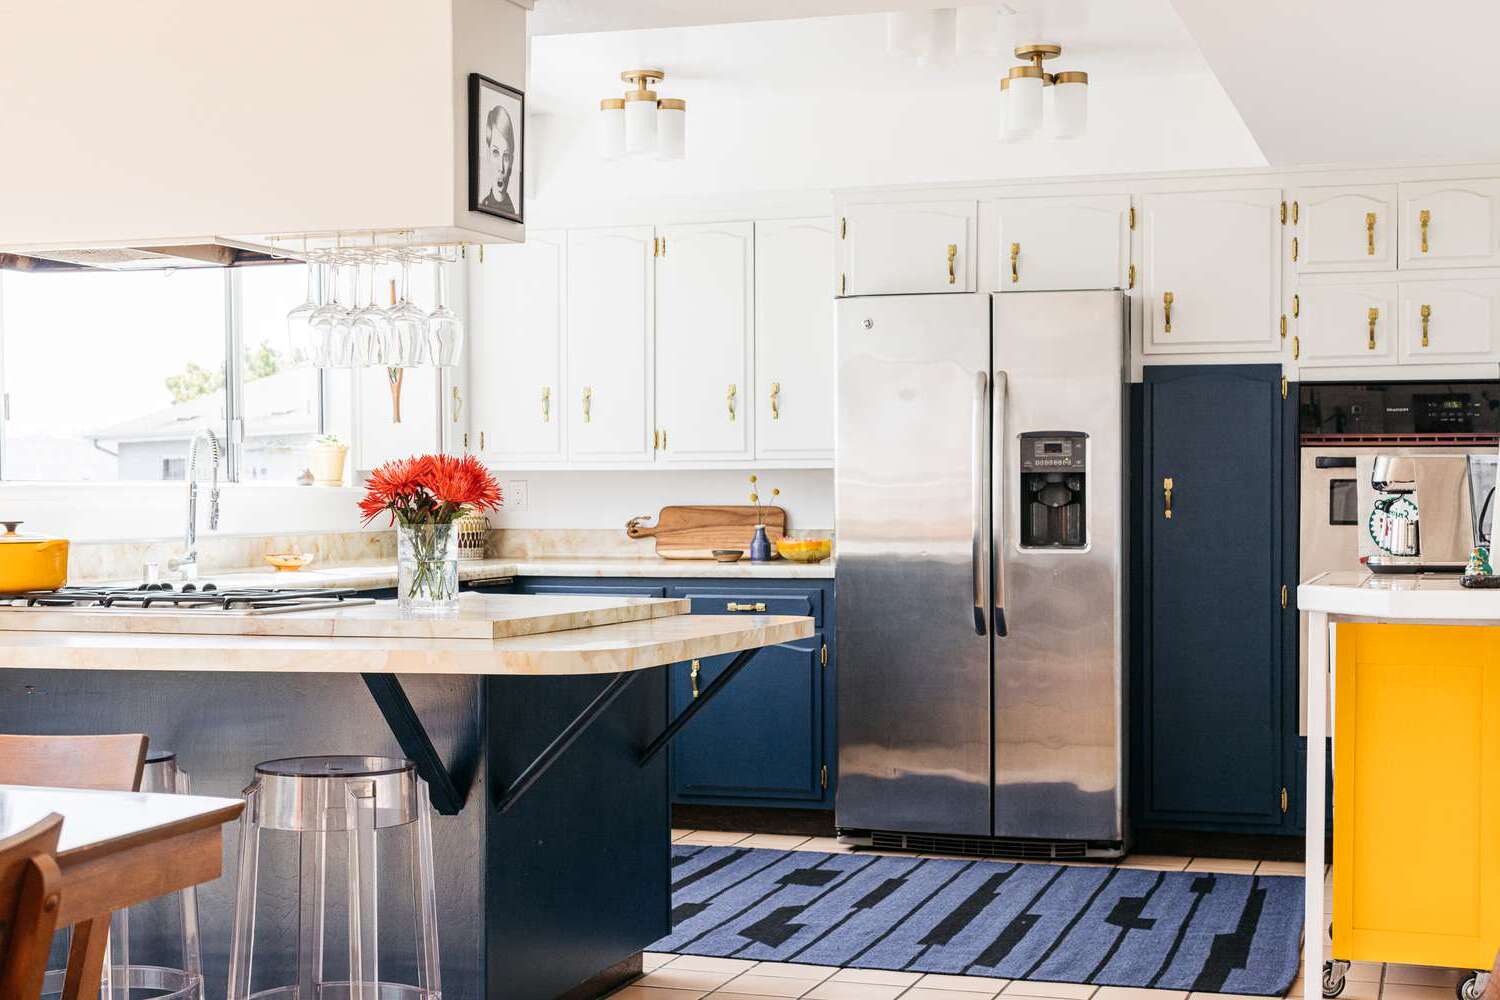
One popular option is to paint the upper cabinets in a lighter color and the lower cabinets in a darker color. This creates a visual division in the kitchen and adds depth and visual interest to the space. For example, you can have white upper cabinets and deep navy blue lower cabinets for a classic and timeless look.
If you want to create a more dramatic effect, you can choose contrasting colors for the two-tone kitchen. For instance, pairing white or light gray upper cabinets with vibrant and bold red or teal-colored lower cabinets can create a stunning visual impact. This creates a focal point in the kitchen and adds a dynamic and energetic feel.
Another option is to use a neutral color for the majority of the cabinets and introduce a pop of color on selected accent cabinets. For example, you can have light gray cabinets and add a vibrant yellow or green accent cabinet to create a focal point. This adds personality and visual interest without overwhelming the entire space.
When creating a two-tone kitchen, it’s important to consider the balance between the two colors. One option is to choose a lighter color for the majority of the cabinets and a darker color for the accent cabinets. This ensures that the overall look remains balanced and cohesive.
Additionally, you can also consider incorporating open shelving or glass-front cabinets in one of the tones. This creates a visual break and adds dimension to the kitchen design. For example, you can have open shelves painted in a contrasting color to the rest of the cabinets, showcasing your favorite kitchenware and adding a unique touch.
The two-tone kitchen design can be further enhanced by coordinating the colors with other elements in the kitchen, such as the backsplash, countertops, or appliances. This creates a cohesive and harmonious look throughout the space.
Creating a two-tone kitchen is a versatile and creative way to elevate the style of your kitchen. It allows you to play with colors, contrasts, and textures, resulting in a visually stunning and personalized space that reflects your unique taste and personality.
Painting the kitchen island
If you want to make a statement in your kitchen, painting the kitchen island is a fantastic option. The kitchen island serves as a focal point and can be transformed into a unique design element with a fresh coat of paint.
When choosing a paint color for your kitchen island, consider the overall color scheme and style of your kitchen. You can opt for a color that contrasts with the rest of the cabinetry to make the island stand out. For example, if your cabinets are white or light-colored, painting the island in a bold shade like navy blue or emerald green can create a striking visual impact.
On the other hand, if you prefer a more cohesive look, you can paint the island in a slightly different shade or tint of the existing cabinet color. This creates a subtle distinction while maintaining a harmonious overall design. It adds depth and dimension to your kitchen space.
Another option is to create a two-tone effect by painting the base of the island in one color and the top or countertop in another color. For example, you can have a white base with a contrasting black countertop or vice versa. This adds visual interest and creates a unique touch to your kitchen island.
If you want to add a touch of warmth and rustic charm, consider using a wood stain or a faux wood grain technique on the island. This allows you to showcase the natural beauty of the wood and create a cozy and inviting atmosphere in your kitchen.
In addition to choosing the right paint color, it’s important to consider the finish for your kitchen island. Opt for a durable and easy-to-clean finish, such as a semi-gloss or satin finish. This ensures that the island can withstand daily wear and tear in the busy kitchen environment.
Before painting the kitchen island, ensure that it is properly prepped. Remove any hardware, such as handles or knobs, and clean the surface to remove any grease or dirt. Sand the island lightly to create a smooth surface for the paint to adhere to, and apply a primer to enhance the paint’s adhesion and longevity.
Use a high-quality brush or roller to apply the paint evenly. Consider applying multiple coats for a professional and polished finish. Once the paint has dried, reattach the hardware and admire your transformed kitchen island.
Painting the kitchen island is a fantastic way to add a pop of color, create a focal point, and give your kitchen a fresh and personalized look. It can completely change the dynamic of the space and make a stylish statement in your culinary oasis.
Using chalkboard paint in the kitchen
Looking for a fun and practical way to add style and functionality to your kitchen? Consider using chalkboard paint to create an interactive and versatile surface right in your culinary space. Chalkboard paint can transform any smooth surface into a chalkboard-like finish, providing endless opportunities for creativity and organization.
One of the popular uses of chalkboard paint in the kitchen is creating a chalkboard wall. This can be a whole wall or a designated area where you can jot down recipes, grocery lists, meal plans, or even leave messages for family members. It’s not only practical but also adds a playful and whimsical touch to the room.
Another creative idea is to paint the doors or panels of your kitchen cabinets with chalkboard paint. This allows you to write labels or notes on the cabinets, making it easy to locate specific items or keep track of pantry inventory. It also gives your kitchen a unique and personalized look.
If you have a kitchen pantry or a storage area, consider using chalkboard paint on the doors or inside the pantry. This allows you to create categories or write notes to keep the space organized. It’s a practical solution that saves you time searching for items and adds a touch of style to the pantry.
Chalkboard paint can also be used to create chalkboard labels for containers or jars. This is especially useful for organizing ingredients or storing homemade spices. By labeling your containers with chalkboard paint, you can easily update and change the labels as needed.
Incorporating chalkboard paint into your kitchen design allows for endless creativity. You can use it to showcase daily menu specials, write down favorite recipes, or draw doodles to uplift the mood. It’s a great way to personalize your kitchen and make it a more welcoming and interactive space.
When using chalkboard paint, it’s essential to properly prepare the surface before applying the paint. Clean the surface thoroughly and ensure it is dry and free from any dust or debris. Apply multiple coats of chalkboard paint, following the manufacturer’s instructions, to ensure a smooth and durable finish.
To write or draw on the chalkboard surface, use regular chalk or chalkboard markers. Both are easily erasable with a damp cloth or chalkboard eraser. Keep in mind that chalkboard paint may require occasional touch-ups or reapplication to maintain its fresh and vibrant appearance.
Using chalkboard paint in the kitchen combines functionality and creativity. It provides a versatile and interactive surface where you can organize, express yourself, and have fun. Explore the various ways to incorporate chalkboard paint into your kitchen and enjoy the benefits of this unique and practical design choice.
Painting a faux tile backsplash
Give your kitchen a fresh and stylish look without the hassle and expense of installing a traditional tile backsplash. Painting a faux tile backsplash is a creative and budget-friendly alternative that allows you to achieve the appearance of tiled surfaces without the need for actual tiles.
To begin, start by thoroughly cleaning and prepping the existing backsplash surface. Make sure it is smooth and free from any grease or dirt that could interfere with paint adhesion. Apply a primer designed for the specific surface material, such as tile, laminate, or drywall, to ensure proper paint adhesion and durability.
Once the primer is dry, you can begin the process of creating your faux tile backsplash. The key is to carefully plan out the size and pattern of the tiles to achieve a realistic and cohesive look. You can create a classic subway tile pattern, a mosaic design, or even customize your own unique tile pattern.
There are a few different methods you can use to paint the faux tiles. One option is to use stencils that mimic the look of tiles. These stencils are available in various designs and sizes and can be easily applied and painted over. Simply position the stencil onto the wall, secure it with painter’s tape, and paint the stencil using a brush or roller.
Another option is to freehand paint the faux tiles using painter’s tape as a guide. Measure and mark the desired tile size and use painter’s tape to create the outline of each tile. Then, carefully fill in each section with paint, making sure to create straight and even lines.
If you want to add depth and texture to your faux tile backsplash, consider using a sponge or ragging technique. Dip a sponge or rag into your desired paint color and lightly dab or drag it across the painted tiles to create a textured effect that resembles real tiles.
Once the paint has dried, remove any painter’s tape and touch up any imperfections or uneven lines. Finish the faux tile backsplash with a clear protective coat to ensure longevity and to make it easy to clean and maintain.
A painted faux tile backsplash not only adds visual interest and a pop of color to your kitchen, but it also offers the flexibility to change and update the look as desired. If you ever want to switch up the design or color scheme in your kitchen, you can easily paint over the existing faux tiles and recreate a whole new look.
Painting a faux tile backsplash is a creative and cost-effective way to update your kitchen. It allows you to achieve the charming and timeless look of tiles while saving time and money. Get inspired and let your creativity shine as you transform your kitchen with a beautifully painted faux tile backsplash.
Updating kitchen appliances with paint
Looking to give your kitchen a fresh and updated look without replacing your appliances? Consider updating them with paint! Painting kitchen appliances is a cost-effective and creative way to breathe new life into your kitchen and achieve a cohesive and stylish appearance.
Before getting started, it’s important to choose the right paint suitable for appliances. Look for high-quality, heat-resistant, and durable paints specifically designed for this purpose. These paints are formulated to adhere to different appliance surfaces, such as metal or plastic, and can withstand the wear and tear of daily use.
When selecting a paint color, consider your overall kitchen color scheme and desired style. You can go for a classic and timeless look by painting your appliances in neutral shades like white, black, or gray. These colors seamlessly blend with most kitchen designs and create a clean and sophisticated ambiance.
If you want to add a pop of color to your kitchen, consider painting your appliances in bold and vibrant hues. Red, blue, or even a vibrant yellow can create a playful and energetic atmosphere. Just make sure to choose a color that complements the surrounding elements in your kitchen.
When it comes to painting appliances, thorough preparation is crucial. Clean the surface of your appliances to remove any grease, dirt, or residue. Lightly sand the surface to create a rough texture for better paint adhesion. Use painter’s tape to protect any areas that you don’t want to paint, such as logos or control panels.
Apply multiple thin coats of paint, allowing each coat to dry completely before applying the next. This ensures a smooth and even finish. Consider using a high-quality brush or a paint sprayer for a professional-looking result.
After painting, it’s important to let the appliances cure and dry for the recommended time before using them. This helps to ensure that the paint fully adheres and hardens, making it more resistant to scratches and chipping.
Updating kitchen appliances with paint not only saves you money but also allows you to customize your kitchen to suit your personal style and preferences. It gives you the flexibility to experiment with different colors and designs, transforming your appliances into standout features within your kitchen.
Keep in mind that painted appliances may require occasional touch-ups or repainting over time, depending on the wear and tear they experience. However, with proper maintenance, your painted appliances can last for years, providing a fresh and updated look to your kitchen.
So, if you’re looking for a budget-friendly way to refresh your kitchen space, consider giving your appliances a makeover with a fresh coat of paint. It’s a fun and creative DIY project that can make a significant difference in the overall look and feel of your kitchen.
When choosing a paint color for your kitchen, consider the natural light in the room. Lighter colors can make a small kitchen feel more spacious, while darker colors can add warmth to a larger kitchen.
Painting a kitchen ceiling
When it comes to updating the look of your kitchen, don’t forget to pay attention to the often-overlooked area above your head – the ceiling. Painting a kitchen ceiling can have a transformative effect on the overall ambiance and style of your kitchen space.
Choosing the right color for your kitchen ceiling is essential in creating the desired atmosphere. If you have a smaller kitchen with limited natural light, painting the ceiling in a light or neutral color can help create the illusion of space and make the room feel brighter and more open.
If you want to add a touch of drama and depth to your kitchen, consider painting the ceiling in a darker hue. This can create a cozy and intimate atmosphere, especially in larger kitchens with high ceilings. Deep blues, grays, or even a rich charcoal can add a sense of sophistication and elegance.
Another option is to paint the kitchen ceiling in a complementary or contrasting color to the walls. By choosing a different color for the ceiling, you can create visual interest and make the ceiling a standout feature in the room. This technique is particularly effective in kitchens with unique architectural details or interesting ceiling designs.
When it comes to the finish of the paint, consider using a flat or matte finish for the ceiling. This helps to minimize any imperfections or flaws in the ceiling surface and creates a smooth and even look. Flat finishes also help to reduce glare and reflections, making your kitchen more visually comfortable.
Before painting the ceiling, it’s important to properly prepare the surface. Clean the ceiling to remove any dust or grease that may affect paint adhesion. Repair any cracks or imperfections with spackling and sand them smooth before applying the paint.
When painting the ceiling, use a roller with an extension pole to reach high areas comfortably. Start from one corner and work your way across the ceiling in overlapping strokes. Take your time and ensure an even application of the paint. Depending on the color and coverage you desire, you may need to apply multiple coats to achieve the desired result.
Painting the kitchen ceiling can make a significant difference in the overall look and feel of your kitchen space. It can help tie together the various design elements and create a cohesive and harmonious atmosphere. Don’t neglect this often-forgotten area when giving your kitchen a fresh and updated look.
Remember to cover and protect your countertops, cabinets, and other surfaces while painting the ceiling to prevent any unwanted splatters or drips. And as always, make sure to enjoy the process and have fun customizing your kitchen according to your personal style and preferences.
Painting kitchen countertops
If you’re looking to update your kitchen countertops without the expense of a full replacement, painting them can be a cost-effective and creative solution. Painting kitchen countertops allows you to achieve a new and refreshed look, transforming the overall appearance of your kitchen.
Before diving into the painting process, it’s important to choose the right paint for the job. Look for specially formulated countertop paint or a high-quality multi-surface paint that is suitable for use on countertops. These paints are designed to withstand the wear and tear of kitchen activities and provide a durable and long-lasting finish.
When selecting a color for your painted kitchen countertops, consider the style and color scheme of your kitchen. Opt for a neutral shade like white, gray, or beige for a timeless and versatile look that complements various design styles. Alternatively, you can choose a bold and vibrant color for a statement-making focal point in your kitchen.
Before painting, thoroughly clean and prep the countertops. Remove any debris, grease, or stains using a mild cleanser and a scrub brush. Make sure the surface is dry before proceeding. If your countertops have any imperfections or dents, consider using a filler to repair and smooth them out.
Apply a primer specifically designed for countertops to ensure the paint adheres properly and to provide a stable base for the paint color. Follow the manufacturer’s instructions on drying time before moving on to the next step.
Once the primer is dry, it’s time to apply the paint color of your choice. Use a brush or roller to apply thin and even coats of paint, allowing each coat to dry fully before applying the next. Multiple coats may be necessary to achieve the desired color and coverage.
After the final coat of paint has dried, it’s recommended to apply a clear and food-safe sealer to protect the painted countertops from daily wear and tear. The sealer helps to preserve the paint finish and make the countertops easier to clean and maintain.
While painting kitchen countertops can give them a new lease on life, it’s important to keep in mind that painted surfaces may require regular touch-ups or repainting over time. Heavy use, bumps, and scratches can impact the longevity of the paint. However, with proper care and maintenance, painted countertops can last for several years.
Painting your kitchen countertops is an affordable and creative way to update the look of your kitchen. It allows you to customize your countertops according to your style and preferences without the need for a costly replacement. Embrace the transformation and enjoy the fresh and rejuvenated feel of your kitchen space.
Adding a pop of color with painted chairs
If you’re looking to add a vibrant and eye-catching element to your kitchen, consider adding a pop of color with painted chairs. This creative and budget-friendly option allows you to inject personality and style into your kitchen space, instantly transforming it into a more lively and visually appealing area.
Painting chairs is an excellent way to make a statement and tie together the overall color scheme of your kitchen. Whether you have a neutral-toned kitchen that needs a bold accent or a colorful kitchen in need of some balance, painted chairs can be the perfect solution.
When choosing a color for your painted chairs, consider the existing colors in your kitchen. Opt for a hue that complements or contrasts with the color scheme to achieve the desired effect. For example, if you have a predominantly white kitchen, consider painting the chairs in a vibrant red or turquoise to create a striking contrast.
If you want a more subtle and cohesive look, consider using a shade from the same color family as your kitchen’s primary color. For instance, if your kitchen features shades of blue, opt for chairs painted in a slightly lighter or darker blue tone. This creates a harmonious and cohesive look that ties the whole space together.
While painting the entire chair in a solid color is a classic choice, you can also get creative with patterns and designs. Consider using stencils to create interesting patterns or geometric shapes on the chair seats or backs. This adds an extra layer of visual interest and uniqueness to your painted chairs.
Before painting the chairs, make sure to properly prepare the surfaces by cleaning them and lightly sanding any rough areas. Apply a primer designed for the chair material to ensure better paint adhesion and durability. This step is particularly important for wooden chairs to ensure a smooth and long-lasting finish.
When it comes to the paint itself, choose a high-quality paint that is suitable for the chair material, whether it’s wood, metal, or plastic. Consider using a paint with a satin or semi-gloss finish for durability and easy cleaning.
Once the chairs are painted and dry, consider adding a clear protective sealant to help protect the paint from chipping or scratching over time. This step is especially important if the chairs will be subject to heavy use or frequent cleaning.
By adding a pop of color with painted chairs, you can bring personality, vibrancy, and a sense of fun to your kitchen. It’s an easy and cost-effective way to refresh the space and make a bold design statement. Embrace your creativity and enjoy the transformation your painted chairs bring to your kitchen!
Painting kitchen shelves or open cabinets
If you have open cabinets or shelves in your kitchen, painting them can be a fantastic way to add color, style, and personality to the space. Painting kitchen shelves or open cabinets allows you to create a focal point, showcase your favorite items, and tie together the overall design of your kitchen.
When choosing a color for painting your kitchen shelves or open cabinets, consider the existing color scheme and style of your kitchen. You can opt for a color that complements the surrounding elements, creating a cohesive and harmonious look. Alternatively, you can choose a contrasting color to make the shelves or cabinets stand out and make a statement.
If you have a modern kitchen with neutral tones, consider painting the shelves or cabinets in a vibrant and bold color. This adds a vibrant pop and creates an eye-catching feature in the room. For example, painting the shelves in a sunny yellow or a deep turquoise can instantly liven up the kitchen space.
If you prefer a more subtle and soothing look, choose a soft and muted shade that enhances the calming ambiance of your kitchen. Light pastel colors like mint green, pale pink, or a serene blue can create a serene and elegant atmosphere. These colors work particularly well in kitchens with light-colored walls or natural wood tones.
Consider incorporating patterns or designs when painting kitchen shelves or open cabinets to add even more visual interest. Creating a pattern with alternating colors or using stencils to paint intricate designs can elevate the look of the shelves or cabinets. These patterns can be subtle or bold, depending on your personal taste and the overall style of your kitchen.
Before painting the shelves or open cabinets, make sure to properly prepare the surfaces by cleaning them and sanding any rough spots. Apply a primer specifically designed for the material of your shelves or cabinets, whether it’s wood, laminate, or metal, to ensure better paint adhesion.
When applying the paint, use a high-quality brush or a paint sprayer to achieve a smooth and even finish. Apply multiple thin coats to build up the color and allow each coat to dry fully before applying the next one. This ensures a professional-looking result.
Consider adding a clear protective topcoat to the painted shelves or open cabinets to protect them from scratches and extend their durability. A clear topcoat helps to seal the paint and make it easier to clean and maintain.
Painting kitchen shelves or open cabinets is a creative and effective way to add visual interest and personality to your kitchen. It provides a unique opportunity to highlight your style, create a custom look, and transform your kitchen space into a reflection of your personal taste and design preferences.
Painting a kitchen pantry door
The kitchen pantry door is often an overlooked element in kitchen design, but it can be an excellent opportunity to add a touch of style and creativity to your space. Painting a kitchen pantry door can transform it into a standout feature, making a statement and enhancing the overall aesthetics of your kitchen.
When choosing a color for painting your pantry door, consider the existing color scheme and style of your kitchen. You can opt for a color that complements the surrounding elements, creating a cohesive and harmonious look. Alternatively, you can choose a contrasting color to make the pantry door stand out as a focal point.
If you have a neutral-colored kitchen, consider painting the pantry door in a vibrant and bold color to add a pop of energy and create visual interest. Colors like bright red, deep blue, or even a sunny yellow can instantly liven up the space and make the pantry door a memorable feature. Just make sure to balance the intensity of the color with the overall color scheme to maintain a harmonious look.
For a more cohesive look, consider painting the pantry door in a shade that matches or complements the surrounding cabinetry or wall color. This creates a seamless flow in your kitchen design and adds a subtle touch of style.
If you’re feeling particularly creative, consider adding patterns, designs, or even textures to the pantry door. Stencils can be used to create intricate designs or patterns that add visual interest and uniqueness. You can also try techniques such as color blocking, ombre effects, or faux finishes to further customize the look of the pantry door.
Before painting the pantry door, ensure that it is properly prepped. Remove any hardware, such as handles or knobs, and clean the surface to remove any grease or dirt. Lightly sand the door to create a smooth surface for the paint to adhere to.
Use a high-quality brush or a paint sprayer to apply the paint evenly. Apply multiple thin coats for a professional and polished finish, allowing each coat to dry fully before applying the next one. Consider using a durable paint finish, such as a satin or semi-gloss, which is easier to clean and maintain in a high-traffic area like the kitchen.
After painting the pantry door, don’t forget to reattach the hardware and enjoy the transformed look of your kitchen. A painted pantry door can add that extra touch of style and personality, making your kitchen feel more inviting and customized to your taste.
Painting a kitchen pantry door is a simple yet effective way to elevate the overall look of your kitchen. It allows you to showcase your creativity, add color and style, and make a subtle but impactful statement within your kitchen space. So, unleash your creativity and embark on this fun and rewarding painting project!
Painting kitchen trim and moldings
When it comes to giving your kitchen a polished and cohesive look, don’t forget about the importance of painting the trim and moldings. Painting kitchen trim and moldings can elevate the overall aesthetic of your space, creating a finished and unified appearance.
Choosing the right color for your trim and moldings is crucial in achieving a cohesive look. One option is to paint them in a color that matches the surrounding walls, creating a seamless and understated finish. This allows other elements in your kitchen, such as cabinetry or backsplash, to stand out as the main focal points.
If you want to make a bolder statement, consider painting the trim and moldings in a contrasting color. This can add drama and visual interest to the space. For example, if your walls are light-colored, painting the trim and moldings in a darker shade creates a striking contrast and draws attention to the architectural details in your kitchen.
An alternative approach is to use a neutral color for the trim and moldings, such as white or a light gray. This creates a clean and timeless look that complements various design styles. White trim, in particular, can make your kitchen appear fresh and bright, while adding a touch of elegance.
Before painting the trim and moldings, make sure they are clean and free from any dirt, dust, or grease. Fill any small holes or imperfections with a suitable filler and sand them smooth. Properly prep the surface to ensure the paint adheres well and creates a smooth finish.
When it comes to painting the trim and moldings, use a high-quality brush or a small foam roller to achieve fine details and a smooth application. Take your time and apply thin coats of paint for better control and to avoid drips or streaks. Allow each coat to dry fully before applying additional coats to achieve the desired coverage.
Consider using a paint specifically designed for trim and moldings. These paints are usually formulated to provide a smooth and durable finish. Satin or semi-gloss finishes are popular choices for trim work as they are easy to clean and tend to resist fingerprints and stains.
Painting kitchen trim and moldings can make a significant difference in the overall appearance of your kitchen. It provides a finished and cohesive look, enhancing the architectural details and creating a polished finish. Don’t underestimate the impact that a well-painted trim and moldings can have on the overall aesthetics of your kitchen.
So, take the time to paint your kitchen’s trim and moldings, paying attention to the details that elevate the look of your space. It’s a simple and rewarding task that can give your kitchen a finished and refined look you’ll love for years to come.
Painting a kitchen mural or accent wall
Looking for a unique and artistic way to transform your kitchen? Consider painting a mural or accent wall. Adding a hand-painted design to your kitchen can create a stunning focal point and bring a touch of creativity and personalization to the space.
A kitchen mural or accent wall allows you to showcase your artistic flair and make a bold statement. You can choose to paint a mural that reflects your personality or interests, or opt for an accent wall that complements the overall design and color scheme of your kitchen.
When deciding on the design for your kitchen mural or accent wall, consider the style and vibe you want to create. You can choose a realistic mural that depicts a scenic landscape, a whimsical mural with playful patterns and images, or even a botanical mural featuring lush greenery and flowers.
If you feel confident in your artistic abilities, you can paint the mural yourself. However, if you’re not artistically inclined, consider hiring a professional muralist to bring your vision to life. They can help translate your ideas into a beautiful and cohesive design that suits your kitchen perfectly.
When choosing colors for your kitchen mural or accent wall, consider the existing color scheme of your kitchen. Opt for colors that harmonize or contrast with the surrounding elements. Bold and vibrant colors can create an energizing and dynamic atmosphere, while muted and earthy tones can establish a calming and soothing ambiance.
Before starting your mural or accent wall, it’s important to properly prepare the surface. Clean the wall to remove any dust or grime and apply a base coat of paint to ensure a smooth and even surface for your design. Use painter’s tape to delineate the borders and protect adjacent walls or cabinets from accidental paint splatters.
Map out your design beforehand by sketching it on paper or using stencils or projectors to transfer the design onto the wall. Take your time and follow a step-by-step process, starting with the background colors and gradually adding in the details. Use high-quality paint and the appropriate brushes or tools to achieve the desired effect.
Once your mural or accent wall is complete, consider applying a clear protective topcoat to preserve and protect the paint. This will help seal the mural and make it easier to clean and maintain over time.
A painted kitchen mural or accent wall can add a wow-factor and personal touch to your kitchen. It becomes a conversation piece and a unique expression of your style and creativity. Embrace the opportunity to turn your kitchen into a work of art, and enjoy the vibrant and inspired atmosphere it brings to your culinary space.
Repainting kitchen hardware or fixtures
If you’re looking to update your kitchen without the expense of replacing all your hardware and fixtures, consider repainting them. Repainting kitchen hardware or fixtures is a cost-effective and creative solution that can breathe new life into your kitchen and give it a fresh and updated look.
Over time, kitchen hardware and fixtures can become worn or outdated. However, with a little bit of paint and some creativity, you can easily transform them to match your desired aesthetic without the need for a complete replacement.
When deciding on a paint color for your kitchen hardware or fixtures, consider the overall color scheme and style of your kitchen. Opt for a color that complements or contrasts with the surrounding elements to create a harmonious and visually appealing look.
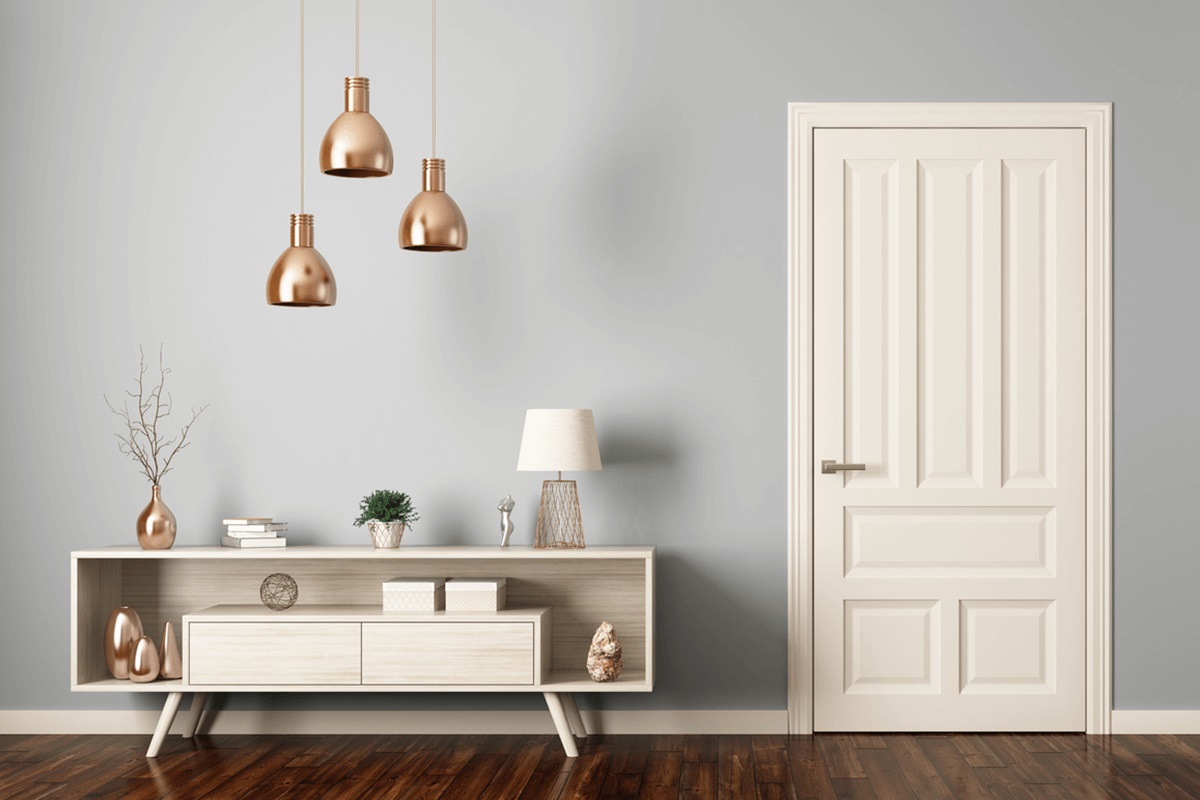
For example, if you have a modern and sleek kitchen, consider painting your hardware or fixtures in a bold and vibrant color like black or brushed gold for a contemporary and stylish touch. Alternatively, if your kitchen has a more traditional or rustic style, muted and earthy tones like antique bronze or copper can add a classic and timeless feel.
Before repainting, it’s important to thoroughly clean and prepare the surfaces of your hardware or fixtures. Remove them from their respective locations and clean them with soap and water to remove any grease or residue. Sand them lightly to create a smooth surface for the paint to adhere to.
When it comes to painting, use a primer specifically designed for the material of your hardware or fixtures, whether it’s metal, wood, or plastic. This will help the paint adhere better and provide a more durable finish. Apply thin and even coats of paint, allowing each coat to dry fully before applying the next one.
Consider using a high-quality enamel or metallic paint for a durable and long-lasting finish. These paints are specifically formulated to withstand wear and tear, ensuring that your painted hardware or fixtures will maintain their appearance over time.
Once the paint is dry, consider adding a clear protective topcoat to further protect the painted surfaces. This will help prevent chipping, scratches, and fading, making your hardware or fixtures more resistant to daily use and cleaning.
Repainting your kitchen hardware or fixtures is a simple and cost-effective way to update the look of your kitchen. It allows you to customize the style and color to match your personal taste and current design trends. With a little bit of creativity and some paint, you can revitalize your kitchen and give it a fresh and modern update.
So, embrace the opportunity to transform your kitchen hardware or fixtures with a fresh coat of paint. Enjoy the process of rejuvenating your space and appreciate the impact that repainted hardware or fixtures can have on the overall look and feel of your kitchen.
Conclusion
Painting is a powerful tool when it comes to transforming your kitchen and adding that extra touch of style and personality. Through the various ideas shared in this article, you have learned how to utilize paint to enhance different aspects of your kitchen, from cabinets and walls to backsplashes and hardware.
Choosing the right paint color is essential in setting the desired tone and atmosphere in your kitchen. Whether you opt for bright and vibrant colors to create a lively and energetic space, or neutral and muted tones for a calm and timeless ambiance, the right paint color can truly make a difference.
From painting cabinets and creating two-tone kitchens to adding a pop of color with painted chairs and updating kitchen appliances with paint, the possibilities for customizing your kitchen are endless. Each of these ideas allows you to infuse your personal style, making your kitchen a reflection of your taste and preferences.
Additionally, an accent wall or mural can become a captivating centerpiece, and repainting kitchen hardware or fixtures provides a budget-friendly way to refresh your kitchen’s look without a complete overhaul.
As you embark on your painting projects, remember to properly prepare the surfaces, choose high-quality materials, and follow the necessary steps to ensure a smooth and durable finish. Consider using protective topcoats to enhance the longevity of your painted surfaces and make them easier to clean and maintain.
Whether you’re a DIY enthusiast or prefer to enlist the help of professionals, painting your kitchen provides an opportunity for creativity and self-expression. It allows you to transform your kitchen into a space that not only functions efficiently but also reflects your unique style and creates a welcoming atmosphere for all who enter.
So, roll up your sleeves, grab your paintbrushes, and let your imagination soar as you embark on the journey of transforming your kitchen with the power of paint. With the ideas and inspiration shared in this article, you have all the tools you need to create a kitchen that is not only functional but also visually stunning and truly your own.
Happy painting!
Frequently Asked Questions about Painted Kitchen Ideas: 17 Ideas For Painting A Kitchen
Was this page helpful?
At Storables.com, we guarantee accurate and reliable information. Our content, validated by Expert Board Contributors, is crafted following stringent Editorial Policies. We're committed to providing you with well-researched, expert-backed insights for all your informational needs.


0 thoughts on “Painted Kitchen Ideas: 17 Ideas For Painting A Kitchen”