Home>Technology>Smart Home Devices>How To Change Printer Default Settings On Mac
Smart Home Devices
How To Change Printer Default Settings On Mac
Modified: February 18, 2024
Learn how to easily change the default settings for your printer on Mac to optimize its performance for smart home devices. Take control of your printing experience today!
(Many of the links in this article redirect to a specific reviewed product. Your purchase of these products through affiliate links helps to generate commission for Storables.com, at no extra cost. Learn more)
**
Introduction
**
Smart home devices have revolutionized the way we interact with our living spaces, offering convenience, efficiency, and enhanced connectivity. From smart thermostats to security cameras, these devices have become integral components of modern homes. Among the myriad of smart home devices, smart printers stand out as indispensable tools for both personal and professional use. With the ability to seamlessly connect to various devices, including Mac computers, smart printers have streamlined the printing process and elevated the overall user experience.
In this comprehensive guide, we will delve into the intricacies of changing printer default settings on Mac, empowering users to customize their printing preferences with ease. Whether you are seeking to adjust default paper sizes, printing quality, or other essential settings, this article will equip you with the necessary knowledge to navigate the process seamlessly. By understanding how to modify default settings, you can optimize your printing experience and ensure that your smart printer aligns with your specific requirements.
Let's embark on this enlightening journey to unlock the potential of your smart printer and harness the power of customization. With a few simple steps, you can tailor your printing defaults to suit your unique needs, ultimately enhancing your productivity and efficiency. Join us as we explore the realm of smart printing and discover the art of customizing default settings on Mac for a seamless and personalized printing experience.
**
Key Takeaways:
- Customize your smart printer’s default settings on Mac to fit your needs, from paper size to printing quality, for a personalized and efficient printing experience.
- Access, change, and test printer default settings on Mac with ease, empowering you to tailor your smart printer to your unique preferences and requirements.
Read more: How To Remove Default Printer
Accessing Printer Default Settings on Mac
**
Before embarking on the process of changing printer default settings on your Mac, it is essential to familiarize yourself with the steps for accessing these settings. Apple”s macOS provides a user-friendly interface for managing printer preferences, allowing users to modify default settings with ease. Whether you are looking to adjust default paper sizes, printing quality, or other essential parameters, accessing the printer default settings is the crucial first step in the customization process.
To access the printer default settings on your Mac, follow these simple steps:
**
1. Open System Preferences:
**
Begin by clicking on the Apple logo in the top-left corner of your screen and selecting “System Preferences” from the dropdown menu. This will launch the System Preferences window, providing access to a wide range of customizable settings for your Mac.
**
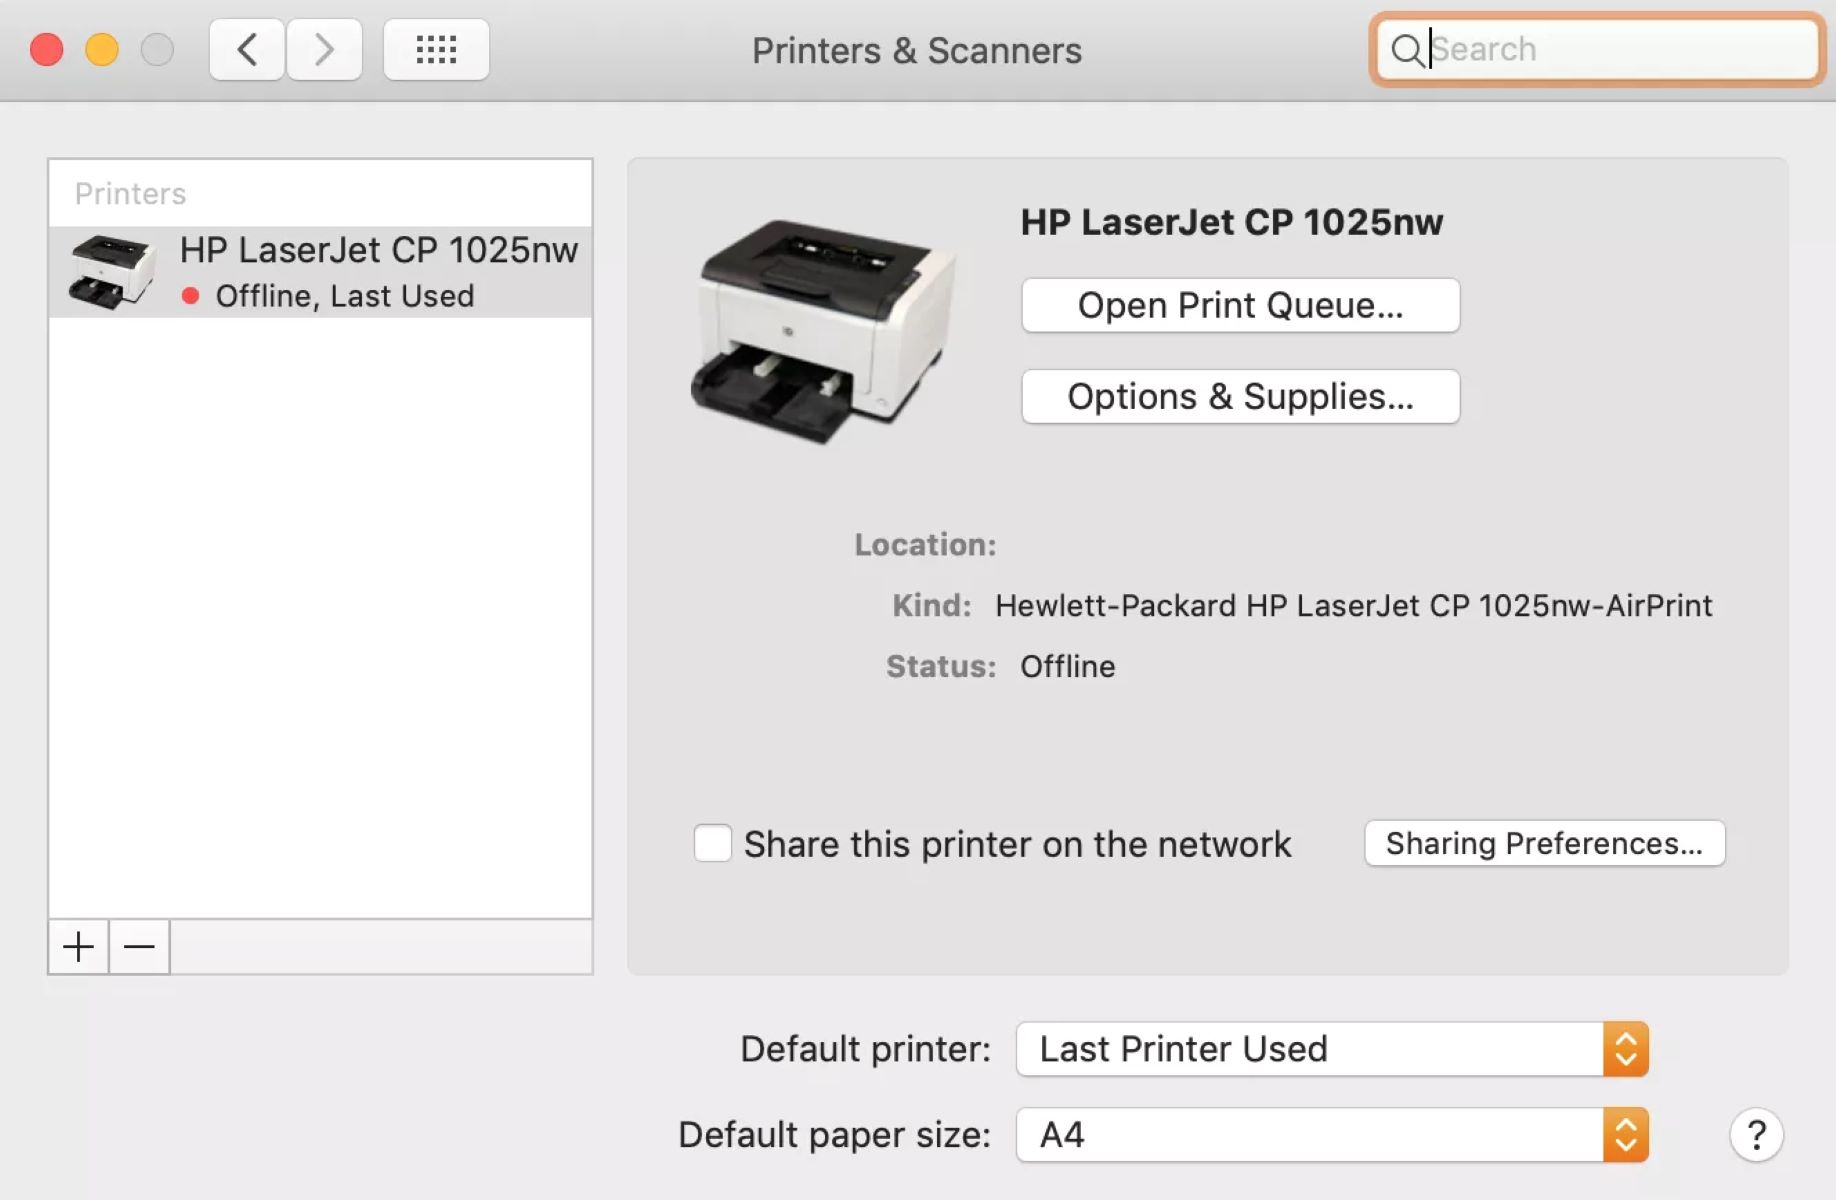
2. Select Printers & Scanners:
**
Within the System Preferences window, locate and click on the “Printers & Scanners” icon. This will open the Printers & Scanners settings, where you can view and manage the printers connected to your Mac.
**
3. Choose Your Printer:
**
From the list of available printers, select the smart printer for which you wish to modify the default settings. By clicking on the printer name, you will access the specific settings and preferences associated with that device.
**
4. Access Printer Preferences:
**
Once you have selected your printer, look for an option to access the printer preferences or settings. This may be represented by a gear icon, a “Settings” button, or a similar indicator that allows you to delve into the printer”s specific configurations.
**
5. Navigate to Default Settings:
**
Within the printer preferences, locate the section dedicated to default settings. This is where you can view and modify the default parameters that govern the printer”s behavior, such as paper size, orientation, printing quality, and other relevant options.
By following these steps, you can seamlessly access the printer default settings on your Mac, laying the groundwork for customizing and fine-tuning the printing experience to align with your preferences and requirements. With the ability to effortlessly navigate the printer preferences within the System Preferences interface, you are poised to embark on the next phase of the customization process: changing the printer default settings to suit your needs.
**
Changing Printer Default Settings on Mac
**
With access to the printer default settings within the System Preferences interface, you are now ready to embark on the process of changing these defaults to better align with your specific printing requirements. Whether you seek to adjust default paper sizes, printing quality, or other essential parameters, modifying the printer default settings on your Mac is a straightforward endeavor that empowers you to tailor the printing experience to your liking.
To change the printer default settings on your Mac, follow these intuitive steps:
**
1. Modify Default Paper Size:
**
Within the printer default settings, locate the option to adjust the default paper size. This allows you to specify the default paper size that the printer will use for all print jobs, ensuring that your documents are formatted according to your preferences. Whether you prefer standard letter size, legal size, or custom dimensions, you can set the default paper size to suit your needs.
**
2. Adjust Printing Quality:
**
Another crucial parameter within the printer default settings is the printing quality. Depending on your preferences and the nature of your printing tasks, you can customize the default printing quality to align with your desired balance of speed and resolution. Whether you prioritize rapid printing for draft documents or high-quality output for professional presentations, adjusting the default printing quality empowers you to achieve the desired results with every print job.
**
3. Set Default Orientation:
**
Orientation plays a pivotal role in how your documents are printed, and adjusting the default orientation within the printer settings allows you to dictate whether documents are printed in portrait or landscape mode by default. This customization ensures that your documents are formatted and presented in the orientation that best suits your content and layout preferences.
**
4. Customize Additional Settings:
**
Beyond the fundamental parameters of paper size, printing quality, and orientation, explore the printer default settings to identify and customize additional parameters that are pertinent to your printing needs. This may include default color settings, duplex printing preferences, and other advanced options that enable you to fine-tune the printing process to your exact specifications.
By following these steps, you can effortlessly modify the printer default settings on your Mac, tailoring the printing experience to align with your unique preferences and requirements. With the ability to customize default paper sizes, printing quality, orientation, and other essential parameters, you are empowered to optimize the printing process and ensure that your smart printer operates in harmony with your specific needs.
**
To change printer default settings on Mac, go to System Preferences, then Printers & Scanners. Select your printer, click on “Options & Supplies,” then “Driver.” From there, you can adjust default settings like paper size and quality.
Saving Changes and Testing the New Default Settings
**
After customizing the printer default settings on your Mac to align with your specific preferences, it is essential to save these changes to ensure that your modifications are preserved for future print jobs. Additionally, testing the new default settings allows you to verify that the adjustments accurately reflect your desired printing preferences, providing confidence in the customized parameters that will govern your printing experience.
Here are the essential steps for saving changes and testing the new default settings on your Mac:
**
1. Save Your Modifications:
**
Once you have adjusted the printer default settings to your liking, navigate to the appropriate option within the printer preferences interface to save your modifications. This may involve clicking a “Save” or “Apply” button to ensure that your customized default settings are retained for future print jobs.
**
2. Print a Test Document:
**
To validate the new default settings and ensure that they accurately reflect your preferences, print a test document using the modified default parameters. This allows you to assess the output and confirm that the default paper size, printing quality, orientation, and other customized settings align with your expectations.
**
3. Evaluate the Output:
**
Examine the printed test document to assess the impact of the modified default settings. Pay attention to the paper size, orientation, and overall printing quality to determine whether the adjustments have effectively tailored the printing experience to your specific requirements. This evaluation provides valuable insights into the functionality and accuracy of the new default settings.
**
4. Make Further Adjustments (If Necessary):
**
If the test document reveals any discrepancies or areas for improvement, revisit the printer default settings to make further adjustments as needed. Whether it involves refining the default paper size, fine-tuning the printing quality, or addressing other parameters, iteratively testing and modifying the default settings allows you to achieve an optimal printing experience.
By following these steps, you can confidently save your customized printer default settings on your Mac and validate their effectiveness through the printing of a test document. This iterative approach empowers you to fine-tune the default parameters to align with your specific preferences, ultimately ensuring that your smart printer operates in harmony with your unique printing needs.
**
Conclusion
**
As smart home devices continue to enrich our daily lives, the ability to customize and personalize their functionalities becomes increasingly valuable. Smart printers, in particular, play a pivotal role in facilitating seamless printing experiences, and the capability to modify default settings on Mac empowers users to tailor the printing process to their precise preferences.
Throughout this comprehensive guide, we have navigated the intricacies of accessing, changing, and testing printer default settings on Mac, providing users with the knowledge and confidence to embark on this customization journey. By following intuitive steps within the System Preferences interface, users can effortlessly access the printer default settings, modify parameters such as paper size and printing quality, and validate the effectiveness of their customizations through test documents.
With the newfound ability to customize default paper sizes, printing quality, orientation, and other essential parameters, users can optimize their printing experiences and ensure that their smart printers align with their unique requirements. Whether it involves adjusting default settings for personal or professional printing tasks, the flexibility and control afforded by modifying printer defaults on Mac empower users to achieve tailored and precise outcomes with every print job.
By seamlessly integrating the art of customization into the realm of smart printing, users can elevate their productivity, efficiency, and overall satisfaction with their printing experiences. The ability to fine-tune default settings on Mac represents a significant advancement in personalizing the smart home ecosystem, allowing users to harness the full potential of their smart printers and enjoy a seamless and personalized printing journey.
As you embark on your printing customization endeavors, remember that the process of modifying default settings is not only about technical adjustments; it is about crafting a printing experience that resonates with your unique preferences and enhances your daily routines. Embrace the power of customization, and unlock the full potential of your smart printer to achieve printing outcomes that truly align with your individual needs and aspirations.
With the knowledge and insights gleaned from this guide, you are poised to embark on a journey of personalized printing experiences, where every document reflects your distinct style and requirements. Embrace the art of customization, and let your smart printer become a seamless extension of your creativity and productivity.
Frequently Asked Questions about How To Change Printer Default Settings On Mac
Was this page helpful?
At Storables.com, we guarantee accurate and reliable information. Our content, validated by Expert Board Contributors, is crafted following stringent Editorial Policies. We're committed to providing you with well-researched, expert-backed insights for all your informational needs.


0 thoughts on “How To Change Printer Default Settings On Mac”