Home>Technology>Smart Home Devices>How Do You Clean A Printer
Smart Home Devices
How Do You Clean A Printer
Published: January 18, 2024
Learn the best ways to clean your smart home devices, including printers, to keep them in top condition and ensure optimal performance. Discover expert tips and techniques for maintaining your devices.
(Many of the links in this article redirect to a specific reviewed product. Your purchase of these products through affiliate links helps to generate commission for Storables.com, at no extra cost. Learn more)
Introduction
Welcome to the world of smart home devices, where convenience and efficiency converge to simplify everyday living. Smart home devices, also known as home automation or domotics, encompass a wide array of interconnected gadgets designed to enhance comfort, security, and energy management within the home. From intelligent thermostats and lighting systems to voice-activated assistants and smart locks, these devices offer unparalleled convenience and control.
In this comprehensive guide, we will delve into the fascinating realm of smart home devices, exploring their functionality, benefits, and the latest trends shaping the industry. Whether you're a tech enthusiast looking to upgrade your living space or a homeowner seeking to streamline daily tasks, this article will provide invaluable insights to help you navigate the ever-expanding landscape of smart home technology.
Join us as we embark on a journey through the exciting world of smart home devices, where innovation and connectivity converge to redefine modern living. Let's explore the boundless possibilities and transformative impact of these cutting-edge technologies, empowering you to create a smarter, more efficient home environment.
Key Takeaways:
- Keep your printer clean by gathering supplies like cloths, alcohol, and cotton swabs. Turn off the printer, clean the exterior and interior, then reassemble it for optimal performance and longevity.
- Regular maintenance and cleaning are essential for preserving the quality of your printer. By following the step-by-step guidelines, you can ensure optimal performance and longevity for your printer.
Read more: How Do You Scan With A Printer
Step 1: Gather Your Supplies
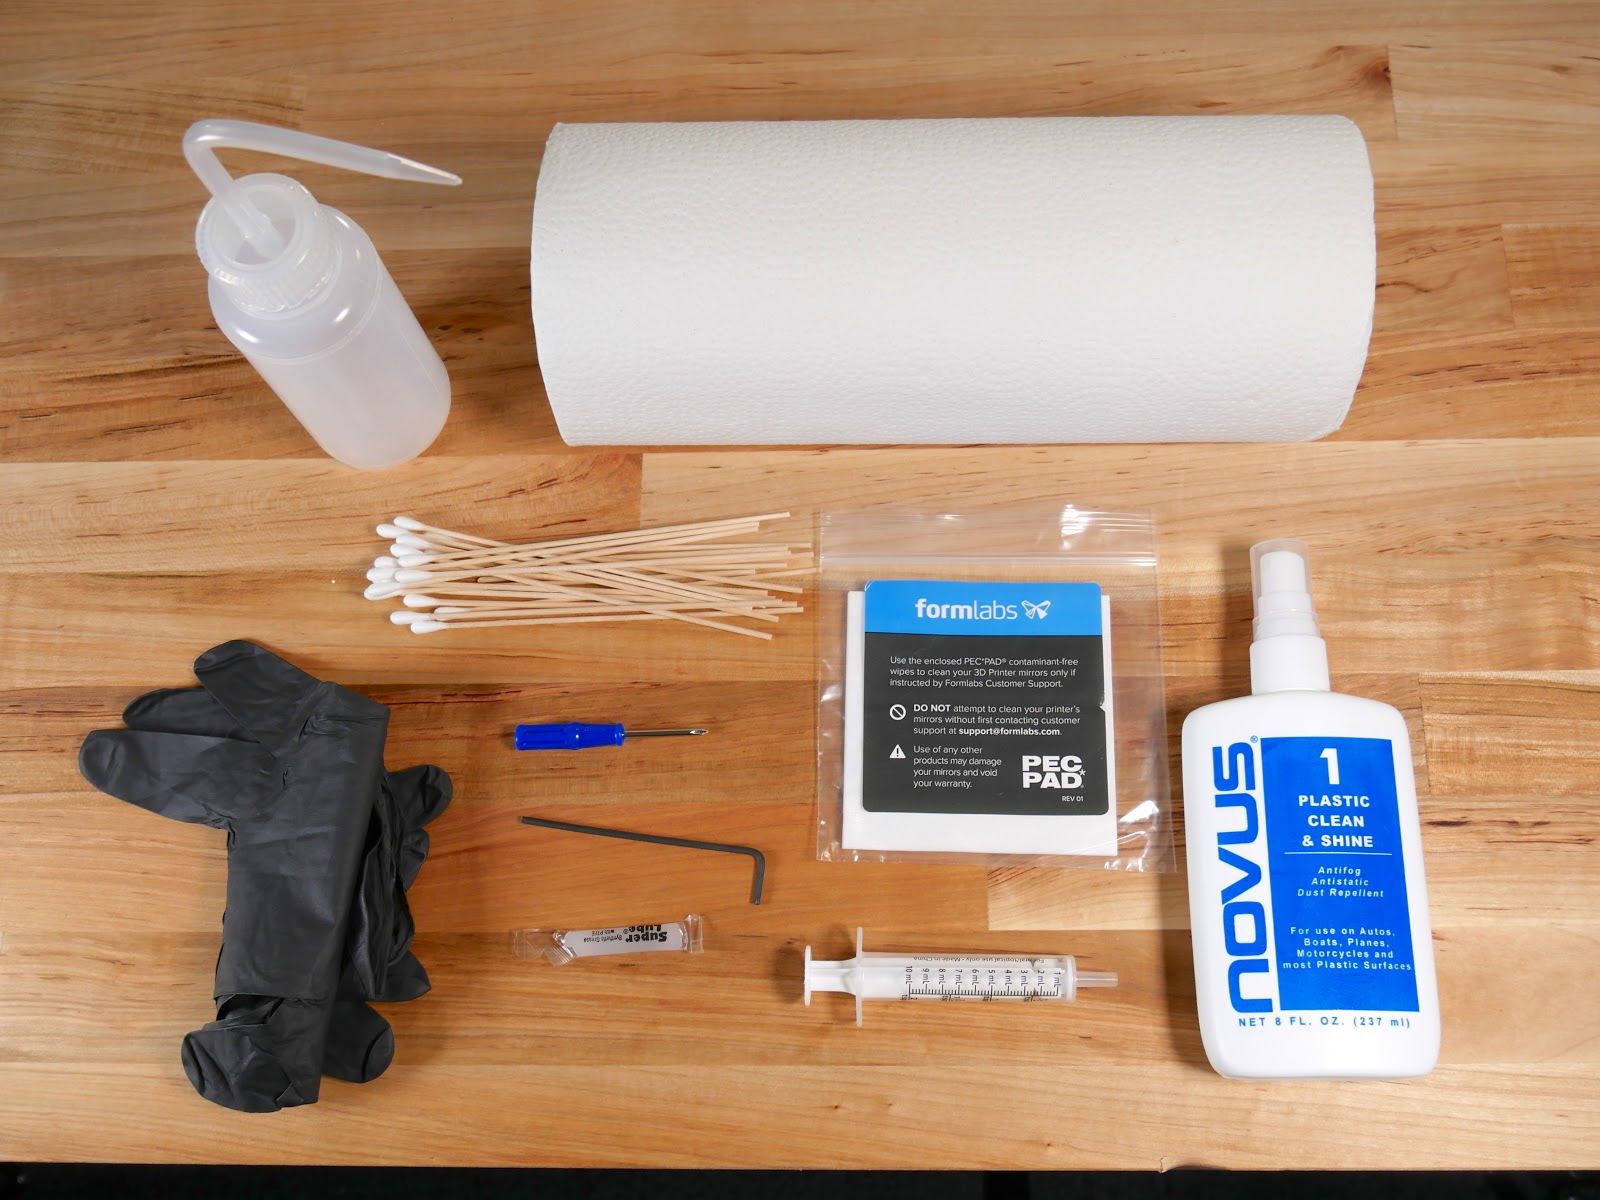
Before diving into the process of cleaning your printer, it’s essential to gather the necessary supplies to ensure a thorough and effective cleaning. Here’s a list of items you’ll need:
- Clean, lint-free cloths
- Isopropyl alcohol
- Cotton swabs
- Canned air or a small, soft-bristled brush
- Distilled water
- Mild dish soap
Once you have these supplies at hand, you’ll be well-equipped to tackle the cleaning process, ensuring that your printer remains in optimal condition and continues to produce high-quality prints.
Step 2: Turn Off the Printer
Before commencing the cleaning process, it’s crucial to power off the printer and unplug it from the electrical outlet. This precautionary measure ensures your safety and prevents any potential damage to the printer during the cleaning procedure. Additionally, allowing the printer to cool down for a few minutes before initiating the cleaning process can minimize the risk of accidental burns and ensure that the internal components are safe to handle.
By turning off the printer and disconnecting it from the power source, you create a secure environment for cleaning the device without the risk of electrical hazards. This simple yet essential step sets the stage for a thorough and safe cleaning process, allowing you to maintain your printer in prime working condition for years to come.
Step 3: Clean the Exterior
Begin the cleaning process by focusing on the exterior surfaces of the printer. Use a clean, lint-free cloth lightly dampened with water to wipe down the exterior, removing any dust, fingerprints, or smudges that may have accumulated. For stubborn stains or marks, a mild solution of water and a small amount of dish soap can be used to gently cleanse the exterior surfaces, followed by a thorough wipe with a damp cloth to remove any soap residue.
When cleaning the display panel or control interface, exercise caution to avoid excessive moisture or harsh cleaning agents that may damage the sensitive components. Use a slightly damp cloth to gently wipe the display and control buttons, taking care not to allow any moisture to seep into the internal circuitry or mechanisms.
To ensure a pristine exterior, pay attention to detail as you clean the various surfaces of the printer. Take the time to clean around buttons, ports, and any crevices where dust and debris may accumulate, using cotton swabs lightly moistened with water or isopropyl alcohol to reach confined areas and achieve a thorough cleaning.
By meticulously cleaning the exterior of the printer, you not only maintain its aesthetic appeal but also prevent dust and grime from infiltrating the internal components, thereby promoting optimal performance and longevity.
To clean a printer, use a soft, lint-free cloth to wipe away dust and debris from the exterior and interior. Be gentle and avoid using liquid cleaners to prevent damage.
Step 4: Clean the Interior
Once the exterior surfaces are immaculate, it’s time to turn your attention to the interior of the printer. Begin by opening the printer’s access panels and removing any visible debris, such as paper dust, stray paper fragments, or ink residue. Use a small, soft-bristled brush or canned air to gently dislodge and remove any accumulated dust or debris from the interior components, ensuring that the printer’s mechanisms remain unobstructed.
Next, inspect the printer’s ink or toner cartridges and printheads. If you notice any excess ink or toner buildup, carefully wipe the cartridges and printheads with a clean, lint-free cloth lightly moistened with water or isopropyl alcohol. Exercise caution to avoid damaging the delicate components while ensuring that any residual ink or toner is thoroughly removed.
For laser printers, it’s essential to clean the printer’s drum unit and transfer roller, as these components play a critical role in the printing process. Gently wipe the drum unit and transfer roller with a soft, lint-free cloth to remove any toner residue or debris, taking care to follow the manufacturer’s guidelines for proper cleaning techniques.
Additionally, if your printer features a paper feed mechanism, carefully inspect and clean the paper rollers to prevent paper jams and ensure smooth, reliable paper feed. Use a damp cloth to wipe the rollers, removing any accumulated dust or paper residue that may impede their functionality.
By meticulously cleaning the interior components of your printer, you safeguard its performance and longevity, ensuring consistent, high-quality prints while minimizing the risk of malfunctions or maintenance issues.
Read more: How Do You Clean A Fireplace
Step 5: Reassemble the Printer
After completing the cleaning process, it’s time to reassemble the various components of the printer, ensuring that everything is securely in place and ready for operation. Begin by carefully reinserting the ink or toner cartridges, ensuring that they are properly seated and securely latched into position. Take care to follow the manufacturer’s guidelines for cartridge installation to prevent any potential leaks or operational issues.
Next, close the access panels and any compartments that were opened during the cleaning process, ensuring that they are securely fastened. Double-check that all panels and doors are closed properly to prevent any errors or malfunctions when the printer is powered on.
If you removed any detachable parts, such as paper trays or input trays, during the cleaning process, reattach them to the printer according to the manufacturer’s instructions. Ensure that the trays are aligned correctly and that any latches or locking mechanisms are engaged to maintain stability and proper functionality.
Before reconnecting the printer to the power source, take a moment to inspect the exterior surfaces for any residual moisture or cleaning solution. Use a dry, lint-free cloth to gently wipe down the exterior, ensuring that all surfaces are dry and free of any moisture that could potentially cause electrical issues or damage to the printer.
Once you’ve verified that the printer is dry and reassembled, reconnect it to the power source and power it on. Allow the printer to go through its startup sequence, and perform a test print to ensure that it is functioning correctly and producing high-quality prints. By following these steps, you can rest assured that your printer is clean, reassembled, and ready to deliver exceptional performance.
Conclusion
Congratulations on successfully completing the printer cleaning process! By following the step-by-step guidelines outlined in this comprehensive guide, you have taken proactive measures to maintain the cleanliness and functionality of your printer, ensuring optimal performance and longevity.
Regular maintenance and cleaning are essential for preserving the quality of your printer and preventing potential issues that may arise from dust accumulation, debris buildup, or ink residue. By incorporating these cleaning practices into your printer care routine, you can prolong its lifespan and continue to enjoy crisp, clear prints without the worry of preventable malfunctions.
Remember to schedule periodic cleanings to uphold the cleanliness and efficiency of your printer, especially if it experiences heavy usage or is situated in a dusty environment. By investing time in proper maintenance, you contribute to the longevity of your printer and minimize the need for costly repairs or replacements in the future.
We hope this guide has empowered you with valuable insights and practical techniques for maintaining your printer in prime condition. With a clean and well-maintained printer, you can confidently tackle your printing tasks, knowing that your device is primed for optimal performance.
Thank you for joining us on this journey through the printer cleaning process. Here’s to a sparkling clean printer and a future filled with flawless prints!
Frequently Asked Questions about How Do You Clean A Printer
Was this page helpful?
At Storables.com, we guarantee accurate and reliable information. Our content, validated by Expert Board Contributors, is crafted following stringent Editorial Policies. We're committed to providing you with well-researched, expert-backed insights for all your informational needs.


0 thoughts on “How Do You Clean A Printer”