Articles
How Do You Use A VEVOR Button Machine
Modified: December 7, 2023
Learn how to use the VEVOR button machine with our informative articles. Master the art of button making and create custom designs easily.
(Many of the links in this article redirect to a specific reviewed product. Your purchase of these products through affiliate links helps to generate commission for Storables.com, at no extra cost. Learn more)
Introduction
A VEVOR Button Machine is a versatile tool that allows you to create your own buttons for various purposes. Whether you are a button-making enthusiast, a small business owner, or a designer looking to add custom buttons to your products, a VEVOR Button Machine can be a valuable asset. This article will guide you through the process of using a VEVOR Button Machine effectively, from understanding its components to troubleshooting common issues and performing maintenance.
Creating your own buttons can be a fun and rewarding experience. Not only do you have the freedom to design buttons that perfectly match your style and brand, but you can also save money by making them yourself. With a VEVOR Button Machine, you can easily produce high-quality buttons for personal use, promotional events, fundraisers, or even to sell.
Before we dive into the details of using a VEVOR Button Machine, let’s first understand the key components that make up the machine and how they work together to create custom buttons.
Key Takeaways:
- Unleash Your Creativity and Make a Statement
With a VEVOR Button Machine, you can easily create custom buttons for personal use, promotional events, or business branding. Select the right size and design, apply proper technique, and troubleshoot common issues to produce high-quality buttons that captivate and make a statement. - Maintain and Maximize Your VEVOR Button Machine
Regular maintenance, proper cleaning, and following manufacturer’s recommendations are essential to ensure the longevity and optimal performance of your VEVOR Button Machine. By incorporating these practices, you can extend the lifespan of your machine and consistently produce high-quality buttons for various purposes.
Read more: How Do You Use A Nespresso Coffee Machine
What is a VEVOR Button Machine?
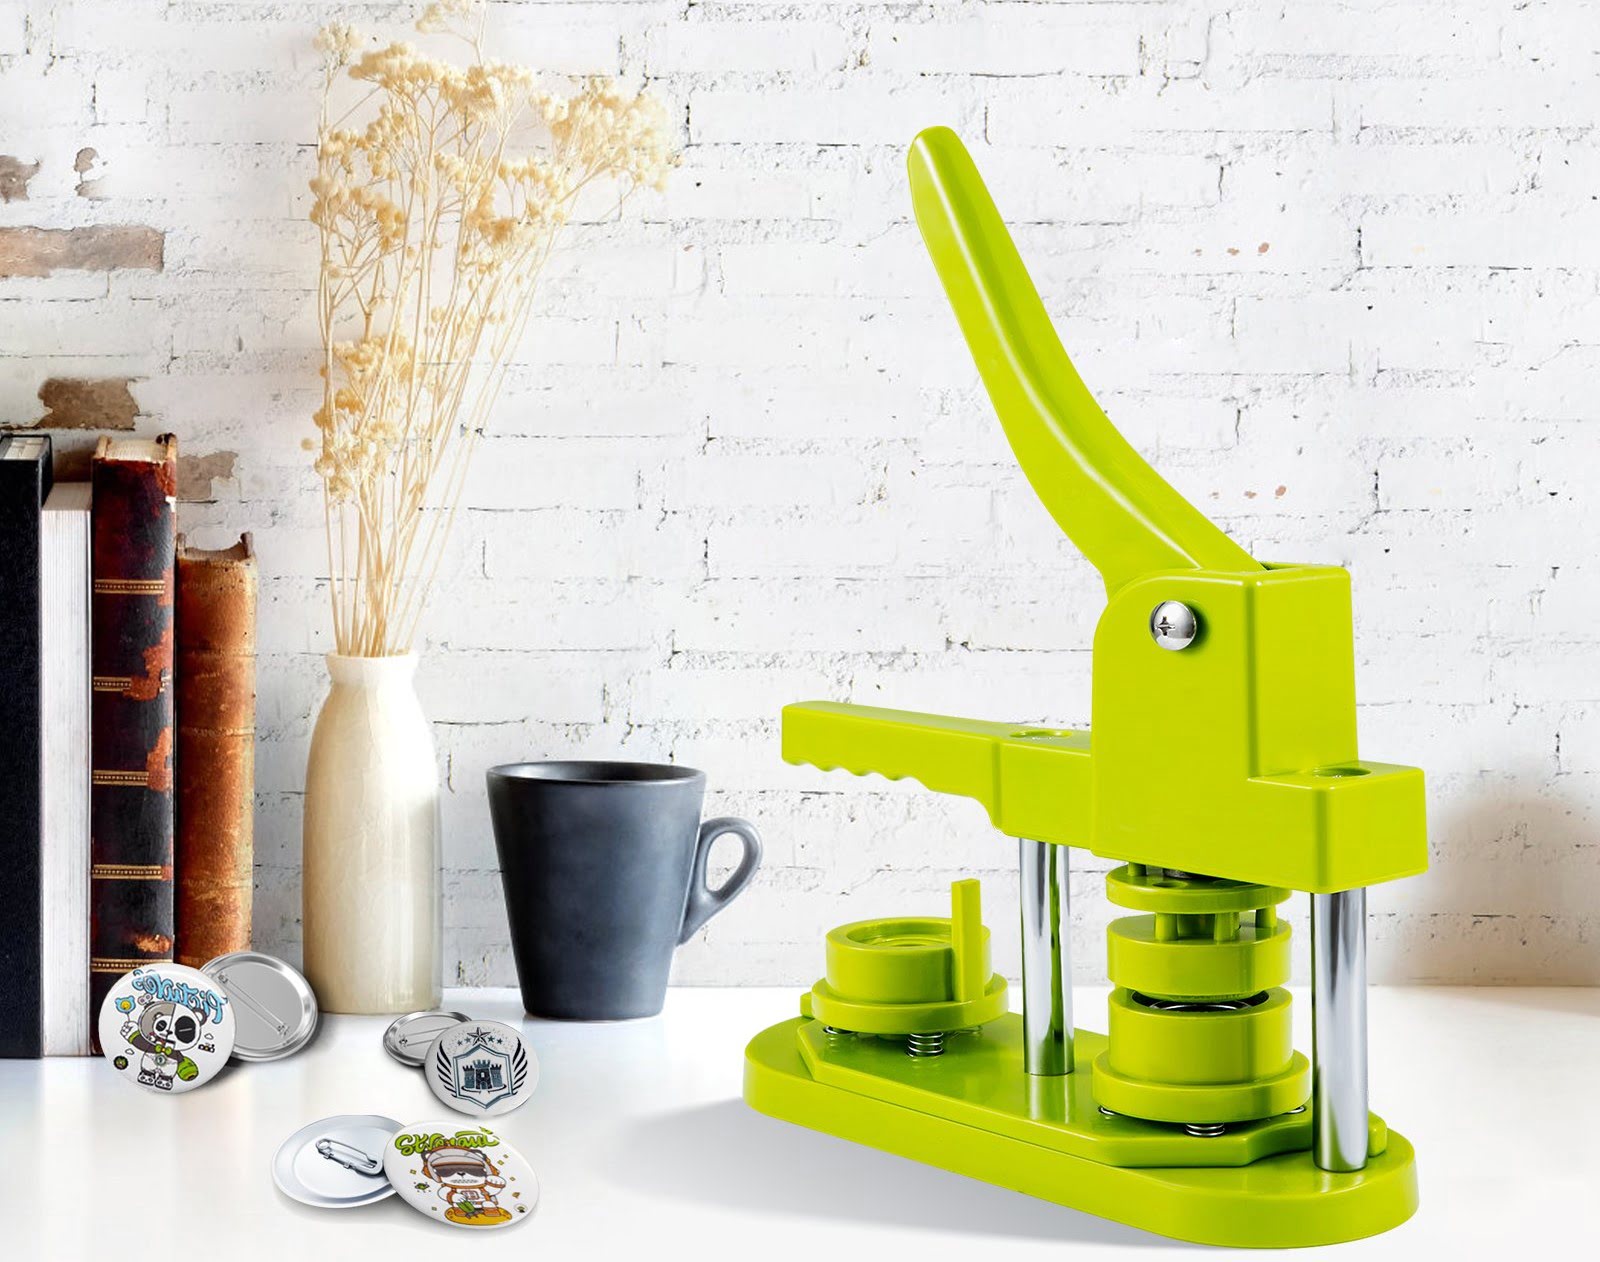
A VEVOR Button Machine is a specialized tool designed to make the process of button-making quick and effortless. It consists of several components that work harmoniously to assemble buttons with precision. These components typically include a button press, die mold, button shell, and graphic insert.
The button press is the main body of the machine that houses the other components. It is constructed from durable materials to provide stability and ensure longevity. The die mold is a crucial part of the button machine as it determines the size and shape of the finished button. Die molds are available in various sizes to accommodate different button sizes and designs.
Button shells are the outer metal parts of the button that enclose the graphic insert. These shells come in various sizes and are made from sturdy materials such as stainless steel to ensure durability. The graphic insert is the design or image that is placed in the button shell. It can be printed or hand-drawn, allowing you to unleash your creativity and personalize your buttons.
VEVOR Button Machines are known for their user-friendly design and ease of operation. They typically come with a lever or handle that is used to exert pressure on the button press, causing the components to come together and create a perfectly assembled button. These machines are designed to provide consistent and professional-looking results every time.
Now that we have a basic understanding of what a VEVOR Button Machine is, let’s explore how to use it effectively in the next section.
Understanding the Components of a VEVOR Button Machine
Before you start using a VEVOR Button Machine, it’s important to familiarize yourself with its key components. Understanding how each component functions will ensure that you can operate the machine efficiently and produce high-quality buttons. Let’s take a closer look at the main components of a VEVOR Button Machine:
- Button Press: The button press is the main body of the machine. It provides stability and serves as the foundation for the button-making process. High-quality button presses are made from durable materials and are built to withstand frequent use.
- Die Mold: The die mold is a crucial component that determines the size and shape of the buttons you can create. Die molds are available in various sizes to accommodate different button sizes, ranging from small pins to larger badges or magnets. It’s important to choose the die mold that matches the button size you intend to make.
- Button Shells: Button shells are the outer metal parts of the button that enclose the graphic insert. They come in various sizes and are typically made from stainless steel or other robust materials. Button shells are designed to provide a secure and durable housing for the graphic insert.
- Graphic Inserts: The graphic insert is the design or image that you place inside the button shell. It can be a printed artwork, photograph, or any other visual element that you want to showcase on the button. The graphic insert is what gives your button its unique and personalized look.
- Handle or Lever: VEVOR Button Machines typically feature a handle or lever that you use to exert pressure and assemble the button components together. The handle or lever allows you to apply consistent pressure, resulting in a well-formed button.
- Base or Work Area: Some VEVOR Button Machines come with a base or work area where you can position your button making supplies and materials. This base provides stability and a convenient workspace for assembling the buttons.
Now that you have a clear understanding of the components of a VEVOR Button Machine, you are ready to dive into the step-by-step guide on how to use it effectively. This guide will walk you through the entire process, from selecting the right button size to troubleshooting common issues that may arise during button-making.
Step-by-Step Guide on Using a VEVOR Button Machine
Now that you are familiar with the components of a VEVOR Button Machine, let’s dive into a step-by-step guide on how to use it effectively. By following these instructions, you’ll be able to create professional-looking buttons in no time:
- Select the Button Size: Start by choosing the desired button size based on your project requirements. VEVOR Button Machines typically come with various die molds to accommodate different button sizes. Ensure that the die mold you select matches the button size you want to create.
- Prepare the Graphic Insert: Design or print your graphic insert according to the button size you’ve chosen. Ensure that the graphic fits within the dimensions specified for the button shell. Cut out the graphic insert using a circle cutter or a manual cutting tool if needed.
- Assemble the Button Shell: Place the button shell face down on a stable surface. Take the graphic insert and position it in the recessed area on the backside of the button shell. Ensure that the graphic is centered and properly aligned.
- Position the Button Shell and Graphic Insert: Place the button shell with the graphic insert into the die mold, aligning it with the cavity of the mold. Ensure that the button shell fits snugly in the mold and sits evenly.
- Apply Pressure: Use the handle or lever of the VEVOR Button Machine to exert pressure on the button press. Apply steady and even pressure to assemble the button components together. You will feel some resistance, but avoid applying excessive force, as it may cause damage to the machine or affect the button’s quality.
- Release the Pressure: After applying pressure for a few seconds, release the handle or lever to release the pressure on the button press. This will complete the button-making process.
- Remove the Button: Carefully remove the finished button from the die mold by pushing it up from the bottom. The button should come out easily, leaving the graphic insert securely encased within the button shell.
- Inspect the Button: Examine the finished button to ensure that it is properly assembled and free from any defects. Check that the graphic insert is centered and securely fastened within the button shell. Make any necessary adjustments if required.
- Repeat the Process: Repeat the above steps to create additional buttons or experiment with different designs and sizes. With practice, you’ll become more proficient in using the VEVOR Button Machine and achieve consistent and professional results.
By following this step-by-step guide, you’ll be able to harness the full potential of your VEVOR Button Machine and create custom buttons for a variety of purposes such as promotional events, crafts, or personal use. Remember to always refer to the manufacturer’s instructions and guidelines specific to your model for the best results.
Choosing the Right Button Size and Design
When using a VEVOR Button Machine, one of the critical aspects is selecting the right button size and design. The size and design of your buttons will depend on the intended purpose and personal preferences. Here are some factors to consider when making your choices:
Button Size:
VEVOR Button Machines come with various die molds that allow you to create buttons of different sizes. Consider the following factors when selecting the button size:
- Intended Use: Determine what the buttons will be used for. Are they for marketing or promotional purposes, as part of a clothing accessory, or for personal use? The size of the buttons should be appropriate for their intended application.
- Visibility of Design: Consider the complexity of the design or image you want to showcase on the button. If the design is intricate or contains important details, choosing a larger button size will ensure better visibility and clarity.
- Aesthetic Appeal: Think about the overall visual impact you want to achieve with your buttons. Larger buttons can make a bold statement, while smaller buttons can be more subtle and versatile.
Button Design:
The design of your buttons plays a crucial role in capturing attention and conveying your message. Consider the following factors when choosing the button design:
- Brand Recognition: If you are creating buttons for your business or organization, consider incorporating your logo, brand colors, or tagline to enhance brand recognition.
- Message or Theme: Determine the message or theme you want your buttons to convey. Whether it’s a social cause, a statement, or a fun design, ensure that the design aligns with your intended message or theme.
- Clarity and Readability: Ensure that the design or text on the button is clear, legible, and easy to read from a distance. Choose fonts and colors that enhance readability and make an impact.
- Visual Appeal: Experiment with different colors, patterns, and layouts to make your buttons visually appealing. Consider the target audience and their preferences when selecting the design elements.
Remember that the right button size and design will depend on your specific requirements and goals. Take the time to brainstorm ideas, gather feedback, and create mock-ups before finalizing the size and design choices. With the flexibility of a VEVOR Button Machine, you can easily create customized buttons that reflect your style and make a statement.
Tips for Proper Technique and Button Quality
Creating high-quality buttons using a VEVOR Button Machine requires attention to detail and proper technique. Follow these tips to ensure that you achieve the best possible results and produce buttons that meet your expectations:
1. Use Quality Materials:
Ensure that you use high-quality button shells, graphic inserts, and any other materials involved in the button-making process. Quality materials will result in sturdy and durable buttons that withstand regular use and maintain their appearance over time.
2. Center the Graphic Insert:
When placing the graphic insert in the button shell, make sure it is properly centered. This will create a visually pleasing and well-balanced button. Take your time to adjust the position of the graphic before applying pressure to ensure a centered and aligned design.
3. Apply Even Pressure:
When using the VEVOR Button Machine, apply even and consistent pressure to assemble the button components together. Avoid exerting excessive force, as it could lead to misalignment or cause damage to the machine. A smooth and controlled application of pressure will result in well-formed buttons.
4. Trim Excess Graphic Material:
If you notice any excess graphic material sticking out from the button shell after assembly, trim it using scissors or a cutting tool. This will ensure a clean and polished finish to your buttons.
5. Conduct Quality Checks:
Inspect each button after assembly to check for any defects or imperfections. Look for any misalignment, loose graphic inserts, or other issues that may affect the overall quality. This attention to detail will help you maintain a consistent level of button quality.
6. Experiment with Different Designs:
Don’t be afraid to get creative and experiment with various designs and styles. Try different color combinations, patterns, or even incorporate different materials into your buttons. This experimentation will help you discover unique designs and cater to a wider range of preferences.
7. Practice and Refine:
Practice makes perfect when it comes to using a VEVOR Button Machine. Take the time to refine your technique, experiment with different settings, and learn from any mistakes. As you gain experience, you’ll become more proficient at creating high-quality buttons consistently.
By following these tips, you’ll be able to master the proper technique for using a VEVOR Button Machine and produce buttons that meet your desired quality standards. Always remember to have fun with the process and enjoy the creativity that button-making allows.
Troubleshooting Common Issues with a VEVOR Button Machine
While using a VEVOR Button Machine is generally straightforward, you may occasionally encounter some common issues. Here are a few troubleshooting tips to help you address these problems and ensure smooth operation:
1. Misaligned Button Components:
If you notice that the button components are not properly aligned after pressing, the graphic insert may not be centered within the button shell. To fix this, double-check the position of the graphic insert before applying pressure. Adjust it as necessary to ensure a centered and aligned design.
Read more: How To Use VEVOR Heat Press
2. Loose Graphic Inserts:
If the graphic insert tends to come loose from the button shell after assembly, it may be due to insufficient pressure applied during the button-making process. Ensure that you exert enough pressure with the button machine’s handle or lever to securely fasten the graphic insert within the button shell.
3. Difficulty Releasing Buttons from the Die Mold:
Sometimes, buttons may get stuck in the die mold, making it challenging to remove them. In such cases, try tapping the bottom of the die mold gently to loosen the button. You can also use a small tool or a pen to push the button up from the bottom of the die mold.
4. Irregular Button Shape:
If your buttons come out with an irregular shape or appear distorted, it may be due to uneven pressure applied during the button-making process. Make sure to apply pressure evenly and consistently with the button machine’s handle or lever. Avoid using excessive force, as it can deform the button shape.
5. Button Shell Jamming in the Die Mold:
In some cases, the button shell may get stuck or jammed in the die mold, making it difficult to proceed with the button-making process. To resolve this issue, check if there are any debris or obstructions in the die mold or on the button press. Clean the machine thoroughly and ensure that there is no debris hindering the proper movement of the button shell.
Read more: How To Use VEVOR Moonshine Still
6. Inconsistent Button Quality:
If you notice significant variations in button quality, such as variations in size, alignment, or graphic stability, it may be helpful to review your technique. Ensure that you are consistently applying the same level of pressure during each button-making process. Pay attention to the alignment of the graphic insert and make any necessary adjustments for better consistency.
If you continue to experience issues or encounter more complex problems with your VEVOR Button Machine, it’s always advisable to consult the manufacturer’s manual or reach out to their customer support for further assistance. They can provide specific guidance tailored to your machine model and troubleshoot any unique issues you may be facing.
By troubleshooting common issues and fine-tuning your technique, you’ll be able to overcome challenges and produce high-quality buttons with your VEVOR Button Machine.
Maintenance and Cleaning of a VEVOR Button Machine
Proper maintenance and regular cleaning of your VEVOR Button Machine are essential to ensure its longevity and optimal performance. By following these maintenance tips, you can keep your machine in excellent condition and prevent any potential issues:
1. Regular Cleaning:
After each button-making session, take the time to clean the machine. Use a soft cloth or tissue to wipe away any debris, dust, or adhesive residue that may have accumulated on the machine’s surfaces. Pay special attention to the button press, die mold, and any areas where excess material may have accumulated.
2. Lubrication:
Periodically lubricate the moving parts of the machine to ensure smooth operation. Check the manufacturer’s recommendations for the specific lubricant to use and apply it sparingly to avoid over-lubrication. Regular lubrication will prevent any unnecessary friction and maintain the machine’s performance.
Read more: How Do I Contact VEVOR?
3. Check for Loose Screws:
Inspect your VEVOR Button Machine regularly for any loose screws or components. Tighten any loose screws using the appropriate tools. This will help maintain the stability and integrity of the machine, preventing any potential issues during operation.
4. Store Properly:
When not in use, store your VEVOR Button Machine in a clean and dry environment. Protect it from dust, moisture, and extreme temperatures. Use a designated storage case or cover to prevent any potential damage or accumulation of debris.
5. Follow Manufacturer’s Recommendations:
Always refer to the manufacturer’s guidelines and recommendations for specific maintenance instructions. Each machine may have unique requirements, so it’s important to follow the instructions provided to ensure proper maintenance.
6. Have Regular Service Checks:
Consider having your VEVOR Button Machine serviced regularly by a professional or following the manufacturer’s recommended service schedule. This will help identify and address any potential mechanical issues or adjustments that may be necessary.
By incorporating these maintenance practices into your routine, you can extend the lifespan of your VEVOR Button Machine and maximize its performance. Taking the time to care for your machine will ensure consistent, high-quality button-making results and a reliable tool for your button-making endeavors.
Read more: How To Use VEVOR Pizza Oven
Conclusion
Utilizing a VEVOR Button Machine allows you to create custom buttons for various purposes, from personal projects to promotional campaigns. By understanding its components and following a step-by-step guide, you can easily produce high-quality buttons with precision and consistency.
When using a VEVOR Button Machine, it is essential to select the right button size and design based on your specific requirements. Take into consideration the intended use, visibility of the design, and aesthetic appeal to create buttons that effectively convey your message or brand.
To ensure the best results, follow proper technique and apply even pressure when assembling the button components. Take care to center the graphic insert, trim any excess material, and inspect each button for quality before moving on to the next one.
In the event of any issues, familiarize yourself with troubleshooting techniques such as addressing misalignments, ensuring the graphic insert is secure, and resolving button jams. Regular cleaning, maintenance, and lubrication will help keep your VEVOR Button Machine in optimal condition, ensuring its longevity and performance.
Using a VEVOR Button Machine offers endless possibilities for button-making, allowing you to unleash your creativity and personalize your buttons. Whether for personal use, promoting your business, or raising awareness for a cause, these professionally crafted buttons will leave a lasting impression.
Remember to always follow the manufacturer’s instructions and guidelines specific to your VEVOR Button Machine model. With practice and attention to detail, you’ll become proficient in the art of button-making and enjoy the process of creating unique and eye-catching buttons.
So, unleash your creativity, let your imagination soar, and start making buttons that captivate and make a statement with your VEVOR Button Machine!
Frequently Asked Questions about How Do You Use A VEVOR Button Machine
Was this page helpful?
At Storables.com, we guarantee accurate and reliable information. Our content, validated by Expert Board Contributors, is crafted following stringent Editorial Policies. We're committed to providing you with well-researched, expert-backed insights for all your informational needs.

0 thoughts on “How Do You Use A VEVOR Button Machine”