
Articles
How To Use VEVOR Heat Press
Modified: January 6, 2024
Learn how to effectively use the VEVOR Heat Press with our informative articles. Improve your heat pressing skills and achieve professional results.
(Many of the links in this article redirect to a specific reviewed product. Your purchase of these products through affiliate links helps to generate commission for Storables.com, at no extra cost. Learn more)
Introduction
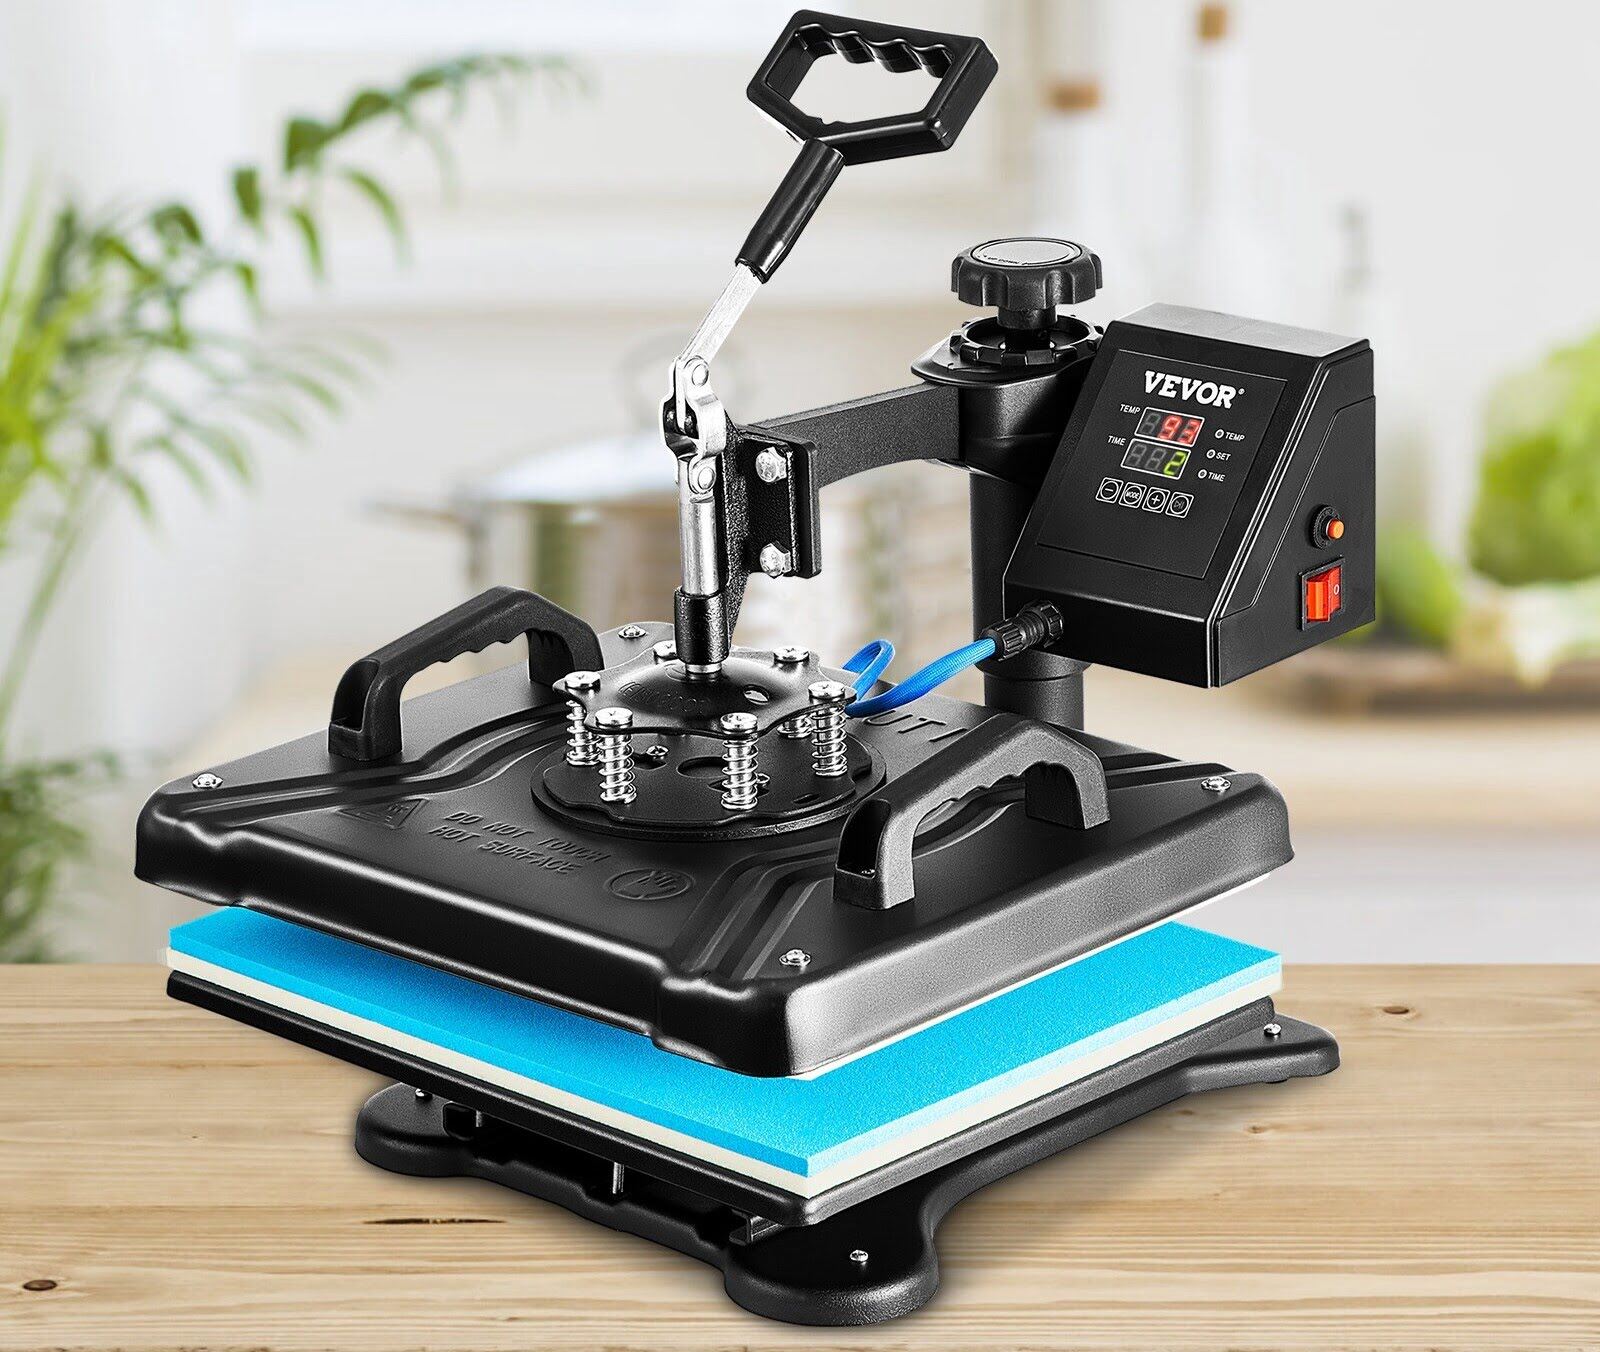
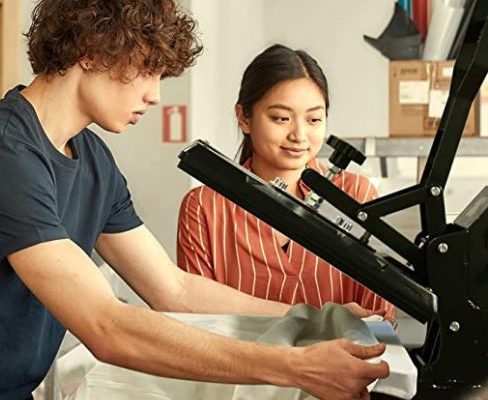
Welcome to this comprehensive guide on how to use the VEVOR Heat Press. If you’re a DIY enthusiast, a small business owner, or simply someone who loves customizing clothing and accessories, a heat press machine can be a game-changer. The VEVOR Heat Press is a reliable and versatile machine that allows you to transfer designs onto various surfaces using heat and pressure.
Whether you’re looking to create personalized t-shirts, bags, hats, or even home decor items, the VEVOR Heat Press can provide you with professional-quality results in the comfort of your own home or small business. In this guide, we’ll walk you through the steps of using the VEVOR Heat Press, from unboxing to troubleshooting common issues.
Before we dive into the specifics, it’s important to note that safety should always be your top priority. Heat presses operate at high temperatures and can cause burns if not used properly. Always follow the manufacturer’s instructions and take the necessary precautions to protect yourself and others around you.
Key Takeaways:
- Safety First
Prioritize safety when using the VEVOR Heat Press by following the manufacturer’s guidelines, wearing protective gear, and setting up the machine in a well-ventilated, clutter-free workspace. Regular maintenance and careful handling ensure a safe and productive heat pressing experience. - Versatile Creativity
The VEVOR Heat Press offers endless creative possibilities, from applying heat transfer vinyl to t-shirts and apparel to pressing designs onto various items like mugs and shoes. Experiment with different materials and techniques, and don’t be afraid to unleash your imagination for stunning, personalized creations.
Read more: How To Use VEVOR 5-In-1 Heat Transfer Press
Safety Precautions
Before you begin using the VEVOR Heat Press, it’s essential to take a moment to familiarize yourself with some important safety precautions. By following these guidelines, you can ensure a safe and enjoyable heat pressing experience:
- Read the user manual thoroughly: Before operating the VEVOR Heat Press, carefully read and understand the user manual provided by the manufacturer. This will help you become familiar with the machine’s features, functions, and safety guidelines.
- Protective gear: Always wear protective gear, such as heat-resistant gloves and heat-resistant aprons, to safeguard yourself from potential burns. It’s also a good idea to wear closed-toe shoes to avoid any accidents.
- Proper workspace setup: Set up your heat press machine in a well-ventilated and spacious area. Ensure that there are no flammable materials nearby, and keep the workspace clear of any clutter to prevent accidents or damage to the machine.
- Power supply: Make sure your heat press machine is plugged into a grounded outlet and that the power cord is in good condition. Avoid using extension cords or power strips as they can cause electrical hazards.
- Temperature control: Be cautious when adjusting the temperature settings on your heat press machine. Avoid touching the heating element directly and use the provided temperature control knob or digital display to adjust the temperature to the desired level.
- Caution when opening and closing: When opening and closing the heat press machine, be mindful of your fingers and hands. Use the handle or designated areas to avoid any accidental injuries.
- Cooling time: After each use, allow the heat press machine to cool down completely before handling or storing it. The heating element and surrounding areas can remain hot for some time even after the machine is turned off.
- Minimize distractions: It’s important to stay focused while operating the heat press machine. Minimize distractions and keep children and pets away from the workspace to avoid accidents.
- Regular maintenance: Proper maintenance of the heat press machine is crucial for its safe and efficient operation. Follow the manufacturer’s instructions for routine cleaning and maintenance, and always unplug the machine when not in use.
By following these safety precautions, you can ensure a safe and productive experience while using the VEVOR Heat Press. Remember, safety always comes first!
Unboxing
Excitement builds as you eagerly await the arrival of your new VEVOR Heat Press. Before you dive into the world of heat pressing and customization, let’s go through the unboxing process so you can get started on the right foot.
- Inspect the package: Upon receiving your VEVOR Heat Press, carefully inspect the package for any signs of damage during transit. If you notice any visible damage, take pictures and contact the seller or shipping carrier immediately.
- Open the box: With caution, open the box and remove the contents. You will find the VEVOR Heat Press machine and accessories securely packed.
- Check the contents: Take a moment to verify that all the necessary components are included. These typically include the heat press machine, user manual, power cord, and any additional accessories that may come with your specific model.
- Remove packaging materials: Gently remove any protective plastic or foam packaging materials from the machine. Be careful not to scratch or damage the surfaces of the heat press.
- Inspect for damage: Before proceeding, inspect the machine for any visible damage or defects. If you notice any issues, contact the seller or manufacturer for assistance.
- Review the user manual: Before powering on your VEVOR Heat Press, thoroughly read the user manual. Familiarize yourself with the machine’s features, functions, and safety guidelines to ensure proper and safe operation.
- Find a suitable location: Choose a well-ventilated and spacious area to set up your heat press machine. Ensure there is a sturdy, heat-resistant surface to place the machine on.
- Powering on: Once you have set up the machine in the desired location, plug in the power cord and switch on the heat press. Ensure that the power supply meets the requirements specified in the user manual.
By following these unboxing steps, you will be well-prepared to start using your VEVOR Heat Press and unleash your creativity on various materials. Now that you have the machine ready, it’s time to move on to the next step of setting it up.
Setting Up the VEVOR Heat Press
Now that you have unboxed your VEVOR Heat Press, it’s time to set it up for use. Follow these steps to ensure a proper setup and get your machine ready to create stunning heat transfer designs:
- Choose a suitable location: Select a well-ventilated area with enough space to accommodate the heat press machine and allow for easy movement. Ensure that the surface you place the machine on is sturdy, heat-resistant, and level.
- Assemble the machine: If any assembly is required, refer to the user manual provided by VEVOR to ensure proper and secure assembly of the heat press. Follow the step-by-step instructions carefully to avoid any issues later on.
- Power on the machine: Before connecting the power cord, double-check that the machine is switched off. Plug the cord into a grounded outlet and switch on the heat press machine. Verify that the power indicator lights up, indicating that the machine is receiving power.
- Temperature and time settings: Most VEVOR Heat Press models feature temperature and time control knobs or digital displays. Adjust these settings according to the material and transfer paper or vinyl you plan to use. Refer to the user manual or recommended settings for different materials.
- Preheating the machine: Preheat the heat press to the desired temperature by allowing it to run for a few minutes. This ensures that the machine reaches the optimal temperature for heat transfer applications and helps in maintaining consistent results.
- Pressure adjustment: VEVOR Heat Press machines usually come with an adjustable pressure knob or lever. Set the pressure according to the material you are working with. Refer to the user manual for recommended pressure settings.
- Test print: It is always a good idea to conduct a test print before starting any actual projects. Use a scrap piece of fabric or transfer material to check the temperature, time, and pressure settings. This will help you ensure that the heat press is working correctly and producing the desired results.
By following these steps, you can set up your VEVOR Heat Press machine correctly. Having a properly calibrated and adjusted machine is essential for achieving professional-quality heat transfer designs. Once the machine is set up, you’re ready to move on to the next step: adjusting the temperature and time settings.
Adjusting Temperature and Time
One of the key factors in achieving successful heat transfer designs is adjusting the temperature and time settings on your VEVOR Heat Press. These settings vary depending on the materials you are working with, so it’s crucial to understand how to make the necessary adjustments. Here’s a step-by-step guide on how to do it:
- Refer to the user manual: First and foremost, consult the user manual provided by VEVOR for recommended temperature and time settings. The manual will provide specific guidelines for different types of materials, such as cotton, polyester, or blends.
- Select the appropriate temperature: Use the temperature control knob or digital display on your VEVOR Heat Press to adjust the temperature. Start with the recommended temperature for the material you are working with and make adjustments as needed. It’s important to find the right balance to ensure proper adhesion without damaging the material.
- Determine the ideal time: Adjusting the time setting on your VEVOR Heat Press is equally important. The recommended time will depend on the type of material and heat transfer paper or vinyl being used. Start with the recommended time and refine it based on your testing and experience.
- Preheating the machine: Allow the heat press to preheat to the desired temperature before placing your material. This ensures that the machine is at the optimal temperature for heat transfers and helps in achieving consistent results.
- Test prints: Conduct test prints on scrap materials before working on your actual projects. Use different combinations of temperature and time settings to find the perfect balance for your specific materials. Take note of the settings that produce the best results for future reference.
- Make adjustments as needed: During your heat transfer process, you may find that adjustments need to be made. If your design is not adhering properly or if there are heat marks or discoloration, consider tweaking the temperature and time settings accordingly. Be patient and make small, incremental changes.
- Keep a record: It’s a good practice to keep a record of the temperature and time settings that work best for each type of material. This will save you time and effort in the future, as you can refer to your records for consistent and successful heat transfer designs.
Remember, each material and transfer paper or vinyl may require different temperature and time settings. It’s important to experiment and find the right combination that works for you. With practice and proper adjustment of the temperature and time on your VEVOR Heat Press, you’ll be able to create high-quality, durable heat transfer designs on a variety of materials.
Read more: How To Set Temp On VEVOR Heat Press
Preparing Your Design
Before you can start applying heat transfer designs using your VEVOR Heat Press, it’s important to properly prepare your design for transfer. This involves a few key steps to ensure that your design is ready for a successful application. Here’s what you need to do:
- Design creation: Use graphic design software or online design tools to create or customize your design. You can create your own artwork, logo, or use pre-existing templates. Make sure the design is sized appropriately for the item you’ll be pressing.
- Mirror your design: When using heat transfer vinyl (HTV), it’s essential to mirror or flip your design horizontally before cutting or printing. This ensures that the design appears correctly when transferred onto the fabric or substrate.
- Cutting or printing: Depending on the type of heat transfer material you’re using (such as HTV or heat transfer paper), cut or print your design accordingly. Use a cutting machine or a standard printer, ensuring that the design is accurately reproduced.
- Weeding (for HTV): If you’re working with heat transfer vinyl, the next step is weeding. Weeding involves removing the excess vinyl from around and within your design using a weeding tool. This process leaves only the desired design on the carrier sheet, ready for transfer.
- Prepare the material: Prepare the material you’ll be applying the heat transfer design to. Make sure it is clean, dry, and free from any wrinkles or debris. Pre-washing and ironing the material can also help in achieving better adhesion and longevity of the design.
- Placement: Position the design on the fabric or substrate to determine the desired placement. Use rulers, measuring tapes, or alignment guides to ensure accurate placement. You can mark the placement with heat-resistant tape or chalk for reference.
- Securing the design: Depending on your heat transfer material, you may need to use an adhesive or heat-resistant tape to secure the design in place. This prevents any shifting or movement during the transfer process.
- Prepare the transfer sheet: If you’re using heat transfer paper, cut out the design, leaving a small border around it. Remove any protective backing or cover from the transfer sheet, exposing the design for transfer.
By following these steps to prepare your design, you’ll ensure a smooth transfer process and increase the chances of achieving professional-looking results. Once your design is prepared, it’s time to move on to the exciting part – applying the design using your VEVOR Heat Press!
When using the VEVOR heat press, always make sure to adjust the pressure according to the thickness of the material being pressed. This will ensure even and consistent results.
Applying Heat Transfer Vinyl (HTV)
Heat Transfer Vinyl (HTV) is a popular material for creating vibrant and durable designs on fabric using a heat press. With your design prepared and HTV cut and weeded, it’s time to apply it to your desired fabric or garment using your VEVOR Heat Press. Follow these steps for a successful HTV application:
- Preheat the heat press: Turn on your VEVOR Heat Press and preheat it to the recommended temperature for the HTV you’re using. Refer to the HTV manufacturer’s instructions for the optimal temperature setting.
- Place the fabric: Lay the garment or fabric on the heat press machine, ensuring it’s smooth and free from any wrinkles or folds. Pre-press the fabric for a few seconds to remove any moisture and wrinkles.
- Align the HTV: Position your weeded HTV design onto the fabric, ensuring it is centered and aligned as desired. Use rulers, alignment guides, or markings you made earlier to assist in accurate placement.
- Apply heat and pressure: Once your design is in place, close the heat press gently, applying even pressure across the entire design. The recommended pressure depends on the material you’re using, so refer to the HTV manufacturer’s guidelines. Start with a lower pressure setting and gradually increase if needed.
- Set the time: Set the timer on your VEVOR Heat Press according to the HTV manufacturer’s instructions. The recommended time will vary depending on the HTV type and thickness. Begin with the recommended time and adjust as necessary based on your test prints.
- Press the design: When the time is up, remove the heat press’s upper platen and carefully peel off the carrier sheet from the HTV while it is still warm. If the design is not fully adhered, place the carrier sheet back on the HTV and press for a few more seconds.
- Cooling process: Allow the fabric to cool completely before handling it. This ensures that the HTV adhesive sets properly, providing a long-lasting bond. Avoid stretching or pulling on the design during this cooling period.
- Peel the carrier sheet: Once the fabric has cooled down, gently peel off the carrier sheet. Start from one corner and pull it back at a 180-degree angle. If any part of the design lifts, place the carrier sheet back and press again for a few seconds.
- Final press (optional): To ensure maximum adhesion and durability, consider placing a Teflon sheet or siliconized release paper over the design and pressing it again for a few seconds. This step is particularly helpful for HTV materials that require a hot or cold peel.
By following these steps and using your VEVOR Heat Press correctly, you’ll be able to achieve professional-quality HTV designs on your fabric or garment. Remember to always reference the HTV manufacturer’s instructions for the best results. Now that you’ve mastered HTV application, you can move on to pressing t-shirts and apparel, or explore other heat transfer options with your VEVOR Heat Press.
Pressing T-Shirts and Apparel
Pressing t-shirts and apparel with your VEVOR Heat Press is a fantastic way to personalize and create custom designs on clothing. Whether you’re looking to start a small business or simply want to add your personal touch to your wardrobe, here’s a step-by-step guide on how to press t-shirts and apparel using your VEVOR Heat Press:
- Preheat the heat press: Turn on your VEVOR Heat Press and preheat it to the recommended temperature for the type of transfer material you’re using.
- Prepare the garment: Lay the t-shirt or apparel flat on the heat press, ensuring it’s smooth and free from any wrinkles or folds. Pre-press the garment for a few seconds to remove any moisture and wrinkles.
- Position your design: Place your heat transfer design or HTV onto the desired location of the garment. Use rulers, alignment guides, or markings to ensure accurate placement. It’s a good idea to perform a test placement on a similar fabric or garment before pressing.
- Apply heat and pressure: Close the heat press gently, ensuring even pressure across the entire design area. The recommended pressure depends on the fabric and transfer material being used. Start with a lower pressure setting and adjust if needed.
- Set the time: Set the timer on your VEVOR Heat Press as per the guidelines provided by the transfer material manufacturer. The recommended time will vary depending on the type of material being used.
- Press the garment: Once the time is up, open the heat press carefully and remove the upper platen. Peel off the carrier sheet or backing paper from your transfer material while it’s still warm. If the design is not fully adhered, place the carrier sheet back on and press for a few more seconds.
- Cooling process: Allow the garment to cool completely before handling it. This ensures that the transfer material sets properly and provides a long-lasting bond. Avoid stretching or pulling on the design during this cooling period.
- Final press (optional): For added durability, you can place a Teflon sheet or siliconized release paper over the design and press it again for a few seconds. This will help to ensure a secure bond and prevent any peeling over time.
- Care instructions: It’s important to follow the care instructions provided by the transfer material manufacturer. Typically, you’ll want to avoid using harsh detergents, bleach, or any abrasive cleaning methods that could compromise the design.
By following these steps, you’ll be able to press t-shirts and apparel effectively with your VEVOR Heat Press. Remember to always refer to the guidelines provided by the transfer material manufacturer for specific instructions. With practice, you’ll be able to create stunning, personalized garments that reflect your unique style or wow your customers.
Pressing Other Items
While t-shirts and apparel are common items to press with your VEVOR Heat Press, the versatility of this machine extends beyond clothing. With the right techniques and adjustments, you can apply heat transfer designs to various other items. Here’s a guide on how to press other items using your VEVOR Heat Press:
- Select the appropriate transfer material: Depending on the item you’re working with, choose the appropriate transfer material. For rigid or smooth surfaces, such as ceramic mugs, glassware, or metal objects, consider using heat transfer paper or sublimation transfers. If you’re pressing onto curved or irregular surfaces, like caps or shoes, heat transfer vinyl (HTV) may be a better option.
- Preheat the heat press: Preheat your VEVOR Heat Press to the recommended temperature for the specific transfer material you’re using. Refer to the manufacturer’s instructions to ensure the correct temperature setting.
- Prepare the item: Clean the item thoroughly to remove any dirt, dust, or oils that could affect the transfer. For some materials, like ceramics or glass, you may need to pre-treat the surface with a specific primer or coating for better adhesion.
- Position your design: With rigid objects like mugs or plates, use heat-resistant adhesive tape or thermal tape to secure the transfer in place. For curved surfaces like caps or shoes, use a heat-resistant adhesive spray or heat-resistant tape to hold the HTV design in position.
- Apply heat and pressure: Close the heat press carefully, ensuring even pressure across the transfer area. The pressure required may vary depending on the item and transfer material. Refer to the transfer material manufacturer’s guidelines for recommended pressure settings.
- Set the time: Set the timer on your VEVOR Heat Press according to the instructions provided by the transfer material manufacturer. The recommended time may vary depending on the transfer material and the specific item being pressed.
- Press the item: Once the time is up, open the heat press carefully and remove the upper platen. Peel off the carrier sheet or backing paper from your transfer material while it’s still warm. If necessary, place the carrier sheet back on and press for a few more seconds to ensure proper adhesion.
- Cooling process: Allow the item to cool completely before handling it. This allows the transfer material to set properly and ensures a long-lasting bond. Avoid any unnecessary movements or handling during the cooling process.
- Finishing touches (optional): Depending on the item, you may need to perform additional steps after pressing. For example, when pressing ceramic mugs or glassware, you might want to bake them in an oven to further set the design and ensure dishwasher safety. Always refer to the transfer material manufacturer’s instructions for any additional finishing steps.
- Care instructions: To preserve the quality and longevity of the transfer, follow the care instructions provided by the transfer material manufacturer. This may include recommendations on washing, drying, or cleaning the item.
With a bit of experimentation and careful attention to detail, you can use your VEVOR Heat Press to apply beautiful and customized designs to a variety of items. Just remember to adjust the temperature, time, and pressure settings according to the specific material and transfer method you’re using. Always refer to the manufacturer’s instructions to ensure the best results and a successful heat transfer.
Troubleshooting Common Issues
While using your VEVOR Heat Press, you may encounter some common issues that can affect the quality of your transfers. Don’t worry, though, as most of these issues can be easily resolved. Here are some troubleshooting tips for common problems:
- Poor adhesion: If your design is not adhering properly to the item, check the following:
- Ensure that the heat press is reaching the correct temperature. Use a thermometer to verify the temperature accuracy.
- Adjust the pressure setting. Increase the pressure gradually if necessary to improve adhesion.
- Make sure your item is clean and free from any oils, dirt, or lint that might interfere with adhesion.
- Verify that you are using the appropriate heat transfer material and compatibility for the specific item you are pressing.
- Burn marks or scorching: If you notice burn marks or scorching on your transfer or item, try the following:
- Adjust the temperature and time settings to a lower setting, as excessive heat can cause scorching.
- Ensure that the heat press is heating evenly across the entire platen by performing regular temperature checks.
- Use a Teflon sheet or siliconized release paper to create a barrier between the heat press and the item to prevent scorching.
- Uneven pressure or transfer: To resolve issues related to uneven pressure or transfer, consider the following:
- Check the pressure adjustment knob or lever on your heat press and ensure it is set correctly.
- Inspect the upper platen for any alignment issues or warping that can cause uneven pressure. Contact the manufacturer if necessary.
- Ensure that the item and transfer material are positioned correctly and evenly on the heat press to achieve consistent pressure across the design area.
- Peeling or lifting: If your transfer is peeling or lifting after application, try these steps:
- Increase the pressure slightly to improve adhesion and ensure better bonding between the transfer material and the item. Be cautious not to apply too much pressure, as it may damage the item.
- Extend the pressing time slightly to provide more heat and pressure for the transfer material to fully bond with the item.
- Check if the item was washed or treated with any harsh chemicals before or after the transfer. Avoid using aggressive detergents or bleach, as they can affect the longevity of the transfer.
Remember that troubleshooting may require some adjustments and experimentation. It’s essential to keep track of the changes you make so you can replicate successful results in the future. If you encounter persisting issues or face any technical difficulties, reach out to the VEVOR customer support team for further assistance. With practice and troubleshooting, you’ll become well-versed in using your VEVOR Heat Press to achieve excellent heat transfer results.
Maintenance and Care
Proper maintenance and care of your VEVOR Heat Press are essential for its longevity and optimal performance. By following a few maintenance guidelines, you can ensure that your heat press machine remains in excellent condition. Here are some tips for maintaining and caring for your VEVOR Heat Press:
- Regular cleaning: After each use, make sure to clean the heat press thoroughly. Wipe down the surfaces with a soft, lint-free cloth to remove any residue or debris. Pay attention to the platen and ensure it remains clean and free from any adhesive buildup.
- Use caution when cleaning: Avoid using abrasive or harsh cleaning agents, as they can damage the heat press’s surface. Instead, opt for mild cleaning solutions or specialized heat press cleaners recommended by the manufacturer.
- Inspect electrical connections: Periodically check the power cord and plug for any signs of damage or fraying. If you notice any issues, have them addressed by a qualified professional before using the heat press again.
- Check temperature accuracy: It’s a good idea to regularly test the heat press’s temperature accuracy using an infrared thermometer or heat press temperature testing strips. This will help ensure that the machine is heating evenly and reaching the desired temperature.
- Calibrate the pressure: Over time, the pressure adjustment on your heat press may require calibration. Consider using a pressure testing tool or consulting the manufacturer’s guidelines to confirm that the pressure is accurate and even across the platen.
- Store in a safe and dry place: When not in use, store your VEVOR Heat Press in a clean, dry environment. Protect it from excessive dust, moisture, and extreme temperatures. If possible, cover the machine or use a dust cover to prevent any dust or debris from settling on the surfaces.
- Follow manufacturer guidelines: Always refer to the user manual and guidelines provided by VEVOR for specific maintenance instructions. They may include recommendations for lubrication, replacement of parts, or any other necessary maintenance tasks.
By following these maintenance tips, you can extend the lifespan of your VEVOR Heat Press and ensure that it continues to provide consistent results for years to come. Regular maintenance not only helps in maintaining performance but also contributes to the safety and reliability of the machine. Treat your heat press with care, and it will serve you well in all your heat transfer endeavors.
Conclusion
Congratulations on completing this comprehensive guide on how to use the VEVOR Heat Press! You’ve learned how to safely operate the heat press, from unboxing to troubleshooting common issues. With this newfound knowledge, you’ll be able to create personalized and professional-quality heat transfer designs on various items.
Remember to prioritize safety throughout the entire process, following the recommended precautions and using protective gear. Familiarize yourself with the user manual provided by VEVOR to understand the machine’s features and functions fully. Adjust the temperature and time settings according to the transfer materials and items you’re working with, and perform test prints to fine-tune the process.
Whether you’re pressing t-shirts and apparel, or exploring other items like mugs, caps, or shoes, the VEVOR Heat Press offers versatility and endless creative possibilities. Take care of your heat press by regularly cleaning it and following proper maintenance guidelines. Store it in a safe and dry place when not in use to ensure its longevity.
Remember, practice makes perfect. Experiment with different materials, designs, and techniques to refine your heat transfer skills. Don’t be afraid to be creative and explore new ideas. With time and experience, you’ll become more confident in using your VEVOR Heat Press to produce stunning and customized creations.
Thank you for joining us on this heat pressing journey. We hope this guide has provided you with valuable insights, enabling you to unleash your creativity and enjoy the art of heat transfer. So, get ready to start pressing and bring your imagination to life with the help of your VEVOR Heat Press!
Frequently Asked Questions about How To Use VEVOR Heat Press
Was this page helpful?
At Storables.com, we guarantee accurate and reliable information. Our content, validated by Expert Board Contributors, is crafted following stringent Editorial Policies. We're committed to providing you with well-researched, expert-backed insights for all your informational needs.


0 thoughts on “How To Use VEVOR Heat Press”