Articles
How Do You Use A Protractor
Modified: May 6, 2024
Learn how to use a protractor to measure angles accurately in this informative article. Discover tips and techniques for achieving precise measurements.
(Many of the links in this article redirect to a specific reviewed product. Your purchase of these products through affiliate links helps to generate commission for Storables.com, at no extra cost. Learn more)
Introduction
Welcome to the world of geometry! Whether you are a student learning about angles or a professional working with measurements, understanding how to use a protractor is an essential skill. A protractor is a tool used to measure and draw angles accurately. It is widely used in various fields such as engineering, architecture, and mathematics.
Using a protractor may seem daunting at first, but with a little practice and guidance, you will become proficient in using this versatile instrument. In this article, we will discuss the definition of a protractor and provide you with a step-by-step guide on how to use it effectively.
So, grab your protractor and let’s dive into the fascinating world of angles!
Key Takeaways:
- Mastering the use of a protractor is essential for accurate angle measurements in various fields. Positioning, aligning, and reading angles with precision are key skills to acquire for geometry enthusiasts and professionals alike.
- Avoid common mistakes such as improper alignment, tilting the protractor, and inaccurate readings to ensure reliable angle measurements. Practice and patience are key to mastering the art of using a protractor effectively.
Read more: How To Use A Military Protractor
Definition of a Protractor
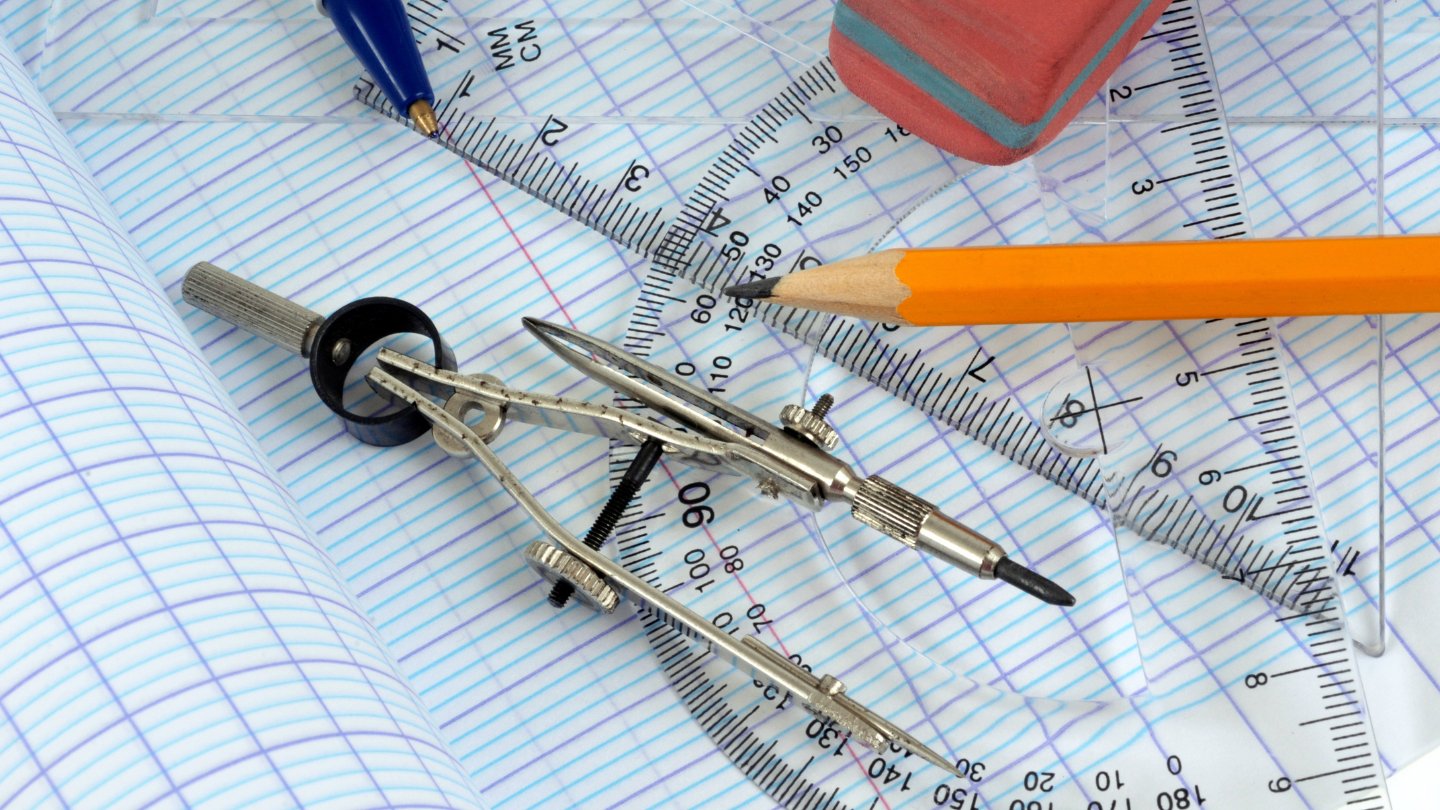
A protractor is a measuring tool that is primarily used to measure and draw angles. It is typically made of transparent plastic or metal and consists of a semicircular shape with markings ranging from 0 to 180 degrees. Some protractors also include an outer circle divided into smaller increments, allowing for precise angle measurements.
The inner edge of the protractor is called the baseline, which is used to align the protractor with the lines or objects that you want to measure. The center of the protractor is marked with a small aperture or hole, which is useful for accurately placing the protractor over a specific point or vertex.
Protractors come in various sizes and designs. In addition to the traditional semicircular protractor, there are also full-circle protractors and digital protractors that provide additional features and convenience for measuring angles.
Protractors are widely used in mathematics classrooms, as they help students understand concepts related to angles, such as acute, obtuse, and right angles. They are also invaluable tools for professionals in fields like architecture, engineering, and construction, where precise angle measurements are crucial for designing and constructing structures.
Now that we have a clear understanding of what a protractor is, let’s dive into the step-by-step process of using one to measure angles.
Step-by-step Guide on Using a Protractor
Using a protractor to measure angles may seem intimidating at first, but with a systematic approach, it becomes much simpler. Here is a step-by-step guide to help you use a protractor effectively:
- Place the protractor on a flat surface: Before you start measuring an angle, make sure your protractor is placed on a flat and stable surface. This will ensure accurate measurements.
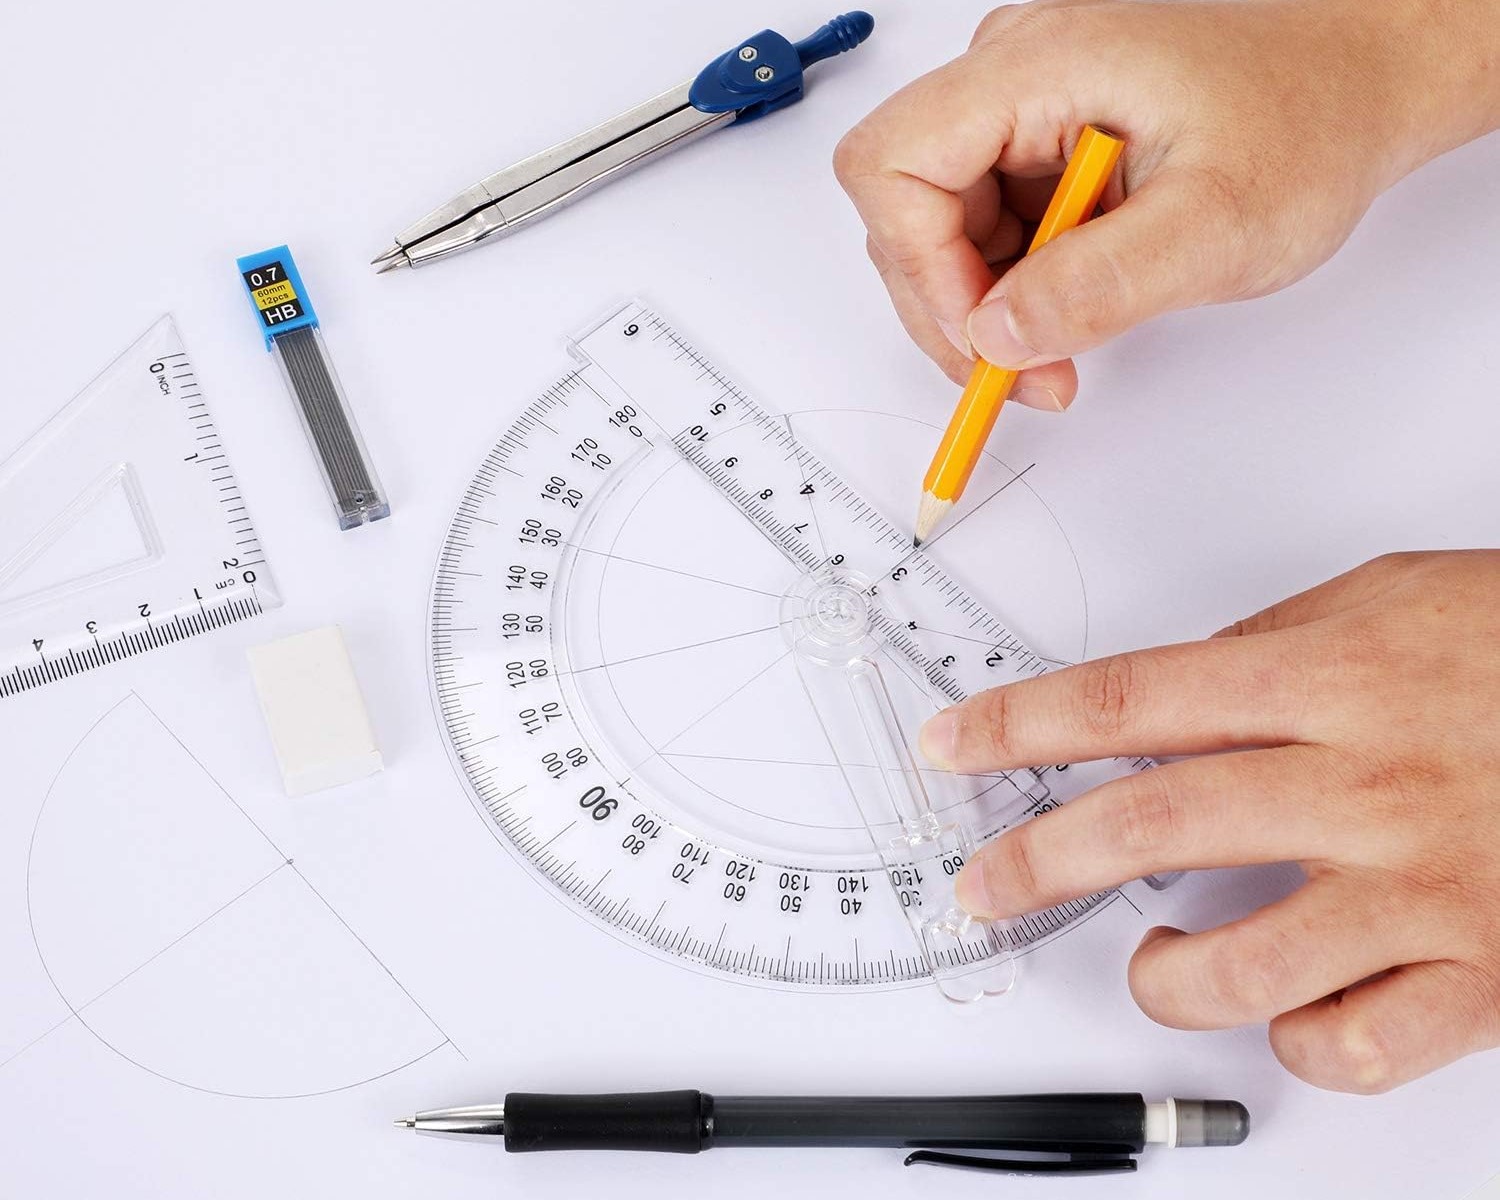
- Position the protractor: Align the baseline of the protractor with one of the lines or edges of the angle you want to measure. The baseline should be positioned in such a way that it intersects the vertex of the angle.
- Align the baseline: Make sure the baseline of the protractor is aligned perfectly with the line or edge of the angle, ensuring that it is parallel to the line.
- Read the angles: Look at the markings on the protractor and find the degree measurement that corresponds to one of the arms of the angle. This should be located on the inner scale of the protractor.
- Mark the angle measurement: Once you have located the degree measurement, use a pencil or pen to mark the corresponding value on the outer edge of the protractor. This will indicate the angle measurement.
- Measure angles greater than 180 degrees: If the angle you are measuring extends beyond 180 degrees, follow the previous steps to measure the angle up to 180 degrees. Then, flip the protractor and align the baseline with the other arm of the angle. Continue measuring from the previous marking to determine the complete angle measurement.
Remember to be patient and take your time while using a protractor. It may require some practice to align the protractor accurately and read the measurements correctly, but with persistence, you will become more proficient.
Now that you know the step-by-step process, let’s explore some additional tips to ensure accurate measurements.
Positioning the Protractor
Proper positioning of the protractor is crucial to obtain accurate angle measurements. Follow these steps to position the protractor correctly:
- Place the protractor on a flat surface: Ensure that you are working on a stable and even surface to prevent any tilting or shifting of the protractor during measurement.
- Identify the vertex of the angle: The vertex is the common endpoint of the arms of an angle. Locate the vertex of the angle you want to measure.
- Align the baseline with one arm: Position the protractor so that the baseline aligns with one of the lines or edges of the angle. Make sure the baseline passes through the vertex of the angle.
- Keep the protractor flat: While holding the baseline in position, ensure that the protractor remains flat on the surface. If the protractor is tilted or raised at an angle, it can result in inaccurate measurements.
- Confirm alignment with the other arm: Check that the other arm of the angle aligns with the appropriate degrees on the protractor, allowing for easy reading of the measurement.
- Secure the protractor if needed: If you are working on a smooth or slippery surface, consider using tape or a paperweight to hold the protractor in place. This will prevent it from moving or shifting during measurement.
Remember, maintaining proper alignment and keeping the protractor flat are essential for obtaining accurate measurements. Incorrect positioning can lead to skewed results and inaccurate angle calculations.
Now that you have positioned the protractor correctly, let’s move on to the next step: aligning the baseline.
Aligning the Baseline
Aligning the baseline of the protractor is a crucial step in accurately measuring angles. Follow these steps to align the baseline properly:
- Position the protractor: Place the protractor on a flat surface or hold it securely with one hand, ensuring that it remains stable throughout the process.
- Identify the vertex: Locate the vertex, which is the common point where the two arms of the angle meet. This is where the baseline of the protractor should intersect.
- Align the baseline with one arm: Make sure the baseline of the protractor lies along one of the lines or edges of the angle. The baseline should pass through the vertex, forming a straight line.
- Ensure parallel alignment: Check that the baseline of the protractor is parallel to the line or edge it is aligned with. This alignment is crucial for accurate angle measurement.
- Verify accuracy: Double-check the alignment of the protractor by ensuring that the other arm of the angle lies within the inner scale of the protractor, allowing for easy reading of the angle measurement.
- Hold the protractor steady: While aligning the baseline, make sure to hold the protractor steady and firm. This prevents it from shifting or moving during measurement.
Remember to take your time and make precise adjustments while aligning the baseline. Any misalignment can lead to inaccurate measurements and affect the overall accuracy of your angles.
Now that you have aligned the baseline of the protractor correctly, let’s move on to the next step: reading the angles.
When using a protractor, place the center hole over the vertex of the angle. Then, align one side of the angle with the zero line on the protractor. Finally, read the measurement where the other side of the angle crosses the protractor.
Read more: How To Use Bevel Protractor
Reading the Angles
Once you have positioned and aligned the baseline of the protractor accurately, it’s time to read the angles. Here’s how you can do it:
- Locate the degree markings: Look at the inner scale of the protractor, where you will find degree markings ranging from 0 to 180 degrees. These markings indicate the measurement of the angle.
- Identify the degree measurement: Identify the arm of the angle that intersects with one of the degree markings on the protractor. This arm will give you the reference point for reading the angle.
- Read the angle measurement: Follow the line made by the arm of the angle until it intersects with a degree marking on the protractor. The value where the line intersects the degree marking is the measurement of the angle.
- Note the angle measurement: Once you have determined the degree measurement, mark it on the outer edge of the protractor using a pencil or pen. This makes it easier to refer to the angle later.
- Check for accuracy: Double-check your measurement by ensuring that both arms of the angle align with the protractor accurately. Any slight misalignment can affect the accuracy of the angle measurement.
- Record the angle measurement: If you are using a protractor to measure angles for a project or assignment, be sure to record the angle measurement in the appropriate units (degrees, radians, etc.). This will help you keep track of your measurements.
Remember to read the angle measurement carefully and take note of any additional features on the protractor, such as subdivisions or supplementary angle indicators, if present. These features can provide additional information and make your measurements more precise.
Now that you can accurately read angle measurements, let’s move on to the next step: measuring angles greater than 180 degrees.
Measuring Angles Greater than 180 Degrees
While most angles you encounter will fall within the range of 0 to 180 degrees, there may be instances where you need to measure an angle that exceeds 180 degrees. Here’s how to do it:
- Measure up to 180 degrees: Begin by following the steps we discussed earlier to measure the angle up to 180 degrees. Align the protractor’s baseline with one arm of the angle, locate the degree measurement, and mark it on the protractor’s outer edge.
- Flip the protractor: After measuring up to 180 degrees, flip the protractor over so that the baseline is aligned with the other arm of the angle. The vertex should still be at the center of the protractor.
- Continue measuring: From the previous mark you made, align the protractor’s baseline with the second arm of the angle, which is now on the opposite side. Follow the same process as before to read the degree measurement where the arm intersects the degree markings on the protractor.
- Add the measurements: Once you have determined the second degree measurement, add it to the measurement you obtained within the 0 to 180-degree range. The sum of these measurements will give you the final angle measurement.
- Verify accuracy: Ensure that both arms of the angle align accurately with the protractor during measurement. Any misalignment can affect the accuracy of the final angle measurement.
Measuring angles greater than 180 degrees requires flipping the protractor and continuing the measurement from the initial mark. By following this process, you can effectively measure and calculate angles that extend beyond the usual range.
Now that you know how to measure such angles, let’s discuss some common mistakes to avoid during the process.
Common Mistakes to Avoid
When using a protractor to measure angles, there are a few common mistakes that you should be aware of and strive to avoid:
- Improper alignment: One of the most common mistakes is not aligning the baseline of the protractor accurately with the lines or edges of the angle. This can lead to skewed angle measurements.
- Tilting the protractor: Keeping the protractor flat on the surface is crucial for accurate measurements. Tilting or lifting it at an angle can result in distorted angle readings.
- Inaccurate reading: Misreading the degree markings on the protractor can lead to incorrect angle measurements. Pay close attention to the markings and double-check your reading.
- Ignoring the vertex: The vertex, where the two arms of the angle intersect, should be exactly at the center of the protractor. Failing to position it accurately can affect the measurement.
- Not flipping the protractor: If you need to measure an angle greater than 180 degrees, make sure to flip the protractor and continue the measurement. Neglecting this step can result in incorrect angle calculations.
- Using a damaged or inaccurate protractor: It’s essential to use a protractor that is in good condition and properly calibrated. A damaged or inaccurate protractor can lead to erroneous angle measurements.
- Rounding off measurements too soon: Avoid rounding off the angle measurement before obtaining the final result. Keeping the measurements precise ensures accuracy in calculations and analysis.
By being aware of these common mistakes and actively working to avoid them, you can ensure more accurate angle measurements and reliable results in your work.
Now that we have covered the common mistakes, let’s wrap up our discussion.
Conclusion
Using a protractor to measure angles is a fundamental skill in geometry and various fields that rely on accurate angle measurements. By following the step-by-step guide outlined in this article, you can confidently and effectively use a protractor to measure angles with precision.
We started by understanding the definition of a protractor – a measuring tool designed for angles. We then delved into the step-by-step process, beginning with positioning the protractor, aligning the baseline, and reading the angles. We also discussed how to measure angles greater than 180 degrees by flipping the protractor and continuing the measurement. Throughout the guide, we highlighted common mistakes to avoid to ensure accurate measurements.
Remember, practice makes perfect when it comes to using a protractor. The more you familiarize yourself with the tool and the process, the more confident you will become in measuring angles accurately. So, don’t hesitate to grab a protractor and start practicing!
Whether you are a student, a professional, or an enthusiast of angles and geometry, mastering the use of a protractor opens up a world of possibilities. From solving mathematical problems to designing architectural structures, the ability to measure angles accurately is essential in various aspects of life.
Now that you have acquired the knowledge and skills to use a protractor effectively, go forth and explore the fascinating realm of angles and geometry. Remember, the angle measurement is just the beginning – there is a vast world of angles waiting to be discovered and applied in countless disciplines.
So, embrace the power of the protractor and let your understanding of angles soar to new heights!
Now that you've got the basics of using a protractor down, why not level up your skills with our next guide? Our detailed walkthrough on using a protractor angle finder will help you tackle more complex projects with ease. You'll learn not only to measure straightforward angles but also how to handle those tricky, unconventional ones with confidence. Perfect for anyone looking to refine their measuring prowess, this guide is a must-read for both novices and experienced users alike.
Frequently Asked Questions about How Do You Use A Protractor
Was this page helpful?
At Storables.com, we guarantee accurate and reliable information. Our content, validated by Expert Board Contributors, is crafted following stringent Editorial Policies. We're committed to providing you with well-researched, expert-backed insights for all your informational needs.


0 thoughts on “How Do You Use A Protractor”