Home>Articles>How To Apply Felt Or Building Paper On New Construction
Articles
How To Apply Felt Or Building Paper On New Construction
Modified: December 7, 2023
Learn how to apply felt or building paper on new construction projects with these informative articles.
(Many of the links in this article redirect to a specific reviewed product. Your purchase of these products through affiliate links helps to generate commission for Storables.com, at no extra cost. Learn more)
Introduction
Welcome to the world of new construction! The process of building a new structure comes with a myriad of tasks and considerations. One such crucial task is installing felt or building paper. This step is essential for protecting the building against moisture and ensuring its longevity.
In this article, we will guide you through the process of applying felt or building paper on new construction. From surface preparation to material installation, we will cover each step in detail to help you achieve a successful outcome.
Whether you are a seasoned contractor or a DIY enthusiast, this article is designed to provide you with the knowledge and skills required for a smooth and efficient installation process. So, let’s jump right in!
Key Takeaways:
- Proper surface preparation, precise measurement, and careful installation are crucial for effectively applying felt or building paper on new construction. Attention to detail ensures long-term protection against moisture.
- Thorough inspection and proper securing of the material are essential for a successful installation. This final step ensures the integrity and effectiveness of the felt or building paper in safeguarding the new construction.
Step 1: Prepare the Surface
Before installing felt or building paper on new construction, it’s crucial to properly prepare the surface to ensure a secure and effective installation. Here are the steps to follow:
- Clean the Surface: Start by thoroughly cleaning the surface where the felt or building paper will be applied. Remove any dirt, debris, or loose materials using a stiff brush or broom. This step is important to create a clean and smooth surface for the material to adhere to.
- Inspect for Damage: Carefully inspect the surface for any signs of damage, such as cracks, holes, or rotten wood. If any damage is identified, it should be repaired before proceeding with the installation. Fill in cracks and holes with an appropriate filler and replace any damaged wood.
- Apply Flashing: Next, install flashing around windows, doors, and other openings. Flashing helps to redirect water away from these vulnerable areas, preventing moisture from seeping in behind the felt or building paper. Follow manufacturer instructions for proper installation.
- Install Drip Edge: If applicable, install drip edge along the eaves and rakes of the roof. Drip edge helps to channel water away from the underlying materials, protecting the structure from water damage.
- Check for Levelness: Ensure that the surface is level before proceeding. Use a level to check for any uneven areas. If necessary, make adjustments to ensure a flat and even surface.
- Prime the Surface: If recommended by the manufacturer, apply a primer to the surface. Priming helps to improve adhesion and promotes a longer-lasting installation.
By taking the time to properly prepare the surface, you are setting the foundation for a successful installation of felt or building paper. This step is crucial for ensuring the effectiveness and durability of the material in protecting your new construction from moisture damage. Once the surface is prepared, you are ready to move on to the next step: measuring and cutting the felt or building paper.
Step 2: Measure and Cut the Felt or Building Paper
Once the surface is prepared, the next step in applying felt or building paper on new construction is to measure and cut the material to the appropriate size. Follow these steps to ensure a precise and seamless installation:
- Measure the Surface: Use a tape measure to determine the length and width of the area where the felt or building paper will be installed. Measure each section separately, accounting for any corners or edges.
- Add Overlap: To ensure adequate coverage and protection, add an overlap of 3-6 inches to each measurement. This overlap will help to create a waterproof barrier between the sheets of material.
- Cut the Material: Using a utility knife or a pair of scissors, carefully cut the felt or building paper according to the measured dimensions. Take your time to ensure straight and clean cuts.
- Label the Pieces: To avoid confusion during installation, it is helpful to label each piece of cut material with its corresponding location or section. This will make it easier to identify where each piece should be placed.
When measuring and cutting the felt or building paper, accuracy is key. Taking precise measurements and cutting the material to the correct size not only ensures a professional-looking installation but also maximizes its effectiveness in protecting your new construction.
Now that you have your pieces cut and labeled, it’s time to move on to the next step: installing the first row of felt or building paper.
Step 3: Install the First Row
With the surface prepared and the material cut to size, it’s time to start the installation process by applying the first row of felt or building paper. Follow these steps to ensure a secure and properly aligned installation:
- Start at the Bottom: Begin by positioning the first piece of felt or building paper at the bottom of the wall or surface. Align it carefully, making sure it is straight and level.
- Secure with Staples or Nails: Attach the felt or building paper to the surface using staples or nails. Place the fasteners along the top edge of the material, spacing them approximately every 6 to 8 inches. Avoid placing fasteners too close to the edges, as this can cause tearing.
- Overlap the Next Piece: For the second piece of material, apply it directly above the first row, overlapping it by the recommended amount. The overlap helps create a continuous waterproof barrier.
- Secure the Second Row: Fasten the second piece of material to the surface, following the same method as the first row. Ensure that it is aligned with the first row and securely attached.
- Continue the Installation: Repeat the process of overlapping and securing the remaining rows of felt or building paper until you reach the top of the surface. Take care to maintain consistent alignment and secure attachment throughout.
During the installation of the first row, pay attention to the alignment and levelness of the material. A straight and properly aligned installation will help ensure an effective and visually appealing result.
With the first row completed, you’re ready to move on to the next step: overlapping and nailing the remaining rows of felt or building paper.
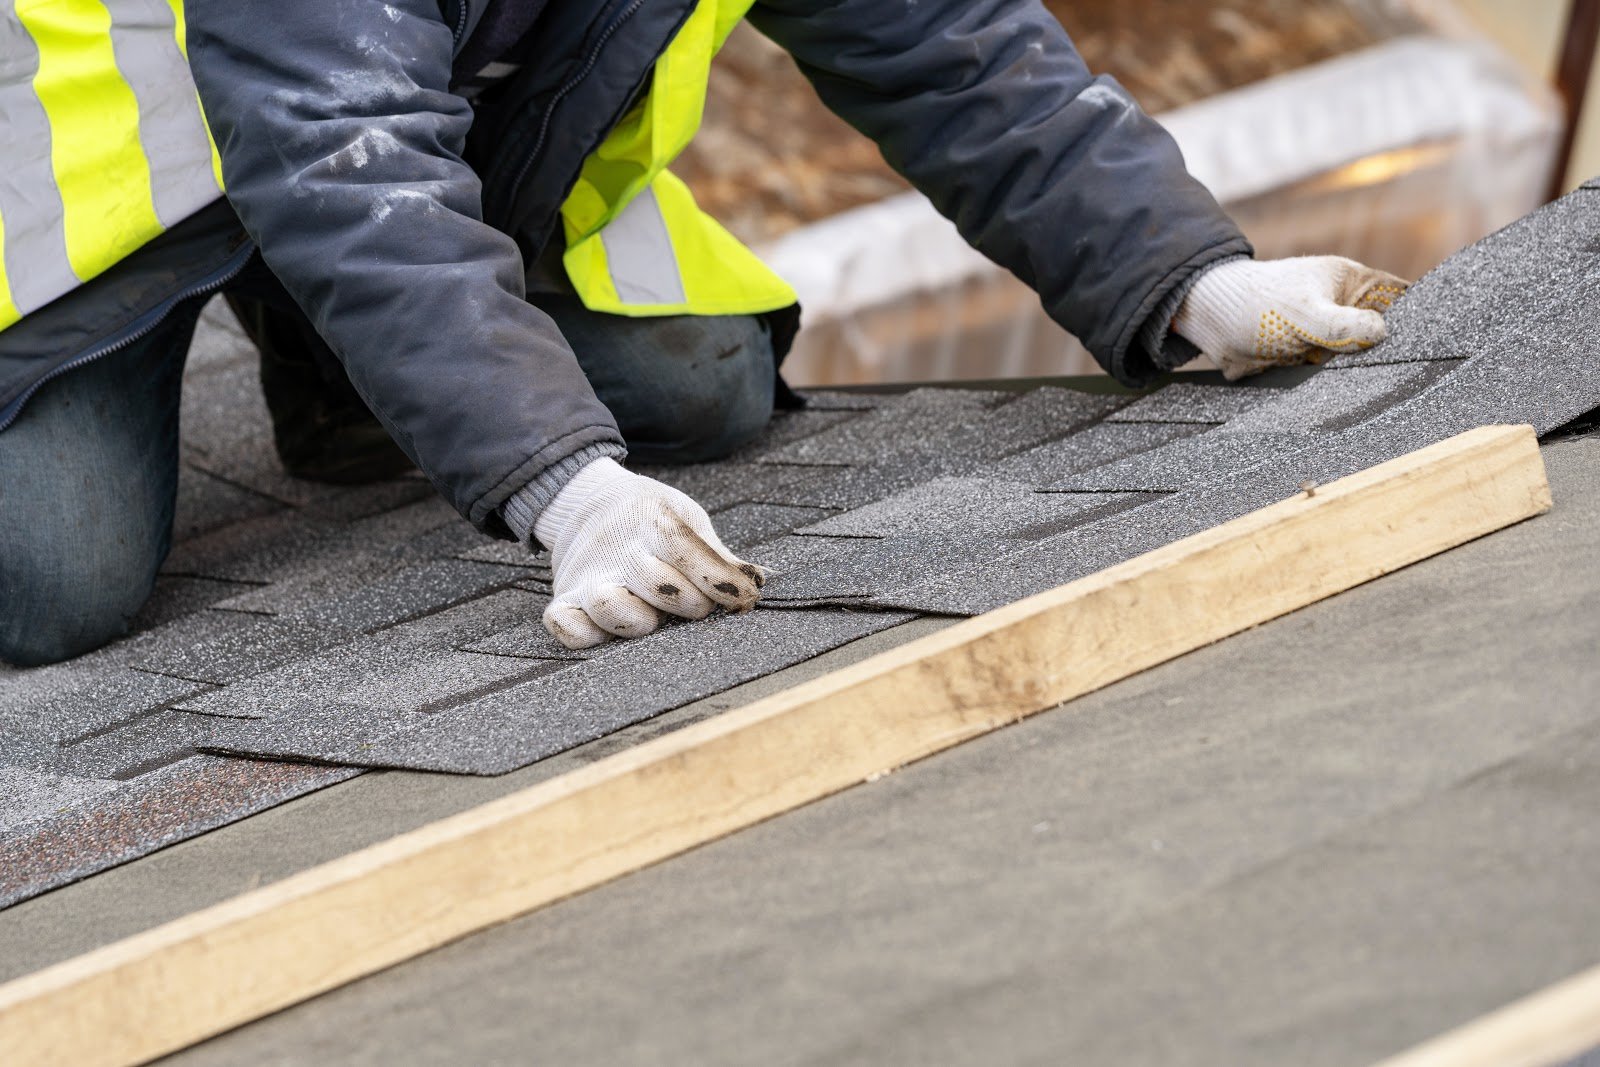
Step 4: Overlap and Nail the Remaining Rows
Now that the first row of felt or building paper is securely in place, it’s time to continue the installation by overlapping and nailing the remaining rows. Follow these steps to ensure a seamless and watertight installation:
- Overlap the Sheets: When applying the second row and subsequent rows, overlap each sheet of felt or building paper with the previous row by the recommended amount. This overlap creates a dual-layered barrier against moisture.
- Secure with Fasteners: Use staples or nails to secure the overlapping portions of the material. Place the fasteners along the top edge of the overlap, spacing them approximately every 6 to 8 inches. Ensure a secure attachment without excessive force that may cause tearing.
- Continue the Process: Repeat the process of overlapping and nailing the remaining rows of felt or building paper until you reach the top of the surface. Take care to maintain the recommended overlap and alignment for consistent protection.
Proper overlap and secure fastening are crucial to create a continuous and watertight barrier on your new construction. By following these steps, you can ensure that the felt or building paper is effectively protecting the underlying structure from moisture damage.
Once you have completed overlapping and nailing the remaining rows, it’s time to move on to the next step: applying felt or building paper to corners and edges.
Overlap the felt or building paper by at least 2 inches to ensure proper coverage and protection against moisture. Use a staple gun to secure the material in place, making sure to smooth out any wrinkles or air pockets.
Read more: How To Apply For An FHA Construction Loan
Step 5: Apply Felt or Building Paper to Corners and Edges
As you near the completion of the felt or building paper installation, it’s important to pay special attention to the corners and edges of your new construction. Follow these steps to properly apply the material to these vulnerable areas:
- Corners: Begin by folding the felt or building paper around the corners. Ensure that the material sits flush against the corner and does not create any gaps. Secure it in place using staples or nails, making sure to maintain the recommended overlap with the adjacent rows.
- Window and Door Openings: For windows and doors, carefully cut a slit in the felt or building paper to fit around the opening. Fold the material around the edges of the opening and secure it with staples or nails. Apply additional layers of material if necessary for added protection.
- Edges: Along the edges of the surface, fold the felt or building paper to create a clean and secure edge. Secure it in place using staples or nails, ensuring a tight and neat finish.
Properly applying felt or building paper to corners and edges is crucial in preventing water infiltration and maintaining the integrity of your new construction. Taking the time to carefully fold, secure, and overlap the material in these areas will greatly enhance its effectiveness in protecting against moisture.
Once you have completed applying the material to corners and edges, it’s time to move on to the next step: trimming excess material.
Step 6: Trim Excess Material
After applying felt or building paper to corners and edges, the next step is to trim any excess material for a clean and professional finish. Follow these steps to effectively trim the excess:
- Assess the Excess Material: Carefully inspect the surface and identify any areas where the felt or building paper extends beyond the desired coverage. This may occur at corners, edges, or overlapping sections.
- Mark the Cutting Line: Use a pencil or marker to mark the line where you will cut the excess material. Take your time to ensure accuracy and a clean-cut.
- Cut the Excess Material: Using a sharp utility knife or scissors, carefully cut along the marked line to trim the excess felt or building paper. Pay attention to maintain straight lines and avoid cutting into the underlying structure. Dispose of the trimmed material appropriately.
- Inspect the Trimmed Edges: After trimming the excess, inspect the edges to ensure a neat and clean finish. Make any touch-ups if necessary.
Trimming the excess material not only improves the aesthetic appearance but also prevents any potential issues such as wind damage or water penetration. Taking the time to achieve precise cuts will contribute to the overall effectiveness and longevity of the felt or building paper installation.
Once you have trimmed the excess material, it’s time to move on to the final step: inspecting and securing the felt or building paper.
Step 7: Inspect and Secure the Felt or Building Paper
After completing the installation of felt or building paper on your new construction, it’s important to thoroughly inspect the work and ensure that the material is securely in place. Follow these steps for a final inspection and to secure the felt or building paper:
- Inspect for Tears or Gaps: Carefully examine the entire surface, paying close attention to seams, corners, and edges. Look for any tears, gaps, or areas where the material may have come loose during installation.
- Repair Any Issues: If you identify any tears, gaps, or loose sections, take the necessary steps to repair them. Use the appropriate adhesive or additional fasteners to secure the material in place. Ensure that all areas are properly sealed and protected.
- Check for Proper Overlap: Verify that the felt or building paper rows have been overlapped correctly. The overlap should provide sufficient coverage and create a continuous barrier against moisture. Make any adjustments if needed.
- Secure Loose Edges: If you notice any edges that are not securely fastened or appear to be lifting, use additional staples or nails to firmly secure them to the surface. This will prevent potential wind damage or water infiltration.
- Make Final Touch-Ups: Take a final look at the overall appearance of the felt or building paper installation. Smooth out any wrinkles or uneven sections, ensuring a clean and professional finish.
By conducting a thorough inspection and making any necessary repairs or adjustments, you can ensure that your new construction is adequately protected from moisture and the elements. This final step ensures the integrity and effectiveness of the felt or building paper installation.
Congratulations! You have successfully completed the installation of felt or building paper on your new construction. Your hard work and attention to detail will contribute to the long-term durability and protection of your building. Remember to follow manufacturer guidelines and local building codes throughout the entire installation process.
With the felt or building paper in place, you can now proceed with the next steps of your construction project, confident in the moisture protection it provides.
Stay tuned for more informative articles on construction and home improvement!
Conclusion
Applying felt or building paper on new construction is a vital step in protecting the building from moisture and ensuring its longevity. By following the steps outlined in this article, you have learned how to prepare the surface, measure and cut the material, install the first row, overlap and nail the remaining rows, apply the material to corners and edges, trim excess material, and inspect and secure the felt or building paper.
Thoroughly preparing the surface and accurately measuring and cutting the material set the foundation for a successful installation. Installing the material in rows, overlapping and securing them with staples or nails, creates a continuous barrier against moisture. Paying careful attention to corners and edges, trimming excess material, and conducting a final inspection ensure a professional and effective installation.
By following these steps, you have taken a significant stride in safeguarding your new construction against moisture damage. The felt or building paper provides an extra layer of protection that helps to extend the lifespan of your building, promoting its durability and structural integrity.
Remember to consult manufacturer guidelines and local building codes throughout the installation process to ensure compliance and maximize the benefits of the felt or building paper.
Thank you for reading this comprehensive guide on how to apply felt or building paper on new construction. We hope that this article has provided you with valuable insights and practical knowledge to accomplish this important task. As you continue your construction journey, stay tuned for more informative articles to help you achieve successful and efficient results.
Frequently Asked Questions about How To Apply Felt Or Building Paper On New Construction
Was this page helpful?
At Storables.com, we guarantee accurate and reliable information. Our content, validated by Expert Board Contributors, is crafted following stringent Editorial Policies. We're committed to providing you with well-researched, expert-backed insights for all your informational needs.


0 thoughts on “How To Apply Felt Or Building Paper On New Construction”