Home>diy>Building & Construction>How To Measure For New Construction Windows

Building & Construction
How To Measure For New Construction Windows
Modified: August 28, 2024
Learn how to measure for new construction windows in your building construction project. Ensure precise fit and maximize energy efficiency.
(Many of the links in this article redirect to a specific reviewed product. Your purchase of these products through affiliate links helps to generate commission for Storables.com, at no extra cost. Learn more)
Introduction
Welcome to our comprehensive guide on how to measure for new construction windows. Whether you’re building a new home or renovating an existing one, getting accurate measurements for your windows is crucial to ensure a perfect fit and optimum performance. In this article, we will take you through the step-by-step process of measuring for new construction windows, equipping you with the knowledge you need to confidently tackle your next project.
Measuring for new construction windows may seem like a daunting task, but with the right tools and approach, it can be a straightforward process. By following these steps, you’ll be able to determine the precise dimensions and specifications required for your windows, laying the foundation for a successful installation.
Before we dive into the measurement process, let’s briefly discuss the importance of accurate measurements. When it comes to windows, an improper fit can lead to a range of issues, including air leaks, energy inefficiency, moisture intrusion, and compromised structural integrity. By taking the time to measure correctly, you can ensure that your windows not only look great but also function optimally.
Are you ready to get started? Let’s gather the necessary tools for the job in the next step.
Key Takeaways:
- Ensure a seamless window installation by accurately measuring the rough opening, window width, height, and depth. Double-check measurements and consider special requirements for a successful construction project.
- Don’t overlook the importance of precise window measurements. They not only ensure a perfect fit but also contribute to energy efficiency, comfort, and aesthetics in your home or building. If in doubt, seek professional assistance for guidance.
Step 1: Gather the necessary tools
Before you begin measuring for new construction windows, it’s important to have the right tools on hand. Here’s a list of the essential tools you’ll need:
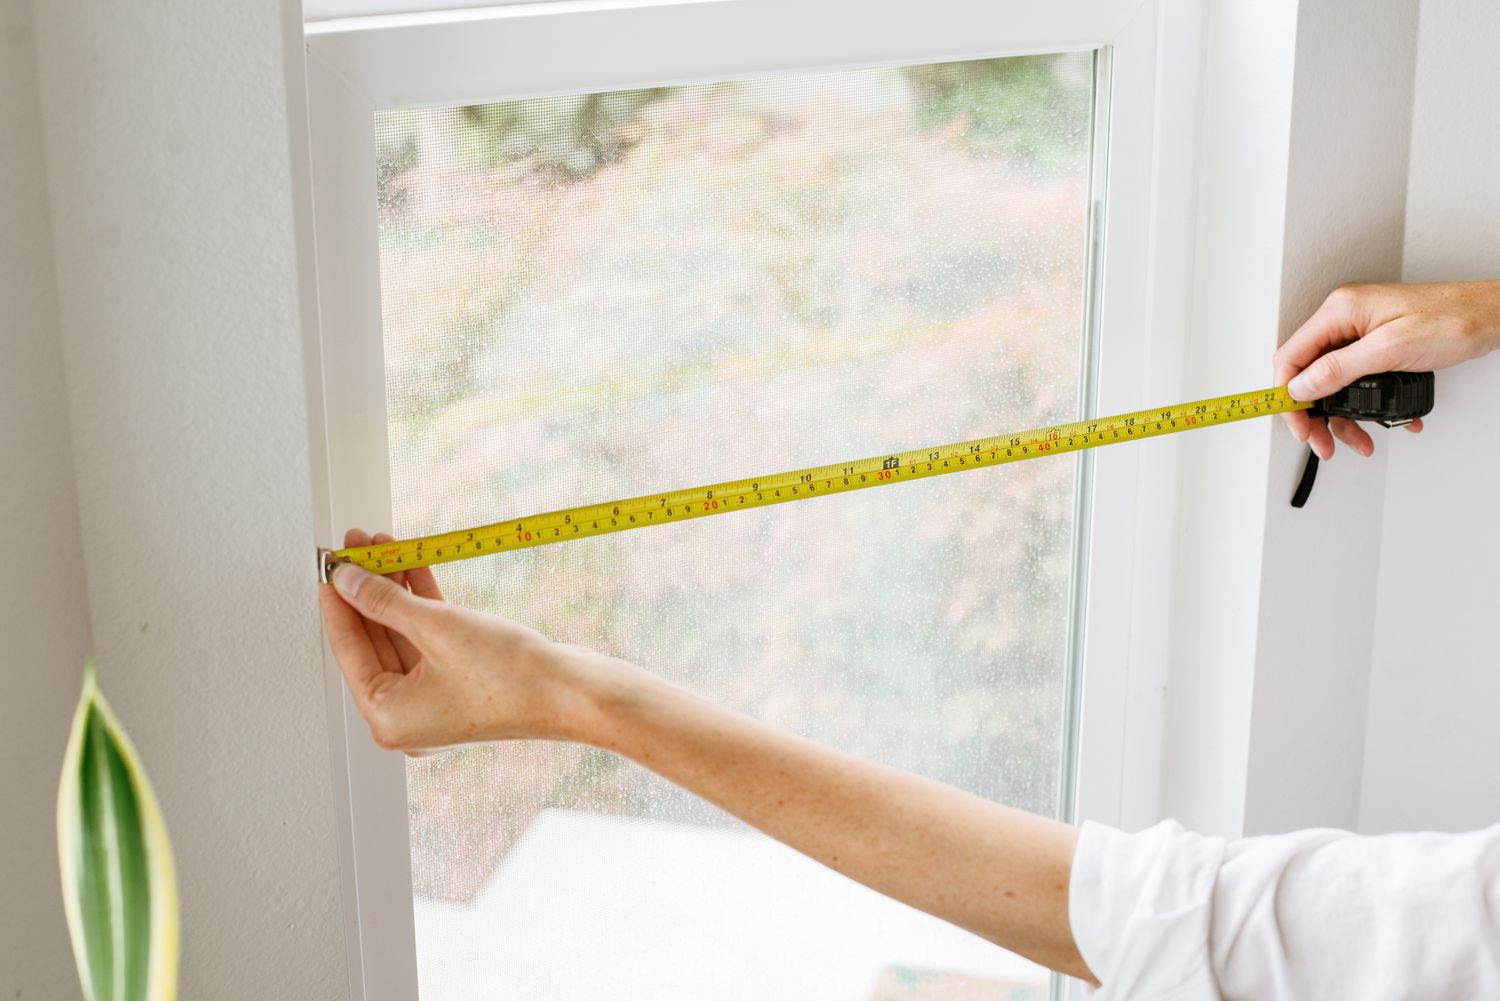
- Tape measure: Ensure you have a reliable tape measure that can provide accurate measurements up to the nearest 1/8 inch or millimeter.
- Pencil and paper: Keep a pencil and paper handy to jot down your measurements and any additional notes.
- Ladder: Depending on the location of the windows, a ladder might be necessary to reach high or hard-to-reach areas.
- Safety equipment: If you’re working at heights or in potentially hazardous conditions, make sure to utilize appropriate safety equipment such as gloves and goggles.
Having these tools readily available will make the measuring process smoother and more efficient. Once you have gathered your tools, you’re ready to move on to Step 2: Measure the rough opening.
Step 2: Measure the rough opening
The rough opening refers to the framed opening in the wall where the window will be installed. Measuring the rough opening accurately is essential to ensure that the window fits properly. Here’s how to measure the rough opening:
- Start by removing any trim or casing around the existing window to expose the rough opening.
- Measure the width of the rough opening from side to side. Take three measurements – one at the top, one in the middle, and one at the bottom. Record the smallest measurement as the window width.
- Next, measure the height of the rough opening from top to bottom. Again, take three measurements – one on the left side, one in the center, and one on the right side. Record the smallest measurement as the window height.
- Take note of the depth of the rough opening as well. This measurement will be important if you’re considering windows with specific depth requirements.
It’s important to measure the rough opening accurately, as windows that are too large or too small can cause installation issues. Remember to use a tape measure that provides precise measurements and record the smallest measurements for both width and height to ensure a proper fit.
Once you have the dimensions of the rough opening, you’re ready to move on to Step 3: Measure the window width.
Step 3: Measure the window width
Now that you have the measurements of the rough opening, it’s time to measure the width of the window itself. The window width refers to the horizontal distance across the window frame. To accurately measure the window width, follow these steps:
- Measure the width of the existing window frame from inside to inside. Start from the left side and measure to the right side. Take three measurements – one at the top, one in the middle, and one at the bottom.
- Record the smallest measurement as the window width. This ensures that the new window will fit properly within the existing frame.
- Additionally, take note of any obstructions such as handles, locks, or sashes that might affect the window’s width. Make sure to account for these obstructions when ordering your new construction window.
By accurately measuring the window width, you can ensure that your new window will fit seamlessly within the existing frame. Remember to take multiple measurements and record the smallest one to ensure the correct size. With the window width measurement complete, you can proceed to Step 4: Measure the window height.
Step 4: Measure the window height
After measuring the window width, it’s time to move on to measuring the window height. The window height refers to the vertical distance from the top to the bottom of the window frame. Follow these steps to accurately measure the window height:
- Measure the height of the existing window frame from inside to inside. Start from the top and measure down to the bottom. Take three measurements – one on the left side, one in the middle, and one on the right side.
- Record the smallest measurement as the window height. This ensures that the new window will fit properly within the existing frame.
- Take note of any obstructions such as latches, handles, or sashes that might affect the window’s height. Make sure to account for these obstructions when ordering your new construction window.
Accurately measuring the window height is crucial to ensure a proper fit and the smooth operation of your new construction window. Remember to take multiple measurements and record the smallest one for the most accurate result. With the window height measurement complete, you can move on to Step 5: Measure the window depth.
When measuring for new construction windows, always measure the width and height at three different points to ensure accuracy. Use the smallest measurement to ensure a proper fit.
Step 5: Measure the window depth
In Step 5, we will focus on measuring the window depth. The window depth refers to the distance from the inside of the window frame to the exterior of the window frame. This measurement is important to ensure that the window you choose will fit properly within the wall opening. Follow these steps to accurately measure the window depth:
- Place the end of the tape measure at the inside of the window frame.
- Extend the tape measure to the outer edge of the window frame, measuring the distance between the two points. This measurement represents the window depth.
- Take note of any additional window components that may extend beyond the window frame, such as grids or hardware. These should also be included in the depth measurement.
Accurately measuring the window depth is essential to ensure that the new construction window will fit properly without any obstructions. By including any additional window components in the measurement, you can ensure that the new window will be installed flush with the wall surface. With the window depth measurement complete, move on to Step 6: Note any special requirements or additional measurements.
Step 6: Note any special requirements or additional measurements
As you progress through the window measurement process, it’s essential to consider any special requirements or additional measurements that may be necessary. This step will ensure that you have accounted for all the unique aspects of your window installation. Here are some factors to consider:
- Window type: Determine the type of window you will be installing, such as a single-hung, double-hung, casement, or sliding window. Each window type may have specific measurement requirements.
- Window style: Consider the style of the window you desire, such as traditional, contemporary, or architectural. Different styles may have different dimensions and design considerations.
- Window material: Note the material of the window frames, such as vinyl, wood, or aluminum. Different materials may require specific installation techniques or additional measurements.
- Window opening method: Determine whether your window will open horizontally or vertically, as this can impact the required measurements.
- Sill angle: If your window has a sloped sill, you may need to measure the angle to ensure a proper fit and water drainage.
- Window accessories: Consider any additional features or accessories you plan to include with your window, such as grids, screens, or hardware. Measure these components as needed.
By noting any special requirements or additional measurements upfront, you can avoid potential issues during the installation process. This step ensures that you have all the necessary information to order the correct windows and successfully complete your construction project. With these considerations in mind, you can move on to Step 7: Double-check the measurements.
Step 7: Double-check the measurements
The final step in the window measurement process is to double-check all of the measurements you have taken. Double-checking is crucial to ensure accuracy and avoid any mistakes that could lead to ill-fitting windows or costly rework. Here are some tips for double-checking your measurements:
- Review your notes: Take a close look at the measurements you recorded for the rough opening, window width, height, and depth. Verify that they are consistent and make sense based on the window type and style you have chosen.
- Compare multiple measurements: Compare the multiple measurements you took for each dimension (width, height, and depth). Ensure that the smallest measurements are recorded accurately and align with the window requirements.
- Consider the window type: Double-check that the measurements align with the specific requirements for the type of window you are installing, such as single-hung, double-hung, casement, or sliding windows.
- Consult manufacturer guidelines: Review the manufacturer’s guidelines or installation instructions for the particular window model you have chosen. Check if there are any specific measurement requirements or guidelines provided by the manufacturer.
- Seek professional assistance if needed: If you are uncertain about any measurements or if you have complex window requirements, consider consulting a professional. They can help ensure accuracy and provide expert guidance.
By taking the time to double-check your measurements, you can minimize the risk of errors and ensure a successful installation process. Once you have confirmed the accuracy of your measurements, you are ready to order your new construction windows with confidence.
Congratulations! You have now completed all the steps necessary to measure for new construction windows. Armed with accurate measurements, you can move forward with your construction or renovation project with confidence, knowing that your windows will fit perfectly and enhance the beauty and functionality of your space.
Remember, precise measurements are the foundation for a successful window installation, so take your time, use the right tools, and double-check your work. Happy measuring!
Conclusion
Measuring for new construction windows may seem like a challenging task, but with the right approach, it becomes a manageable and rewarding process. By following the steps outlined in this guide, you can ensure accurate measurements for your windows, setting the stage for a seamless installation and optimal performance.
Throughout this guide, we discussed the importance of precise measurements, starting from the rough opening all the way to specific dimensions like width, height, and depth. We also highlighted the significance of considering special requirements, such as window type, style, material, and accessories.
Double-checking measurements before ordering your new construction windows is a critical step to minimize errors and ensure a perfect fit. By reviewing your notes, comparing measurements, and consulting manufacturer guidelines, you can have confidence in the accuracy of your measurements.
Remember that when it comes to window installation, accuracy is key. Properly measured windows not only fit seamlessly within the opening but also contribute to energy efficiency, comfort, and aesthetics in your home or building.
If you ever feel unsure or overwhelmed during the measurement process, don’t hesitate to seek professional assistance. Experienced professionals can provide guidance, answer your questions, and ensure that your window measurements are precise.
Now that you have completed this guide, take your measurements with confidence and proceed with ordering your new construction windows. Embrace the transformation these windows will bring, enhancing both the beauty and functionality of your space.
Good luck, and may your new construction windows exceed your expectations!
Frequently Asked Questions about How To Measure For New Construction Windows
Was this page helpful?
At Storables.com, we guarantee accurate and reliable information. Our content, validated by Expert Board Contributors, is crafted following stringent Editorial Policies. We're committed to providing you with well-researched, expert-backed insights for all your informational needs.


0 thoughts on “How To Measure For New Construction Windows”