Tableware
How To Make Felted Coasters
Modified: January 5, 2024
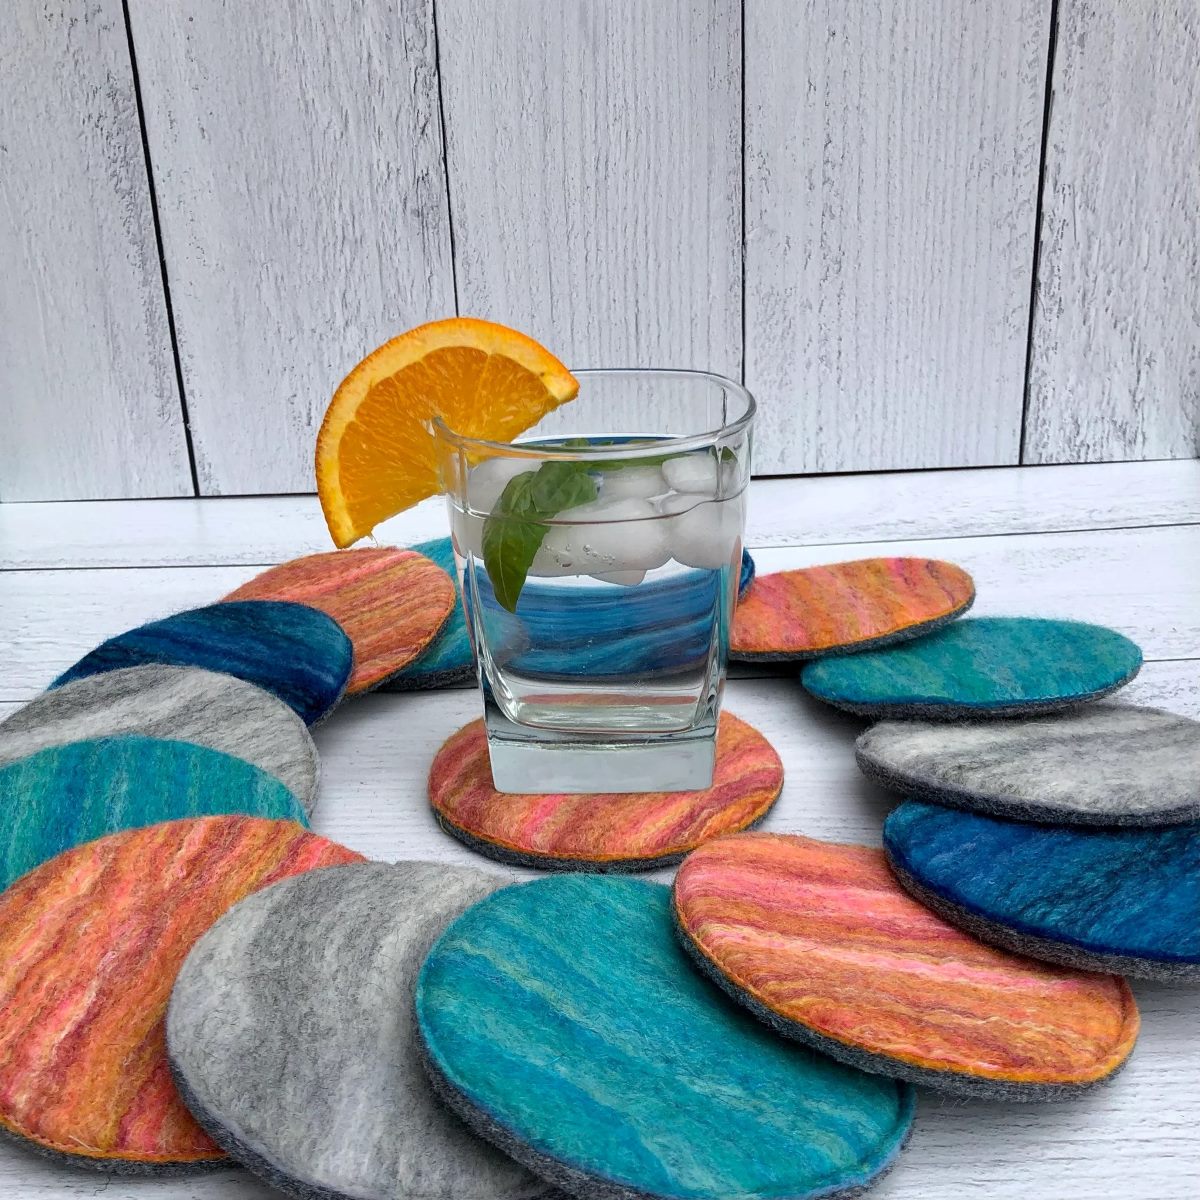
Learn how to make beautiful felted coasters for your tableware collection. Step-by-step guide with easy instructions and materials needed.
(Many of the links in this article redirect to a specific reviewed product. Your purchase of these products through affiliate links helps to generate commission for Storables.com, at no extra cost. Learn more)
Introduction
Welcome to the wonderful world of felted coasters! If you’re looking to add a touch of charm and functionality to your tableware collection, felting your own coasters is a fun and rewarding project to undertake. Whether you’re a beginner or an experienced crafter, making felted coasters allows you to unleash your creativity and create personalized, one-of-a-kind pieces.
In this article, we will guide you through the step-by-step process of making felted coasters. We will cover everything from choosing the right wool to embellishing the coasters with decorative elements. So, grab your materials and get ready to embark on a crafting adventure!
Why choose felted coasters, you may ask? Well, besides being a visually appealing addition to your table setting, felted coasters offer practical benefits too. The dense and absorbent nature of felt makes it an excellent material for protecting your furniture from spills and heat damage. Plus, with endless color and design possibilities, you can create coasters that perfectly complement your home decor.
Creating felted coasters is also a fantastic way to express your personal style and give handmade gifts to friends and loved ones. Whether you opt for simple and minimalist designs or go all out with vibrant patterns and intricate textures, these coasters are sure to impress.
In the following sections, we’ll explore the materials needed for this project and guide you through the step-by-step process of creating your own felted coasters. So, let’s dive in and start crafting!
Key Takeaways:
- Transform simple wool roving into charming and functional felted coasters, adding a touch of creativity and warmth to your tableware collection. Protect your furniture with personalized, one-of-a-kind pieces that reflect your personal style.
- Unleash your creativity and patience by choosing high-quality wool, shaping, felting, and embellishing your felted coasters. Enjoy the crafting adventure and create delightful accents for your home or thoughtful gifts for loved ones.
Read more: How To Make Felt Wine Glass Coasters
Materials Needed
Before you get started with making felted coasters, make sure you have the following materials on hand:
- Wool Roving: Choose high-quality wool roving in your desired colors. Merino wool is a popular choice for felting due to its softness and ability to felt easily. You can find wool roving at craft stores or online.
- Felting Needle: Felting needles have barbs that help interlock the wool fibers. Make sure to have a variety of needle sizes, including fine, medium, and large, to achieve different effects.
- Foam Pad: A foam pad serves as a working surface and helps protect your needles. You can use a specialized felting pad or improvise with a thick sponge or foam block.
- Hot Water: You’ll need hot water to wet and felt the wool. Water should be hot but not scalding, as extreme heat can damage the wool fibers.
- Soap: Use a mild soap or liquid detergent to aid in the felting process. Avoid using harsh chemicals or additives.
- Towel: A towel is essential for absorbing excess water and drying your coasters.
- Scissors: You’ll need scissors to trim and shape the felted wool.
- Embellishments (Optional): If you want to add extra flair to your coasters, gather some embellishments like embroidery floss, beads, buttons, or fabric scraps.
- Protective Gloves: Felting can be tough on the hands, so consider using protective gloves to prevent any injuries or discomfort.
- Patience and Creativity: Felting is a process that requires patience and creativity. So be prepared to take your time and let your imagination run wild!
Once you have all these materials ready, you’re well-equipped to begin your felted coaster adventure. So let’s move on to the first step – choosing your wool!
Step 1: Choosing Your Wool
When it comes to making felted coasters, choosing the right type of wool is crucial. The quality and characteristics of the wool will directly impact the final result of your coasters. Here are a few considerations to keep in mind when selecting your wool:
- Choose Felting Wool: Opt for wool specifically labeled for felting. This type of wool has been processed in a way that makes it easier to felt.
- Consider Merino Wool: Merino wool is a popular choice among felting enthusiasts. It is prized for its softness, fine fibers, and excellent felting properties. Merino wool is available in a wide range of colors, making it ideal for creating vibrant and visually appealing coasters.
- Blend Different Fibers: If you want to experiment with different textures or add some visual interest to your coasters, consider blending different types of wool or incorporating other natural fibers like silk, bamboo, or alpaca.
- Take Color into Account: Think about the color palette you want for your coasters. Wool roving comes in various beautiful shades, allowing you to create coasters that match your home’s decor or reflect your personal style.
- Consider Thickness: The thickness of the wool roving will affect the overall appearance and durability of your coasters. Thicker wool can create a more substantial and cushioned coaster, while thinner wool will result in a lighter and more delicate feel. Choose a thickness that suits your preferences and needs.
- Quality Matters: Invest in high-quality wool roving to ensure a successful felting process and long-lasting coasters. Cheaper-quality wool may not felt as well or may result in coasters that easily come apart over time.
When purchasing wool roving, you can find it in craft stores, specialized fiber shops, or online. Be sure to read product descriptions and reviews to ensure you’re buying the right type of wool for felting.
Now that you’ve chosen your wool, it’s time to move on to the next step – preparing the wool for felting. Let’s dive in!
Step 2: Preparing the Wool
Now that you have chosen your wool, it’s time to prepare it for the felting process. Properly preparing the wool will ensure better felting results and help you achieve the desired shape and texture for your coasters. Follow these steps to prepare the wool:
- Separate the Wool: Start by separating the wool roving into small sections. This will make it easier to work with and allow you to control the amount of wool you use for each coaster.
- Fluff and Tease the Wool: Gently fluff and tease the wool to loosen the fibers. This step will help the wool bind together more easily during the felting process.
- Create Layers: Layer the wool roving in different directions to create a sturdy base and ensure even felting. Overlapping the layers slightly will help them stick together during the felting process.
- Experiment with Color and Design: Get creative with the placement of different colors or variations of wool to add visual interest to your coasters. You can create stripes, patterns, or even blend colors for a marbled effect. Don’t be afraid to try different combinations!
- Mix in Other Fibers (Optional): If you want to incorporate other natural fibers or textures, such as silk or bamboo, now is the time to do so. Gently layer or blend these fibers into the wool to create unique and textured coasters.
- Check for Weak Spots: Before moving on to the felting process, carefully inspect the layered wool to ensure there are no weak spots or gaps. If you notice any areas that seem thin or have loose fibers, add more wool to strengthen them.
Preparing the wool sets the foundation for successful felting, allowing the fibers to interlock and bind together. Take your time with this step to ensure that your coasters will hold their shape and withstand everyday use.
Now that the wool is prepared, we’re ready to move on to the exciting part – creating the coaster shape! Let’s dive in.
Step 3: Creating the Coaster Shape
Now that your wool is prepared, it’s time to shape it into coaster form. This step will determine the size and design of your finished coasters. Follow these steps to create the coaster shape:
- Start with a Core: Take a small section of the prepared wool and roll it tightly into a ball. This will serve as the core of your coaster.
- Add More Layers: Gradually add more layers of wool around the core in a circular motion. Continue to build up the layers until you reach your desired coaster size. Make sure to gently smooth and shape the wool as you go to create an even and stable coaster shape.
- Shape the Edges: Use your fingers to pinch and shape the edges of the coaster. You can create a round shape, square shape, or any other design that appeals to you. Remember, felted wool is flexible, so feel free to experiment with different shapes and sizes.
- Check for Thickness: As you build the layers, periodically check the thickness of the coaster. Aim for a thickness of about 1/4 to 1/2 inch (0.6 to 1.3 cm). Adjust the amount of wool you add accordingly to achieve the desired thickness.
- Smooth Out the Surface: Once you have shaped the coaster, gently smooth out the surface by lightly patting it. This will help even out any uneven areas and create a more polished look.
Remember, the shaping process is an opportunity to let your creativity shine. You can create coasters of varying sizes, shapes, and even experiment with asymmetrical designs. Don’t be afraid to think outside the box and explore different possibilities.
Now that you’ve shaped the wool into coaster form, it’s time to move on to the felting process. Get ready to transform your wool into sturdy and durable coasters! Stay tuned for the next step – felting the wool.
When felting coasters, be sure to use 100% wool yarn or roving for best results. Avoid using superwash wool, as it will not felt properly.
Read more: How To Make Felt Baskets
Step 4: Felting the Wool
The felting process is where the magic happens. This is when the wool fibers interlock and shrink together to create a solid and stable material. Follow these steps to felt the wool and transform it into a durable coaster:
- Prepare a Bowl of Hot Soapy Water: Fill a bowl or basin with hot water, making sure it’s not too hot to handle. Add a small amount of mild soap or liquid detergent and mix until it becomes slightly sudsy.
- Wet the Wool: Gently submerge the coaster into the hot soapy water. Allow the wool to become thoroughly soaked, ensuring that the fibers are fully saturated.
- Fold and Rub: Fold the wet coaster in your hands, applying gentle pressure and rubbing it together. This agitation will cause the wool fibers to interlock and felt together. Continue folding, rubbing, and rolling the coaster for about 5-10 minutes.
- Check the Progress: Periodically check the progress of felting by squeezing the coaster and observing how well the fibers are sticking together. You should start to notice the wool becoming denser and more solid.
- Rinse and Repeat: Rinse the coaster under warm water to remove the soap residue. Gently squeeze out excess water and repeat the felting process if needed, focusing on areas that require further felting.
- Avoid Over-Felting: Be mindful not to over-felt your coaster, as this can result in a stiff and rigid texture. Stop the felting process when you are satisfied with the density and stability of the coaster. Remember, some slight shrinkage is normal during the felting process.
During the felting process, the hot water and agitation cause the wool fibers to lock together, resulting in a sturdy and thick material. However, keep in mind that wool felts differently based on individual characteristics, so the time required may vary depending on the type and thickness of the wool you are using.
Once you are happy with the felting process, it’s time to move on to the next step – shaping and drying the coasters. Stay tuned!
Step 5: Shaping and Drying the Coasters
After felting the wool, it’s time to shape and dry your coasters. This step will give your coasters their final form and ensure that they maintain their shape while drying. Follow these steps to shape and dry your felted coasters:
- Gently Shape the Coasters: While the coaster is still wet, mold it into the desired shape using your hands. You can reshape the edges, smooth out any imperfections, and adjust the size if needed. Take your time during this step to ensure that the coaster maintains the desired form.
- Place the Coasters on a Towel: Lay a towel on a flat surface and carefully transfer the shaped coasters onto it. Make sure to space them out to allow for even drying.
- Reshape if Necessary: Double-check that the coasters are still in the desired shape. If they have shifted during the transfer, gently reshape them to ensure a consistent form.
- Let the Coasters Air Dry: Allow the coasters to air dry completely. This process can take anywhere from a few hours to overnight, depending on the thickness of the wool and the air circulation. Avoid using direct heat or sunlight, as this can cause excessive shrinkage or distortion.
- Check for Dryness: To ensure the coasters are fully dry, gently touch them to make sure there are no damp areas. If you notice any dampness, give them more time to dry before moving on to the next step.
During the drying process, the coasters will retain their shape, and the wool fibers will continue to strengthen and interlock further. Be patient and resist the temptation to handle the coasters until they are completely dry to avoid any potential distortion.
Once your coasters are dry, you can move on to the final step – embellishing them with decorative elements, if desired. Get ready to add a personal touch to your one-of-a-kind felted coasters!
Step 6: Embellishing the Coasters (Optional)
If you want to add an extra touch of personalization and flair to your felted coasters, you can choose to embellish them with decorative elements. This step allows you to showcase your creativity and make your coasters truly unique. Here are some ideas for embellishing your coasters:
- Embroidery: Add beautiful and intricate embroidery designs to your coasters using different colors of embroidery floss. You can create patterns, floral motifs, or monograms to make each coaster truly stand out.
- Beads and Sequins: Enhance the visual appeal of your coasters by attaching beads, sequins, or small gems. You can create simple designs or go for a more elaborate and intricate look. Just make sure to securely attach the embellishments to ensure they stay in place.
- Fabric Appliqué: Cut out shapes or designs from fabric scraps and attach them to your coasters using fabric glue or by sewing them in place. This allows you to add texture and unique patterns to your coasters.
- Paint or Fabric Markers: Get creative and paint or draw designs on your coasters using fabric-safe paints or markers. This method allows you to explore various colors and create intricate or abstract patterns.
- Ribbons and Trim: Attach ribbons or decorative trims to the edges of your coasters to add a touch of elegance or whimsy. You can glue or sew them along the perimeter for a polished and finished look.
- Quilting: If you have quilting skills, you can quilt intricate designs onto your coasters. This adds texture and depth, making your coasters look like miniature pieces of art.
Remember, embellishing your coasters is optional and entirely up to your preference. Experiment with different techniques, materials, and designs to find the style that appeals to you the most. Just ensure that the embellishments are securely attached to prevent them from detaching during everyday use.
Once you have finished embellishing your coasters, allow any glue or paint to dry completely before using or gifting them. Now, sit back and admire your beautifully decorated felted coasters!
Congratulations! You have successfully completed the steps to make your very own felted coasters. These handmade creations are not only functional but also serve as delightful accents for your home or thoughtful gifts for friends and loved ones. Enjoy using your coasters and let your creativity continue to inspire your future crafting projects!
Conclusion
Congratulations on completing the journey to create your own felted coasters! By following the step-by-step process, you’ve transformed simple wool roving into functional and visually appealing tableware. These felted coasters not only protect your furniture but also add a touch of warmth and creativity to your home.
Throughout this article, we’ve explored the materials needed for felting coasters, learned how to choose the right wool, prepared the wool for felting, shaped it into coaster form, felted the wool to create a solid material, shaped and dried the coasters, and even delved into optional embellishments to make them truly unique.
Remember, the key to successful felting lies in patience, creativity, and attention to detail. Take the time to choose high-quality materials and experiment with different techniques to create coasters that reflect your personal style and taste.
Whether you keep your coasters simple and minimalist or you embellish them with intricate designs, each coaster you create will be a testament to your craft and creativity. They can be a beautiful addition to your dining table, coffee table, or even a thoughtful gift for a loved one.
So gather your materials, let your imagination run wild, and embark on your felting adventure. Enjoy the process of transforming wool into functional and decorative items that bring joy and practicality to your everyday life.
Now that you’re equipped with the knowledge and skills to make felted coasters, don’t be afraid to explore other felting projects. Let your creativity soar and dive into the wonderful world of felting, where the possibilities are endless. Happy felting!
Frequently Asked Questions about How To Make Felted Coasters
Was this page helpful?
At Storables.com, we guarantee accurate and reliable information. Our content, validated by Expert Board Contributors, is crafted following stringent Editorial Policies. We're committed to providing you with well-researched, expert-backed insights for all your informational needs.
0 thoughts on “How To Make Felted Coasters”