
Articles
How To Clean Leaves From Gutters
Modified: February 23, 2024
Learn effective techniques and tools for clearing leaves from gutters with our informative articles. Keep your gutters clean and functioning properly.
(Many of the links in this article redirect to a specific reviewed product. Your purchase of these products through affiliate links helps to generate commission for Storables.com, at no extra cost. Learn more)
Introduction
Keeping your gutters clean and free of debris is an essential part of home maintenance. Leaves, twigs, and other debris can accumulate in your gutters over time, leading to clogs and potential water damage to your home. Regularly cleaning leaves from gutters not only ensures proper water drainage but also prevents issues like roof leaks, foundation damage, and mold growth.
In this article, we will guide you through the process of cleaning leaves from gutters effectively. We will provide step-by-step instructions, safety tips, and a list of tools and materials you’ll need to get the job done. By following these guidelines, you can ensure the longevity and functionality of your gutters while safeguarding your home against potential damage.
So grab your tools, put on your safety gear, and let’s dive into the world of gutter cleaning!
Key Takeaways:
- Regularly cleaning leaves from gutters is crucial to prevent water damage, roof leaks, and pest infestations. Follow safety precautions, clear debris, and maintain gutters for optimal home protection.
- Properly setting up the ladder, removing leaves by hand, and flushing gutters with water are essential steps for effective gutter cleaning. Regular maintenance and inspection ensure long-term home protection.
Read more: How To Clean Gutters From The Roof
Why Clean Leaves from Gutters?
It’s easy to overlook the importance of keeping your gutters clean, but neglecting this task can have serious consequences for your home. Here are the key reasons why it is crucial to clean leaves from your gutters regularly:
- Prevent Water Damage: One of the primary functions of gutters is to channel water away from your home’s foundation. When leaves and debris clog your gutters, rainwater can overflow, leading to water accumulation near the foundation. This can cause basement flooding, cracks in the foundation, and soil erosion.
- Avoid Roof Damage: When gutters are clogged, water can seep into the roof and cause leaks. Over time, this can lead to water damage, rot, and mold growth, compromising the structural integrity of your roof. Regularly cleaning leaves from gutters helps prevent these issues and prolongs the lifespan of your roof.
- Prevent Pest Infestations: Clogged gutters can become breeding grounds for pests like mosquitoes, termites, and birds. The damp and decaying leaves create an ideal environment for these unwanted guests to thrive. Cleaning your gutters prevents the build-up of debris and reduces the risk of pest infestations.
- Maintain the Aesthetic Appeal: Clogged gutters with overflowing leaves can detract from the overall appearance of your home. The gutters may appear dirty and unkempt, which can diminish the curb appeal and affect the value of your property. Regular cleaning ensures that your gutters look neat and presentable.
- Prevent Ice Dams in Winter: If leaves and other debris are left in your gutters before the onset of winter, they can contribute to the formation of ice dams. Ice dams occur when the water from melting snow cannot flow properly through the gutters, causing it to back up and freeze along the roofline. This can lead to damage to both your gutters and your roof.
By understanding the importance of cleaning leaves from gutters, you can take proactive measures to protect your home from potential damage. Regular maintenance and cleaning not only save you from costly repairs but also ensure the longevity and efficiency of your gutters.
Tools and Materials Needed
Before you start cleaning leaves from your gutters, gather the necessary tools and materials to make the process more efficient. Here’s a list of what you’ll need:
- Ladder: Choose a sturdy, reliable ladder that can safely reach your gutter height. A ladder stabilizer or standoff can also provide extra stability and prevent damage to your gutters.
- Gloves: Wear thick, waterproof gloves to protect your hands from debris and potentially sharp objects in the gutters.
- Safety Glasses: Invest in a pair of safety glasses or goggles to shield your eyes from any debris that may fly out while cleaning.
- Tarp or Bucket: Place a tarp or bucket on the ground to collect the leaves and debris you remove from the gutters. This makes cleanup easier once you finish cleaning.
- Handheld Trowel or Scoop: Use a handheld trowel or scoop to remove leaves and debris from the gutters. Opt for one with a long handle and a narrow, curved end to effectively scrape and scoop out the debris.
- Garden Hose with Spray Nozzle: Have a garden hose with a spray nozzle ready to flush out any remaining debris and ensure that the gutters and downspouts are clear.
- Gutter Cleaning Brush: A specialized gutter cleaning brush can be beneficial for dislodging stubborn debris and reaching into the corners of the gutters.
- Safety Harness (optional): If you have a multi-story home or feel uneasy working from a ladder, consider using a safety harness to provide an extra layer of protection.
Having these tools and materials on hand before you begin cleaning your gutters will facilitate a smoother and safer cleaning process. Remember to prioritize safety and take necessary precautions throughout the cleaning process.
Step 1: Safety Precautions
Prioritizing safety is crucial when cleaning leaves from gutters. Follow these guidelines to ensure a safe and accident-free cleaning process:
- Use a Sturdy Ladder: Choose a ladder that is in good condition and can support your weight. Set it up on a stable, flat surface, and have a ladder stabilizer or standoff attached to prevent any wobbling.
- Wear Protective Gear: Put on thick, waterproof gloves to protect your hands from sharp debris or possible animal waste. Safety glasses or goggles will shield your eyes from any flying debris.
- Inform Others: Let someone know that you will be working on cleaning the gutters, especially if you’re doing it alone. In case of an accident, they will be aware of your whereabouts.
- Inspect the Area: Before climbing the ladder, carefully examine the surroundings for any hazards, such as loose power lines or unstable branches.
- Avoid Overreaching: Always keep your hips within the sides of the ladder and avoid stretching or leaning too far to reach the gutters. It’s better to reposition the ladder as needed.
- Maintain a Good Grip: Ensure that your shoes have a good grip on the ladder rungs to minimize the risk of slipping. Avoid wearing loose clothing that may get caught on the ladder.
- Be Cautious of Power Lines: Pay attention to the proximity of power lines when cleaning gutters, as accidental contact can cause serious injury or even be fatal. If you are unsure, consult a professional.
- Use a Safety Harness (optional): If you have a multi-story home or feel uncomfortable working from a ladder, consider using a safety harness that is securely anchored to a stable structure.
- Take Breaks: Cleaning gutters can be physically demanding, so listen to your body and take breaks if needed. Stay hydrated and avoid overexertion.
By following these safety precautions, you can minimize the risk of accidents and injuries while cleaning leaves from your gutters. Remember, it’s always better to take extra precautions and prioritize your well-being.
Step 2: Clearing Debris from the Roof
Before you begin working on the gutters themselves, it’s important to clear any loose debris from the roof to prevent it from falling into the gutters during the cleaning process. Here’s how to clear debris from the roof:
- Inspect the Roof: Use a sturdy ladder to access the roof. Begin by inspecting the roof for any debris, such as leaves, branches, or twigs. Take note of any loose or damaged shingles that may need repair.
- Remove Large Debris: Carefully remove any large debris by hand, making sure to wear gloves for protection. Place the debris into a bucket or tarp for easy disposal later.
- Sweep Off Small Debris: Use a broom or brush to sweep off any smaller debris, such as dirt or gravel. Start from the top of the roof and work your way down, gently sweeping the debris towards the edge of the roof.
- Clear Debris from Valleys and Chimneys: Pay special attention to the roof valleys and around chimneys, as these areas tend to collect more debris. Use a hand trowel or scoop to carefully remove any trapped debris.
- Ensure Proper Drainage: As you clear the debris, ensure that the roof’s drainage system, including gutters, downspouts, and scuppers, are free from blockages. This will help prevent water from pooling on the roof and causing damage.
- Dispose of Debris: Once you’ve finished clearing the debris from the roof, carefully dispose of it in a proper manner. Bag it up and dispose of it according to local regulations or compost it if appropriate.
Clearing debris from the roof before tackling the gutters will make the gutter cleaning process more efficient and prevent further debris from entering and potentially clogging the gutters. Once the roof is clear, you can move on to the next step of cleaning the gutters themselves.
Read more: How To Prevent Leaves In Gutters
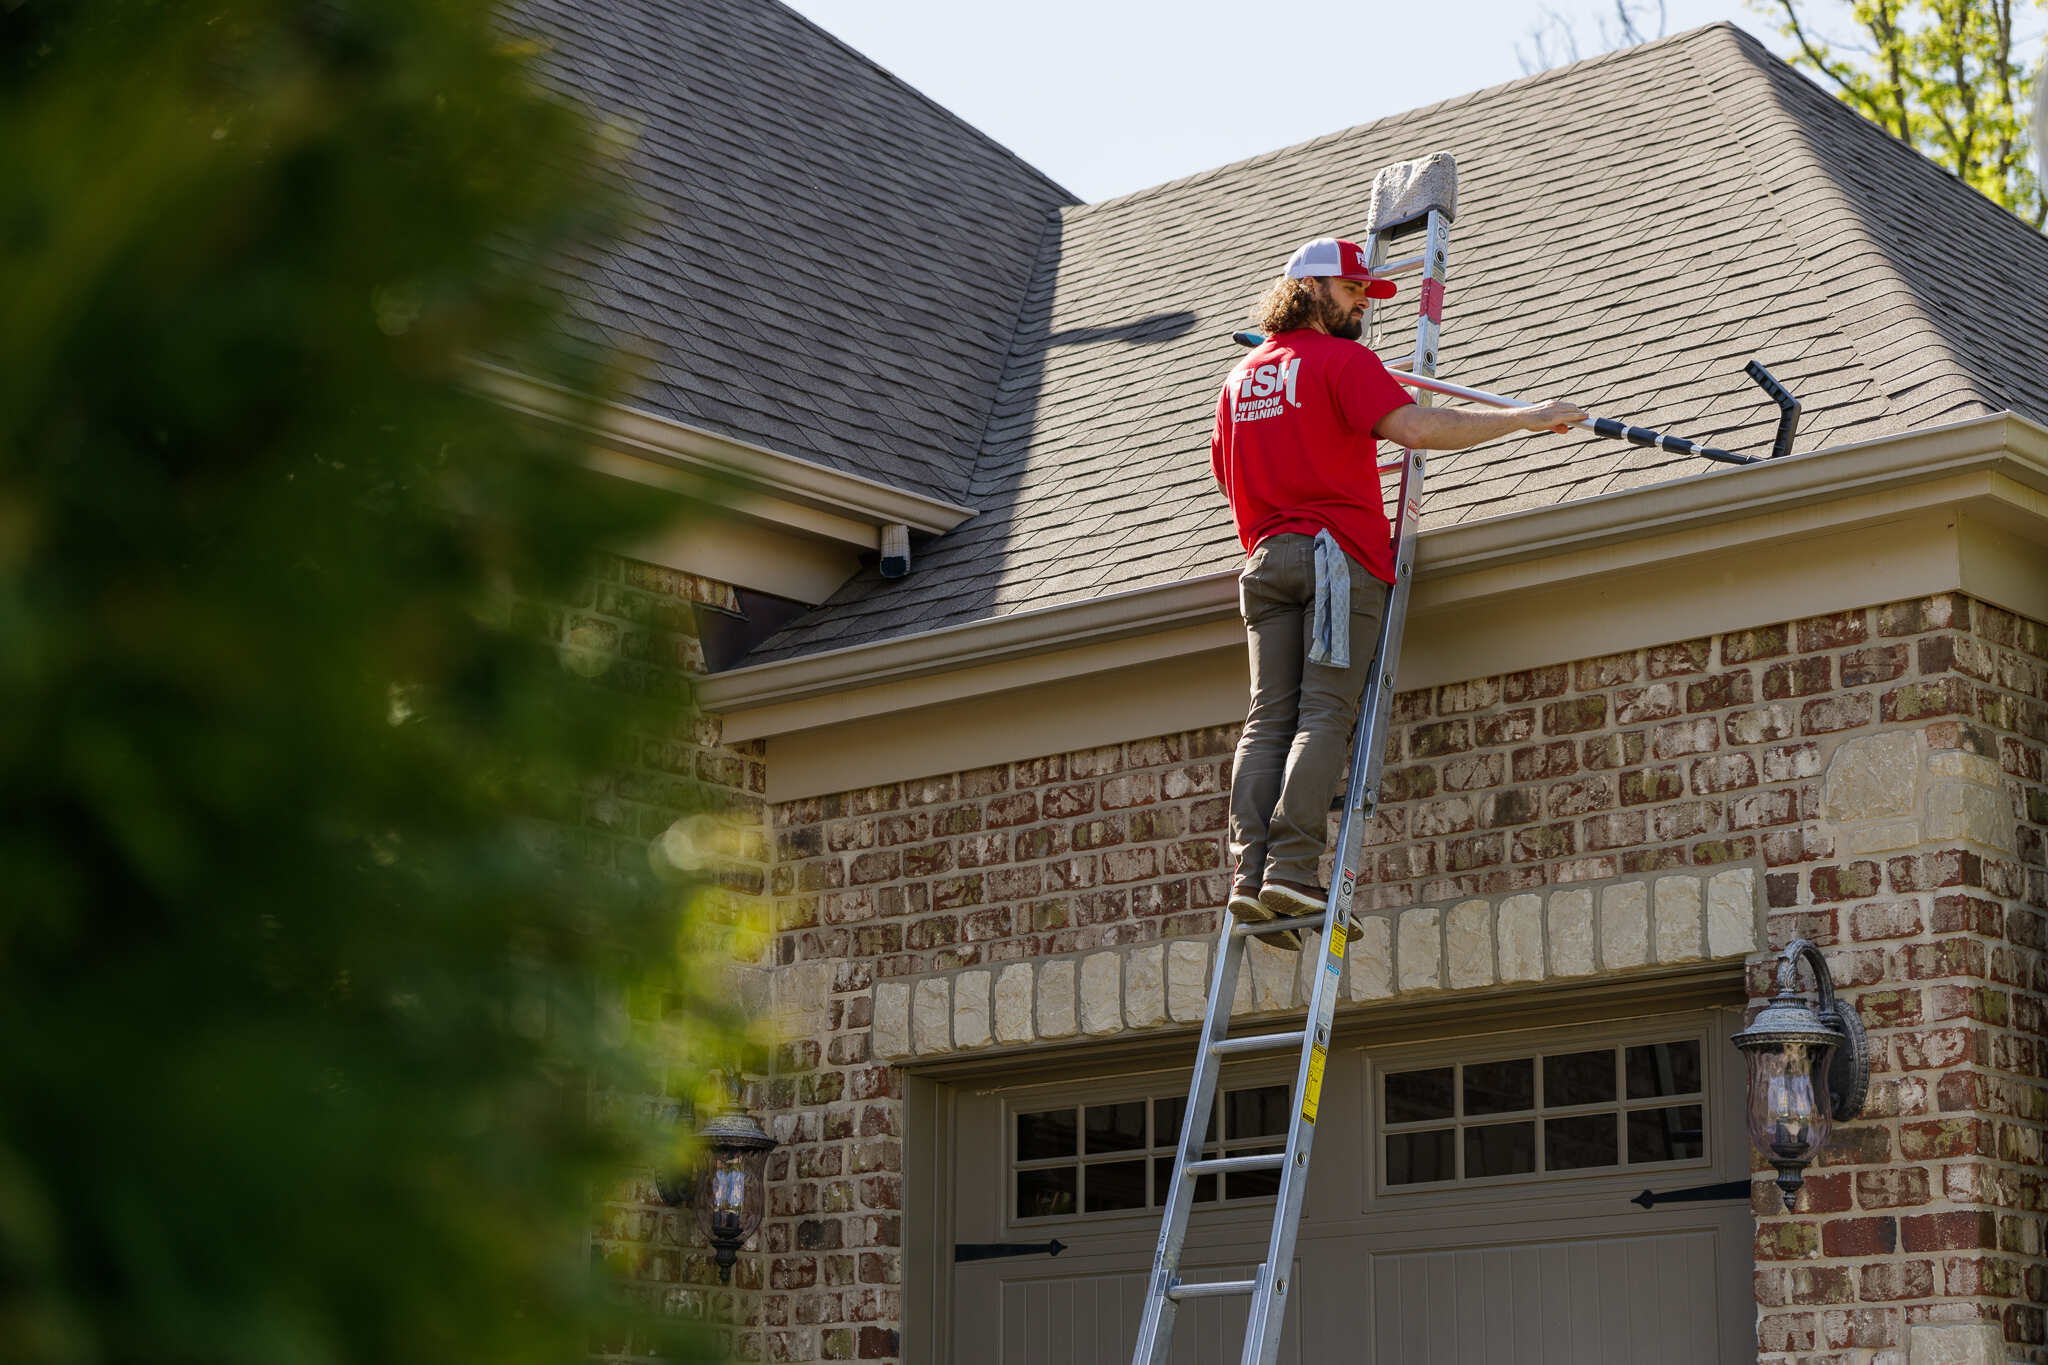
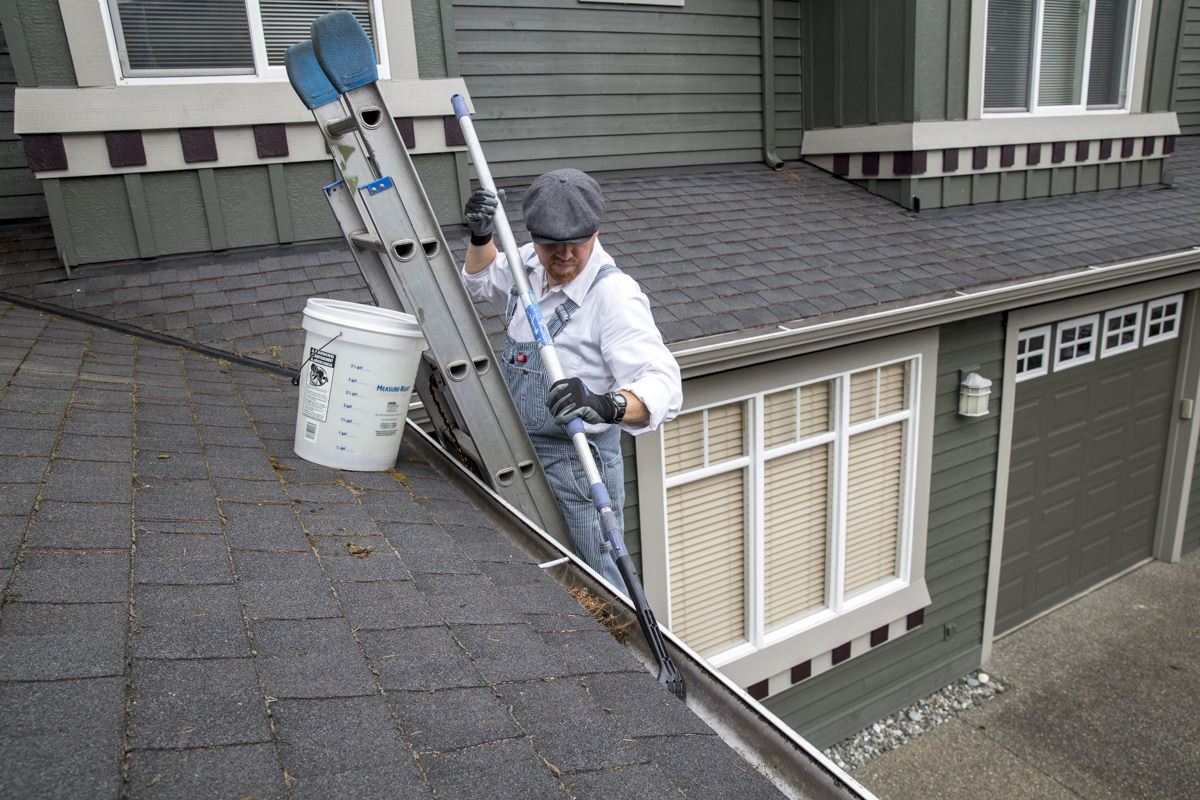
Step 3: Setting up the Ladder
Properly setting up your ladder is crucial for your safety and stability while cleaning the gutters. Follow these steps to set up your ladder correctly:
- Choose the Right Ladder: Select a ladder that is tall enough to reach the gutters comfortably. Ensure that it is in good condition, without any defects or damage. A ladder with rubberized feet can provide better stability.
- Find a Stable Spot: Look for a level and solid surface on which to place the ladder. Avoid setting up the ladder on loose soil or uneven ground. If necessary, use wooden boards or ladder stabilizers to provide a stable base.
- Angle the Ladder: Place the ladder against the wall or the edge of the roof at approximately a 75-degree angle. To achieve this, measure and mark one-fourth of the ladder’s working length horizontally away from the wall for every four feet of vertical rise.
- Secure the Ladder: Ensure that the ladder is securely positioned and doesn’t wobble or shift when you apply pressure. Double-check by giving it a gentle shake before climbing up.
- Use a Ladder Stabilizer: If your gutters are directly underneath an eave or a roof overhang, use a ladder stabilizer or standoff to keep the ladder a few inches away from the gutters. This prevents any damage to the gutters and increases stability.
- Avoid Overreaching: As you climb the ladder, maintain three points of contact at all times — two hands and one foot or two feet and one hand. Avoid leaning or overreaching to maintain balance and stability.
- Have a Spotter: If possible, have someone else hold the ladder at the bottom for added stability and assistance. They can also help pass you tools or materials, reducing the need for you to go up and down the ladder frequently.
- Keep Safety Measures in Mind: Throughout the cleaning process, continue to prioritize safety by following the precautions mentioned in Step 1. Take breaks when needed, stay hydrated, and never rush through the task.
Setting up the ladder properly and ensuring its stability is essential for a safe and efficient gutter cleaning process. Taking the time to properly set up the ladder will greatly reduce the risk of accidents and allow you to focus on the task at hand.
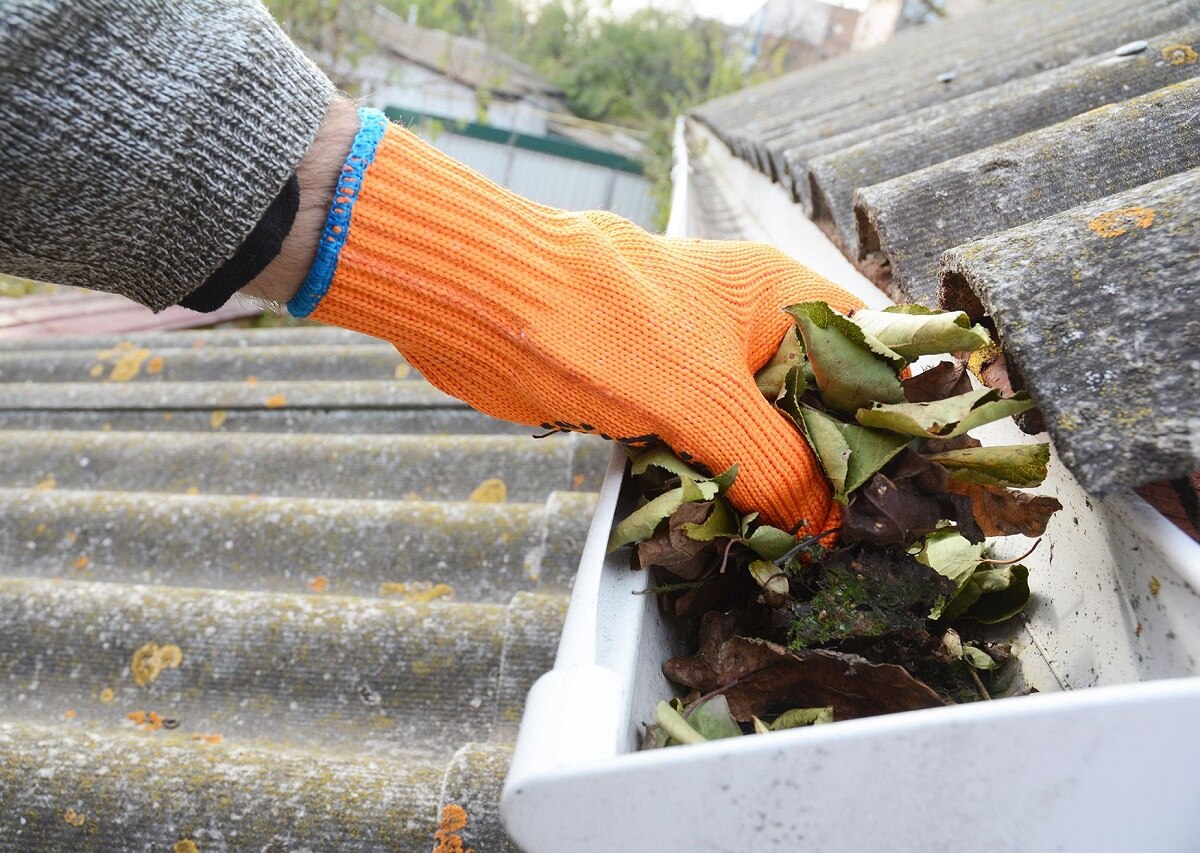
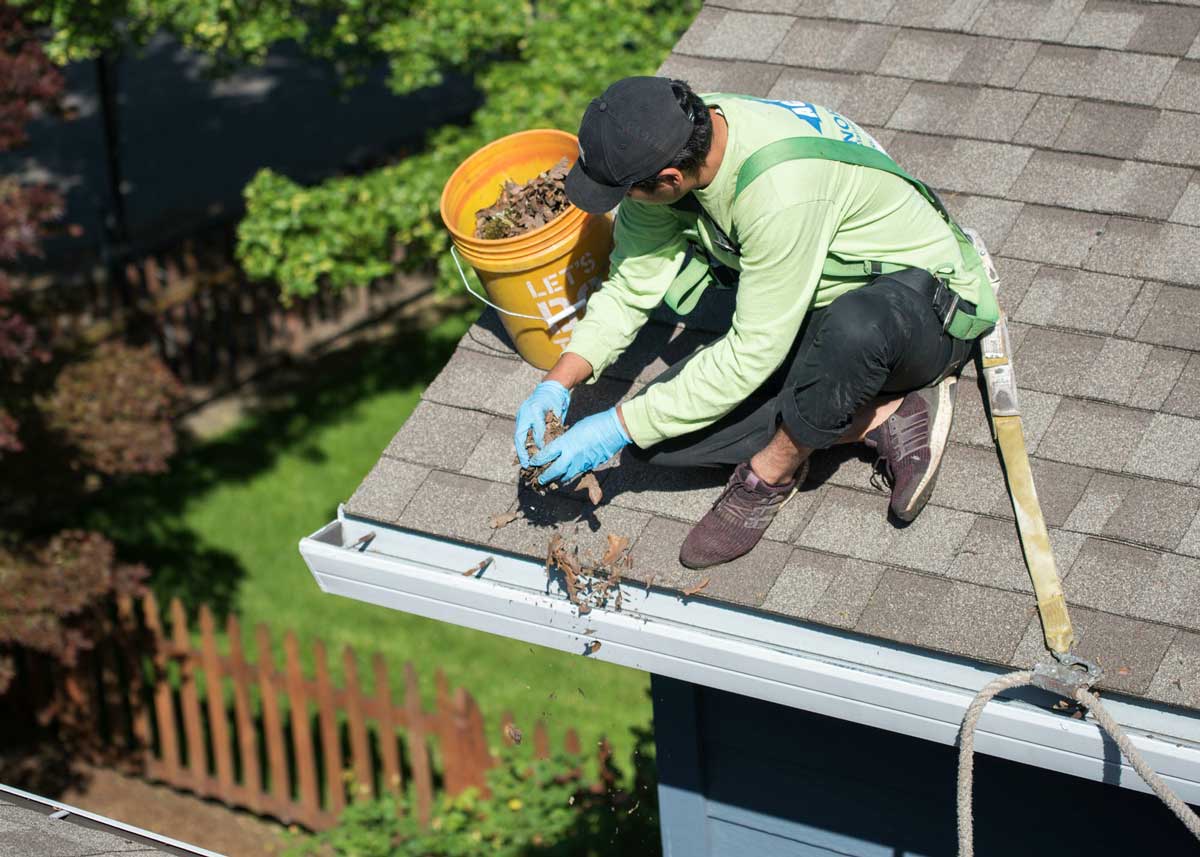
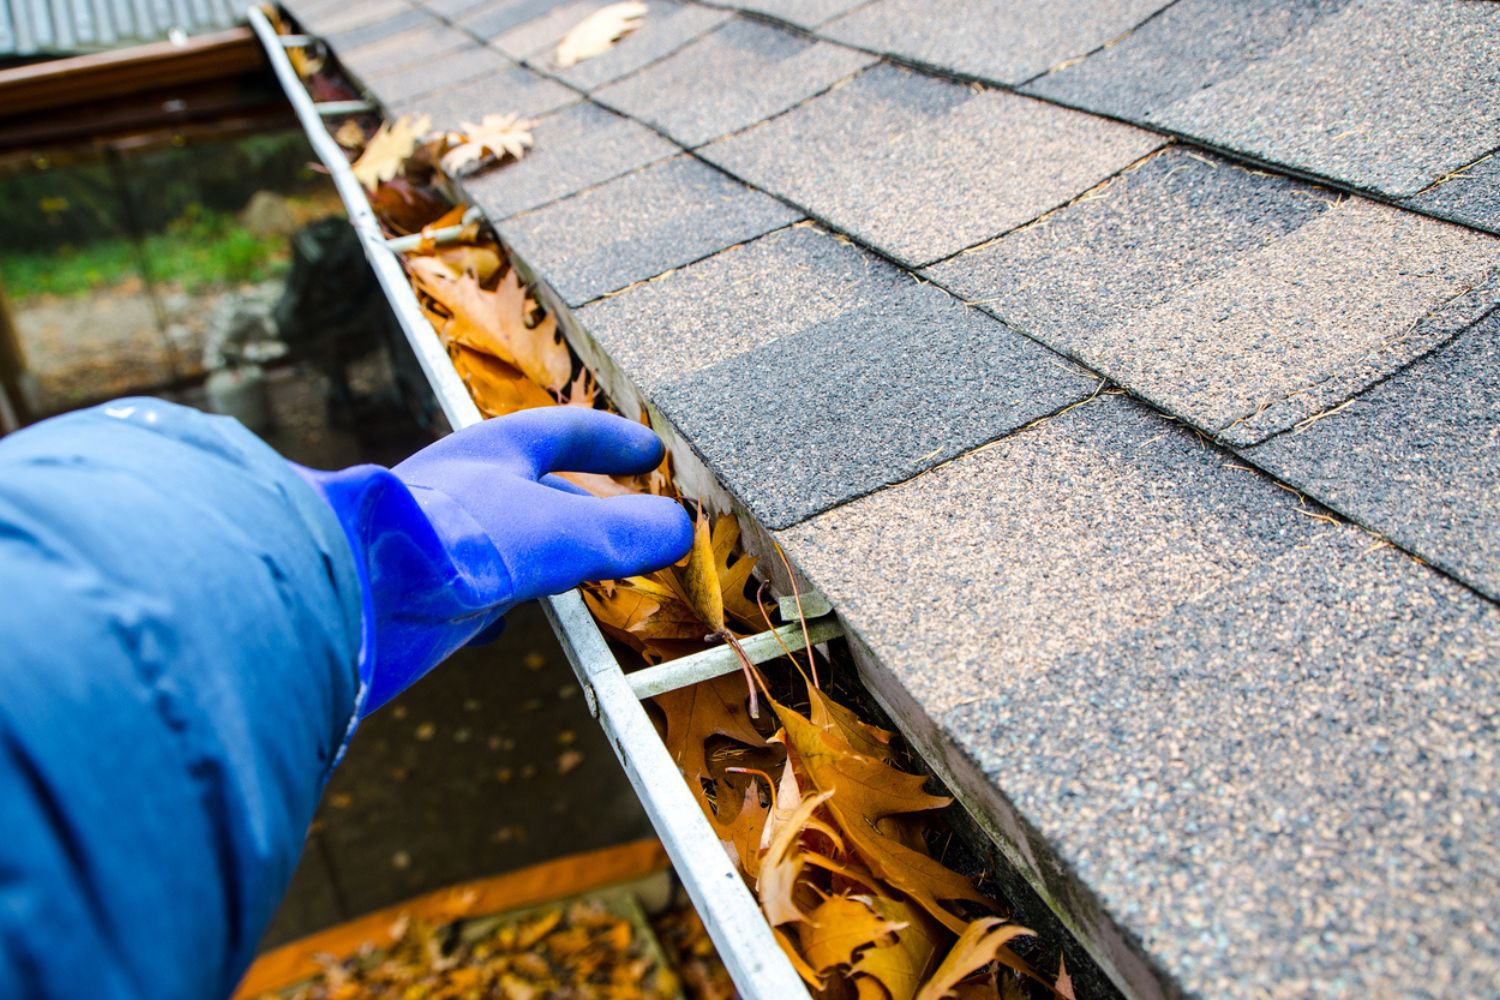
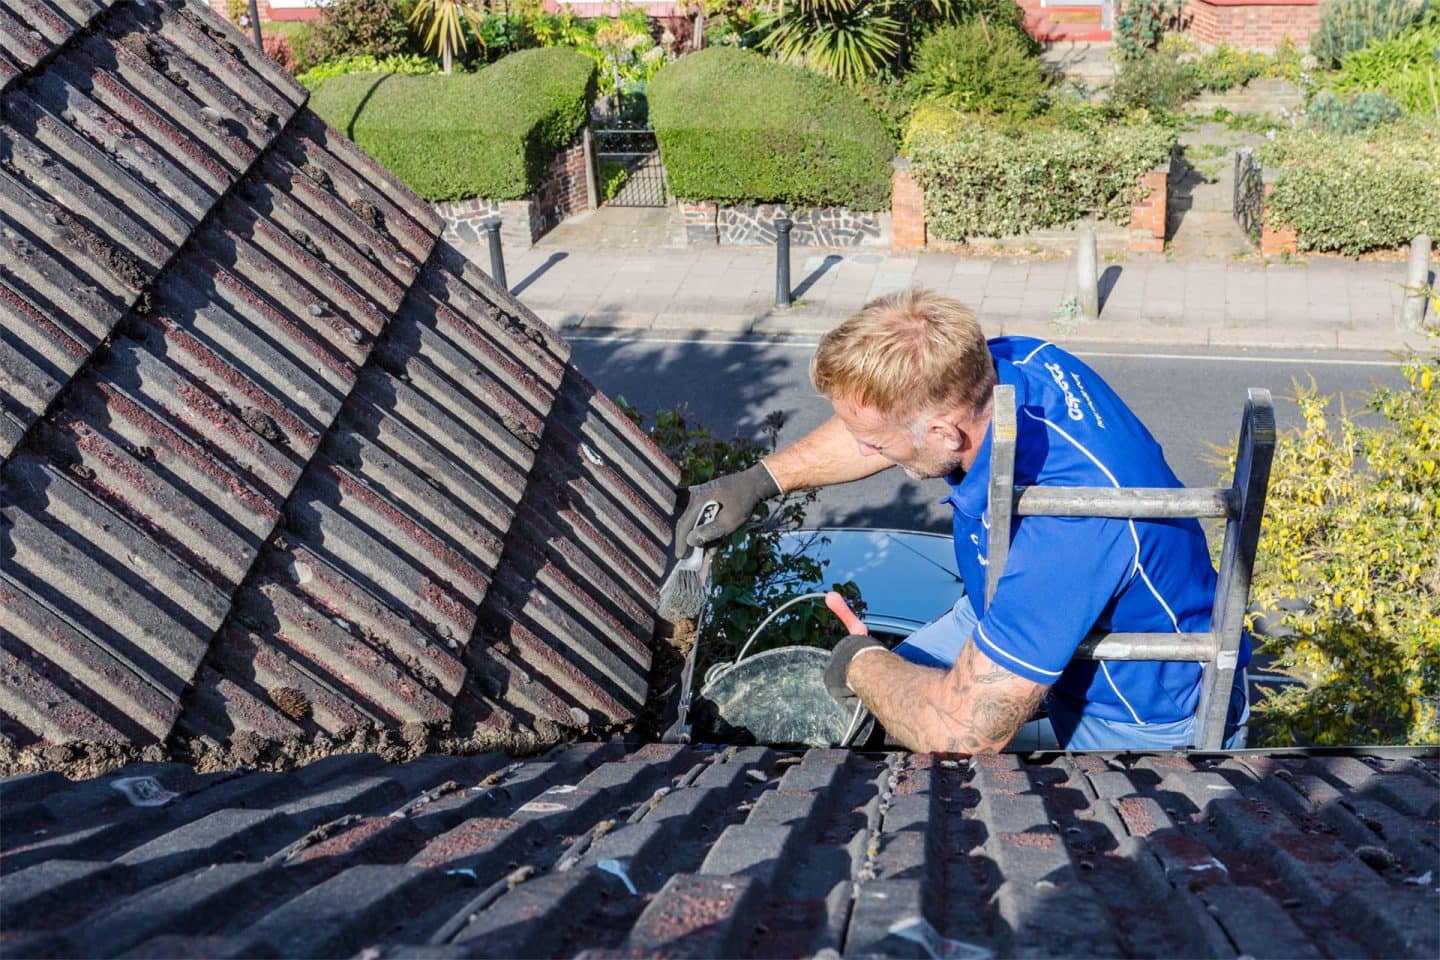
Step 4: Removing Leaves by Hand
Now that you have safely set up the ladder, it’s time to start removing leaves and debris from the gutters. Here’s how to do it:
- Put on Gloves and Safety Gear: Before reaching into the gutters, put on a pair of thick gloves to protect your hands from potential sharp objects or animal waste.
- Start Near the Downspout: Begin by working near the downspout and gradually move along the length of the gutters. This will help ensure that the downspout doesn’t get clogged with debris as you progress.
- Reach into the Gutters: Use your gloved hand to reach deep into the gutter and scoop up the accumulated leaves and debris. Pull them towards you and deposit them into a bucket or tarp on the ground.
- Remove Larger Debris: Be on the lookout for larger debris like branches or rocks. Pick them up and place them directly into the collection container. Set aside any large debris separately for disposal later.
- Work in Sections: Clean the gutters in small sections, progressing along the length of the gutters as you go. This will help you maintain balance on the ladder and prevent excessive stretching or leaning.
- Inspect for Blockages: As you remove the leaves, check for any blockages or buildup in the gutters. If you come across a clog, use your gloved hand or a trowel to carefully dislodge the debris and continue clearing the gutter.
- Dispose of Debris: Empty the contents of your collection container into a compost pile or sealed garbage bag for disposal.
- Repeat the Process: Continue removing leaves and debris from the gutters until you have cleaned the entire length of the gutter system.
By removing leaves by hand, you can have better control over the cleaning process and ensure that you thoroughly clear the debris from the gutters. However, if the gutters are heavily clogged or difficult to reach, consider using a different tool or technique, which will be covered in the next steps.
Use a leaf blower or a gutter cleaning tool to remove leaves from gutters. Start from the downspout and work your way towards the corners for the most effective cleaning.
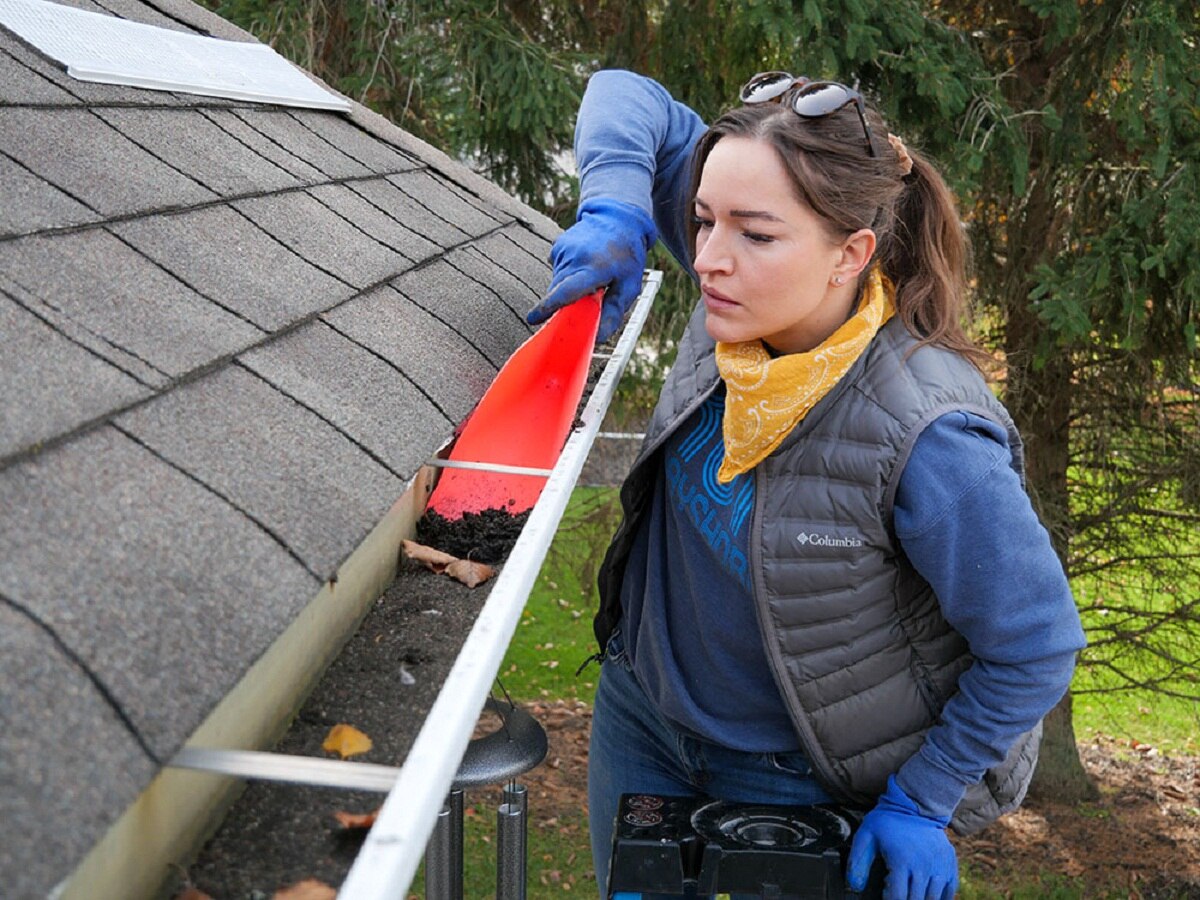
Step 5: Using a Trowel or Scoop
In addition to removing leaves by hand, using a trowel or scoop can be an effective method for cleaning gutters, especially if there is a significant amount of debris or if the gutters are hard to reach. Follow these steps to use a trowel or scoop for gutter cleaning:
- Select the Right Tool: Choose a handheld trowel or scoop specifically designed for gutter cleaning. Look for one with a long handle and a narrow, curved end for easy maneuverability and efficient debris removal.
- Reach Into the Gutters: Insert the trowel or scoop into the gutters and pull it towards you, scraping along the bottom to collect the leaves and other debris. Work in small sections, keeping the tool parallel to the gutter walls for maximum effectiveness.
- Deposit Debris into Collection Container: After scraping the debris, transfer it into a bucket, tarp, or other collection container. Be mindful not to drop the debris into the gutters or downspouts, as it could cause blockages.
- Clear Blockages: If you encounter a stubborn blockage, use the trowel or scoop to dislodge the debris and facilitate better water flow. Be gentle to avoid damaging the gutter system.
- Work Gradually: Move along the gutter length, clearing the debris systematically to ensure thorough cleaning. Take your time and be cautious while working on the ladder.
- Dispose of Debris: Empty the collected debris into a compost bin or sealed garbage bag for proper disposal.
- Inspect for Any Remaining Debris: After using the trowel or scoop, visually inspect the gutters to ensure that all debris has been removed. If you notice any leftover leaves or dirt, use the tool to scoop them out for a clean and unobstructed gutter system.
Using a trowel or scoop can make the gutter cleaning process more efficient, especially when dealing with a substantial amount of debris or hard-to-reach gutters. By following these steps, you’ll be able to effectively clear out the gutters and ensure proper water flow.
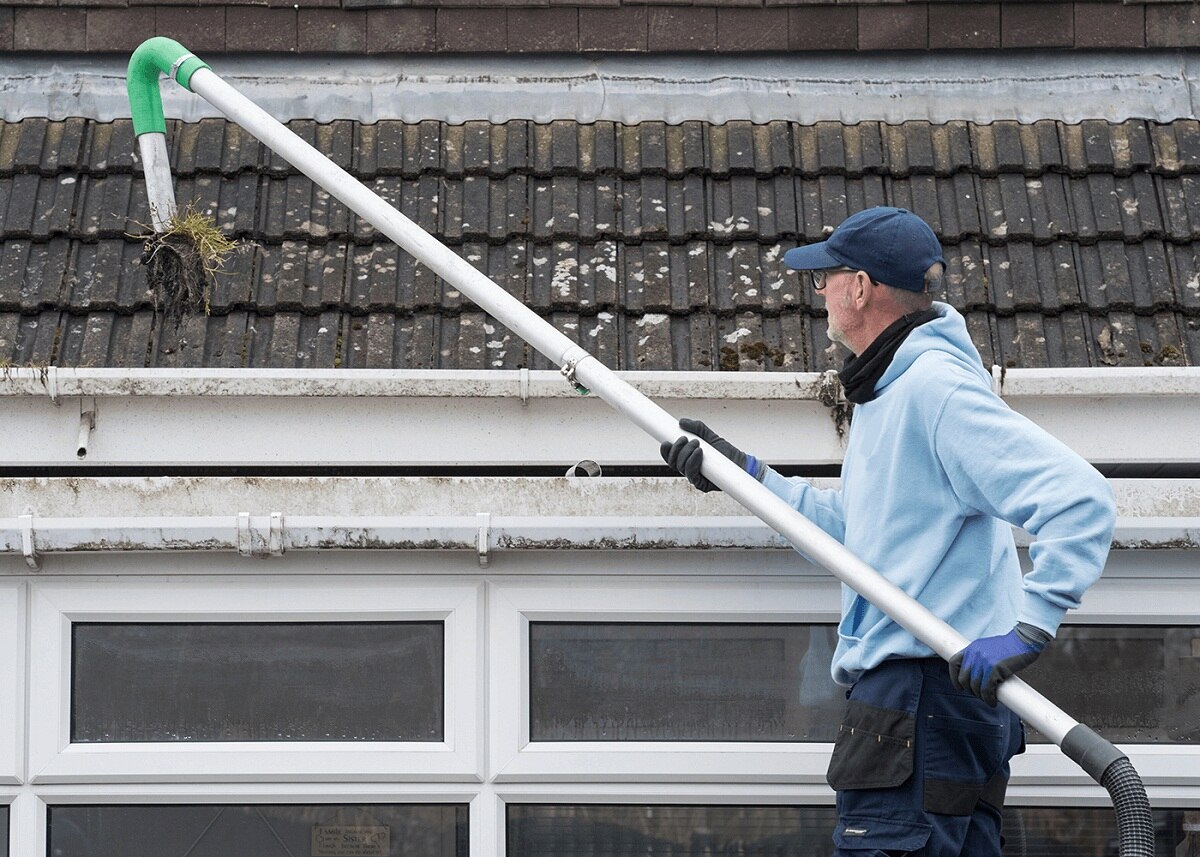
Step 6: Flushing the Gutters with Water
Once you have removed the majority of leaves and debris from the gutters, it’s time to flush them with water to ensure a thorough cleaning. Here’s how to effectively flush the gutters:
- Prepare the Garden Hose: Connect a garden hose to an outdoor water source and ensure that it is long enough to reach all areas of the gutters.
- Start from the Far End: Begin at the farthest end of the gutters from the downspout. This will help ensure that any remaining debris is flushed out along the length of the gutters.
- Turn on the Water: Turn on the water to a moderate flow, avoiding excessive water pressure that could potentially damage the gutters. Start with a gentle stream and gradually increase the pressure as needed.
- Direct the Water into the Gutters: Position the nozzle of the garden hose at an angle inside the gutter and direct the water towards the downspout. This will help dislodge any remaining small debris, dirt, or residue in the gutters.
- Observe the Water Flow: Watch the water as it flows through the gutters and downspouts. Ensure that there are no blockages causing water to back up or overflow. If you notice any obstructions, use the water pressure to help clear them.
- Check for Proper Drainage: As the water flushes through the gutters, observe how well it is draining. Ensure that the water is flowing freely and not pooling or accumulating in any sections of the gutter.
- Move Along the Gutters: Gradually move along the length of the gutters, repeating the process of flushing with water until you reach the downspout.
- Flush the Downspouts: Once you have flushed the gutters, direct the water flow directly into the downspouts to ensure they are clear. If there is any resistance, use a plumber’s snake or a high-pressure nozzle attachment to dislodge and remove any clogs.
- Inspect the Gutters: After flushing with water, inspect the gutters to ensure they are clean and free of debris. If there are any remaining leaves or dirt, consider repeating the process or using a brush or trowel to remove them.
Flushing the gutters with water is an important step in the cleaning process to remove any residual debris and ensure optimal water flow. By following these steps, you’ll be able to achieve clean and effectively-functioning gutters that can efficiently divert rainwater away from your home.
Read more: How To Clean Out Gutters From The Ground
Step 7: Checking for Any Blockages
After cleaning the gutters and flushing them with water, it’s essential to check for any remaining blockages that could impede proper water flow. Here’s how to check for blockages:
- Visually Inspect the Gutters: Take a close look at the gutters to spot any signs of blockages. Look for areas where water may be backing up or overflowing, as this could indicate a blockage.
- Check Downspouts: Examine the downspouts to see if water is flowing smoothly or if there are any signs of blockage. Observe if there is a consistent flow of water coming out of the downspouts.
- Listen for Water Flow: Stand near the downspout and listen for the sound of water flowing freely. If you hear gurgling or unusual sounds, it may indicate a blockage in the downspout or the gutters.
- Use a Plumbers Snake or Auger: If you suspect a blockage, use a plumbers snake or auger to remove the obstruction. Insert the tool into the downspout or gutter and gently maneuver it to dislodge the debris.
- Consider Using a High-Pressure Nozzle Attachment: If the blockage is stubborn or hard to reach, attach a high-pressure nozzle to the garden hose and carefully direct the water into the downspout or gutter to clear the blockage.
- Repeat the Flushing Process: If you are still experiencing issues, repeat the process of flushing the gutters with water to ensure that any remaining debris is dislodged.
- Consult a Professional: If you are unable to clear the blockage or suspect significant damage to the gutter system, it may be necessary to seek the assistance of a professional gutter cleaner or a roofing contractor.
Checking for blockages ensures that your gutters are properly functioning and preventing any potential issues such as water overflow or damage to your home’s foundation. By following these steps and taking prompt action to clear blockages, you can maintain the effectiveness of your gutter system and protect your home.
Step 8: Cleaning the Downspouts
Cleaning the downspouts is an important step in ensuring proper water flow and preventing clogs in your gutter system. Here’s how to clean the downspouts:
- Inspect the Downspouts: Begin by visually inspecting the downspouts to check for any visible debris or blockages. Look for signs of leaves, twigs, or other obstructions that could hinder water flow.
- Detach the Downspout Extension: If your downspouts have extension pipes, detach them at the connecting joints to gain access to the downspout itself.
- Use a Plumbers Snake or Auger: Insert a plumbers snake or auger into the top opening of the downspout and slowly feed it down. Rotate the snake or auger clockwise as you push it down into the downspout to help dislodge any debris.
- Push and Rotate: Apply gentle but firm pressure on the snake or auger as you push it further down the downspout. Rotate it in both clockwise and counterclockwise directions to break up any compacted debris.
- Flush with Water: After using the snake or auger, flush the downspout with water. Attach a high-pressure nozzle to your garden hose and direct the water into the top opening of the downspout. This will help flush out any loosened debris.
- Clear the Bottom Opening: If your downspout has a bottom opening, ensure that it is also clear of any debris. Use the snake or auger to gently remove any obstructions from the bottom opening.
- Reattach the Downspout Extension: Once you’ve cleared the downspout, reattach any extension pipes you may have removed earlier. Ensure that the connections are secure and watertight.
- Inspect and Test: After cleaning and reassembling the downspout, visually inspect it to ensure it is free from blockages. Then, run water through the gutter system and check if the downspout is allowing proper water flow.
- Repeat if Necessary: If you notice any blockages or issues with water flow, repeat the cleaning process or seek professional assistance if the problem persists.
Cleaning the downspouts is vital for maintaining the functionality of your gutter system. By following these steps and removing any obstructions, you can promote proper water drainage and prevent potential water damage to your home.
Step 9: Final Inspection and Cleanup
After completing the cleaning process, it’s important to perform a final inspection of your gutters and ensure everything is in proper working order. Here’s how to conduct a final inspection and complete the cleanup:
- Check for Any Remaining Debris: Take a close look at your gutters to ensure that all debris has been removed. Inspect both the gutters and downspouts for any signs of blockages or build-up.
- Test Water Flow: Run water through your gutter system to verify that water is flowing freely and draining properly. Pay attention to any areas where water may be pooling or overflowing.
- Inspect the Roof and Gutters for Damage: While inspecting the gutters, also examine your roof for any signs of damage or areas that may need repair. Look for loose or damaged shingles, leaks, or any other issues that should be addressed.
- Repair Any Damage: If you notice any damage to your gutters or roof, it’s important to address it promptly. Repair or replace any damaged components to ensure the longevity and effectiveness of your gutter system.
- Clean Up the Work Area: Collect all the tools, materials, and debris that accumulated during the cleaning process. Dispose of the debris properly according to local regulations. Clean and organize your work area to leave it neat and tidy.
- Consider Gutter Guards or Covers: To reduce the frequency of gutter cleaning and prevent future build-up of debris, you may want to consider installing gutter guards or covers. These devices can help keep leaves and other debris out of your gutters, reducing the need for frequent cleaning.
- Evaluate the Frequency of Cleaning: Take note of the condition and cleanliness of your gutters after the cleaning process. Assess how often you may need to clean your gutters in the future based on factors such as the surrounding trees and the climate in your area.
- Maintain Regular Gutter Maintenance: To keep your gutters in optimal condition, make gutter cleaning a part of your regular home maintenance routine. Schedule cleanings at least twice a year or more frequently if necessary.
Completing a final inspection and cleanup ensures that your gutters are clean, functional, and ready to effectively manage rainwater runoff. Regular maintenance and attention to your gutter system will help prolong its lifespan and prevent potential water damage to your home.
Conclusion
Cleaning leaves from gutters is a vital task that should be a part of every homeowner’s maintenance routine. By following the step-by-step guide outlined in this article, you can effectively clean your gutters and ensure their optimal functionality. Regular gutter maintenance not only prevents water damage to your home but also aids in preserving the integrity of your roof and foundation.
Starting with safety precautions, such as using a sturdy ladder and wearing appropriate protective gear, ensures your well-being throughout the cleaning process. Removing leaves and debris by hand or using a trowel allows for thorough cleaning, while flushing the gutters with water helps to clear any remaining residue.
Checking for blockages and cleaning downspouts ensures unobstructed water flow, reducing the risk of clogs and water damage. Performing a final inspection allows you to identify any damage or repair needs, ensuring your gutters are in proper working order. Additionally, considering the installation of gutter guards or covers can help minimize future debris accumulation.
Maintaining regular gutter cleaning and maintenance will keep your gutter system in its best condition. By incorporating these practices into your home maintenance routine, you can protect your home from potential water damage, preserve the lifespan of your gutters, and enhance the overall functionality and aesthetics of your property.
Remember, if at any point you feel uncomfortable or unsure about cleaning your gutters, it’s always wise to seek professional assistance. They have the expertise and proper equipment to tackle even the most challenging gutter cleaning tasks.
Take pride in maintaining your gutters and enjoy the peace of mind that comes from knowing your home is safeguarded against potential water damage. So, grab your gloves, climb that ladder, and start cleaning those leaves from your gutters – your home will thank you!
Frequently Asked Questions about How To Clean Leaves From Gutters
Was this page helpful?
At Storables.com, we guarantee accurate and reliable information. Our content, validated by Expert Board Contributors, is crafted following stringent Editorial Policies. We're committed to providing you with well-researched, expert-backed insights for all your informational needs.


0 thoughts on “How To Clean Leaves From Gutters”