Articles
How To Take Off Gutters
Modified: October 18, 2024
Learn step-by-step articles on how to take off gutters and effectively maintain your home's drainage system. Discover expert tips and techniques for gutter removal.
(Many of the links in this article redirect to a specific reviewed product. Your purchase of these products through affiliate links helps to generate commission for Storables.com, at no extra cost. Learn more)
Introduction
Gutters are an essential component of any home’s drainage system. They help collect and redirect rainwater away from the roof and foundation, preventing potential water damage and erosion. However, there may be instances when you need to remove gutters, such as during a renovation, repair, or replacement project. This article will guide you through the step-by-step process of taking off gutters efficiently and safely.
Before we dive into the details, it’s important to note that working at height and removing gutters can be potentially hazardous. Ensure you follow proper safety precautions throughout the process. If you are uncomfortable or unsure about performing the task yourself, it’s always best to hire a professional to handle the job.
In this article, we will provide a comprehensive guide on how to take off gutters, including the necessary tools and materials needed, as well as important considerations for a successful gutter removal project. Let’s get started!
Key Takeaways:
- Prioritize safety by wearing appropriate gear, securing ladders, and avoiding inclement weather when removing gutters. Always work with a partner and inspect the gutters for stability before starting the removal process.
- Gather essential tools and materials, clear the area, and follow a systematic approach to safely remove gutters. Dispose of gutters responsibly and inspect for any damage to ensure a smooth removal process.
Read more: How To Clean Mold Off Gutters
Safety Precautions
When it comes to any home improvement task, safety should always be your top priority. Before you begin removing gutters, make sure to follow these safety precautions:
- Wear appropriate safety gear, including gloves, safety glasses, and a hard hat to protect yourself from potential hazards such as debris and falling objects.
- Use a sturdy ladder with rubber feet and ensure it is securely positioned on a stable surface. Avoid placing the ladder on uneven ground or slippery surfaces.
- Do not attempt to remove gutters during inclement weather, such as heavy rain or strong winds. Wait for a clear and calm day to prevent accidents or injuries.
- Always work with a partner who can assist you and provide an extra set of hands when needed. They can also help ensure your safety while working at height.
- Be cautious of electrical wires that may be present near the gutter system. Avoid coming into contact with them or causing any damage that could result in electrical hazards.
- If you encounter any bees, wasps, or other stinging insects near the gutters, exercise caution and call a professional pest control service if necessary.
- Inspect the condition of the gutters and downspouts before removing them. If they appear to be in poor condition or unstable, it’s best to use extra caution or contact a professional.
- Take breaks as needed and stay hydrated while working under the sun. Overexertion and dehydration can lead to accidents and health issues.
- If you have any concerns or doubts about your ability to safely remove the gutters, it’s advisable to consult with a professional or seek their assistance.
By following these safety precautions, you can minimize the risk of accidents and ensure a safe working environment while removing your gutters.
Tools and Materials Required
Before you begin taking off gutters, gather the necessary tools and materials to ensure a smooth and efficient process. Here are the items you will need:
- Ladder: Choose a sturdy ladder that is tall enough to reach the gutters comfortably. Ensure it has rubber feet and is in good condition.
- Gloves: Wear heavy-duty work gloves to protect your hands from sharp edges, debris, and potential contaminants.
- Safety Glasses: Protect your eyes from dust, debris, and any potential hazards by wearing safety glasses.
- Screwdriver: Depending on the type of gutter hangers used, you may need a screwdriver to remove the screws or fasteners that secure the gutters to the fascia.
- Tin Snips: If your gutters are made of aluminum or another soft material, tin snips can help you cut through them easily.
- Hammer: A hammer may be needed to gently tap and loosen stubborn gutter hangers or downspouts.
- Pry Bar: A pry bar can be useful for leveraging and removing stubborn gutter sections.
- Plastic Bags or Tarps: Use plastic bags or tarps to collect and dispose of the removed gutter sections and debris.
- Buckets: Have a few buckets on hand to gather any water or debris that may be trapped in the gutters.
- Trash Bags: Use trash bags to dispose of any collected debris and keep your work area clean.
- Caulk Gun and Sealant: If you plan to reinstall or replace the gutters, you may need a caulk gun and suitable sealant to ensure proper installation and prevent leaks.
- Cleaning Supplies: Prepare a bucket of soapy water, scrub brush, and a hose for cleaning the roof and fascia once the gutters are removed.
Having these tools and materials readily available will help streamline the gutter removal process and ensure you have everything you need to complete the task efficiently.
Step 1: Clearing the Area
Before you start removing the gutters, it’s important to clear the area around your home to create a safe and accessible work environment. Follow these steps to clear the area:
- Remove any obstacles or debris from the ground near the gutters. This includes items such as potted plants, patio furniture, or garden tools.
- Trim any overhanging tree branches or foliage that may obstruct your access to the gutters. This will make it easier to maneuver and prevent any damage to the branches or your gutters.
- Securely cover any nearby delicate plants or shrubs with plastic sheets or tarps to protect them from falling debris or potential damage during the gutter removal process.
- Clear the area of any loose debris such as leaves, sticks, or dirt. Use a broom or leaf blower to sweep away any debris on the roof, fascia, and surrounding areas.
- If there is any standing water in the gutters, use a bucket or scoop to remove it. Dispose of the water appropriately.
By clearing the area before you start removing the gutters, you create a safe and organized workspace that will facilitate a smooth and efficient gutter removal process.
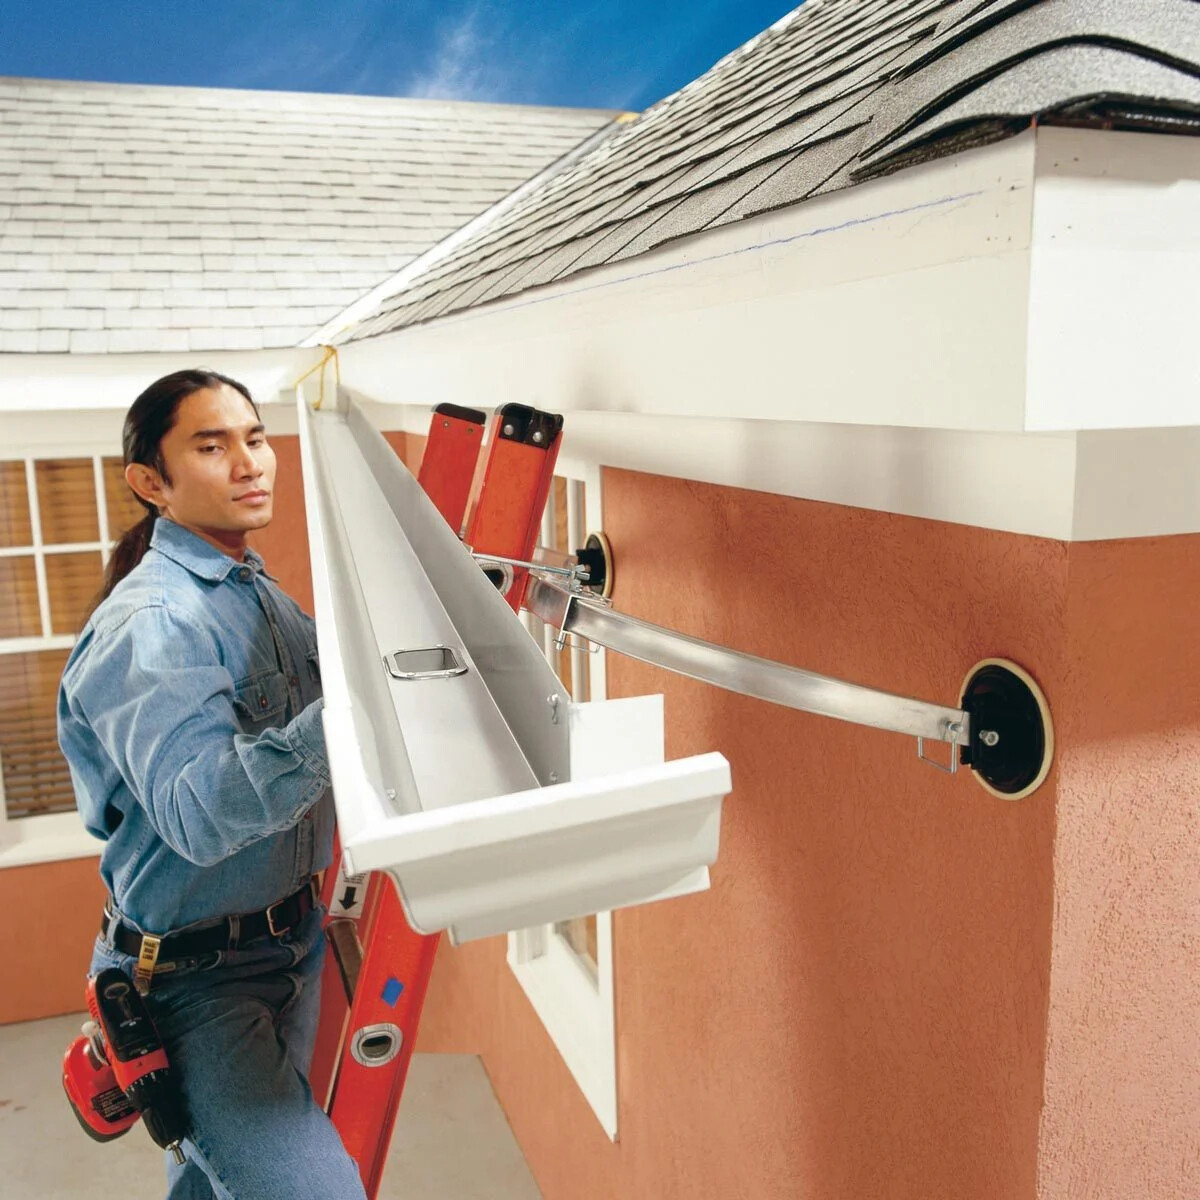
Step 2: Removing Downspouts
Once the area is clear, the next step in removing gutters is to tackle the downspouts. Follow these steps to remove the downspouts:
- Start at the bottom of the downspout and work your way up. Use a screwdriver or drill to remove any screws or fasteners that secure the downspout to the wall.
- Gently pull the downspout away from the wall, loosening it from any brackets or hangers as you go. If necessary, tap the brackets or hangers with a hammer to loosen them.
- If the downspout is connected to another section with a connector, detach the connector by sliding or unclipping it. Be careful not to twist or force the downspout to avoid damaging it.
- Continue to remove the downspout section by section until it is completely detached from the gutters and wall.
- Inspect the downspout for any signs of damage or wear. If the downspout is in good condition, you can store it for future use. Otherwise, dispose of it appropriately.
Removing the downspouts first will make it easier to remove the gutters later on. Ensure you handle the downspouts with care to avoid any unnecessary damage.
Read more: How To Clean Black Streaks Off Gutters
Step 3: Loosening Gutter Hangers
With the downspouts removed, it’s time to loosen the gutter hangers. These hangers are the metal brackets or clips that secure the gutters to the fascia board. Follow these steps to loosen the gutter hangers:
- Start at one end of the gutter section and locate the gutter hangers. These are typically spaced evenly along the length of the gutter.
- Using a screwdriver or drill, remove the screws or fasteners that secure the gutter hangers to the fascia board. Take care not to strip or damage the screws.
- Gently pry or wiggle the gutter hangers to loosen them from the gutter. If they are stubborn or stuck, you can use a hammer or pry bar to gently tap or nudge them loose.
- Repeat this process for all the gutter hangers along the length of the gutter section.
- Once all the gutter hangers are loosened, carefully remove the gutter section from the hangers. Take note of any additional screws or fasteners that may be securing the gutter to the hangers.
- Inspect the gutter hangers for any signs of damage or wear. If they are in good condition, you can save them for future use. Otherwise, dispose of them appropriately.
Loosening the gutter hangers will allow you to easily remove the gutter sections. Take your time to ensure the hangers are properly loosened without causing any unnecessary damage to the fascia board or gutter itself.
When taking off gutters, start by removing the downspouts and then work your way along the gutter, loosening the hangers and removing any screws or nails holding it in place. Be sure to have a helper to assist with the process.
Step 4: Unscrewing Gutter Sections
After loosening the gutter hangers, the next step is to unscrew and remove the gutter sections. Follow these steps to safely remove the gutter sections:
- Start at one end of the gutter section that is closest to the downspout.
- Using a screwdriver or drill, locate the screws or fasteners that secure the gutter section to the hangers.
- Carefully unscrew and remove the screws or fasteners, taking care not to strip or damage them.
- Once the screws are removed, gently slide or lower the gutter section out of the hangers.
- If the gutter section is long or heavy, have a partner assist you in supporting and guiding it as you remove it.
- Continue to unscrew and remove each gutter section, working your way towards the other end of the gutter.
- Inspect each gutter section as you remove it for any signs of damage or corrosion. Make note of any sections that may need repair or replacement.
- Store the removed gutter sections in a safe location for future use or dispose of them appropriately if they are damaged.
By unscrewing and removing the gutter sections carefully, you can avoid damaging the gutters or the fascia board. Take your time and ensure each section is properly removed before moving on to the next one.
Step 5: Proper Disposal of Gutters
Once the gutters are removed, it’s important to dispose of them properly. Here are some guidelines to follow for the proper disposal of gutters:
- If the gutters are in good condition and can be reused, consider donating them to a local charity or community organization. They may be able to repurpose the gutters for various projects.
- If the gutters are damaged or no longer usable, check with your local recycling center to see if they accept metal gutters for recycling. Many facilities have programs in place to recycle metal materials.
- If you are unable to recycle the gutters, contact your local waste management company to inquire about their guidelines for disposing of metal materials. They may have designated pickup services or drop-off locations for such items.
- Ensure that the gutters are securely loaded and transported to the appropriate recycling or disposal facility. Use a vehicle that is suitable for hauling heavy objects and secure the gutters to prevent them from shifting or falling during transit.
- Do not discard the gutters in regular household waste bins or leave them on the curb for regular garbage pickup. This can lead to environmental pollution and potential fines.
By disposing of gutters responsibly, you contribute to reducing waste and promoting sustainability. Consider the condition of the gutters and explore recycling or donation options before resorting to disposal.
Step 6: Cleaning the Roof and Fascia
Once the gutters are removed, it’s essential to clean the roof and fascia to ensure a clean and well-maintained appearance. Follow these steps to clean the roof and fascia:
- Begin by removing any loose debris, such as leaves or twigs, from the roof with a broom or leaf blower. Be cautious when working on the roof and step carefully to avoid damaging the shingles.
- Use a hose or pressure washer to rinse off any remaining dirt or debris from the roof. Start from the top and work your way down, ensuring that water flows towards the gutter area.
- Scrub the fascia boards using a solution of mild soap and water. Use a soft brush or sponge to gently scrub away any dirt or stains. Be careful not to apply excessive pressure that could damage the fascia.
- Rinse the fascia boards with clean water to remove the soap residue. Ensure the water flows away from the house to prevent any potential stains or water damage to the walls.
- Inspect the roof and fascia for any signs of damage, such as cracked shingles or rotting wood. If you notice any issues, it may be necessary to consult a professional for repairs or further assessment.
- Allow the roof and fascia to air dry completely before proceeding with any further maintenance or installation of new gutters.
Cleaning the roof and fascia not only improves the aesthetics of your home but also allows you to identify any potential issues that may require attention. Taking care of your roof and fascia ensures the longevity and integrity of your home’s exterior.
Read more: How To Take Off A Chandelier
Step 7: Inspecting for Damage
After the gutters have been removed and the area has been cleaned, it’s crucial to inspect the roof, fascia, and other components for any signs of damage. This step is essential to identify any issues that may require repairs or further attention. Follow these steps to inspect for damage:
- Start by examining the fascia and soffit boards. Look for any signs of rot, moisture damage, or peeling paint. If you notice any issues, it’s recommended to consult a professional for repairs or replacement.
- Closely inspect the roof for any damaged or missing shingles. Look for signs of wear, cracking, or curling. Ensure that the roof is in good condition to prevent water leakage or further damage.
- Check the areas where the gutters were attached, such as the fascia boards or eaves. Look for any damage or deterioration caused by the previous gutter system. If needed, repair or reinforce these areas before installing new gutters.
- Inspect the downspout mounting brackets or straps that were attached to the walls. Ensure they are still secure and not causing any damage to the exterior.
- Check the surrounding landscape and foundation for any signs of erosion or water damage. Address any grading or drainage issues to prevent future water-related problems.
- Pay attention to any signs of water stains or moisture damage on the walls or ceilings inside the house. This may indicate leaks or issues related to the previous gutter system.
- If you notice significant damage or are unsure about the overall condition of your roof and fascia, it’s best to consult a professional roofing contractor. They can provide a thorough assessment and recommend the necessary repairs or replacements.
By carefully inspecting for damage, you can address any issues promptly and ensure the structural integrity and longevity of your home. Regular maintenance and inspections are crucial for preventing further damage and protecting your investment.
Conclusion
Taking off gutters may seem like a daunting task, but with the right approach and proper guidance, it can be completed smoothly and efficiently. Removing gutters is often necessary for renovations, repairs, or replacements, and following the step-by-step process outlined in this article can help you accomplish the task safely.
Throughout the removal process, it’s crucial to prioritize safety by adhering to the recommended precautions. Use the appropriate protective gear, ensure stable ladder placement, and be mindful of potential hazards such as electrical wires and stinging insects.
Gathering the necessary tools and materials beforehand will help make the gutter removal process more manageable. From ladders and gloves to screwdrivers and cleaning supplies, having everything on hand will ensure a seamless experience.
The step-by-step process outlined in this article starts with clearing the area, removing downspouts, loosening gutter hangers, unscrewing gutter sections, and properly disposing of the gutters. You’ll also learn about cleaning the roof and fascia as well as inspecting for any damage that requires attention.
By following these steps, you can successfully remove gutters and pave the way for further maintenance, repairs, or new gutter installations. However, if you feel uncertain or uncomfortable tackling this task yourself, it’s always advisable to seek professional assistance.
Remember, maintaining your home’s gutter system is essential for proper water drainage and overall structural integrity. Regular inspections, cleaning, and repairs will help prevent potential water damage, mold growth, and other related issues.
With a comprehensive understanding of the gutter removal process and the necessary precautions in place, you can confidently embark on your gutter removal project. Take pride in your home’s maintenance and enjoy the benefits of a well-maintained drainage system.
Frequently Asked Questions about How To Take Off Gutters
Was this page helpful?
At Storables.com, we guarantee accurate and reliable information. Our content, validated by Expert Board Contributors, is crafted following stringent Editorial Policies. We're committed to providing you with well-researched, expert-backed insights for all your informational needs.


0 thoughts on “How To Take Off Gutters”