Home>Articles>How To Cook Steak In Townecraft Electric Skillet

Articles
How To Cook Steak In Townecraft Electric Skillet
Modified: August 22, 2024
Learn how to cook the perfect steak in a Townecraft Electric Skillet with our informative articles. Easy and delicious recipes for steak lovers.
(Many of the links in this article redirect to a specific reviewed product. Your purchase of these products through affiliate links helps to generate commission for Storables.com, at no extra cost. Learn more)
Introduction
Cooking a delicious steak that is juicy and tender can be a challenging task. However, with the right equipment and technique, anyone can become a skilled steak chef in their own kitchen. One versatile and efficient cooking tool that can help achieve the perfect steak is the Townecraft Electric Skillet. This innovative appliance offers precise temperature control and even heat distribution, allowing you to cook your steak to perfection every time.
In this article, we will guide you through the step-by-step process of cooking a mouthwatering steak using the Townecraft Electric Skillet. From preparing and seasoning the steak to achieving the desired doneness, we will cover everything you need to know to impress your family and friends with your culinary skills.
So, let’s fire up the skillet and get ready to cook up a steak that will rival those served at the finest steakhouse in town!
Key Takeaways:
- Elevate your culinary skills with the Townecraft Electric Skillet and cook restaurant-quality steak at home. Follow the step-by-step guide for juicy, tender, and flavorful results every time.
- Master the art of cooking steak to perfection by choosing the right cut, seasoning, preheating, and achieving the desired doneness. Impress your loved ones with mouthwatering steaks using the Townecraft Electric Skillet.
Read more: How To Cook Steak In A Electric Skillet
Preparing the Steak
Before you start cooking, it’s important to choose the right cut of steak. Opt for well-marbled cuts like ribeye, New York strip, or filet mignon for the juiciest and most flavorful results. Make sure the steak is at room temperature, as cooking it straight from the refrigerator can result in uneven cooking.
Next, pat the steak dry with paper towels to remove any moisture. This will help the steak develop a nice crust when seared. Trim any excess fat from the edges of the steak, but leave a thin layer for added flavor.
If you prefer your steak to be more tender, consider using a meat tenderizer to gently pound the steak. This will help break down the connective tissues and make the steak more tender. However, be careful not to overdo it as it may turn the steak into mush.
Finally, if the steak is particularly thick, you may want to consider butterflying it. This involves cutting the steak horizontally, but not all the way through, and then opening it like a book. This technique allows for more even cooking and reduces the risk of overcooking the exterior before the interior reaches the desired temperature.
With the steak properly prepared, you are now ready to move on to the next step: seasoning.
Seasoning the Steak
Seasoning is a crucial step in cooking a flavorful steak. While a simple combination of salt and pepper can suffice, you can also get creative by adding other herbs and spices to enhance the taste profile. Here’s a basic seasoning method to get you started:
- Start by generously seasoning both sides of the steak with kosher salt. This will help to enhance the natural flavors of the meat.
- Next, sprinkle freshly ground black pepper over both sides of the steak. The pepper adds a subtle heat and complements the savory flavors.
- If desired, you can incorporate other seasonings like garlic powder, paprika, or dried herbs such as thyme or rosemary. These additional flavors will give your steak a unique twist.
- Gently press the seasonings into the surface of the steak to ensure they adhere properly. Allow the steak to sit for about 15 minutes to allow the flavors to penetrate the meat.
Remember, seasoning is subjective, and you can adjust the amounts and types of seasonings to suit your personal taste. Just be careful not to overpower the natural flavor of the steak. The goal is to enhance, not overwhelm.
Now that your steak is properly seasoned, it’s time to preheat the electric skillet.
Preheating the Electric Skillet
Preheating the electric skillet is essential for achieving a perfectly seared steak. Follow these steps to ensure the skillet is properly heated:
- Place the Townecraft Electric Skillet on a flat, heat-resistant surface.
- Ensure that the skillet is clean and free from any residue or debris from previous cooking sessions.
- Attach the temperature control probe securely to the electric skillet.
- Set the temperature to the desired cooking level. For a medium-rare steak, aim for around 400°F (200°C).
- Allow the electric skillet to preheat for a few minutes until it reaches the desired temperature. You can test if it’s hot enough by splashing a few drops of water onto the surface. If the water sizzles and evaporates quickly, the skillet is ready.
It’s important to note that preheating is a critical step to ensure even cooking and to help develop a delicious sear on the steak’s surface. Without proper preheating, the steak may cook unevenly or result in a less desirable texture.
With the Townecraft Electric Skillet preheated and ready to go, it’s time to move on to the next step: cooking the steak.
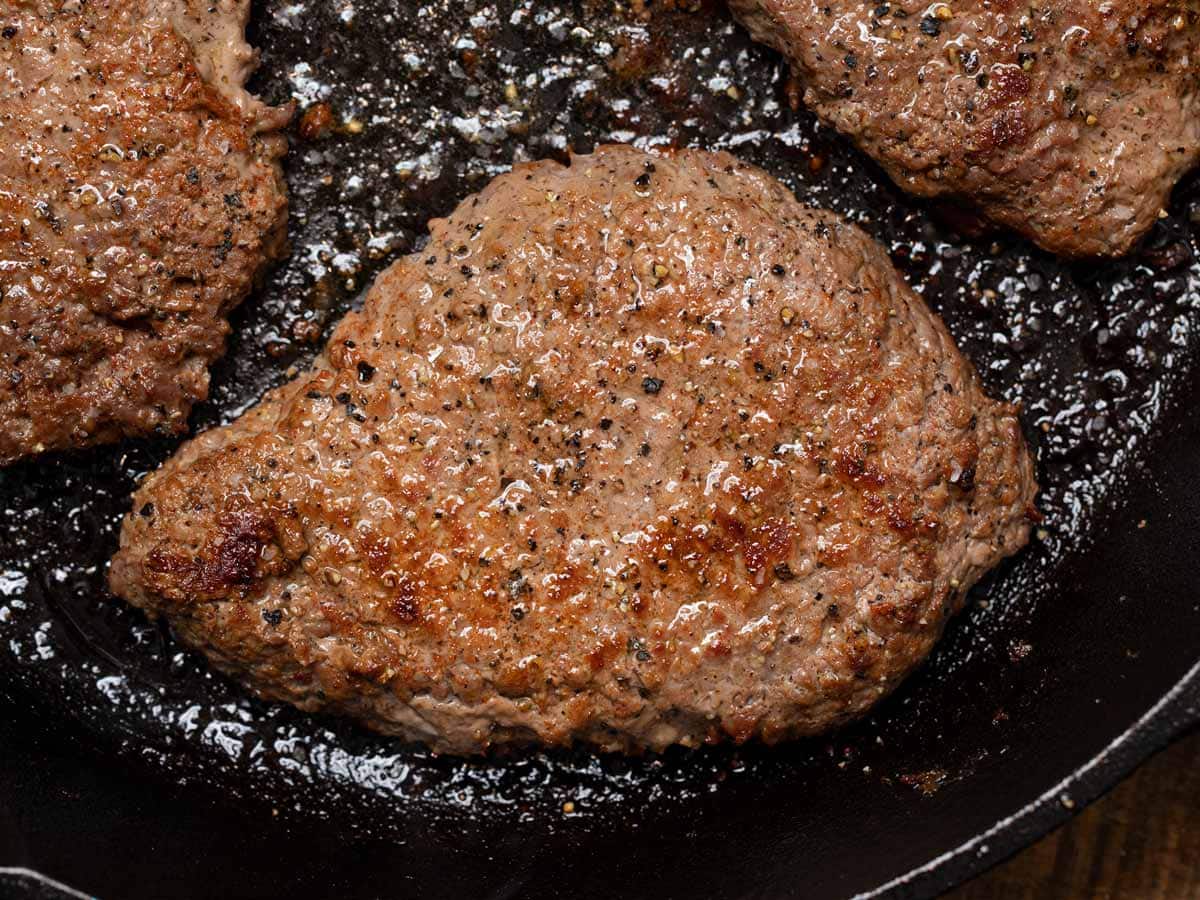
Cooking the Steak
Now that your electric skillet is preheated, it’s time to start cooking the steak. Follow these steps for perfectly cooked steak:
- Drizzle a small amount of oil onto the preheated electric skillet and spread it evenly to coat the surface. This will help prevent the steak from sticking and create a nice sear.
- Carefully place the seasoned steak onto the hot skillet. You should hear a sizzling sound as the steak makes contact with the surface.
- Allow the steak to cook undisturbed for a few minutes, depending on the desired level of doneness:
- For a rare steak, cook for about 2-3 minutes per side.
- For a medium-rare steak, cook for about 4-5 minutes per side.
- For a medium steak, cook for about 6-7 minutes per side.
- For a well-done steak, cook for about 8-9 minutes per side.
- After the first side is seared to your liking, use tongs to carefully flip the steak to the other side. Allow it to cook for the same amount of time as the first side.
- If you prefer your steak cooked closer to well-done, you can reduce the heat slightly and cook it for a few minutes longer on each side.
- During the cooking process, resist the temptation to continuously poke or press the steak as it can cause the juices to escape and result in a drier steak.
Remember, the cooking times mentioned above are just guidelines. The actual cooking time may vary depending on the thickness of the steak and the desired level of doneness. It’s always a good idea to use an instant-read meat thermometer to ensure the steak reaches your desired internal temperature:
- Rare: 120°F (49°C)
- Medium-rare: 130°F (54°C)
- Medium: 140°F (60°C)
- Medium-well: 150°F (66°C)
- Well-done: 160°F (71°C) and above
Once the steak has reached the desired doneness, it’s time to check for doneness and remove it from the skillet.
When cooking steak in a Townecraft electric skillet, make sure to preheat the skillet to the desired temperature before adding the steak. This will ensure a nice sear and even cooking.
Checking the Doneness
Checking the doneness of your steak is crucial to ensure it is cooked to your liking. Here are a few methods you can use to determine the steak’s doneness:
- Visual Inspection: One of the simplest ways to check the doneness is by visually inspecting the steak. As the steak cooks, its color will change. For a rare steak, the center should be bright red; for medium-rare, it should have a warm pink center; for medium, the center should be light pink; and for well-done, it should be grayish-brown.
- Touch Test: Another method is the touch test, which involves gently pressing the steak with your fingertips to gauge its firmness. For a rare steak, it should feel soft and squishy, similar to a sponge. For medium-rare, it should be firmer but still slightly yielding. For medium, it should have medium firmness with a little give, and for well-done, it should feel firm and springy.
- Meat Thermometer: The most accurate way to determine the doneness is by using a meat thermometer. Insert the thermometer into the thickest part of the steak, making sure it doesn’t touch the bone. The temperature should correspond to the desired level of doneness as mentioned earlier.
It’s important to note that the steak will continue to cook slightly as it rests, so it’s advisable to remove it from the heat when it’s slightly below the desired doneness. This will help ensure that it doesn’t overcook and become dry.
Once you have determined that the steak is cooked to your liking, it’s time to remove it from the electric skillet and let it rest before serving.
Resting and Serving the Steak
Resting the steak is a crucial step that allows the juices to redistribute throughout the meat, resulting in a juicier and more flavorful steak. Follow these steps to rest and serve your perfectly cooked steak:
- Using tongs, carefully transfer the cooked steak to a clean plate or cutting board. It’s important to use a surface that can catch any juices that may drip from the steak.
- Cover the steak loosely with aluminum foil. This will help retain the heat and prevent it from cooling too quickly.
- Allow the steak to rest for about 5-10 minutes. This resting period allows the internal temperature to even out, resulting in a more tender and succulent steak.
- While the steak is resting, you can take this time to prepare any additional side dishes or sauces to accompany the meal.
- After the resting period, remove the foil and transfer the steak to a serving platter or individual plates.
- Optionally, you can garnish the steak with freshly chopped herbs, such as parsley or thyme, for an added burst of freshness and visual appeal.
Now, your steak is ready to be enjoyed! Serve it alongside your favorite sides like roasted vegetables, mashed potatoes, or a crisp salad. If desired, you can also drizzle a sauce or compound butter over the steak to enhance its flavor. The possibilities are endless!
Remember to slice the steak against the grain for maximum tenderness. This means cutting perpendicular to the muscle fibers, which helps break them up and makes each bite more tender and enjoyable.
With the steak rested and served, it’s time to clean up the electric skillet.
Cleaning the Electric Skillet
Properly cleaning the Townecraft Electric Skillet after use is important to maintain its performance and longevity. Follow these steps to ensure your skillet stays in top shape:
- Unplug the electric skillet from the power source and wait for it to cool down to a safe temperature.
- Once cooled, remove the temperature control probe from the skillet.
- Disassemble any removable parts such as the lid, non-stick surface, or heating element, if applicable, according to the manufacturer’s instructions.
- Wash the removable parts and the interior of the skillet with warm, soapy water. Use a soft sponge or cloth to gently scrub away any food particles or residue.
- Rinse the parts thoroughly with clean water to remove any soap residue.
- For stubborn stains or stuck-on food, you can create a paste using baking soda and water. Apply the paste to the affected areas and let it sit for a few minutes before scrubbing it away.
- Wipe the exterior of the electric skillet with a damp cloth to remove any grease or spills. Avoid submerging the entire skillet in water or immersing it in the sink.
- Once all the parts are clean, dry them thoroughly with a clean towel or let them air dry.
- Reassemble the skillet, making sure all parts are securely in place.
- Store the electric skillet in a dry and safe place until it’s ready to be used again.
It’s important to note that some electric skillets may have specific cleaning instructions or parts that are dishwasher safe. Always refer to the manufacturer’s guidelines for your specific model to ensure proper cleaning and maintenance.
By following these cleaning steps after each use, you’ll be able to enjoy your Townecraft Electric Skillet for many delicious meals to come!
Conclusion
Mastering the art of cooking steak in a Townecraft Electric Skillet can elevate your culinary skills and allow you to enjoy restaurant-quality steak in the comfort of your own home. By following the step-by-step process outlined in this article, you can achieve a perfectly cooked steak that is juicy, tender, and full of flavor.
From preparing and seasoning the steak to preheating the electric skillet and cooking the steak to your desired level of doneness, each step plays a crucial role in creating a memorable dining experience. Remember to use high-quality cuts of steak, properly season them, and preheat the electric skillet for even cooking and a beautiful sear.
Checking the doneness of your steak using visual inspection, the touch test, or a meat thermometer ensures that it reaches your preferred level of doneness, be it rare, medium-rare, medium, or well-done. Once the steak is cooked to perfection, let it rest before serving to allow the juices to redistribute and ensure maximum tenderness.
After savoring the delicious steak, don’t forget to clean your electric skillet properly. Following the recommended cleaning steps will keep your skillet in excellent condition and ready for your next cooking adventure.
With the Townecraft Electric Skillet at your disposal and the knowledge gained from this article, you are now equipped to cook steak like a seasoned chef. So, grab your apron, fire up the skillet, and get ready to impress your loved ones with mouthwatering steaks that will leave them wanting more!
Frequently Asked Questions about How To Cook Steak In Townecraft Electric Skillet
Was this page helpful?
At Storables.com, we guarantee accurate and reliable information. Our content, validated by Expert Board Contributors, is crafted following stringent Editorial Policies. We're committed to providing you with well-researched, expert-backed insights for all your informational needs.


0 thoughts on “How To Cook Steak In Townecraft Electric Skillet”