Articles
How To Dry Out Basement
Modified: October 18, 2024
Learn effective methods to dry out your basement with informative articles. Find step-by-step guides and expert tips for a moisture-free space.
(Many of the links in this article redirect to a specific reviewed product. Your purchase of these products through affiliate links helps to generate commission for Storables.com, at no extra cost. Learn more)
Introduction
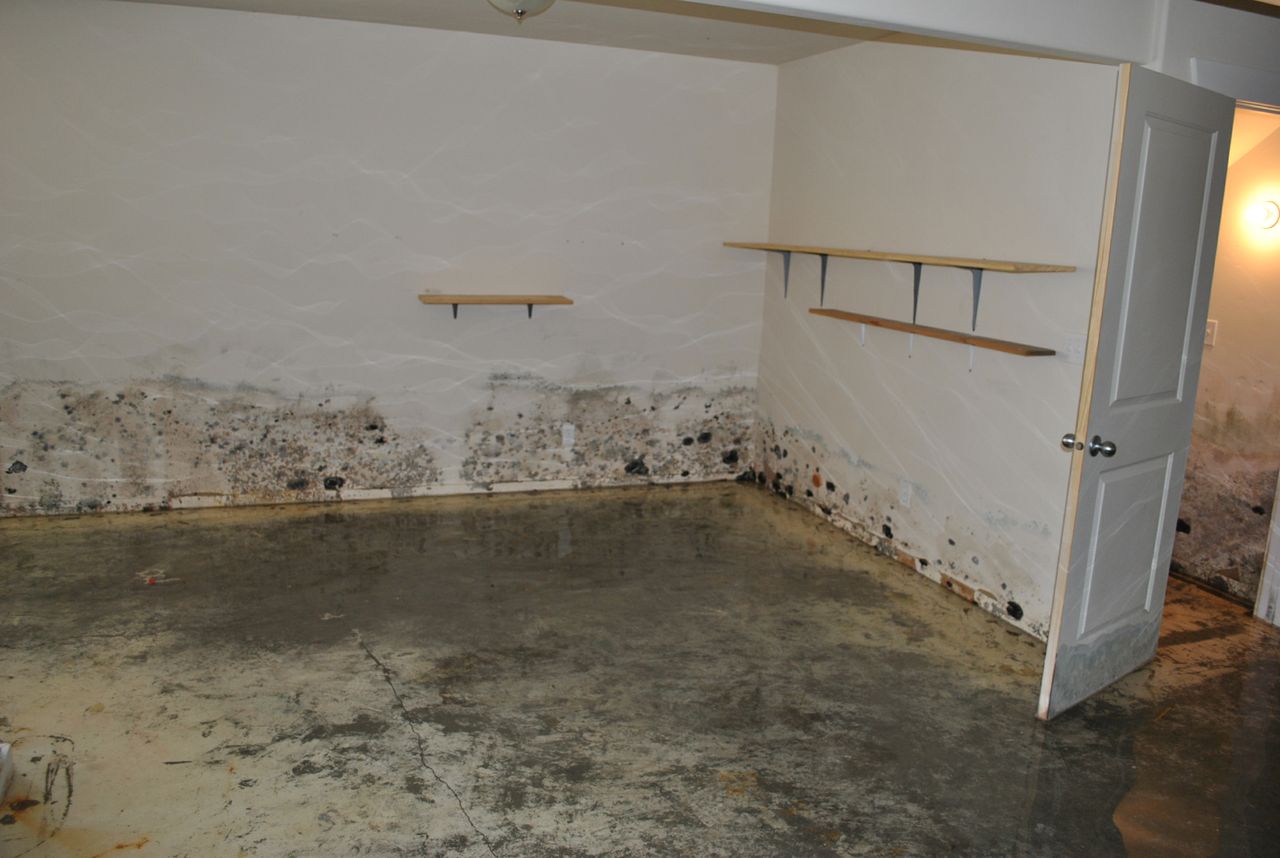
Welcome to our guide on how to dry out a damp basement. Dealing with excess moisture in your basement can be a major headache, leading to unpleasant odors, mold growth, and even structural damage. Fortunately, there are several steps you can take to tackle this issue and create a dry and healthy space.
Before we delve into the solutions, it’s important to understand the root cause of basement moisture. There can be various reasons behind the dampness, including poor ventilation, water leaks, cracks in the foundation, or inadequate insulation. By identifying the source of the problem, you can effectively address it and prevent future issues.
Clearing out the basement is the first step towards drying it out. Remove any items, furniture, or belongings that could be damaged by moisture, and place them in a dry and safe location. This will create space to work and ensure that your possessions remain unaffected during the process.
Next, it’s time to repair any leaks or cracks that may be allowing water to seep into your basement. Check the walls, floors, and foundation for any signs of moisture or damage. Use a waterproof sealant or epoxy to patch up these areas and prevent further water intrusion.
Improving ventilation and air circulation is crucial in reducing moisture levels in your basement. Open windows and doors to allow fresh air to flow through the space. If natural ventilation is not sufficient, consider installing exhaust fans or vents to improve air circulation.
Another effective method to control basement moisture is by using a dehumidifier. These devices work by extracting excess moisture from the air, preventing dampness and mold growth. Place the dehumidifier in a central location in your basement, ideally near a drain for easy water disposal.
Waterproofing the basement walls is a long-term solution to prevent moisture from entering the space. Apply a waterproof sealant or paint on the walls to create a barrier against water intrusion. Additionally, consider installing a drainage system along the perimeter of the basement to divert any excess water away from the foundation.
Key Takeaways:
- Properly assess the cause of basement moisture, clear out the space, repair leaks, and improve ventilation to effectively dry out a damp basement and prevent future issues.
- Utilize dehumidifiers, waterproof the walls, insulate properly, and consider using a sump pump to create a dry, comfortable, and protected basement environment.
Read more: How To Dry Out Basement Carpet
Assessing the Cause of Basement Moisture
Before you can effectively dry out your basement, it’s important to identify the root cause of the moisture issue. Understanding the underlying problem will help you implement the most appropriate solutions and prevent future occurrences.
One common cause of basement moisture is poor ventilation. If there is limited airflow and stagnant air in your basement, it can lead to a buildup of excess moisture. Insufficient ventilation often results in a damp and musty smell, as well as condensation on windows and walls.
Another common culprit is water leaks or cracks in the foundation. These openings can allow water to seep into your basement, causing dampness and potential damage. Inspect the walls, floors, and foundation for any signs of moisture or cracks. Pay attention to areas where water stains, mold, or mildew are present.
Inadequate insulation can also contribute to basement moisture. Insulation helps regulate temperature and prevents condensation. Check the insulation in your basement to ensure it is in good condition and properly installed.
Other factors that can contribute to a damp basement include groundwater seepage, plumbing leaks, and poor exterior drainage. If you live in an area with a high water table or have a history of flooding, it’s important to address these issues to keep your basement dry.
To assess the cause of basement moisture, start by visually inspecting the space for any visible signs of dampness or leaks. Look for water stains, mold growth, musty odors, or condensation on walls and windows. Additionally, check the exterior of your home for any grading or drainage issues that may be allowing water to accumulate near the foundation.
If you’re having trouble identifying the source of the moisture or if the issue seems more complex, it may be beneficial to consult with a professional. A qualified contractor or a basement waterproofing specialist can conduct a thorough assessment and provide expert advice on the best course of action.
Once you have determined the cause of the moisture, you can proceed with the necessary steps to dry out your basement and create a dry and healthy environment.
Clearing out the Basement
Clearing out your basement is an essential first step when it comes to drying out a damp space. By removing any items, furniture, or belongings, you can create a clean and open area to work with. Here are some guidelines to follow:
1. Start by assessing the contents of your basement. Determine which items are essential and which ones can be discarded or stored elsewhere temporarily. Sort through your belongings and create separate piles for items to keep, items to donate, and items to dispose of.
2. Store valuable belongings in a secure and dry location. If you have items that are susceptible to moisture damage, such as electronics or sentimental items, consider moving them to a climate-controlled storage facility until your basement is completely dry.
3. Remove any furniture, appliances, or large items from the basement. This includes sofas, tables, chairs, and any other bulky items that may be present. If necessary, enlist the help of friends or family members to assist you in lifting and moving heavy objects safely.
4. Organize your remaining belongings in a way that allows for easy access and prevents them from coming into contact with the damp surfaces. Consider using plastic bins or shelving units to keep items elevated off the floor.
5. Clean and sanitize the basement before proceeding with any repairs or moisture control measures. Sweep or vacuum the floors to remove dust and debris. Wipe down any surfaces that may have been affected by dampness, mold, or mildew with a mixture of water and mild detergent.
6. While clearing out the basement, take the opportunity to identify any items that may be contributing to the moisture problem. For example, if you have cardboard boxes or paper materials stored in the basement, they can absorb and retain moisture, leading to mold growth. Consider replacing these items with plastic storage containers that provide a moisture-resistant solution.
By clearing out your basement and properly organizing your belongings, you create a clean and functional space to address the underlying moisture issue. Not only will this make the subsequent repair and drying process easier, but it will also help maintain the longevity of your items and prevent further damage from occurring.
Repairing Any Leaks or Cracks
One of the key steps in drying out a damp basement is to identify and repair any leaks or cracks that may be allowing water to enter the space. These openings in the walls, floor, or foundation can be a major source of moisture and can lead to further damage if left untreated. Here’s how you can tackle this issue:
1. Start by inspecting the walls, floors, and foundation of your basement for any signs of leaks or cracks. Look for water stains, dampness, or mold growth, as these can indicate areas of water infiltration.
2. Once you have identified the problem areas, use a flashlight to get a closer look. Look for any visible cracks, gaps, or holes that may be allowing water to seep in. Pay attention to corners, joints, and areas where different materials meet.
3. Depending on the severity of the damage, you may need to call in a professional to assess and repair the leaks or cracks. A qualified contractor or basement waterproofing specialist can use specialized tools and techniques to identify and fix the problem areas effectively.
4. For smaller cracks or gaps, you can use an appropriate sealant or epoxy to fill them in. Make sure to choose a waterproof sealant that is specifically designed for basement applications. Follow the manufacturer’s instructions for proper application and curing time.
5. If you discover any larger structural issues, such as a compromised foundation, it’s crucial to seek professional help. A foundation repair specialist will be able to assess the damage and recommend the most appropriate solution to repair and reinforce the foundation.
6. In addition to repairing the visible cracks and leaks, it’s important to address any underlying issues that may be causing the damage. Poor drainage, improperly installed gutters, or grading problems can contribute to water seepage. Make necessary adjustments to your drainage system to redirect water away from the foundation.
7. Regular maintenance is key to preventing future leaks or cracks. Inspect your basement periodically for signs of damage and address any issues promptly. Keep an eye out for any changes in the moisture levels or any recurring problems that may require professional attention.
By repairing any leaks or cracks in your basement, you can significantly reduce the amount of moisture entering the space. This will help create a dry and healthy environment and prevent further damage to the structure and belongings stored in the basement.
Improving Ventilation and Air Circulation
Poor ventilation and limited air circulation can contribute to moisture buildup and dampness in your basement. Improving the airflow in the space is essential for drying out a damp basement and preventing the growth of mold and mildew. Here are some effective ways to enhance ventilation:
1. Open windows and doors to allow fresh air to enter the basement. This natural ventilation can help remove stagnant air and replace it with fresh, dry air from outside. On days when the weather permits, keep the windows open for extended periods to maximize airflow.
2. Install exhaust fans or ventilation systems to improve air circulation. These fans can help draw out moist air and bring in fresh air from outside. Place the fans strategically in the basement, focusing on areas where moisture tends to accumulate, such as near laundry machines or bathrooms.
3. Ensure that the vents in the basement are clean and unobstructed. Over time, dust, dirt, and debris can accumulate in the vents, impeding airflow. Regularly clean the vents to maintain optimal air circulation in the basement.
4. Consider using a portable or ceiling fan to improve air movement in the basement. Position the fan in a way that it circulates the air effectively around the space. Leave the fan running for extended periods to promote continuous airflow.
5. If natural ventilation and fans are not sufficient, consider installing a mechanical ventilation system. These systems use ducts and fans to draw in fresh air and remove stale air. The system can be integrated with your existing HVAC system or operate independently.
6. Avoid blocking air vents or obstructing the airflow in the basement. Keep furniture, storage items, or any other belongings away from vents to ensure unrestricted airflow throughout the space.
7. Regularly clean and maintain your HVAC system. Dirty filters and ducts can impede proper airflow and contribute to excess moisture. Change the filters regularly, and schedule professional HVAC maintenance to keep the system in optimal working condition.
Improving ventilation and air circulation in your basement is crucial for drying out the space and maintaining a healthy environment. These measures will help remove stagnant air, control moisture levels, and prevent the growth of mold and mildew. By implementing these strategies, you can effectively improve the overall air quality in your basement.
Make sure to address any sources of moisture, such as leaks or condensation, before attempting to dry out the basement. Use a dehumidifier to remove excess moisture from the air and consider waterproofing any vulnerable areas.
Read more: How To Get Basement Smell Out Of Basement
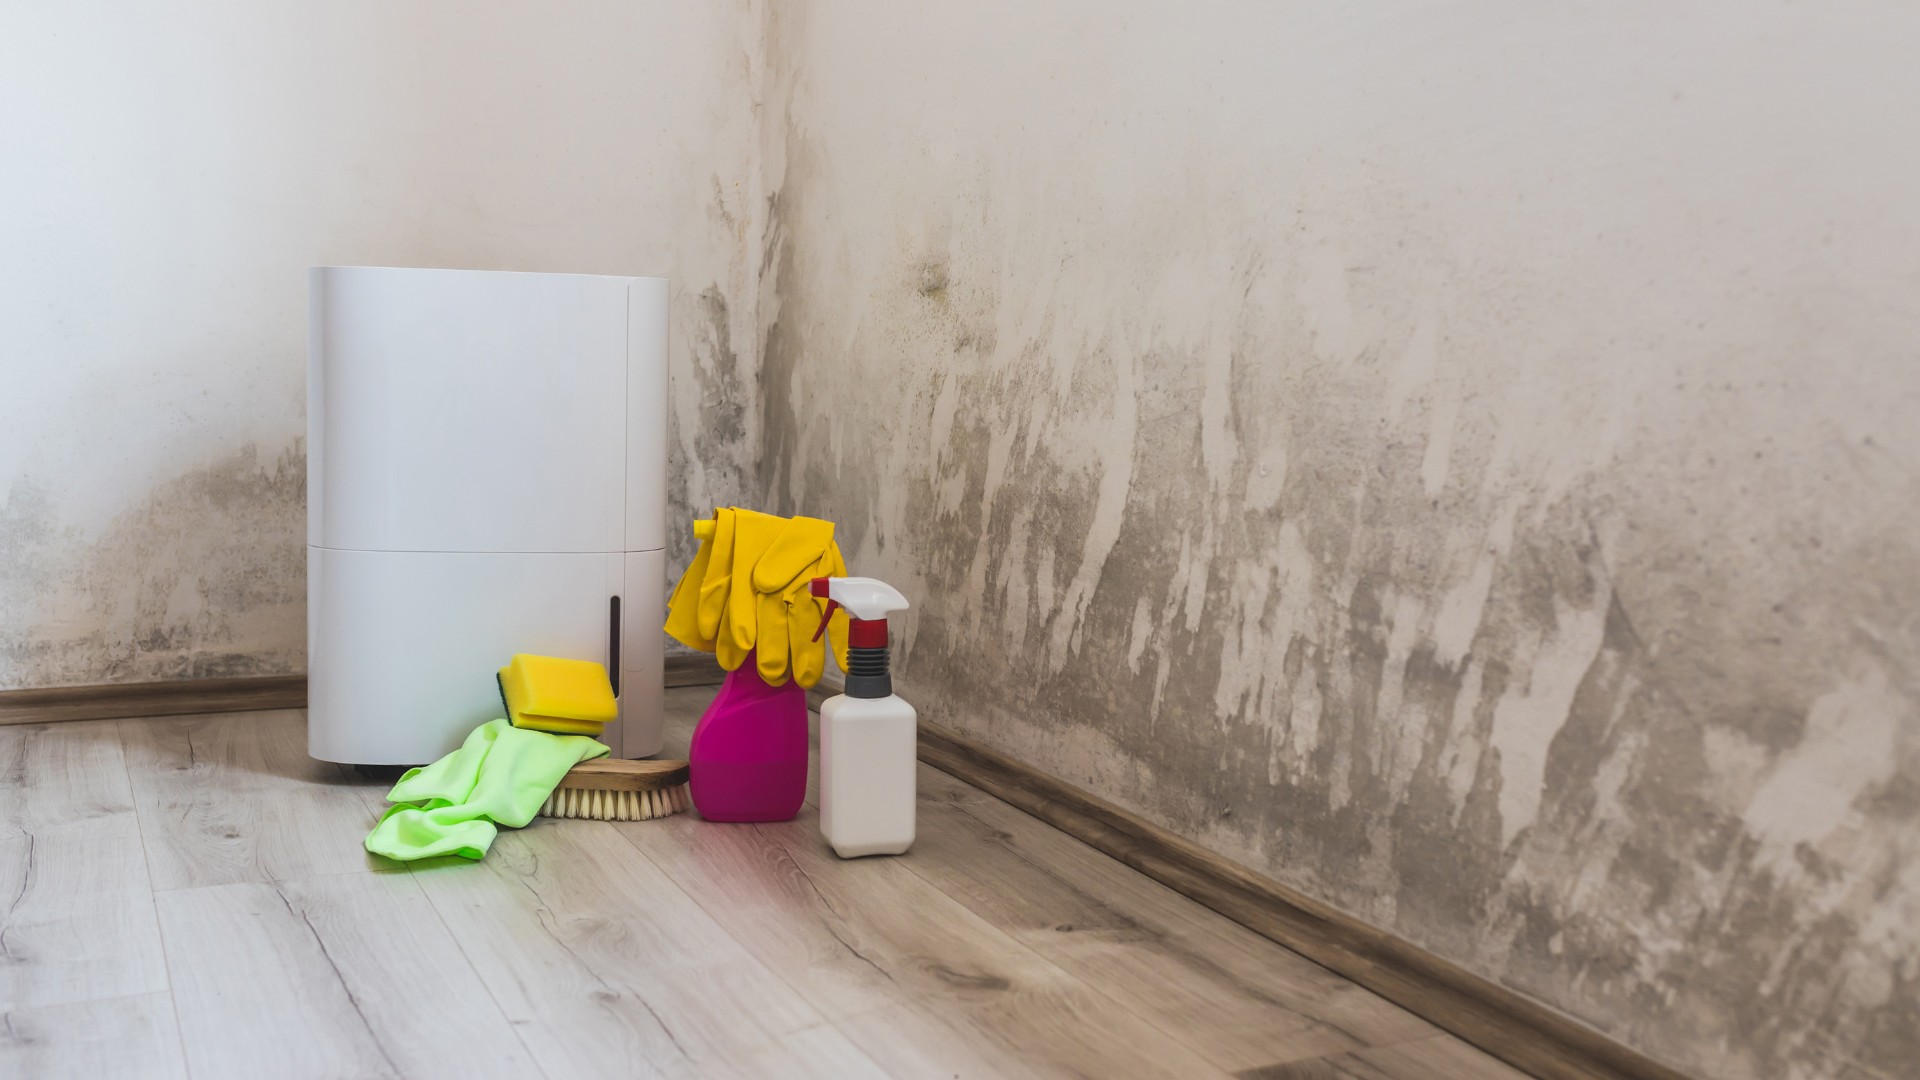
Installing a Dehumidifier
A dehumidifier is a powerful tool in combating moisture and lowering humidity levels in a damp basement. By extracting excess moisture from the air, a dehumidifier helps to create a dry and comfortable environment. Here’s how to effectively install and use a dehumidifier in your basement:
1. Choose the right size dehumidifier based on the square footage of your basement. Consider factors such as the level of moisture and humidity in the space to determine the appropriate capacity. Larger and more humid basements may require a higher-capacity dehumidifier.
2. Decide on the type of dehumidifier that best suits your needs. There are two main types: refrigerative dehumidifiers and desiccant dehumidifiers. Refrigerative dehumidifiers use a cooling coil to condense moisture, while desiccant dehumidifiers absorb moisture using a drying agent.
3. Place the dehumidifier in a central location in your basement to maximize its effectiveness. Ensure that it is positioned away from walls and furniture to allow proper air circulation. If possible, place the dehumidifier near a drain for easy disposal of collected water.
4. Make sure the dehumidifier is properly connected to a power source. Follow the manufacturer’s instructions for electrical requirements and ensure that the unit is grounded and safe to use.
5. Set the desired humidity level on the dehumidifier. Most units allow you to select a specific humidity level, typically between 30% to 50%. It is recommended to maintain a relative humidity level of around 45% to prevent excess moisture and inhibit mold growth.
6. Monitor the water collection tank of the dehumidifier regularly. Empty and clean the tank when it reaches its maximum capacity or according to the manufacturer’s instructions. Some dehumidifiers also offer options for continuous drainage, where a hose can be attached for automatic water disposal.
7. Keep the dehumidifier running continuously or set it to automatically adjust based on humidity levels. Continuous operation ensures that moisture is continuously removed from the air, especially during periods of high humidity or heavy rainfall.
8. Regularly clean and maintain the dehumidifier to ensure optimal performance. Follow the manufacturer’s guidelines for cleaning the unit and changing filters. This will help maintain the efficiency of the dehumidifier and prolong its lifespan.
An installed dehumidifier can significantly reduce excess moisture and humidity in your basement, preventing mold growth and creating a more comfortable living environment. By following these steps, you can effectively utilize a dehumidifier to improve the overall conditions in your basement.
Waterproofing the Basement Walls
Waterproofing the walls of your basement is a crucial step in preventing moisture from seeping into the space. By creating a protective barrier, you can effectively keep your basement dry and free from water intrusion. Here’s how you can waterproof your basement walls:
1. Start by thoroughly cleaning the walls. Remove any loose paint, dirt, or debris from the surface. Use a stiff brush and a mild detergent to scrub the walls clean. Rinse off any soap residue and allow the walls to dry completely before proceeding.
2. Inspect the walls for any cracks or gaps. These openings can allow water to enter the basement. Fill in any visible cracks with an appropriate hydraulic cement or waterproof sealant. Ensure that the sealant is applied evenly and completely covers the crack.
3. Apply a waterproofing compound or paint to the walls. There are various waterproofing products available on the market specifically designed for basement walls. Follow the manufacturer’s instructions for application. Typically, you will need to use a brush or roller to evenly coat the walls with the waterproofing compound or paint. Allow it to dry thoroughly before applying a second coat if needed.
4. Consider using a waterproof membrane or sheeting as an added layer of protection. These materials are applied directly to the walls and act as a moisture barrier. They can be particularly useful if you have a history of water intrusion or live in an area with a high water table. Follow the manufacturer’s instructions for installation.
5. Pay attention to areas where water is likely to collect, such as the base of the walls. Apply an additional layer of waterproofing compound or paint to these areas for enhanced protection.
6. Inspect the exterior of your home for any potential sources of water infiltration. Ensure that your gutters are clean and functioning properly and that downspouts are directing water away from your foundation. Correct any grading issues that may be causing water to accumulate near the basement walls.
7. Regularly inspect the waterproofing on your basement walls and touch up any areas that may have been damaged or worn over time. This will help maintain the effectiveness of the waterproofing and prevent future water intrusion.
Waterproofing your basement walls is a proactive step in keeping your basement dry and free from moisture. By following these guidelines, you can create a protective barrier that will help prevent water infiltration and reduce the risk of mold growth and structural damage.
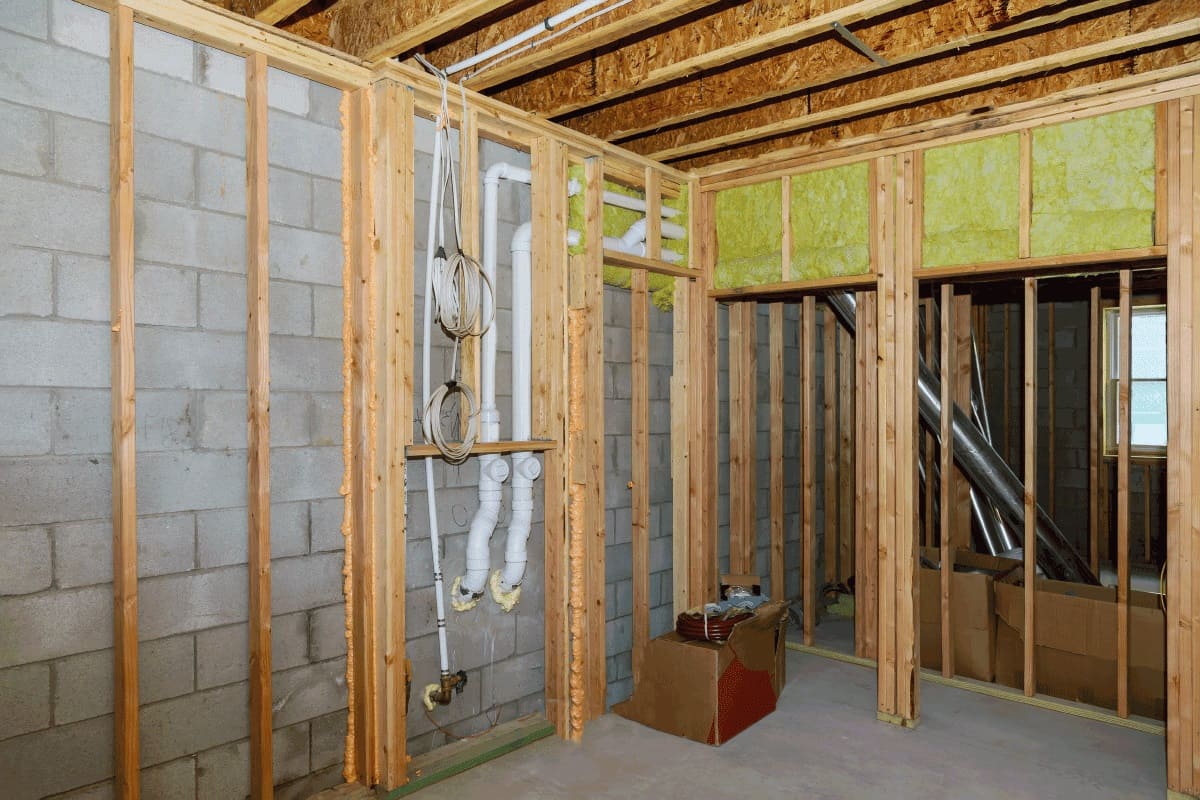
Insulating the Basement Properly
Proper insulation is essential in creating a comfortable and energy-efficient basement. It not only helps regulate the temperature but also prevents condensation and reduces the risk of moisture-related issues. Insulating your basement properly can improve the overall insulation of your home and save on energy costs. Here’s how to insulate your basement effectively:
1. Determine the type of insulation material that best suits your needs. There are several options available, including fiberglass batts, rigid foam boards, and spray foam insulation. Each material has its own advantages and installation requirements.
2. Before proceeding with insulation, ensure that the basement walls are dry and free from moisture issues. Address any leaks or cracks and allow the space to dry completely before installing insulation. Moisture can compromise the effectiveness of insulation and lead to mold growth.
3. Install a moisture barrier or vapor barrier before insulating the walls. This barrier helps prevent moisture from migrating through the walls and into the insulation. It is particularly crucial in areas with high humidity levels.
4. When using fiberglass batt insulation, carefully cut the batts to fit snugly between the wall studs. Ensure that there are no gaps or spaces where air can pass through. Use a utility knife or insulation cutting tool for precise cuts.
5. If using rigid foam insulation, measure and cut the foam boards to fit the wall cavities. Secure them in place using adhesive or fasteners. Make sure to seal any gaps or joints with an appropriate sealant to create an airtight barrier.
6. Consider insulating the basement ceiling if the space above is unconditioned. This will help prevent heat loss and improve energy efficiency. Install insulation batts or rigid foam boards in between the ceiling joists, taking care to cover the entire area.
7. Seal any gaps or openings in the walls or floors before installing insulation. This includes sealing around pipes, electrical outlets, and windows. Use caulk or foam sealant to create an airtight seal and prevent drafts.
8. In areas prone to extreme cold temperatures, it may be beneficial to install a layer of continuous insulation along the interior perimeter of the basement. This additional layer of insulation helps prevent thermal bridging and enhances energy efficiency.
9. Consult local building codes and regulations to ensure that you meet the required insulation standards. Some regions have specific requirements for basement insulation, particularly in areas prone to high moisture levels or extreme temperatures.
By properly insulating your basement, you can create a more comfortable and energy-efficient space. It helps maintain a consistent temperature, prevents condensation, and reduces the risk of moisture-related issues. Insulating your basement is an investment that can significantly improve the overall insulation of your home.
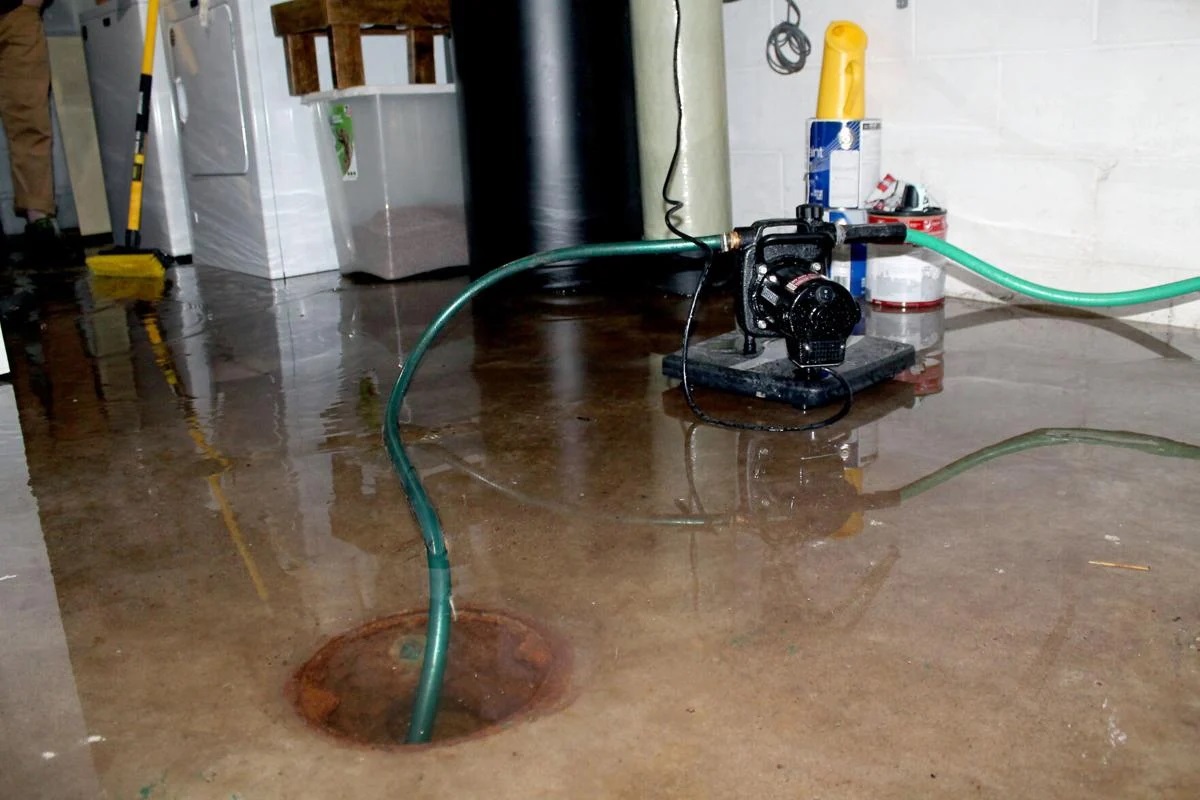
Using a Sump Pump
A sump pump is a valuable tool for managing water accumulation in your basement. It helps prevent flooding, removes excess water, and keeps your basement dry and protected. Here’s how to effectively use a sump pump:
1. Start by locating the lowest point of your basement, typically where water tends to accumulate. This is where you will install the sump pump. It is usually in a designated sump pit or sump basin.
2. Ensure that your sump pump is properly installed and connected to a power source. If you’re unsure about the installation process, consult a professional to ensure it is done correctly and safely.
3. Regularly inspect and maintain your sump pump. Check for any visible signs of damage or wear. Test it periodically by pouring water into the sump pit to see if the pump activates and drains the water successfully.
4. Install a check valve on the discharge pipe of the sump pump. This valve prevents water from flowing back into the pit and ensures that the pump works efficiently.
5. Consider installing a backup power source, such as a battery backup or a generator, to keep your sump pump operational during power outages. This will provide peace of mind and keep your basement protected even during severe weather events.
6. Keep the sump pit free from debris or objects that may obstruct the operation of the pump. Regularly clean the pit and remove any accumulated dirt, sediment, or other materials that could interfere with the pump’s performance.
7. If your basement experiences a significant amount of water accumulation or is prone to flooding, consider installing a secondary sump pump for additional protection. This second pump can serve as a backup or provide extra pumping capacity during heavy rainfall.
8. Monitor the performance of your sump pump during periods of heavy rainfall or high water table levels. If you notice any issues, such as irregular or insufficient water drainage, strange noises, or frequent cycling, it may indicate a problem with the pump. In such cases, consult a professional to diagnose and fix the issue.
Using a sump pump is an effective way to proactively manage water accumulation and prevent basement flooding. By following these guidelines and properly maintaining your sump pump, you can keep your basement dry and protected from water damage.
Read more: How To Keep Your Basement Dry
Final Thoughts and Precautions
When it comes to drying out a damp basement, it’s crucial to consider some final thoughts and take precautions to ensure the best outcome. Here are a few important points to keep in mind:
1. Regular maintenance is key. Even after implementing the necessary steps to dry out your basement, it’s important to stay vigilant and regularly inspect the space for any signs of moisture or leaks. Address any issues promptly to prevent further damage.
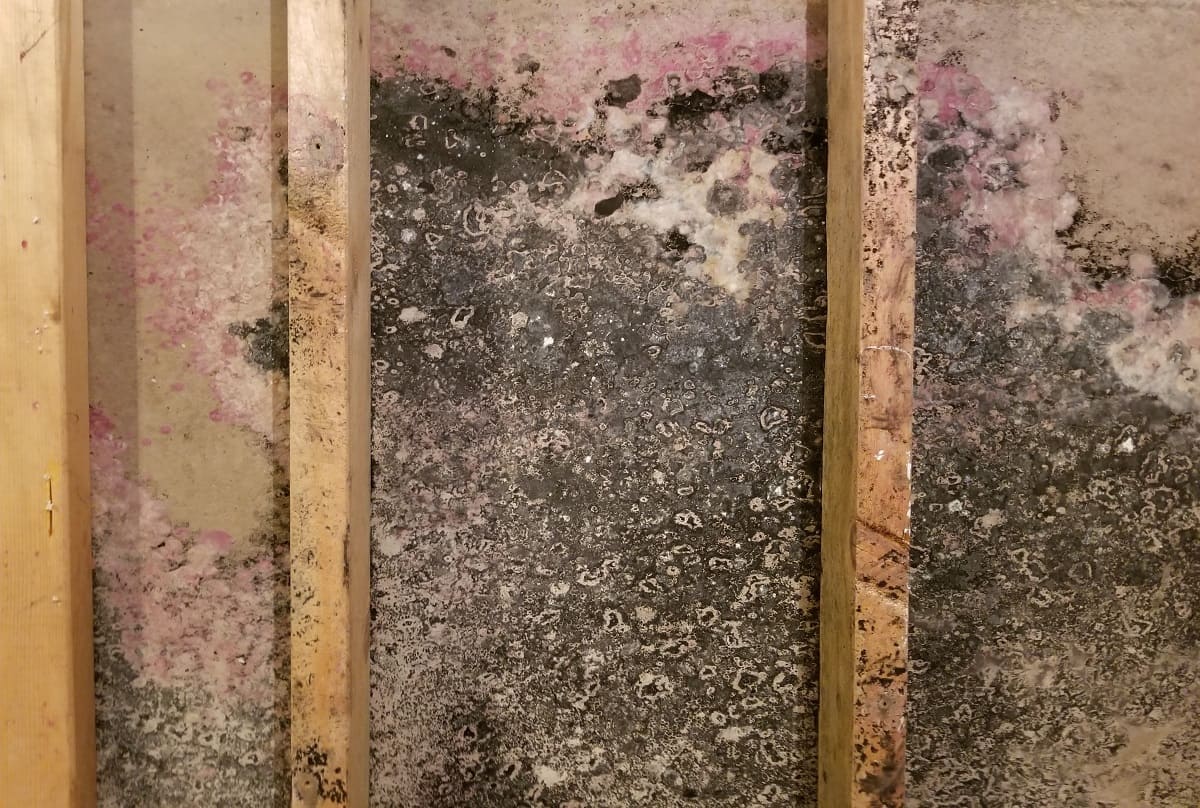
2. Keep an eye out for mold. While drying out your basement, monitor for any signs of mold growth, such as a musty odor or dark spots on walls or furniture. If you suspect mold, consult a professional remediation specialist to assess and safely remove it.
3. Consider professional help. If you are unsure about assessing the cause of basement moisture or handling repairs, it’s wise to consult with a professional contractor or basement waterproofing specialist. They have the expertise and experience to identify and address the root cause of the problem effectively.
4. Take preventative measures. In addition to the steps outlined in this guide, consider preventative measures to avoid future moisture issues. This includes maintaining proper drainage around your home, ensuring gutters are clear of debris, and addressing any landscaping or grading issues that may contribute to water accumulation near the foundation.
5. Understand your local building codes. Make sure that the actions you take to dry out your basement and mitigate moisture-related issues comply with local regulations and building codes. This can help ensure the safety and longevity of your home’s structural integrity.
6. Prioritize safety. When working in your basement, ensure your safety by wearing protective gear, such as gloves, goggles, and a mask. This is especially important when handling chemicals, cleaning agents, or potentially harmful substances.
Remember, each basement is unique, and the solutions that work in one may not be applicable to another. It’s important to assess your specific situation and tailor the steps accordingly. By taking the necessary precautions and following the best practices outlined in this guide, you can effectively dry out your basement and create a dry, healthy, and comfortable space in your home.
Frequently Asked Questions about How To Dry Out Basement
Was this page helpful?
At Storables.com, we guarantee accurate and reliable information. Our content, validated by Expert Board Contributors, is crafted following stringent Editorial Policies. We're committed to providing you with well-researched, expert-backed insights for all your informational needs.


0 thoughts on “How To Dry Out Basement”