Articles
How To Install A Whole House Surge Protector
Modified: October 22, 2024
Discover articles on how to install a whole house surge protector, ensuring maximum protection for your home. Learn step-by-step instructions and expert tips.
(Many of the links in this article redirect to a specific reviewed product. Your purchase of these products through affiliate links helps to generate commission for Storables.com, at no extra cost. Learn more)
Introduction
Welcome to our comprehensive guide on how to install a whole house surge protector. In today’s modern age, we rely heavily on electrical devices and appliances in our homes. However, power surges caused by lightning strikes, utility grid issues, or even faulty wiring can put these valuable items at risk. A whole house surge protector provides an extra layer of protection by diverting excess voltage away from sensitive electronics and preventing damage.
In this article, we will walk you through the step-by-step process of installing a whole house surge protector. We will cover everything from gathering the necessary tools and materials to restoring power supply and testing the surge protector. By following these instructions, you can ensure the safety of your electrical devices and have peace of mind.
Before we dive into the installation process, it’s important to understand what a surge protector is and how it works. A surge protector is a device designed to regulate and control voltage levels in an electrical system. It detects when there is a surge in voltage, such as during a lightning strike or power outage, and redirects the excess electricity to a grounding wire or a surge protection device.
By installing a whole house surge protector at the main electrical panel, you can protect all the electrical devices and appliances connected to your home’s electrical system. This means that not only will your TVs, computers, and gaming consoles be protected, but also your refrigerator, air conditioning, and other essential household appliances.
Now that we have a good understanding of what a surge protector does and why it’s important, let’s move on to the first step: gathering the necessary tools and materials.
Key Takeaways:
- Protect your home’s electrical system and devices by installing a whole house surge protector. Follow the step-by-step guide to ensure safety and longevity for your valuable electronics.
- Prioritize safety, gather necessary tools, and consult a licensed electrician if needed. Enhance surge protection with regular maintenance, point of use protectors, and educating household members.
Read also: 10 Best Whole House Surge Protector for 2025
Step 1: Gather the necessary tools and materials
Before you begin the installation process, it’s important to gather all the tools and materials you’ll need. This will ensure that you have everything on hand and save you time and frustration later on. Here are the tools and materials you’ll need:
- Surge protector: Make sure to choose a surge protector that is suitable for whole house protection. Look for a reputable brand that offers a high level of joule rating, indicating the amount of energy it can absorb.
- Electrical panel identification: Familiarize yourself with your electrical panel and its components. Take note of the main breaker, subpanels, and any existing surge protection devices.
- Screwdriver: You’ll need a screwdriver to open up the electrical panel and secure the surge protector in place.
- Wire cutter/stripper: This tool is essential for cutting and stripping the wires to connect the surge protector properly.
- Wire nuts: These small plastic caps are used to secure and insulate the wires when connecting them to the surge protector.
- Grounding wire: Depending on the surge protector model, you may need to provide your own grounding wire.
- Electrical tape: Use electrical tape to secure and insulate the wire connections.
- Safety equipment: Always prioritize safety during any electrical work. Wear protective gloves, safety glasses, and appropriate clothing.
Once you have gathered all the necessary tools and materials, you’re ready to move on to the next step: shutting off the main power supply.
Step 2: Shut off the main power supply
Before you start working on the electrical panel, it is crucial to ensure your safety by shutting off the main power supply. This will reduce the risk of electrical shock and keep you protected throughout the installation process. Follow these steps to safely shut off the power:
- Locate the main electrical panel: This is usually found in the basement, garage, or utility room. It contains circuit breakers or fuses that control the power supply to various parts of your home.
- Identify the main breaker: The main breaker controls the power supply to the entire house. It is typically larger than the other breakers and may be labeled “Main” or “Main Disconnect.” Make sure you know which breaker is the main one.
- Turn off the main breaker: Using a screwdriver or your hand, switch the main breaker to the “OFF” position. This will deactivate the power supply to your home. You can verify if the power is off by checking a few lights or outlets to ensure they are not functioning.
- Use a voltage tester: As an extra safety measure, use a voltage tester to double-check that the power is indeed turned off. This tool will indicate if there is any voltage present in the electrical panel.
Remember, it is important to take all necessary precautions when working with electricity. Make sure to wear protective gloves and safety glasses, and avoid working in wet conditions. If you are unsure or uncomfortable with this step, it’s always best to consult a licensed electrician.
Now that the main power supply is shut off, we can move on to the next step: determining the placement of the surge protector.
Step 3: Determine the placement of the surge protector
Once you have shut off the main power supply and ensured your safety, it’s time to determine the optimal placement for your whole house surge protector. The surge protector should be installed as close to the main breaker as possible, so that it can provide maximum protection to your entire electrical system.
Here are a few things to consider when determining the placement:
- Accessibility: Ensure that the chosen location allows easy access to the surge protector for future maintenance or replacement.
- Clearance: Make sure there is enough space around the surge protector for proper ventilation and heat dissipation.
- Grounding: Find a location where you can easily attach a grounding wire to the surge protector and connect it to a suitable grounding point.
It’s worth noting that the surge protector should be installed on a dedicated circuit breaker. If there is no available space in the main panel, you may need to install a subpanel. Consult a licensed electrician if you need assistance with this.
Take some time to evaluate your electrical panel and available options. Once you have determined the ideal placement, you can move on to the next step: installing the surge protector in the electrical panel.
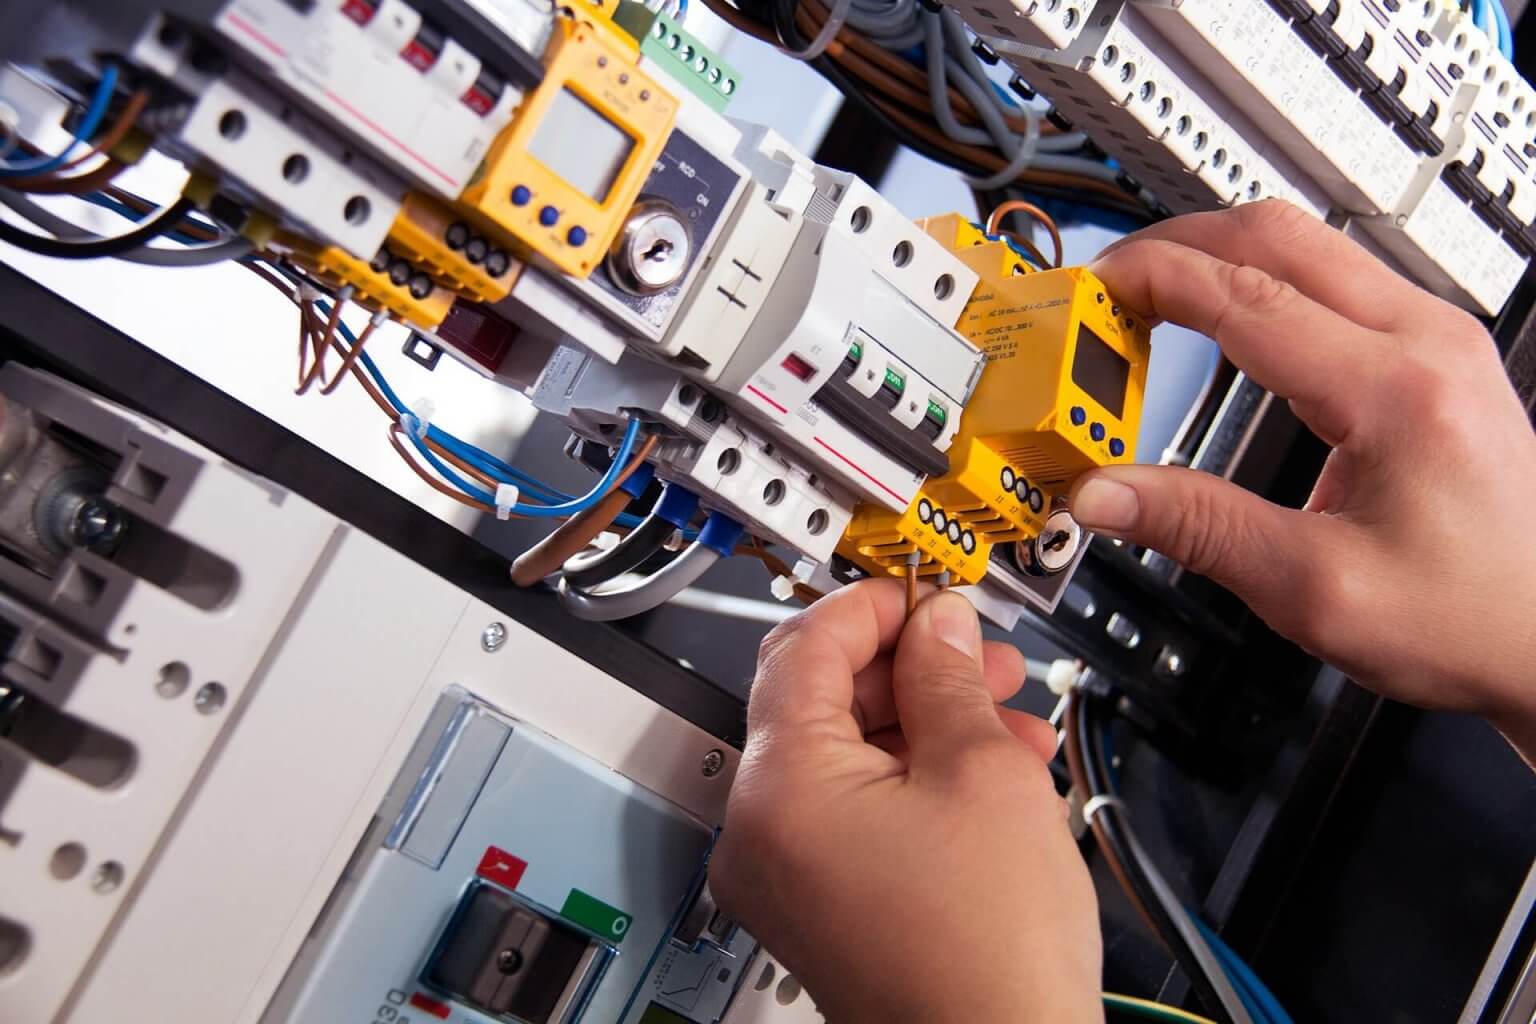
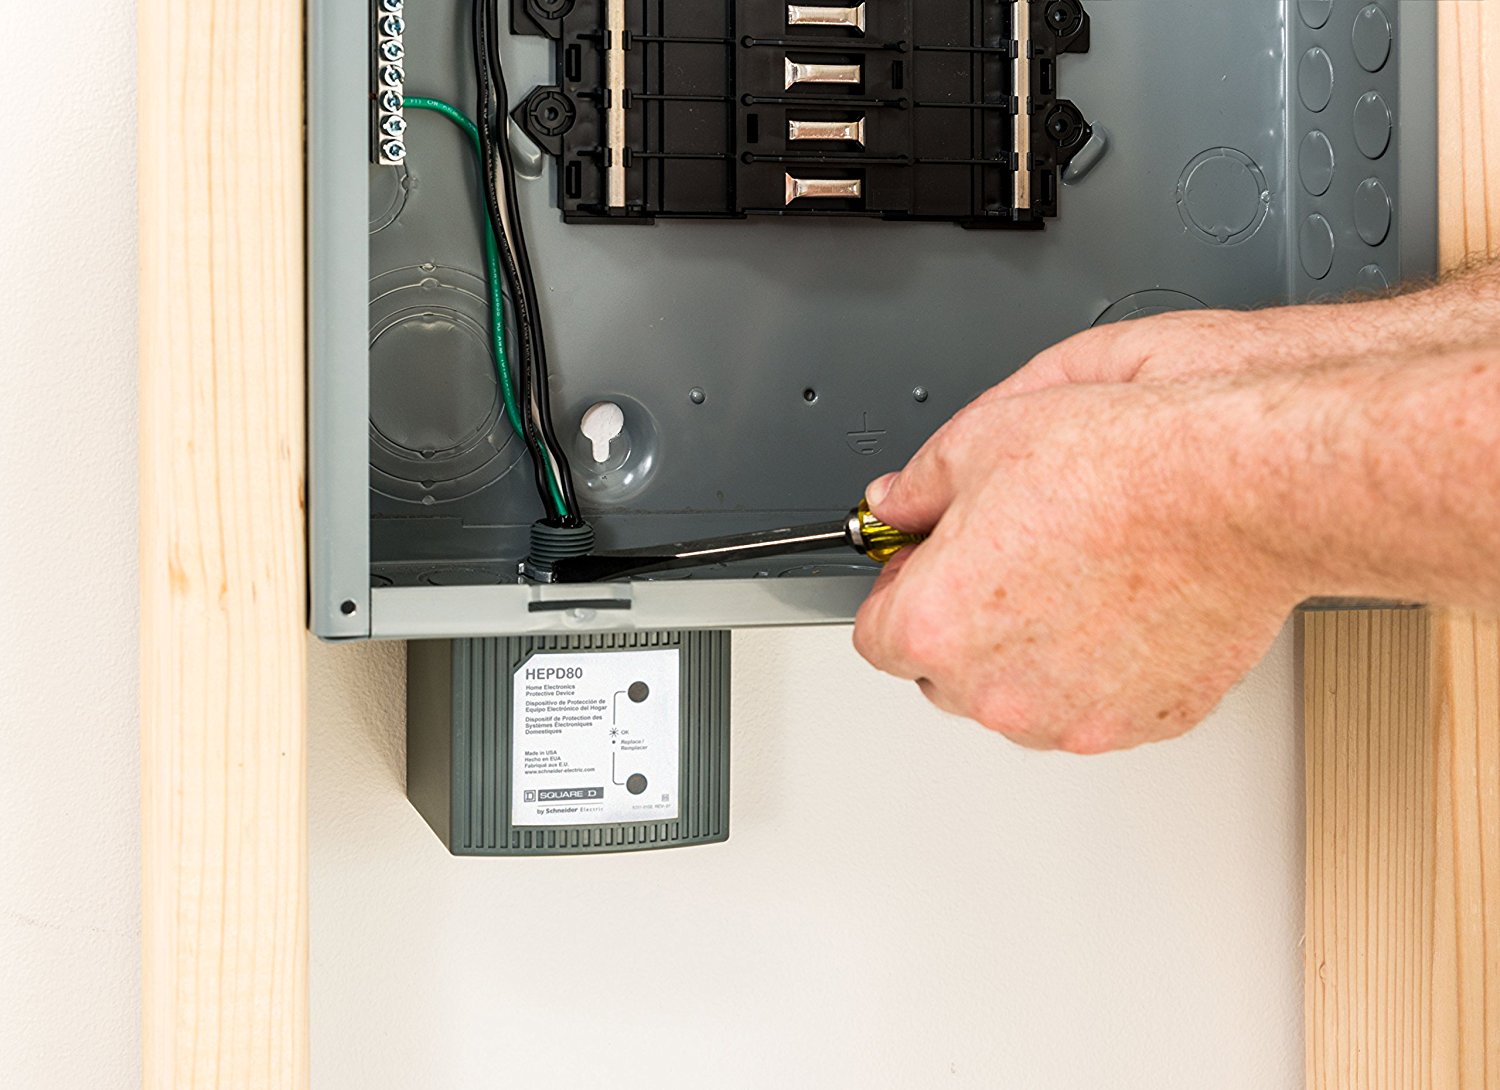
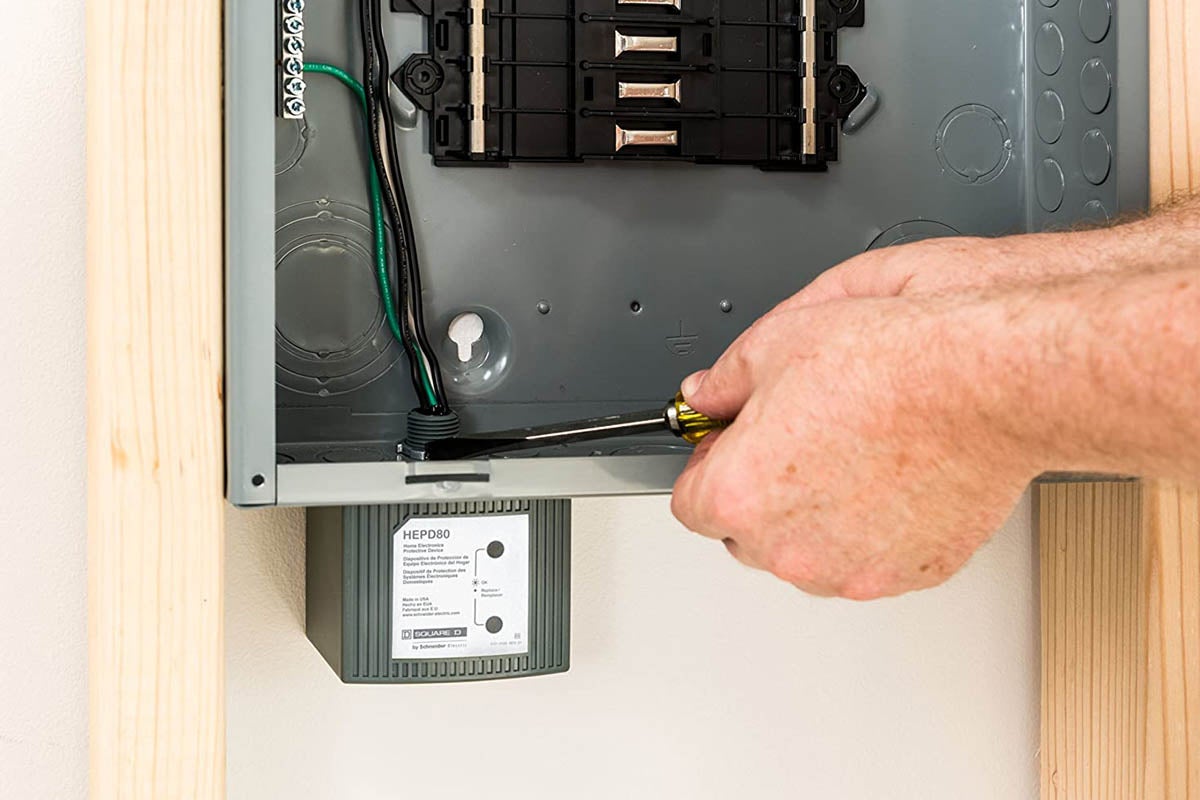
Step 4: Install the surge protector in the electrical panel
Now that you have determined the placement of the surge protector, it’s time to install it in the electrical panel. Follow these steps carefully to ensure a successful installation:
- Open the electrical panel: Use a screwdriver to remove the cover of the electrical panel. Set the cover aside in a safe place.
- Locate an available breaker slot: Look for an empty slot in the electrical panel where you can install the surge protector. Make sure to choose a slot on the same phase as the main breaker.
- Prepare the surge protector: Depending on the model and manufacturer, there may be specific instructions for preparing the surge protector. Follow the manufacturer’s guidelines to ensure proper installation.
- Mount the surge protector: Insert the surge protector into the chosen breaker slot. Align it with the bus bars and press it firmly until it is seated properly. Secure it in place by tightening the screws provided by the manufacturer.
- Connect the surge protector to the grounding system: If your surge protector requires a grounding wire, connect it to the grounding bar in the electrical panel. Make sure to use proper grounding techniques and ensure a solid connection.
- Route the surge protector cables: Depending on the model and installation requirements, you may need to route the surge protector cables inside the electrical panel. Follow the manufacturer’s instructions to ensure the correct routing and avoid any interference with other components.
As you install the surge protector, double-check that all connections are secure and that there are no loose wires or exposed surfaces. If you’re unsure about any step of the installation process, it’s always best to consult a licensed electrician.
Now that the surge protector is installed in the electrical panel, we can move on to the next step: connecting the surge protector to the electrical system.
When installing a whole house surge protector, make sure to turn off the main power supply to the house before beginning the installation process to ensure safety.
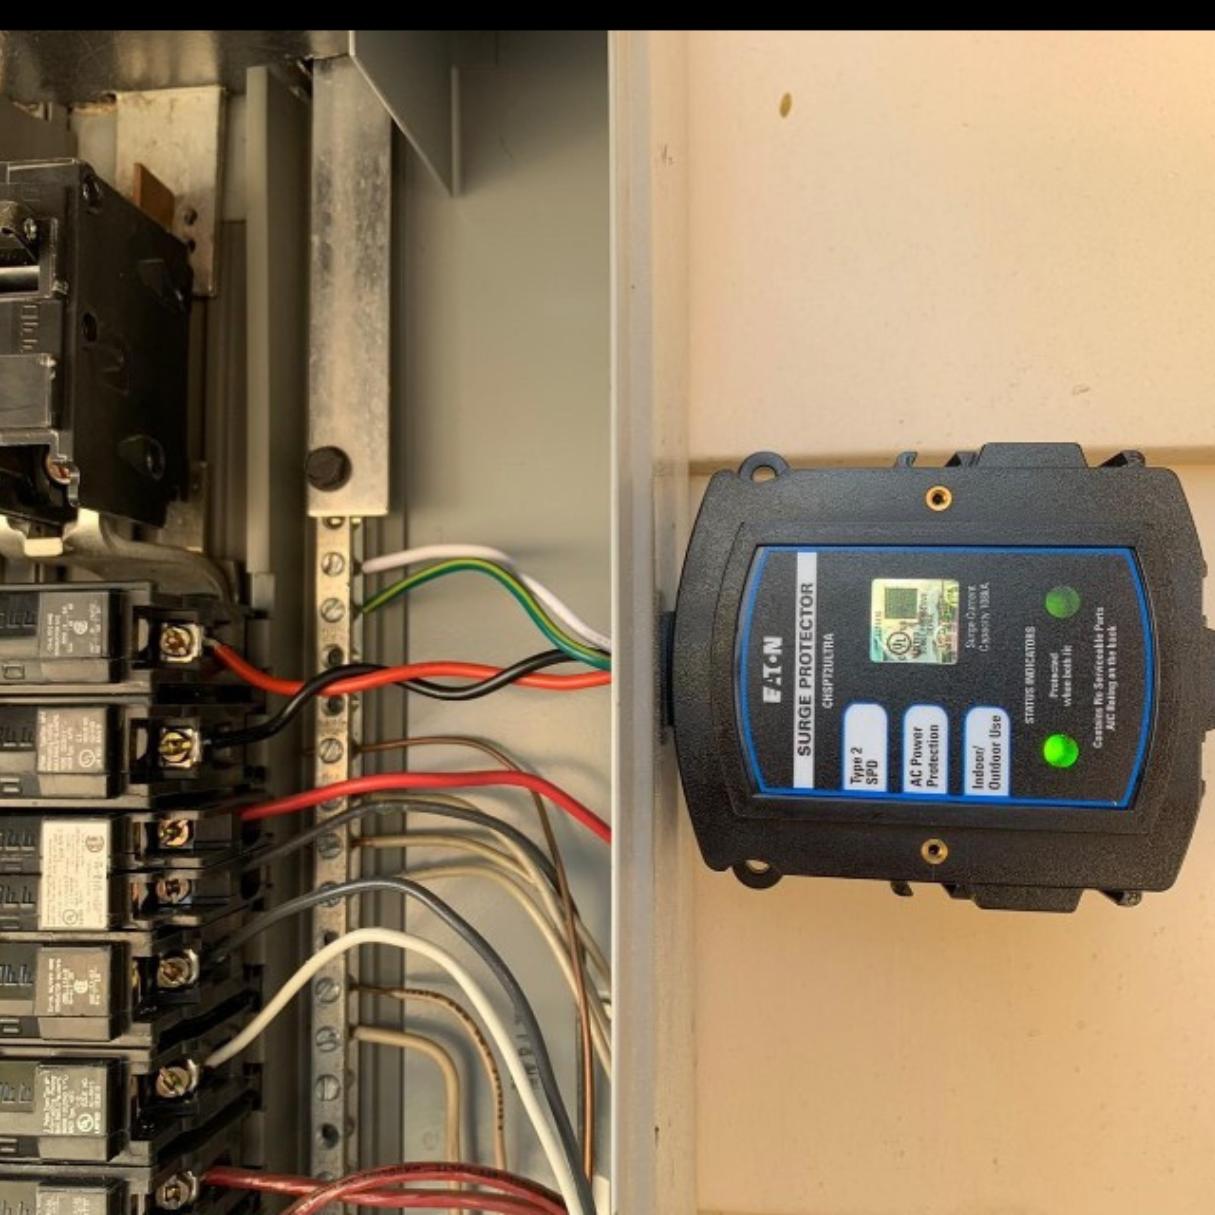
Step 5: Connect the surge protector to the electrical system
With the surge protector securely installed in the electrical panel, it’s time to connect it to the electrical system. Follow these steps to ensure proper connection:
- Identify the hot, neutral, and grounding wires: Inside the electrical panel, locate the hot, neutral, and grounding wires. The hot wire is typically black or red, the neutral wire is white or gray, and the grounding wire is green or bare copper.
- Turn off individual circuit breakers: To ensure safety during the connection process, turn off all individual circuit breakers connected to the electrical system. This will prevent any electrical current from flowing through the wires you’ll be working with.
- Connect the surge protector to the hot and neutral wires: Using a wire cutter/stripper, cut a small portion of the insulation off the hot and neutral wires near the surge protector. Attach these wires to the corresponding terminals on the surge protector, following the manufacturer’s instructions. Secure the connections with wire nuts.
- Connect the grounding wire: If your surge protector requires a grounding wire, attach one end to the surge protector’s grounding terminal. Connect the other end to the grounding bar in the electrical panel. Make sure to use proper grounding techniques to ensure a solid, low-resistance connection.
- Inspect the connections: Double-check that all connections are secure and properly insulated. Use electrical tape to wrap the wire nuts and ensure they are adequately protected.
It’s crucial to take your time during the connection process and ensure that all connections are made correctly. This will safeguard your electrical system and prevent any potential hazards.
Once the surge protector is connected to the electrical system, we can proceed to the next step: restoring power supply and testing the surge protector.
Step 6: Restore power supply and test the surge protector
Now that the surge protector is properly connected to the electrical system, it’s time to restore power supply and test its functionality. Follow these steps to ensure that the surge protector is working effectively:
- Double-check all connections: Before restoring power, perform a final inspection of all connections inside the electrical panel. Ensure that all wires are securely connected and properly insulated.
- Turn on the main breaker: Using a screwdriver or your hand, switch the main breaker back to the “ON” position. This will restore the power supply to your home.
- Monitor the surge protector: Once the power is restored, keep an eye on the surge protector. Look for any indicator lights or displays that confirm it is functioning correctly.
- Test the surge protection capabilities: To test the surge protector, you can use a surge-generating device or consult a licensed electrician. They can create controlled surge situations to validate the effectiveness of the surge protector.
- Verify protection for individual circuits: After testing the surge protector as a whole, it’s recommended to check if individual circuits are protected. Use a surge protector tester or consult an electrician to evaluate the protection levels of different circuits in your home.
During the testing phase, it’s essential to ensure that all electrical devices and appliances are functioning correctly. If you notice any issues or abnormalities, consult a licensed electrician for further assistance.
Keep in mind that surge protectors do have a lifespan and may need to be replaced over time. Refer to the manufacturer’s guidelines regarding maintenance and replacement intervals to ensure your surge protector continues to provide optimal protection.
With the surge protector successfully installed, tested, and operational, you have taken a critical step in safeguarding your electrical system and devices from power surges.
In the final step, we will provide additional considerations and tips to further enhance your surge protection setup.
Step 7: Additional considerations and tips
Congratulations on successfully installing and testing your whole house surge protector! To further enhance the effectiveness of your surge protection setup, here are some additional considerations and tips:
- Regular maintenance: It’s important to periodically inspect your surge protector for any signs of damage or wear. Check the manufacturer’s guidelines for recommended maintenance intervals, and replace the surge protector if necessary.
- Expandable surge protection: If you anticipate adding new electrical circuits or appliances in the future, consider purchasing a surge protector with expandable capabilities. This will allow you to easily add protection for new additions to your electrical system.
- Whole house vs. point of use surge protectors: While a whole house surge protector provides comprehensive protection, you may also want to consider installing point of use surge protectors for particularly sensitive electronics or appliances. This additional layer of protection can further safeguard specific devices.
- Professional consultation: If you have any doubts or concerns during the installation process, it’s always best to consult a licensed electrician. They can provide expert advice and ensure the proper installation of your surge protector.
- Label your electrical panel: To make it easier to identify the surge protector and other breakers in the future, consider labeling each circuit in your electrical panel. This will help facilitate maintenance and troubleshooting.
- Educate household members: Make sure everyone in your household is aware of the purpose and importance of surge protection. Encourage them to unplug sensitive devices during a storm or power outage to minimize the risk of damage.
By following these additional considerations and tips, you can maximize the effectiveness of your whole house surge protector and ensure the long-term protection of your electrical system and devices.
To conclude, installing a whole house surge protector is a proactive and essential step in safeguarding your home’s electrical system against power surges. By gathering the necessary tools and materials, shutting off the power supply, determining the placement, installing and connecting the surge protector properly, and testing its functionality, you can enjoy the peace of mind that comes with knowing your valuable electronics and appliances are protected.
Remember, if you are unsure or uncomfortable with any step of the installation process, it is always recommended to seek the assistance of a licensed electrician to ensure a safe and effective installation.
Conclusion
Installing a whole house surge protector is a crucial step in protecting your home’s electrical system and valuable electronics from power surges. By following the step-by-step instructions outlined in this guide, you can successfully install a surge protector and enhance the safety and longevity of your electrical devices.
We began by discussing the importance of surge protectors and their role in diverting excess voltage away from sensitive electronics. We then walked through the process of gathering the necessary tools and materials, shutting off the main power supply, determining the placement of the surge protector, and installing it in the electrical panel. We also covered how to connect the surge protector to the electrical system, restore power supply, and test the surge protector’s functionality.
Throughout the installation process, it’s important to prioritize safety. Ensure you have the proper tools and safety equipment, and consider consulting a licensed electrician if you have any doubts or concerns.
Additionally, we provided additional considerations and tips, such as the importance of regular maintenance, the option of point of use surge protectors, and the benefits of labeling your electrical panel. By implementing these tips, you can further enhance your surge protection setup.
Remember to educate household members about the importance of surge protection and encourage responsible usage of electronics during storms or power outages.
Installing a whole house surge protector is an investment in the long-term protection and durability of your electrical system and devices. By taking the necessary steps and following the guidelines in this guide, you can enjoy peace of mind, knowing that your electronics are safeguarded against damaging power surges.
Now that you have the knowledge and understanding, it’s time to get started on the installation process. Remember to proceed with caution, prioritize safety, and consider seeking professional assistance if needed.
Thank you for reading our comprehensive guide on how to install a whole house surge protector. Take control of your electrical system’s protection and enjoy the benefits of a secure and reliable power supply.
Frequently Asked Questions about How To Install A Whole House Surge Protector
Was this page helpful?
At Storables.com, we guarantee accurate and reliable information. Our content, validated by Expert Board Contributors, is crafted following stringent Editorial Policies. We're committed to providing you with well-researched, expert-backed insights for all your informational needs.


0 thoughts on “How To Install A Whole House Surge Protector”