Articles
How To Make A French Cleat
Modified: May 6, 2024
Learn how to make a French cleat and enhance your article organization with this easy-to-follow guide on creating sturdy, space-saving wall mounts.
(Many of the links in this article redirect to a specific reviewed product. Your purchase of these products through affiliate links helps to generate commission for Storables.com, at no extra cost. Learn more)
Introduction
Are you tired of dealing with clutter in your workspace? Do you find yourself constantly searching for tools or supplies because they are disorganized or hidden away in drawers? If so, a French cleat system might be the perfect solution for you.
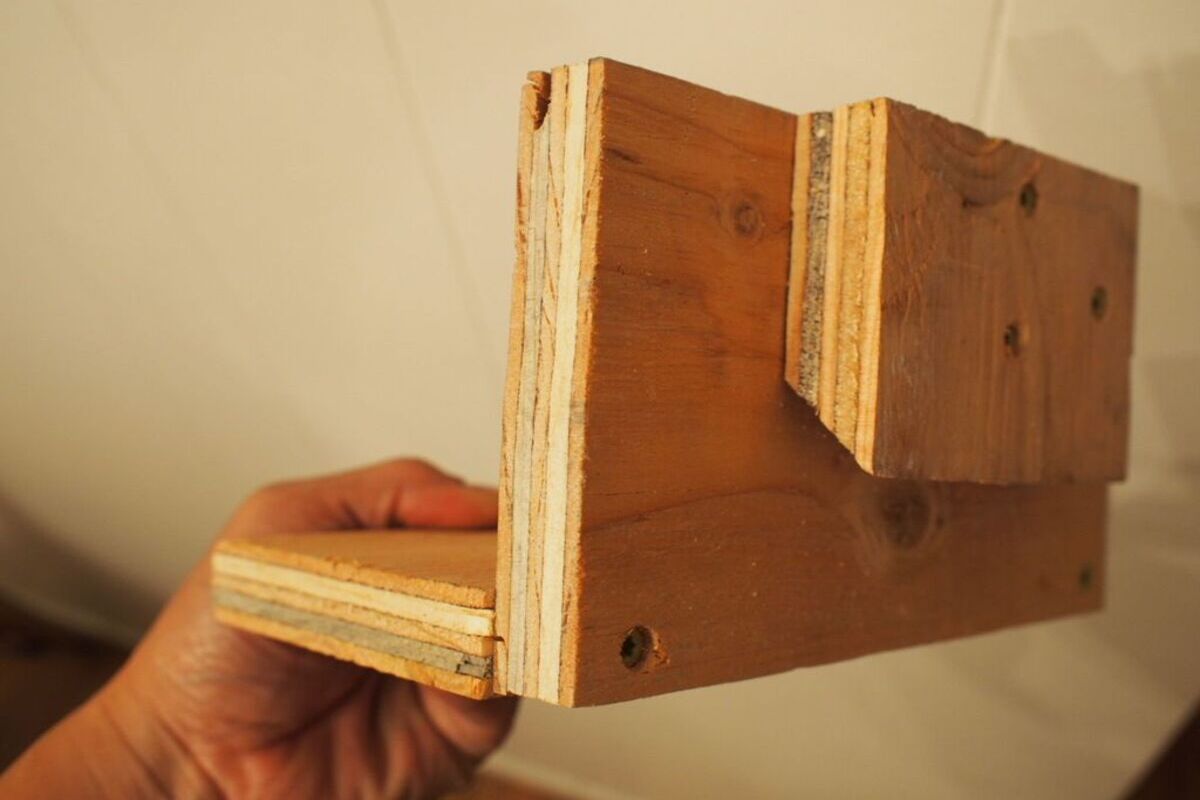
A French cleat is a simple yet incredibly effective way to create storage and organization in your workshop, garage, or any other area where you need to keep items accessible and within reach. It consists of two interlocking wooden strips – one is attached to the wall, and the other is attached to the item you want to hang. This system allows for easy adjustability and provides a secure and stable way to store your tools, equipment, or décor.
This article will guide you through the process of making a French cleat system step-by-step, ensuring that you have all the information you need to create a functional and efficient storage solution. So, gather your tools and let’s get started!
Key Takeaways:
- Create a functional and versatile storage solution with a French cleat system, providing easy access to tools and items while maintaining stability and adjustability.
- Ensure a sturdy and reliable installation by choosing sturdy materials, measuring accurately, and checking for levelness and stability, with the option to add extra cleats for heavy items.
Read more: What Is A Cleat In Woodworking
Materials Needed
Before you begin building your French cleat system, it’s important to gather all the materials you’ll need for the project. Here’s a list of the essentials:
- Wooden board: Choose a durable and sturdy wooden board that is at least 1 inch thick. The length and width will depend on the size of the area you want to cover.
- Saw: You’ll need a saw to cut the wooden board to the desired length. A circular saw or a miter saw will work well for this task.
- Screws: Opt for sturdy screws that are appropriate for the thickness of the wooden board. Make sure they are long enough to securely attach the cleat to the wall.
- Screwdriver or Drill: Depending on your preference, you can use a screwdriver or a drill to attach the screws.
- Tape Measure: Accurate measurements are crucial for a successful French cleat system. Make sure you have a tape measure or ruler handy.
- Pencil or Marker: You’ll need a pencil or marker to mark the measurements and cut lines on the wooden board.
- Level: To ensure that your cleat system is straight and level, a level tool is essential.
- Stud Finder (optional): If you want to attach the cleat to wall studs for added strength, a stud finder can be helpful in locating them.
These are the basic materials needed to build a French cleat system. Additionally, you may want to consider other tools or accessories based on your specific requirements. For example, if you plan to hang heavier items, you might need additional support brackets or larger screws.
Now that you have all the necessary materials, it’s time to move on to the next step: choosing the cleat and wall board.
Step 1: Choosing the Cleat and Wall Board
Choosing the right cleat and wall board is crucial for the stability and functionality of your French cleat system. Here’s what you need to consider when making your selection:
Cleat: The cleat is the horizontal strip that will be attached to the wall. It’s important to choose a cleat that is made of sturdy and durable material, such as hardwood or plywood. The thickness of the cleat should generally match the thickness of the wall board you plan to hang. For example, if you’re using a 1-inch thick wall board, opt for a 1-inch thick cleat.
Wall Board: The wall board is the vertical strip that will be attached to the item you want to hang. It should be made of the same material as the cleat for consistency. The width of the wall board can vary depending on the size of the item you’re hanging. If you’re planning to hang larger or heavier items, it’s a good idea to choose a wider wall board for added stability.
Keep in mind that the length of the cleat and wall board will depend on the size of the area where you want to install the French cleat system. Measure the space carefully and determine the appropriate length for both the cleat and wall board.
Once you have chosen the cleat and wall board, it’s time to move on to the next step: measuring and marking the positions.
Step 2: Measuring and Marking
Before cutting the cleat and wall board, it’s important to accurately measure and mark the positions where they will be installed. Follow these steps to ensure that your French cleat system is level and properly aligned:
- Locate the desired area on the wall where you want to install the cleat system. Use a stud finder, if necessary, to locate the wall studs for added stability.
- Measure and mark the desired height for the cleat on the wall. Use a level to ensure that the marks are straight and level.
- Next, measure and mark the corresponding height on the wall board. This will be the point where the wall board will align with the cleat.
- Using a tape measure or ruler, mark the width of the cleat and wall board on their respective surfaces. This will help you accurately align them during installation.
- Double-check all the measurements and marks to ensure accuracy before moving on to the next step.
By carefully measuring and marking the positions of the cleat and wall board, you’ll ensure a seamless installation and a level French cleat system. Once you’re confident with your measurements, it’s time to proceed to the next step: cutting the cleat and wall board.
Step 3: Cutting the Cleat and Wall Board
Now that you have measured and marked the positions of the cleat and wall board, it’s time to cut them to the desired lengths. Follow these steps to ensure accurate cuts:
- Using a tape measure or ruler, measure the length of the cleat needed to fit the marked area on the wall. Mark this measurement on the cleat.
- Using a saw (such as a circular saw or miter saw), carefully cut along the marked line to create the cleat.
- Repeat the same process for the wall board, measuring and marking the length needed to align with the cleat. Use a saw to make a straight cut along the marked line.
- Double-check the lengths of the cut cleat and wall board to ensure they match your measurements.
It’s essential to make precise and straight cuts to ensure that the cleat and wall board align properly. Take your time and use caution when operating the saw.
Once you have cut the cleat and wall board to the correct lengths, you’re ready to move on to the next step: screwing the cleat to the wall.
When making a French cleat, ensure that the angle of the cleat is 45 degrees to provide a secure and stable hanging system for heavy objects. Use a level to ensure the cleat is installed straight.
Read more: How To Make French Bread In Bread Machine
Step 4: Screw the Cleat to the Wall
With the cleat and wall board cut to the correct lengths, it’s time to securely attach the cleat to the wall. Follow these steps to ensure a stable installation:
- Hold the cleat against the wall at the marked height. Make sure it is level by using a level tool.
- Using a drill or screwdriver, drive screws through the cleat and into the wall studs, if possible. This will provide maximum support and stability.
- If there are no wall studs at the desired location, use appropriate wall anchors to secure the cleat to the wall. Follow the manufacturer’s instructions for installing the anchors.
- Continue placing screws along the length of the cleat, ensuring that it remains level as you screw it in.
- Make sure the screws are tight and secure, but avoid over-tightening as it may cause the wood to split.
By securely attaching the cleat to the wall, you’ll create a strong foundation for your French cleat system. Be sure to use screws that are long enough to penetrate the wall and provide a solid connection.
Now that the cleat is securely in place, it’s time to move on to the next step: attaching the wall board to the cleat.
Step 5: Attaching the Wall Board to the Cleat
Now that the cleat is securely attached to the wall, it’s time to attach the wall board to the cleat. Follow these steps for a proper installation:
- Hold the wall board against the cleat, aligning it with the marked height and width.
- Ensure that the wall board is level by using a level tool.
- Using a drill or screwdriver, drive screws through the wall board and into the cleat. Place the screws evenly across the length of the wall board.
- Make sure the screws are tight, but be careful not to overtighten and damage the wood.
- Double-check that the wall board is securely attached to the cleat and level with the floor or adjacent items.
The wall board will now act as the support for the items you want to hang on your French cleat system. It’s important to attach it firmly to the cleat to ensure stability and prevent any accidental detachment.
With the wall board securely attached, you’re ready to move on to the next step: checking for level and stability.
Step 6: Checking for Level and Stability
After attaching the wall board to the cleat, it’s crucial to check for levelness and stability to ensure the functionality and safety of your French cleat system. Follow these steps to perform a thorough check:
- Use a level tool to ensure that both the cleat and wall board are level horizontally and vertically. Adjust if necessary by loosening the screws and making small adjustments.
- Give the wall board a gentle shake to test its stability. If it feels wobbly or lacks stability, tighten the screws or consider adding additional screws for reinforcement.
- Hang a lightweight item on the wall board and observe if it stays securely in place. If there is any movement or instability, reinforce the connections with additional screws.
- Repeat the process with heavier items to ensure that your French cleat system can support the weight without compromising stability.
By thoroughly checking for levelness and stability, you can address any issues early on and make the necessary adjustments to ensure the longevity and reliability of your French cleat system.
If your French cleat system passes the level and stability tests, congratulations! You’ve successfully completed the core steps in building a functional and efficient storage solution. However, if you plan to hang particularly heavy items, you might want to consider adding additional cleats for added support.
To learn about the optional step of adding additional cleats, continue to the next section.
Step 7: Optional: Adding Additional Cleats for Heavy Items
If you plan to hang heavy items on your French cleat system, it’s advisable to add additional cleats for added support and stability. This optional step will ensure that your system can safely accommodate the weight of the items you want to hang. Follow these steps to add extra cleats:
- Determine the number of additional cleats needed based on the weight and size of the items you plan to hang. As a general rule, it’s a good idea to add one cleat for every 50 pounds of weight.
- Measure and mark the positions for the additional cleats on the wall, ensuring they are evenly spaced and level with the existing cleat.
- Repeat the process of cutting the cleats and attaching them to the wall as described in the previous steps.
- Attach the corresponding wall boards to the added cleats, ensuring they are level and securely fastened.
By adding extra cleats, you distribute the weight of heavy items across multiple support points, reducing the strain on individual cleats and providing greater stability overall.
Remember to always consider the load-bearing capacity of your wall and make sure it can support the combined weight of the cleats, wall boards, and items you plan to hang. If in doubt, consult a professional or consider reinforcing the wall with additional support structures.
Congratulations! You have now completed all the necessary steps to create a French cleat system. Step back and admire your well-organized and easily accessible storage solution. Enjoy the convenience of having your tools, equipment, or décor within reach whenever you need them.
Remember to periodically check the stability of your French cleat system and make any necessary adjustments or reinforcements to ensure its continued functionality and safety.
Happy organizing!
Read more: How To Make French Toast In A Slow Cooker
Conclusion
Congratulations on creating your very own French cleat system! By following the step-by-step process outlined in this article, you have successfully built a functional and efficient storage solution for your workspace, garage, or any area where you need easy access to tools and items.
The beauty of a French cleat system lies in its simplicity and versatility. Its interlocking design provides stability and allows for easy adjustability, making it ideal for organizing a wide range of items such as hand tools, power tools, bins, shelves, and even artwork or decoration.
Remember to choose sturdy materials for your cleats and wall boards, and use proper fastening techniques to ensure a sturdy and durable installation. Taking the time to measure accurately, mark positions, and check for levelness and stability will result in a well-balanced and reliable system.
If you plan to hang heavy items, consider adding extra cleats for added support. This will help distribute the weight more evenly and enhance the overall stability of the system.
Regularly check the stability of your French cleat system and make any necessary adjustments or reinforcements as needed. This will ensure its continued functionality and safety over time.
Enjoy the convenience and organization that your French cleat system brings to your workspace. Say goodbye to fumbling through cluttered drawers or searching for misplaced tools. Everything will be within reach and neatly displayed.
Now it’s time to step back and admire your handiwork. Bask in the satisfaction of a well-organized and efficient space, ready to tackle any project that comes your way.
Happy organizing, and may your French cleat system serve you well for years to come!
Now that you've mastered making a French cleat, why not tackle more creative projects? For those passionate about crafting with wood, our guide on top woodworking trends offers plenty of inspiration. If you prefer a broader scope, our examination of why DIY projects are so rewarding will surely spark your interest. Don’t forget, organizing your tools effectively can transform your workspace; check out our latest recommendations on tool storage solutions to keep everything in tip-top shape.
Frequently Asked Questions about How To Make A French Cleat
Was this page helpful?
At Storables.com, we guarantee accurate and reliable information. Our content, validated by Expert Board Contributors, is crafted following stringent Editorial Policies. We're committed to providing you with well-researched, expert-backed insights for all your informational needs.


0 thoughts on “How To Make A French Cleat”