Articles
How To Install French Drain In Basement
Modified: January 18, 2024
Learn how to install a French drain in your basement with our informative articles. Find step-by-step instructions and expert tips to keep your basement dry and free from water damage.
(Many of the links in this article redirect to a specific reviewed product. Your purchase of these products through affiliate links helps to generate commission for Storables.com, at no extra cost. Learn more)
Introduction
Welcome to the comprehensive guide on how to install a French drain in your basement. If you’ve been experiencing water issues in your basement, a French drain can be a highly effective solution to keep your basement dry and prevent water damage.
A French drain, also known as a weeping tile or sub-surface drain, is a drainage system designed to redirect water away from your basement foundation. It consists of a trench filled with gravel or rock, perforated pipe, and a filter fabric that prevents soil from clogging the system.
Installing a French drain in your basement can be a DIY project, but it does require some planning and preparation. This guide will walk you through the step-by-step process of installing a French drain, from the initial planning to testing the system for proper functionality.
But before we dive into the installation process, let’s take a look at the materials and tools you will need for this project.
Key Takeaways:
- Proper planning and preparation are essential for a successful French drain installation. Assess the water issue, calculate drain length, and obtain necessary permits before beginning the excavation process.
- Testing the French drain after installation is crucial to ensure its effectiveness. Monitor water flow, check for basement water entry, and assess the drainage rate to make any necessary adjustments for optimal functionality.
Read more: What Is A French Drain In Basement
Materials and Tools Required
Before you begin the installation process, it’s important to gather all the necessary materials and tools. Here’s a list of what you’ll need:
Materials:
- Perforated drainage pipe
- Filter fabric
- Gravel or rock
- PVC pipe and fittings (if connecting to a sump pump)
- Pipe connectors and couplings
- PVC primer and cement
- Concrete or masonry sealer (if necessary)
Tools:
- Shovel
- Tape measure
- Level
- Hand saw or reciprocating saw (for cutting pipe)
- Rake
- Utility knife
- Gloves
- Safety goggles
- Wheelbarrow or bucket (for removing and transporting soil)
Make sure you have all the materials and tools ready before starting the installation process. This will save you time and ensure that you can complete the project smoothly.
Step 1: Planning and Preparation
Proper planning and preparation are crucial to ensure the success of your French drain installation. Here’s what you need to do in this initial step:
Read more: How To Install Drain Tile In Basement
1. Assess the water issue:
Identify the source of the water problem in your basement. Is it a result of groundwater seepage, poor drainage, or surface runoff? Understanding the cause will help you determine the most effective placement and design for your French drain.
2. Determine the drain location:
Locate the area where water accumulates most frequently or where the water is entering your basement. This will be the starting point for your French drain.
3. Calculate the drain length:
Measure the length of the wall or area where you plan to install the French drain. This will help you determine the total length of the perforated pipe and the amount of filter fabric and gravel you’ll need.
4. Dig a test hole:
Before excavating the entire perimeter, dig a small test hole near the wall where you plan to install the French drain. This will allow you to evaluate the soil type, water level, and any potential obstacles that may affect the installation process.
5. Obtain necessary permits:
Check with your local authorities to see if any permits are required for installing a French drain in your basement. Follow any regulations or guidelines provided to ensure compliance with local building codes.
By taking the time to plan and prepare, you’ll be better equipped to tackle the installation process with confidence. You’ll have a clear understanding of the problem, the drain location, and the necessary materials and tools required for a successful French drain installation.
Step 2: Perimeter Excavation
Now that you’ve completed the planning and preparation, it’s time to move on to the excavation process. This step involves digging a trench around the perimeter of your basement to create a pathway for the French drain. Here’s a detailed guide on how to perform the excavation:
1. Mark the trench:
Using stakes and string, mark the path of the trench along the perimeter of your basement. Ensure that the trench is sloped away from your foundation to facilitate proper water drainage.
2. Start digging:
Using a shovel, begin digging the trench according to the marked path. The trench should be approximately 12-18 inches deep and 12-18 inches wide. Keep the soil neatly piled next to the trench for easy backfilling later on.
Read more: How To Clean Basement Drain
3. Check the slope:
Regularly check the slope of the trench using a level. Aim for a minimum slope of 1 inch per 8 feet towards the desired drainage outlet. Adjust the depth and width of the trench as needed to maintain the proper slope.
4. Evaluate the soil conditions:
As you excavate, pay attention to the soil conditions and make note of any obstacles, such as rocks or tree roots, that may need to be removed or worked around. Remove any debris or obstructions that could interfere with the drainage system.
5. Inspect the foundation walls:
While excavating, inspect the foundation walls for any signs of cracks, leaks, or damage. If you notice any issues, consider applying a concrete or masonry sealer to ensure a watertight barrier between the French drain and the basement walls.
Excavation is a critical step in the French drain installation process, as it sets the foundation for the drainage system. Take your time to carefully excavate the trench, ensuring proper slope and removing any obstacles along the way. Once the excavation is complete, you’re ready to move on to the next step: digging the trench for the French drain.
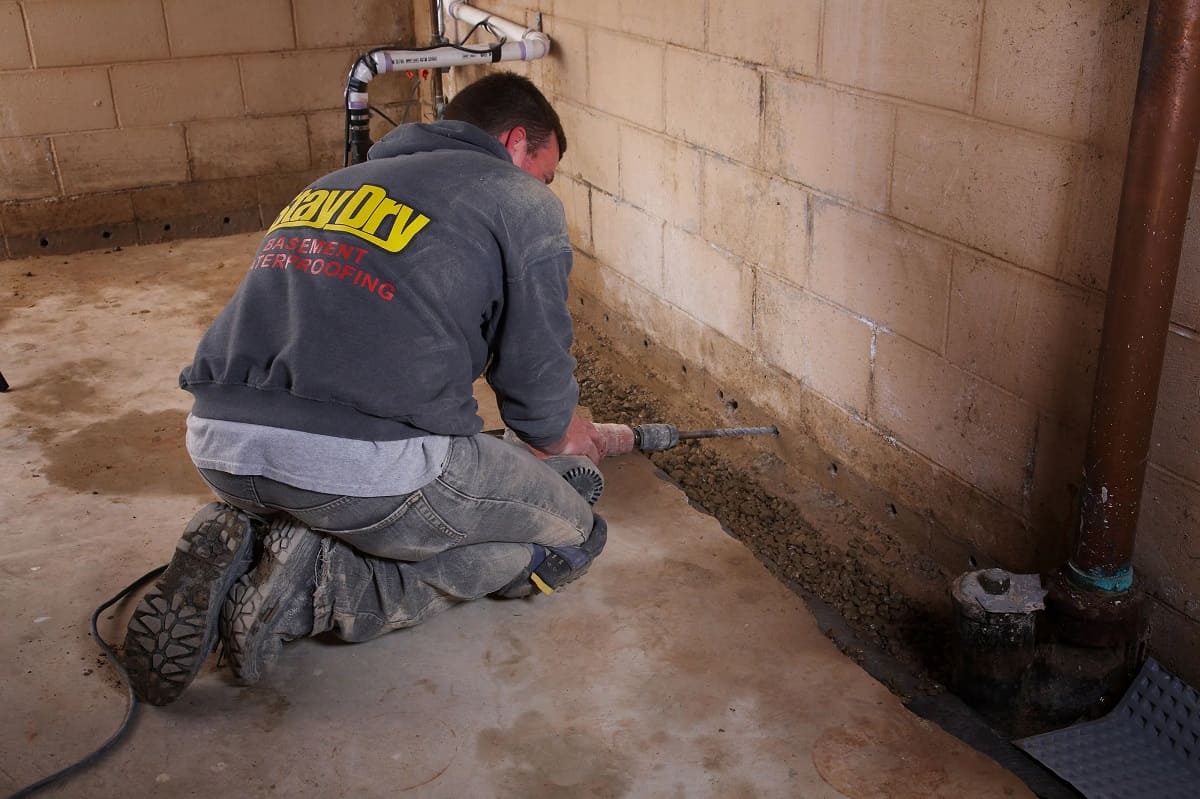
Step 3: Digging Trench for French Drain
With the perimeter excavation complete, it’s time to dig the trench specifically for the French drain. This trench will house the perforated pipe and allow for proper water drainage. Here’s a detailed guide on how to dig the trench:
Read more: How To Unclog A Basement Drain
1. Determine the trench depth:
The depth of the trench will depend on the recommended depth for the French drain in your specific situation. In general, the trench depth should be at least 2-3 inches deeper than the bottom of your basement floor.
2. Dig the trench:
Using a shovel or a trenching tool, dig the trench along the path you marked earlier. The width of the trench should be wide enough to accommodate the size of the perforated pipe and allow room for proper backfilling.
3. Create a slight slope:
As you dig the trench, make sure to create a slight slope from the starting point towards the desired drainage outlet. This will allow water to flow freely through the French drain and away from your basement.
4. Smooth the trench bottom:
Once the trench is dug, use a rake to smooth out the bottom of the trench. Removing any rocks or debris will ensure a secure and stable placement for the perforated pipe.
Read more: How To Install French Patio Doors
5. Check for proper slope:
Again, use a level to check the slope of the trench. Aim for a minimum slope of 1 inch per every 8 feet to ensure proper water flow. Make any necessary adjustments by adding or removing soil as needed.
By following these steps, you’ll create a well-prepared trench that will house the French drain. Keep in mind the recommended depth and slope requirements for your specific situation to ensure optimal water drainage. With the trench prepared, you’re ready to move on to the next step: applying the filter fabric.
Step 4: Applying Filter Fabric
Now that you’ve dug the trench for the French drain, it’s time to apply the filter fabric. The filter fabric acts as a barrier, preventing soil particles from clogging the perforated pipe and ensuring efficient water flow. Here’s a step-by-step guide on how to apply the filter fabric:
1. Measure and cut the fabric:
Measure the length of the trench and cut the filter fabric accordingly. The fabric should be wide enough to cover the bottom and sides of the trench with some excess for folding over the top.
2. Lay the fabric in the trench:
Place the filter fabric at the bottom of the trench, allowing it to extend up the sides. Smooth out any wrinkles or folds to ensure a tight, secure fit. If needed, use stakes or rocks to hold the fabric in place.
Read more: How To Drain Water Heater In Basement
3. Fold over the excess fabric:
Once the fabric is laid in the trench, fold over the excess fabric at the top. This will help prevent soil from entering the drain and clogging the system.
4. Secure the fabric:
Use landscape fabric pins or staples to secure the filter fabric to the sides of the trench. This will keep the fabric in place during the backfilling process and ensure it doesn’t shift or move.
5. Trim any excess fabric:
If there is any excess fabric sticking out of the trench, trim it with a utility knife to create a neat and clean appearance.
Applying the filter fabric is an important step in the French drain installation process. It plays a crucial role in preventing the system from becoming clogged with soil particles, ensuring that water can flow freely through the drain. With the filter fabric in place, you’re now ready to move on to the next step: installing the perforated pipe.
Step 5: Installing Perforated Pipe
With the filter fabric applied in the trench, it’s time to install the perforated pipe. The perforated pipe will collect and channel water away from your basement, preventing moisture buildup and potential water damage. Here’s a step-by-step guide on how to install the perforated pipe:
Read more: How To Clean Floor Drain In Basement
1. Select the perforated pipe:
Choose a high-quality perforated pipe that is specifically designed for drainage applications. The pipe should have evenly spaced holes along its length to allow water to enter.
2. Position the pipe:
Place the perforated pipe on top of the filter fabric in the trench. Ensure that the holes of the pipe are facing downwards to allow water to flow into the pipe.
3. Connect the pipe sections:
If your trench is longer than the length of the perforated pipe, you may need to connect multiple sections of pipe together. Use pipe connectors and couplings to securely join the sections.
4. Create outlet for water:
At the end of the trench, create an outlet for the water to flow out. This can be a lower area of your yard or a designated drainage area. Ensure that the outlet is at a lower elevation than the trench to facilitate proper water drainage.
Read more: How To Install Washer Drain
5. Secure the pipe:
Use gravel or rocks to cover the perforated pipe, ensuring that it is held securely in place. The gravel will provide additional support and stability for the pipe.
Installing the perforated pipe is a critical step in the French drain installation process. It allows water to enter the pipe and be channeled away from your basement, preventing water damage and maintaining a dry environment. With the pipe installed, you’re now ready to move on to the next step: backfilling the trench.
Step 6: Backfilling the Trench
With the perforated pipe installed, it’s time to backfill the trench. Backfilling helps to secure the pipe in place, provides support, and allows for proper water drainage. Here’s a step-by-step guide on how to backfill the trench:
1. Start with coarse gravel:
Begin by adding a layer of coarse gravel over the perforated pipe. This will provide a stable base for the backfill and facilitate water flow to the pipe.
2. Fill the trench with soil:
Gently fill the trench with the soil that was initially removed during excavation. Carefully compact the soil as you go to create a solid foundation for the French drain system.
Read more: How To Install Carpet In A Basement
3. Tamp down the soil:
Use a tamper or the back of a shovel to firmly tamp down the soil. This will help prevent settling and ensure that the backfilled trench remains stable over time.
4. Maintain the proper slope:
As you backfill, maintain the proper slope of the trench to allow for water to flow freely towards the outlet. Regularly check the slope using a level and make any necessary adjustments.
5. Repeat the process:
Continue adding layers of gravel and backfilling with soil until the trench is completely filled. Remember to compact the soil with each layer to maintain a strong foundation for the French drain system.
Backfilling the trench is an important step in the French drain installation process. It ensures that the perforated pipe remains securely in place and provides a clear pathway for water drainage away from your basement. With the trench successfully backfilled, you’re now ready to move on to the next step: optionally installing a sump pump.
Step 7: Installing Sump Pump (Optional)
While not always necessary, installing a sump pump can be advantageous in certain situations. A sump pump helps to further protect your basement from water intrusion by pumping out any excess water collected by the French drain system. Here’s a step-by-step guide on how to install a sump pump:
Read more: How To Install Floor Drain
1. Determine the location:
Choose a suitable location for the sump pump, preferably near the lowest point of your basement. This area is typically where water accumulates the most.
2. Dig the sump pit:
Using a shovel or a spade, dig a hole in the chosen location to create the sump pit. Ensure the pit is deep enough to accommodate the sump pump and allow for proper water collection.
3. Install the sump liner:
Place the sump liner into the pit, ensuring it is level and securely positioned. The sump liner acts as a container for collecting the water that enters the pit.
4. Connect the pump:
Attach the sump pump to the discharge pipe. The discharge pipe will carry the water from the sump pit to a designated drainage area or the exterior of your home.
Read more: Where Do Basement Drains Go
5. Test the pump:
Once the pump is installed, fill the sump pit with water to test the pump’s functionality. Ensure the pump activates and efficiently pumps out the water from the pit.
6. Secure the lid:
Place the lid securely on top of the sump pit to prevent debris and odors from entering the pit. The lid should have a tight seal to maintain the integrity of the system.
Installing a sump pump can provide an extra layer of protection against water intrusion in your basement. It works in conjunction with the French drain system to effectively manage excess water and keep your basement dry. If you decide to install a sump pump, follow these steps carefully to ensure proper installation and functionality.
Step 8: Connecting the Drainage System
With the French drain and, optionally, the sump pump installed, it’s time to connect the drainage system. This step involves connecting the perforated pipe to the sump pump or the outlet for proper water discharge. Here’s a step-by-step guide on how to connect the drainage system:
1. Determine the connection point:
Identify the best location for connecting the perforated pipe to the sump pump or the outlet. This point should allow for efficient water flow and proper discharge away from your basement.
Read more: How To Install Basement Ceiling
2. Cut the pipe if necessary:
If the perforated pipe doesn’t reach the connection point, use a hand saw or a reciprocating saw to cut the pipe to the desired length. Ensure a clean and straight cut for a secure connection.
3. Attach connectors and couplings:
Using PVC connectors and couplings, securely attach the perforated pipe to the sump pump or the outlet. Follow the manufacturer’s instructions and ensure a tight connection to prevent leaks.
4. Apply PVC primer and cement:
Before making the final connections, apply PVC primer to the pipe and fittings as per the manufacturer’s instructions. This will ensure proper adhesion of the PVC cement for a reliable joint.
5. Connect the pipe and fittings:
Join the perforated pipe with the connectors or couplings, making sure to align them correctly. Push the pipe firmly into place and hold it for a few seconds to allow the PVC cement to set.
Read more: How To Install Subfloor In Basement
6. Test the drainage system:
Once the connections are made, test the drainage system to ensure there are no leaks. Fill the trench or the sump pit with water and observe if it flows efficiently through the pipe and discharges properly.
Connecting the drainage system is the final step in the French drain installation process. It ensures that water is effectively channeled away from your basement and properly discharged. Take the time to make secure and watertight connections to ensure the efficiency and functionality of the drainage system.
Step 9: Testing the French Drain
The final step in the French drain installation process is to test the system to ensure its effectiveness and functionality. Testing the French drain will give you the confidence that it is properly installed and capable of managing water drainage in your basement. Here’s a step-by-step guide on how to test the French drain:
1. Wait for a rainy day or simulate water flow:
A natural way to test the French drain is to wait for a rainstorm. Alternatively, you can simulate water flow by using a garden hose. Allow water to flow into the French drain either through rainfall or the hose.
2. Observe water flow:
Monitor the flow of water through the French drain system. Check if the water is properly entering the perforated pipe, flowing through the drain, and being discharged away from your basement. Ensure there are no blockages or signs of water pooling in the trench.
Read more: How To Install A Dehumidifier In Basement
3. Check the basement for water entry:
Inspect your basement for any signs of water entry during the test period. Look for damp spots, moisture, or water seepage. If you notice any issues, investigate and identify the source of the problem.
4. Assess the drainage rate:
Pay attention to the speed at which the French drain system is draining the water. The drainage rate should be sufficient to prevent water buildup and keep your basement dry. Evaluate if any adjustments or improvements are necessary to enhance the drainage flow.
5. Repeat the test if needed:
If you encounter any issues during the initial test, make the necessary adjustments and repeat the process. It is crucial to ensure that the French drain is functioning effectively in diverting water away from your basement.
Testing the French drain is essential to verify its functionality and address any potential issues early on. By carefully observing water flow, checking for basement water entry, and assessing drainage rate, you can make any necessary adjustments to ensure the success of your French drain installation.
Conclusion
Congratulations! You have successfully completed the installation of a French drain in your basement. By following the step-by-step guide provided, you have taken significant steps to prevent water damage and maintain a dry basement environment. Here are some key takeaways from the installation process:
1. Planning and preparation: Begin by assessing the water issue, determining the drain location, and calculating the drain length. Obtain any necessary permits before proceeding with the installation.
2. Excavation and trenching: Carefully dig the trench along the perimeter of your basement, ensuring the proper slope and removing any obstructions that may hinder the installation process.
3. Filter fabric application: Lay the filter fabric in the trench to prevent soil particles from clogging the perforated pipe. Fold over the excess fabric and secure it with landscape fabric pins to maintain a clear pathway for water flow.
4. Perforated pipe installation: Lay the perforated pipe on top of the filter fabric in the trench, ensuring the holes are facing downward. Connect multiple sections of pipe if needed and create an outlet for water to flow out.
5. Backfilling the trench: Fill the trench with coarse gravel, followed by carefully backfilling with soil. Compact the soil in layers to create a stable foundation for the French drain system.
6. Optional sump pump installation: If desired, install a sump pump in the lowest area of your basement. Dig a sump pit, place the sump liner, connect the pump, and ensure proper functionality through testing.
7. Connecting the drainage system: Connect the perforated pipe to the sump pump or the outlet using PVC connectors and couplings. Apply PVC primer and cement for secure connections.
8. Testing the French drain: Test the system by allowing water to flow into the drain through rain or a garden hose. Observe water flow, check for any basement water entry, and assess the drainage rate. Make adjustments if necessary.
By installing a French drain in your basement, you have taken a proactive step to mitigate water-related issues and protect your home from potential damage. With proper maintenance and periodic inspections, your French drain system will continue to effectively manage water and keep your basement dry for years to come. Enjoy the peace of mind that comes with a dry and waterproof basement!
Frequently Asked Questions about How To Install French Drain In Basement
Was this page helpful?
At Storables.com, we guarantee accurate and reliable information. Our content, validated by Expert Board Contributors, is crafted following stringent Editorial Policies. We're committed to providing you with well-researched, expert-backed insights for all your informational needs.

0 thoughts on “How To Install French Drain In Basement”