Articles
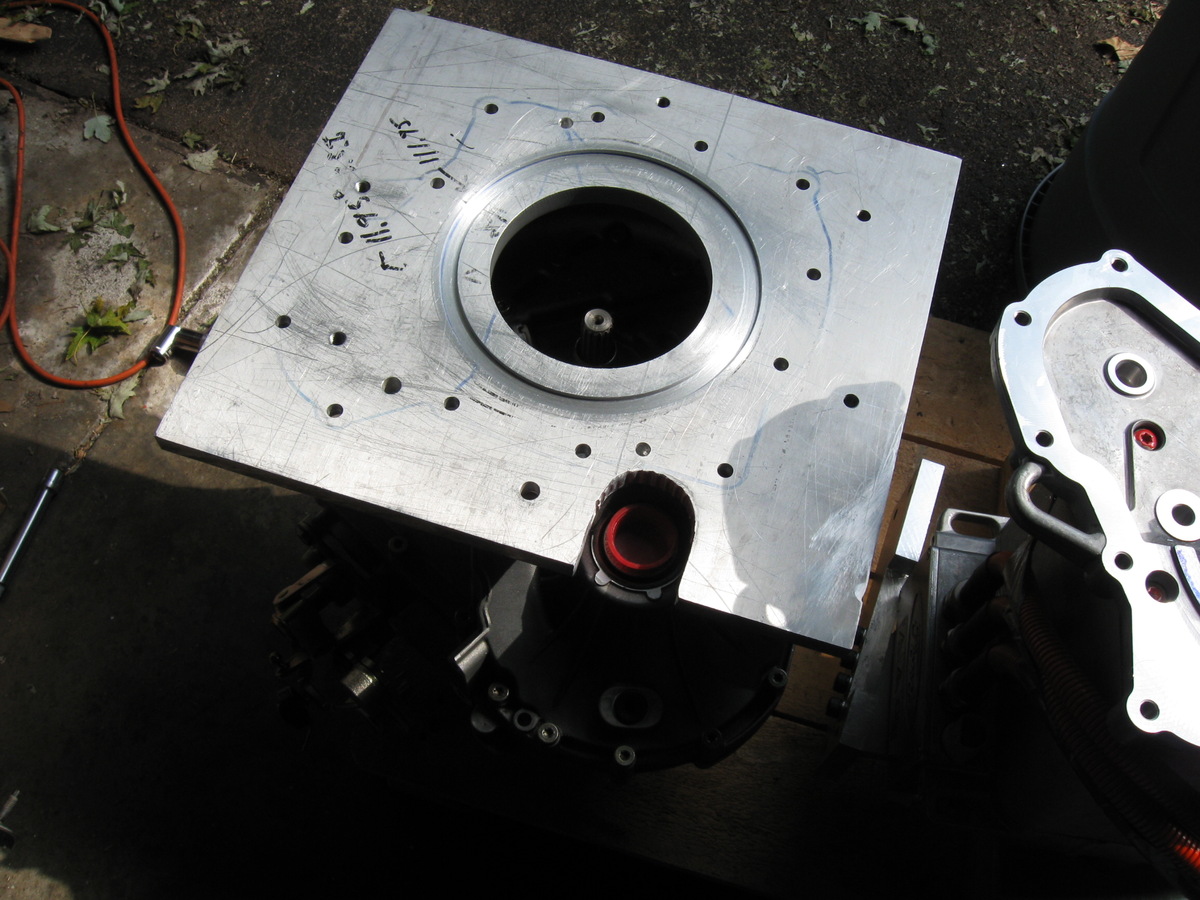
How To Make Transmission Adapter Plate
Modified: August 27, 2024
Learn how to make a transmission adapter plate with our step-by-step guide. Find helpful articles on building your own adapter for your transmission needs.
(Many of the links in this article redirect to a specific reviewed product. Your purchase of these products through affiliate links helps to generate commission for Storables.com, at no extra cost. Learn more)
Introduction
When it comes to modifying vehicles, one of the common challenges enthusiasts face is the need for a transmission adapter plate. This crucial component allows them to mate different engines and transmissions together, enabling a wide range of customization options. Whether you’re looking to swap out your engine, upgrade your transmission, or create a custom build, knowing how to make a transmission adapter plate can save you time and money.
In this article, we will walk you through the step-by-step process of creating your own transmission adapter plate. We will cover everything you need to know, from gathering the measurements and selecting the right materials to cutting, drilling, and shaping the plate to fit your specific needs. With some basic skills and the right tools, you can easily create a high-quality adapter plate that will ensure a seamless connection between your engine and transmission.
Before we dive into the nitty-gritty details, let’s take a moment to understand the purpose and importance of a transmission adapter plate. This plate serves as a bridge between the engine and the transmission, allowing them to be bolted together securely. In instances where the engine and transmission have different bolt patterns or are from different manufacturers, an adapter plate is essential to make them compatible.
With a well-designed and properly fitted transmission adapter plate, you can overcome the limitations that come with factory configurations. This opens up a whole new world of possibilities for engine swaps, transmission upgrades, and unique build combinations. Whether you’re restoring a classic car, building a hot rod, or creating a high-performance vehicle, having the ability to fabricate your own adapter plate gives you the freedom to experiment and push the boundaries of what’s possible.
Now that we have a clear understanding of the purpose and significance of a transmission adapter plate, let’s move on to the equipment and tools you’ll need to get started.
Key Takeaways:
- Mastering the art of creating a transmission adapter plate empowers automotive enthusiasts to seamlessly combine different engines and transmissions, unlocking a world of possibilities for custom vehicle configurations and builds.
- Attention to detail, precision in measurements, and careful fabrication processes are essential for producing a high-quality adapter plate, allowing enthusiasts to confidently pursue their unique automotive projects and modifications.
Read more: How To Make Charger Plates
Equipment and Tools Needed
Making a transmission adapter plate requires a few essential tools and equipment. Before you begin, make sure you have the following items on hand:
- Measuring tape or calipers: Accurate measurements are crucial when creating a custom adapter plate, so having a reliable measuring tool is essential.
- Templates: You’ll need templates of both the engine and transmission bolt patterns to ensure a proper fit. These can be obtained from the manufacturer or by creating your own using cardboard or paper.
- Marker or scribe: This will be used to mark the measurements on the adapter plate material.
- Angle grinder or jigsaw: You’ll need one of these tools to cut the adapter plate material to the desired shape. An angle grinder is recommended for its versatility and ability to handle thicker materials.
- Drill and drill bits: A drill is necessary for creating bolt holes on the adapter plate. Make sure you have the appropriate drill bits for the size of the bolts you’ll be using.
- Clamps or a vice: These are useful for securing the adapter plate material during cutting and drilling to ensure accuracy and safety.
- Sandpaper or sanding block: After cutting and drilling, you’ll need to smooth out the edges and surfaces of the adapter plate for a clean finish. Sandpaper or a sanding block of various grits will help you achieve this.
- Safety gear: Whenever working with tools and machinery, it’s essential to prioritize safety. Wear safety glasses, gloves, and a dust mask to protect yourself from any potential hazards.
Having these tools on hand will make the process of creating a transmission adapter plate much smoother and more efficient. In the next steps, we will guide you through the process of gathering measurements and templates to ensure a precise fit for your adapter plate.
Step 1: Gathering Measurements and Templates
The first step in making a transmission adapter plate is to gather accurate measurements and templates of both the engine and transmission bolt patterns. These measurements will serve as the foundation for creating the adapter plate.
Start by locating the bolt pattern on the engine block where the transmission mounts. Use a measuring tape or calipers to measure the distance between the bolt holes. Take note of the measurements, ensuring accuracy to avoid any issues during the fabrication process.
Next, it’s crucial to obtain a template of the engine bolt pattern. Most engine manufacturers provide bolt pattern templates in the specifications or technical documentation. However, if you can’t find the official template, you can create one yourself by tracing the bolt hole pattern onto a piece of cardboard or paper. Simply place the template over the bolt holes and mark the outlines.
Repeat the same process for the transmission bolt pattern. Locate the bolt holes on the transmission and measure the distance between them. If the transmission manufacturer provides a bolt pattern template, use it. Otherwise, create your own template by tracing the bolt hole pattern onto a separate piece of cardboard or paper.
With both the engine and transmission bolt patterns accurately measured and outlined on templates, you can now proceed to the next step: selecting the appropriate material for your adapter plate.
Remember, precision is crucial at this stage, as any inaccuracies in the measurements or templates can result in an ill-fitting adapter plate. Take your time to ensure everything is measured correctly before moving forward.
Step 2: Selecting the Adapter Plate Material
Choosing the right material for your transmission adapter plate is essential for ensuring durability and a proper fit. The material should have sufficient strength, be resistant to heat and corrosion, and be machinable for drilling and shaping.
One popular choice for adapter plate material is aluminum. Aluminum is lightweight, has good heat dissipation properties, and is relatively easy to work with. It’s important to select a high-quality aluminum alloy that can handle the weight and torque of the engine and transmission.
Another option is steel. Steel is known for its strength and durability, making it suitable for high-performance applications. However, steel is heavier than aluminum, so consider the weight implications if you’re aiming for a lightweight build.
When selecting the material, consider the thickness as well. The thickness of the adapter plate will depend on the specific application and the gap between the engine and transmission. It’s recommended to consult the manufacturer’s specifications or seek advice from experts to determine the appropriate thickness for your adapter plate.
Additionally, you may also consider factors such as cost, availability, and personal preferences when choosing the material for your adapter plate. Ultimately, the material should meet the necessary requirements for strength, heat resistance, corrosion resistance, and machinability.
Once you have selected the appropriate material, you can move on to the next step: cutting the adapter plate material to size.
Remember, safety is important when working with tools and materials. Always wear safety gear and take proper precautions to protect yourself from any potential hazards.
Step 3: Cutting the Adapter Plate Material
Now that you have the measurements and the chosen material for your transmission adapter plate, it’s time to cut the plate to the desired shape.
Start by marking the outline of the adapter plate on the material using a marker or scribe. Use the templates you created in Step 1 to ensure accuracy and alignment with the engine and transmission bolt patterns. Double-check the measurements and markings before proceeding.
Next, secure the adapter plate material using clamps or a vice to prevent it from moving during the cutting process. This will ensure clean and precise cuts.
If you’re using an angle grinder, make sure to use a cutting wheel suitable for the material you’re working with. Begin cutting along the marked outline, taking your time to maintain a smooth and even cut. If using a jigsaw, choose a blade intended for metal cutting and follow the marked outline carefully.
While cutting, it’s important to practice safety precautions. Wear safety glasses, gloves, and a dust mask to protect yourself from any debris or sparks that may be generated.
Take your time and make precise cuts to achieve the desired shape for your adapter plate. If the material is thick, it may require multiple passes to complete the cut. Be patient and ensure that all edges are smooth and free from burrs.
Once you have finished cutting the adapter plate to the desired shape, you can proceed to the next step: drilling the bolt holes.
Remember, accuracy and safety are paramount when cutting the adapter plate material. Take the necessary precautions and use appropriate tools to ensure a successful outcome.
When making a transmission adapter plate, ensure precise measurements and use high-quality materials to ensure a proper fit and reliable performance. Double-check all measurements before cutting or drilling to avoid costly mistakes.
Read more: How To Make A Propane Refill Adapter
Step 4: Drilling Bolt Holes
With the adapter plate material cut to shape, the next step is to drill the bolt holes that will secure it to both the engine and transmission.
Start by referring to the templates you created in Step 1. Align the template for the engine bolt pattern with the corresponding holes on the adapter plate. Use a marker or scribe to mark the exact locations of the bolt holes on the plate. Double-check the measurements and ensure the alignment is accurate.
Once the locations of the bolt holes are marked, it’s time to drill them. Begin by using a center punch to create small indentations at the marked locations. This will help keep the drill bit from slipping and ensure more precise drilling.
Select the appropriate drill bit size based on the bolts you’ll be using. Start with a smaller drill bit size, gradually increasing the size if needed, to prevent any issues with alignment or hole size.
Secure the adapter plate material using clamps or a vice to keep it stable during the drilling process. This will help maintain accuracy and prevent the material from moving or vibrating.
Using a drill, carefully drill the bolt holes at the marked locations. Apply steady pressure and keep the drill perpendicular to the plate to ensure straight and clean holes. Take your time and avoid rushing the drilling process, as accuracy is vital for a proper fit.
After drilling each hole, periodically clean away any metal shavings or debris to prevent them from interfering with the drilling process or damaging the drill bit.
Continue drilling all the necessary bolt holes for both the engine and transmission, following the marked locations on the adapter plate.
Once all the bolt holes are drilled, you can move on to the next step: shaping and sanding the adapter plate to ensure a precise fit.
Remember, wear appropriate safety gear, and take the necessary precautions while drilling to prevent injuries and ensure successful results.
Step 5: Shaping and Sanding the Adapter Plate
After drilling the bolt holes in the adapter plate, the next step is to shape and sand the plate for a precise fit between the engine and transmission.
Start by removing any sharp edges or burrs on the adapter plate using a file or deburring tool. This will ensure a smooth and safe surface when installing the plate.
Next, it’s time to shape the edges of the adapter plate to match the contours of the engine and transmission. This is especially important if there are any irregularities or protrusions that need to be accommodated.
Using an angle grinder or sanding tool, carefully shape the edges of the adapter plate to match the required contours. Take your time and make small adjustments as needed to ensure a proper and flush fit.
Once the shaping is complete, it’s time to sand the surfaces of the adapter plate. Start with a coarse sandpaper to remove any rough areas or imperfections. Gradually move to finer grits to achieve a smooth finish.
Sand the entire surface of the adapter plate, including the edges and bolt holes, to ensure there are no sharp edges or rough spots that could interfere with the installation or cause damage to the engine or transmission surfaces.
Periodically wipe away any dust or debris with a clean cloth to check the progress and ensure a clean surface for a seamless connection.
Continue sanding until the adapter plate has a smooth and even finish. This will not only ensure a clean appearance but also promote better contact and alignment between the engine and transmission.
Once the shaping and sanding are complete, you can proceed to the next step: test fitting the adapter plate to verify its compatibility.
Remember, take your time during the shaping and sanding process to achieve the desired fit and finish, and wear appropriate safety gear to protect yourself from any potential hazards.
Step 6: Test Fitting the Adapter Plate
With the adapter plate shaped and sanded, it’s time to perform a test fit to ensure it aligns properly between the engine and transmission.
Start by carefully aligning the adapter plate with the bolt holes on both the engine and transmission. Ensure that the bolt holes on the adapter plate line up precisely with those on the engine and transmission.
Insert the bolts into each hole to temporarily secure the adapter plate in place. Hand-tighten the bolts to avoid tightening them fully at this stage. This will allow for adjustments if necessary during the test fit.
Check the alignment of the adapter plate and verify that it sits flush against both the engine and transmission surfaces. Pay attention to any gaps, misalignments, or interference that may require further adjustments.
During the test fit, it’s crucial to assess the clearance between the adapter plate, engine, and transmission components. Make sure there is sufficient space for any necessary connections, wiring, or hoses that may be affected by the adapter plate.
After performing the initial test fit, check for any signs of misalignment or issues that may need to be addressed. If necessary, make slight adjustments to the shape of the adapter plate or the bolt hole locations to achieve a proper fit.
Once you are satisfied with the test fit and all issues have been resolved, remove the test-fit bolts and proceed to the final step: finalizing the adapter plate.
Remember, the test fit is crucial to ensure a seamless and precise connection between the engine and transmission. Take your time to make any necessary adjustments and ensure that the adapter plate sits in place securely and accurately.
Step 7: Finalizing the Adapter Plate
After successfully test fitting the adapter plate, it’s time to finalize the fabrication process and prepare the plate for installation.
Start by ensuring that the adapter plate is clean and free from any debris or dust. Wipe down the surfaces of the plate with a clean cloth or use compressed air to remove any particles that may have accumulated during the fabrication process.
Inspect the bolt holes to ensure they are smooth and free from any burrs or rough edges. If necessary, use a deburring tool or sandpaper to remove any imperfections.
Now is the time to apply any necessary finishes or coatings to the adapter plate. This step is important to protect the plate from rust and corrosion, especially if the material used is steel. Consider using a high-quality paint or coating specifically designed for metal surfaces. Follow the instructions provided by the manufacturer for application and drying times.
Allow the paint or coating to fully cure before proceeding with the installation of the adapter plate. This will help ensure a durable and long-lasting finish.
Once the final touches are complete, it’s time to install the adapter plate. Carefully align the plate with the bolt holes on both the engine and transmission. Insert the appropriate bolts and securely tighten them using the recommended torque specifications provided by the manufacturer.
Double-check the alignment of the adapter plate and ensure that it sits flush against both the engine and transmission surfaces. Verify that there are no gaps or misalignments that could compromise the integrity of the connection.
After the adapter plate is installed, perform a final inspection to ensure that everything is properly aligned and secured. Check for any signs of movement, vibration, or interference that may require further adjustments.
With the adapter plate finalized and installed, you can now move forward with your customized vehicle build or modification. Enjoy the benefits of a well-fabricated adapter plate that allows you to combine different engine and transmission combinations seamlessly.
Congratulations on successfully completing the process of making a transmission adapter plate. With your newfound skills and knowledge, you have the ability to tackle exciting projects and achieve your desired vehicle configurations.
Remember to follow all safety guidelines and procedures throughout the fabrication process, and consult professional advice or seek assistance if you are unsure about any steps or techniques.
Conclusion
Creating a transmission adapter plate is a valuable skill for any automotive enthusiast or custom vehicle builder. With the ability to fabricate your own adapter plate, you gain the freedom to mix and match engines and transmissions, opening up a world of possibilities for unique vehicle configurations.
In this article, we have walked you through the step-by-step process of making a transmission adapter plate. From gathering measurements and templates to selecting the right material, cutting, drilling, shaping, and test fitting, each step is crucial in ensuring a precise and secure connection between the engine and transmission.
By carefully following the outlined steps and taking the necessary safety precautions, you can successfully create a high-quality adapter plate that meets your specific requirements. Whether you’re looking to swap engines, upgrade your transmission, or embark on a custom build, the process outlined in this article empowers you to do so.
Remember, taking accurate measurements, using the appropriate tools and materials, and performing thorough test fits are essential for a successful adapter plate fabrication. Attention to detail and patience throughout the process will result in a reliable finished product.
Now that you have the knowledge and skills to create a transmission adapter plate, you can confidently embark on your next automotive project. Explore the possibilities, unleash your creativity, and enjoy the satisfaction of customizing your vehicle to your unique vision.
As with any fabrication project, always prioritize safety, consult professional advice when needed, and continually learn and improve your skills. The world of custom vehicle building is constantly evolving, and by honing your abilities, you can continue to take on exciting challenges and achieve remarkable results.
Good luck with your future endeavors as you apply your newfound knowledge in making transmission adapter plates!
Frequently Asked Questions about How To Make Transmission Adapter Plate
Was this page helpful?
At Storables.com, we guarantee accurate and reliable information. Our content, validated by Expert Board Contributors, is crafted following stringent Editorial Policies. We're committed to providing you with well-researched, expert-backed insights for all your informational needs.


0 thoughts on “How To Make Transmission Adapter Plate”