Articles
How To Make Yogurt Slow Cooker
Modified: October 19, 2024
Learn how to make delicious yogurt in your slow cooker with this comprehensive article. Find step-by-step instructions and helpful tips to get the perfect homemade yogurt every time.
(Many of the links in this article redirect to a specific reviewed product. Your purchase of these products through affiliate links helps to generate commission for Storables.com, at no extra cost. Learn more)
Introduction
Making yogurt in a slow cooker is a convenient and easy way to enjoy delicious homemade yogurt. Not only does it save you time and effort, but it also allows you to have control over the ingredients used, ensuring a healthier and tastier end product. Whether you’re a yogurt lover or looking to incorporate more probiotics into your diet, learning how to make yogurt in a slow cooker is a skill worth mastering.
In this article, we will guide you through the step-by-step process of making yogurt in a slow cooker. From choosing the right ingredients to troubleshooting common issues, we’ve got you covered. So, dust off your slow cooker and get ready to indulge in creamy, homemade yogurt!
Key Takeaways:
- Enjoy the convenience, cost-saving benefits, and customizable flavors of homemade yogurt by mastering the art of slow cooker yogurt-making. Embrace the health benefits and indulge in creamy, probiotic-packed goodness at home.
- Overcome common yogurt-making challenges with patience and experimentation. From runny textures to lack of tanginess, troubleshoot and improve your skills to consistently create delicious, thick, and creamy homemade yogurt.
Read more: How To Make Yogurt In Rice Cooker
Benefits of Making Yogurt in a Slow Cooker
Making yogurt in a slow cooker offers several advantages compared to traditional methods. Here are some of the key benefits:
- Convenience: One of the main advantages of using a slow cooker is the convenience it offers. Simply pour the ingredients into the pot, set the timer, and let it work its magic. You can go about your day knowing that your yogurt is being prepared effortlessly.
- Cost-saving: Buying pre-packaged yogurt from the store can be expensive, especially if you consume it frequently. Making yogurt in a slow cooker is not only cost-effective but also allows you to customize the flavors and control the quality of the ingredients used.
- Healthier Option: Homemade yogurt allows you to control the type and quality of the ingredients used. You can opt for organic milk, avoid artificial additives, and even use probiotic-rich cultures for added health benefits. This ensures a healthier and more nutritious end product.
- Customizable Flavors: When making yogurt in a slow cooker, you have the freedom to experiment with different flavors and add-ons. Whether you prefer fruity combinations, savory options, or indulgent desserts, the possibilities are endless.
- Texture and Creaminess: Slow cookers provide gentle and consistent heat, resulting in a smooth and creamy texture. This is especially desirable for those who prefer a thick, velvety consistency in their yogurt.
- Probiotic Benefits: Homemade yogurt is a rich source of beneficial bacteria known as probiotics. These probiotics support gut health, improve digestion, boost the immune system, and may even provide mental health benefits. By making yogurt in a slow cooker, you can ensure maximum retention of these valuable probiotics.
With all these benefits, it’s no wonder that making yogurt in a slow cooker has gained popularity among health-conscious individuals and yogurt enthusiasts alike. So, let’s dive into the process and start making your own batch of delicious homemade yogurt!
Choosing the Right Ingredients
The quality of your ingredients plays a crucial role in the taste and texture of your homemade yogurt. When selecting the ingredients, keep the following tips in mind:
- Milk: Choose a high-quality milk for the best results. Whole milk typically yields a creamier and richer yogurt, but you can also use low-fat or skim milk if you prefer a lighter option. Organic or grass-fed milk is recommended for a healthier and more natural yogurt.
- Yogurt Starter: You will need a yogurt starter culture, which contains the beneficial bacteria necessary for fermentation. Look for a plain yogurt with active live cultures in your local store. Make sure the yogurt you choose does not contain any additional flavors or additives.
- Optional Add-ins: To enhance the flavor of your yogurt, you can add sweeteners like honey, maple syrup, or sugar. Additionally, you can incorporate fruits, vanilla extract, or other flavorings of your choice.
It’s worth noting that the higher the fat content in the milk, the thicker and creamier the yogurt will be. Experiment with different types of milk and yogurt starters to find the perfect combination that suits your preferences.
Ensure that all your ingredients are fresh and do not contain any expired products. This will ensure the best taste and quality in your homemade yogurt. Now that we have our ingredients sorted, let’s move on to the next step in the process – preparing the slow cooker!
Preparing the Slow Cooker
Before you can start making yogurt in your slow cooker, there are a few steps you need to take to prepare the appliance:
- Clean the Slow Cooker: Start by thoroughly cleaning your slow cooker. This will help ensure that there are no residual flavors or bacteria that could affect the taste and quality of your yogurt.
- Warm up the Slow Cooker: To create an optimal environment for the yogurt to ferment, preheat your slow cooker on the low setting for about 15 minutes. This will warm up the ceramic insert and help maintain a consistent temperature throughout the incubation process.
- Sanitize the Utensils: It’s important to use clean utensils throughout the yogurt-making process. Before you begin, sanitize your mixing spoon, whisk, and any other utensils that will come into contact with the milk and yogurt culture.
By taking these preparatory steps, you’ll ensure that your slow cooker is clean and ready to create the perfect environment for fermenting the yogurt. Once you’ve completed these preparations, the next step is to heat the milk.
Heating the Milk
Heating the milk is a crucial step in the yogurt-making process as it helps to sterilize the milk, denature the proteins, and create the ideal conditions for the yogurt culture to thrive. Follow these steps to heat the milk:
- Pour the Milk: Start by pouring the desired amount of milk into the slow cooker. The amount of milk will depend on the size of your slow cooker and how much yogurt you want to make. It’s recommended to fill the slow cooker about 75% full to prevent overflow during the fermentation process.
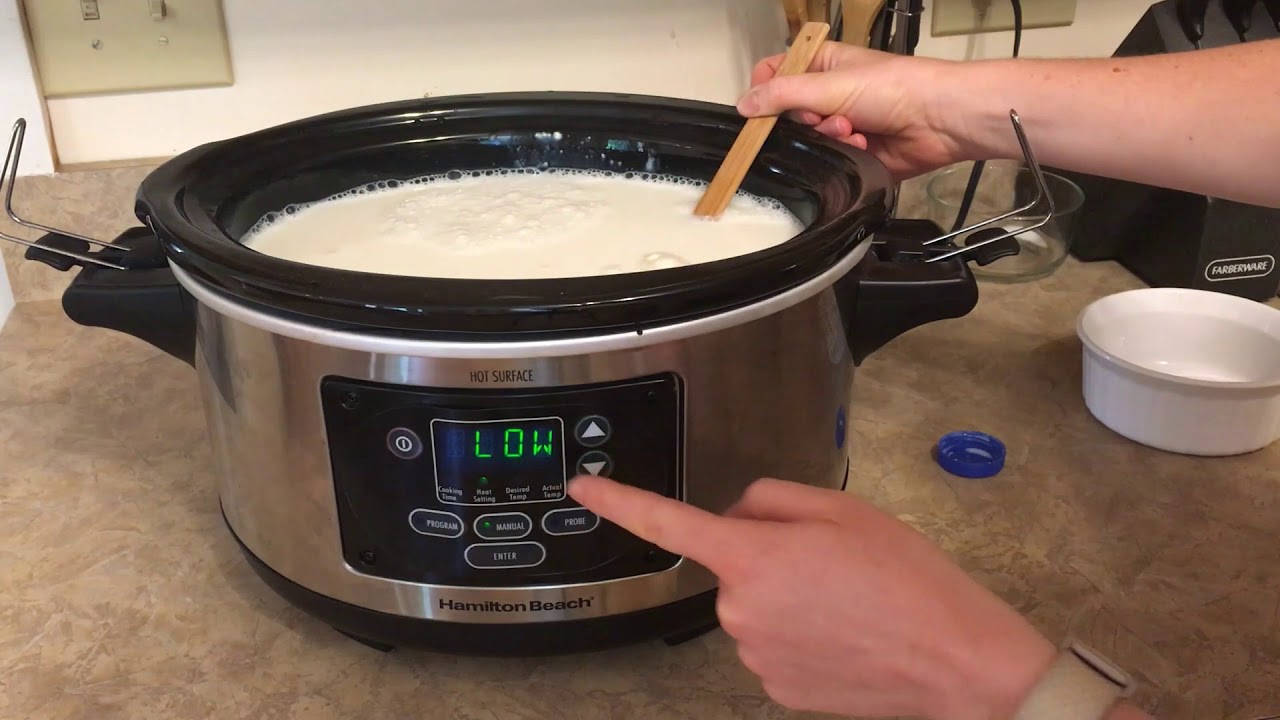
- Cover and Set to Low: Place the lid on the slow cooker and set it to the low heat setting. This will heat the milk gradually and prevent scorching or boiling.
- Monitor the Temperature: Use a food thermometer to monitor the temperature of the milk. You want to heat it to approximately 180°F (82°C). This temperature helps to kill any harmful bacteria present in the milk.
- Stir Occasionally: While the milk is heating, stir it occasionally to distribute the heat evenly and prevent a skin from forming on the surface.
- Keep at 180°F (82°C) for 2 Hours: Once the milk reaches the desired temperature, maintain it at 180°F (82°C) for about 2 hours. This prolonged heating time helps to denature the proteins in the milk, resulting in a thicker, smoother yogurt.
Heating the milk in the slow cooker may take a few hours, so it’s important to plan accordingly. Keep in mind that the exact heating time may vary depending on your slow cooker model and the amount of milk used.
Once the milk has been heated and held at the proper temperature, it’s time to add the yogurt culture. We will explore this step in the next section.
Read more: How To Make Dal In Slow Cooker
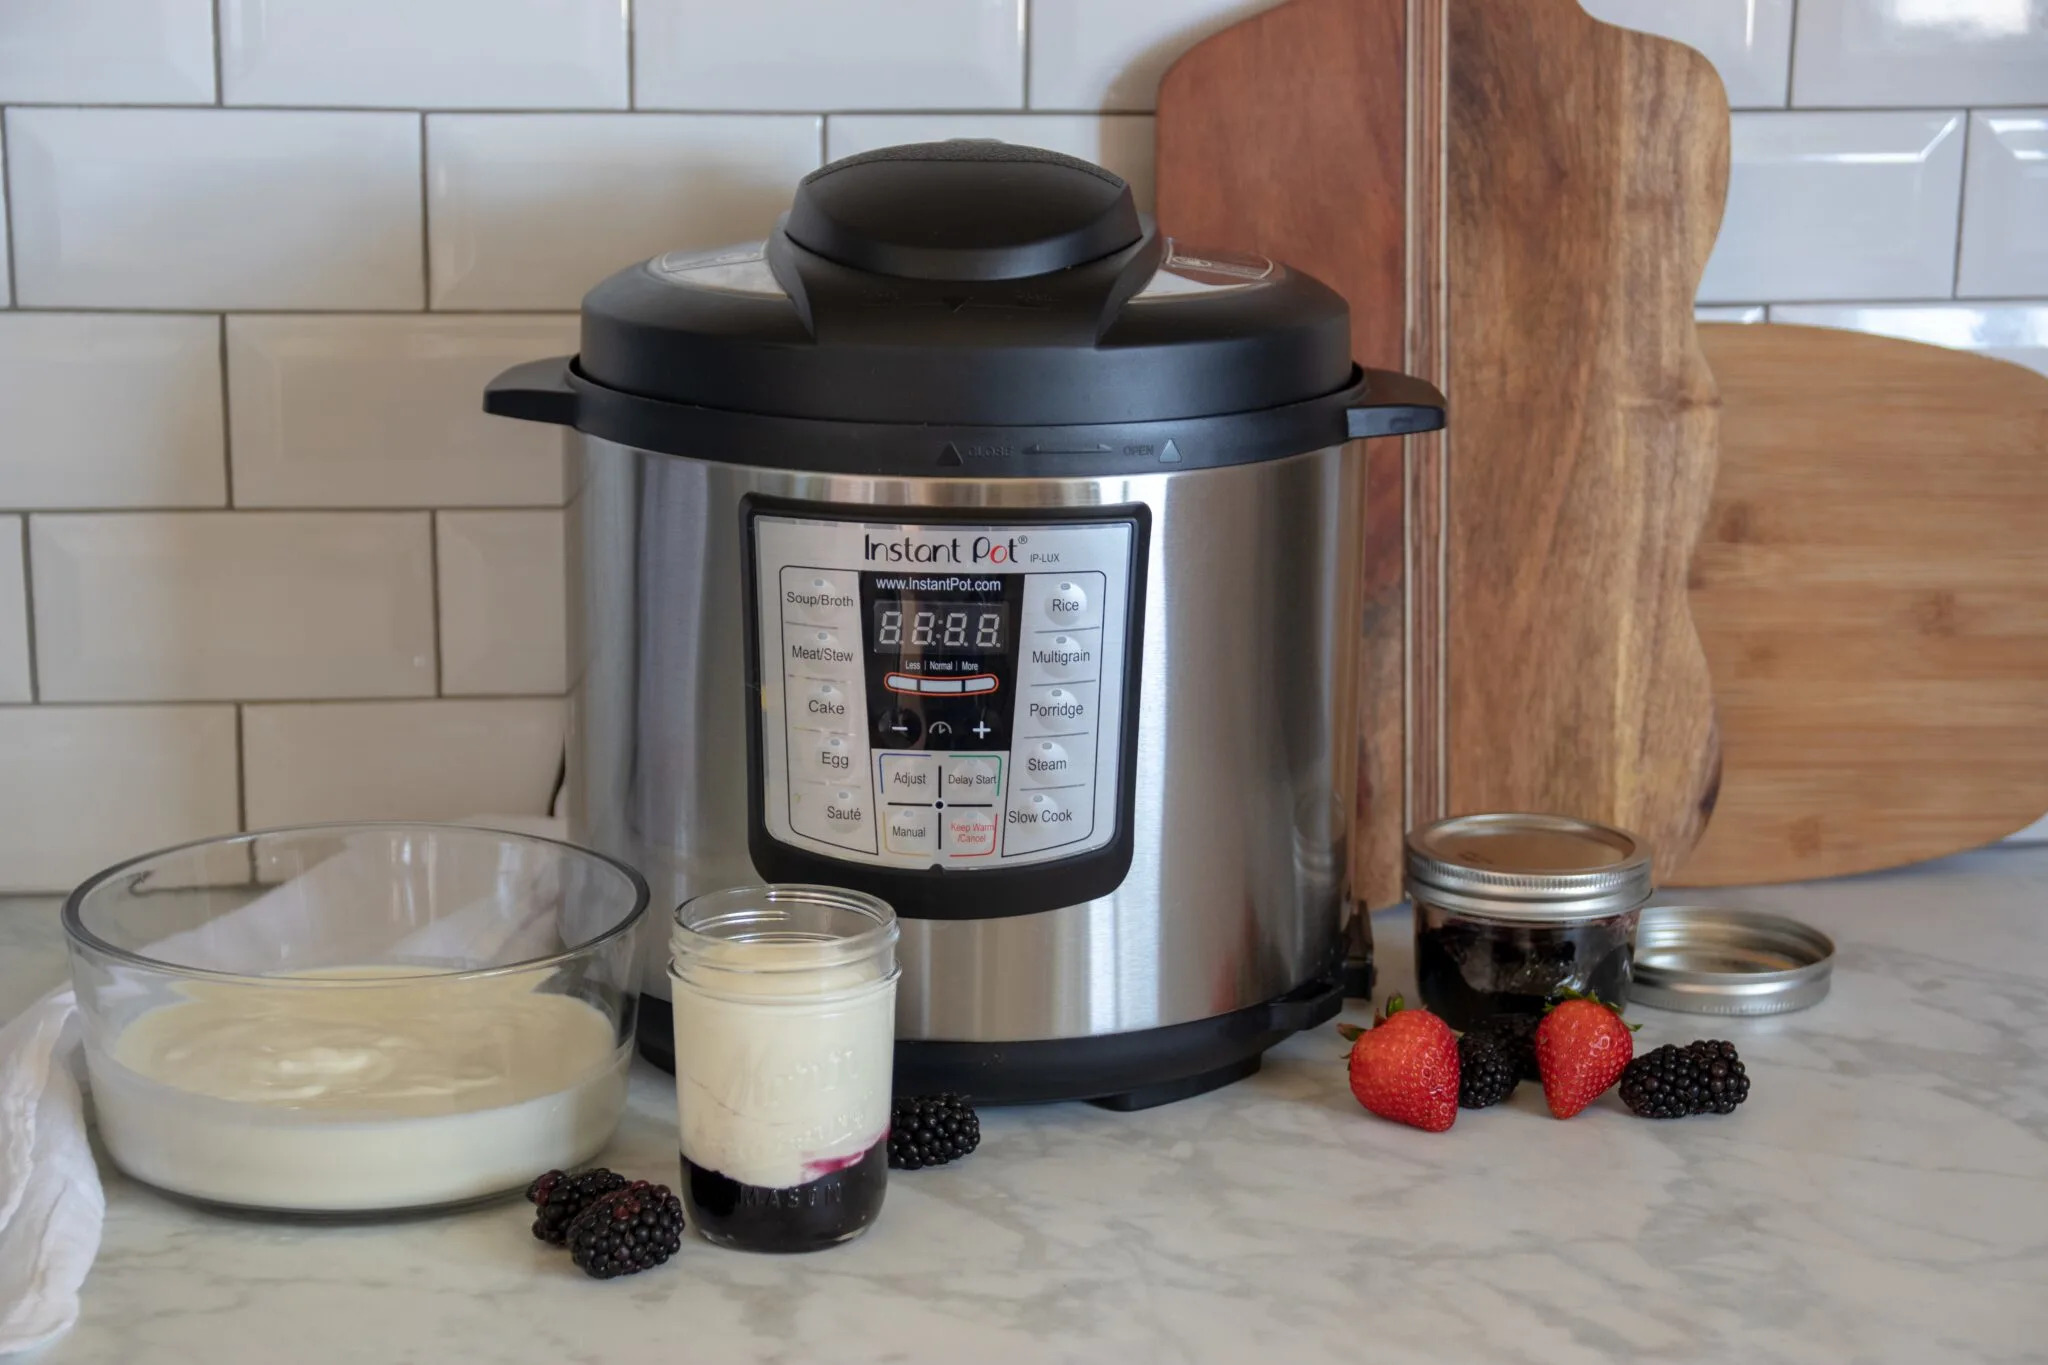
Adding the Yogurt Culture
Adding the yogurt culture is the crucial step that transforms the heated milk into creamy and tangy yogurt. Here’s how you can do it:
- Cool the Milk: After the milk has been heated and held at 180°F (82°C) for 2 hours, remove the slow cooker from the heat source and allow the milk to cool down. You’ll need to bring it to a temperature of around 110°F (43°C) before adding the yogurt culture.
- Combine Milk and Starter: Once the milk has reached the desired temperature, take a small amount of the warm milk and mix it with the yogurt starter in a separate bowl. Stir well to ensure that the starter is well incorporated into the milk.
- Add Starter to the Milk: Pour the milk-starter mixture back into the slow cooker and stir gently to evenly distribute the starter throughout the milk. Make sure to cover any exposed areas of the milk with the starter mixture.
- Whisk or Stir: Use a whisk or spoon to gently whisk or stir the milk and starter together. This will help ensure that the starter is evenly dispersed and mixed with the milk.
Once the yogurt culture has been added, it’s time to incubate the mixture to allow the bacteria to grow and ferment the milk. We will explore this step in the following section.
When making yogurt in a slow cooker, be sure to use a thermometer to monitor the temperature of the milk. It needs to reach 180°F before cooling to 110°F and adding the yogurt culture.
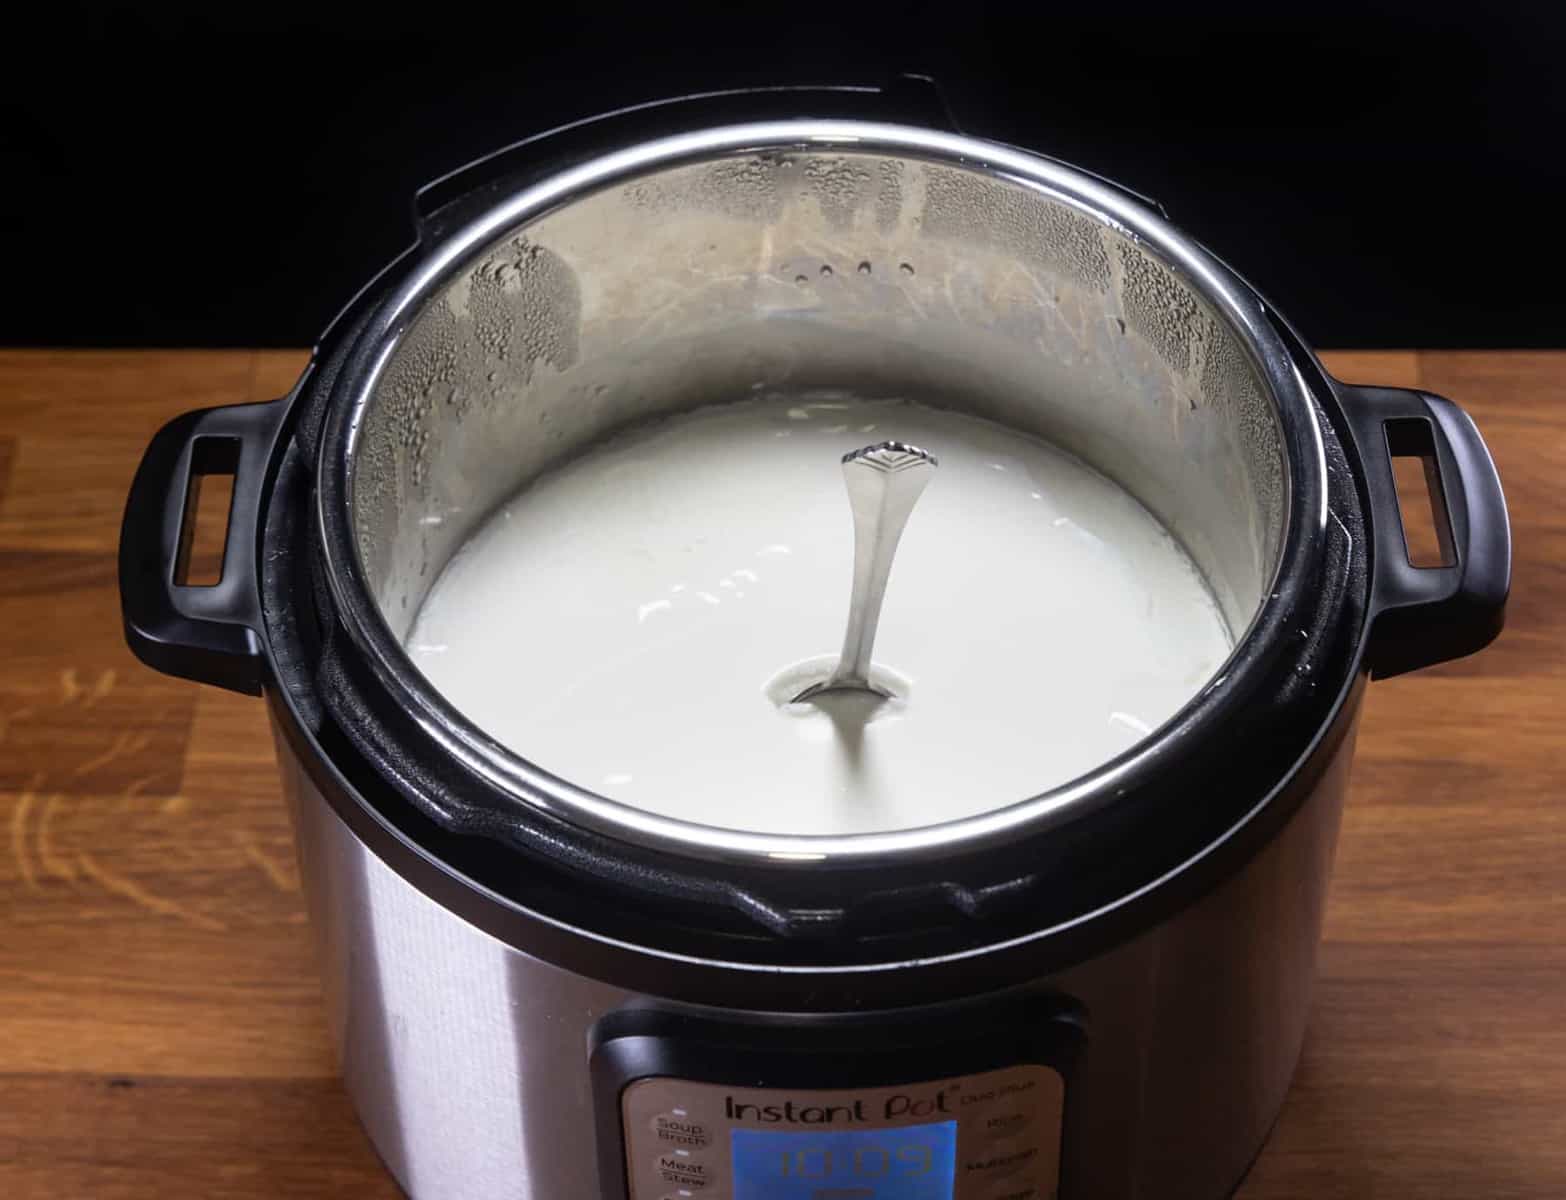
Incubating the Yogurt
Incubating the yogurt is the process in which the yogurt culture ferments the milk, turning it into thick, creamy yogurt. Follow these steps to properly incubate your yogurt in the slow cooker:
- Cover the Slow Cooker: Place the lid back on the slow cooker, ensuring a tight seal. This will help maintain a consistent temperature and prevent any unwanted air or contaminants from entering.
- Wrap the Slow Cooker: To provide additional insulation and help retain warmth, wrap the slow cooker with a towel or blanket. This helps to create a stable environment for the bacteria to thrive.
- Leave Undisturbed: Place the wrapped slow cooker in a warm and undisturbed spot in your kitchen. Avoid moving or shaking the slow cooker during the incubation process, as this can disrupt the fermentation process and result in a runny consistency.
- Incubation Time: The incubation time can vary depending on your desired level of tartness and thickness. In general, incubate the yogurt for 6 to 8 hours. For a tangier flavor or a thicker consistency, you can leave it for up to 12 hours.
- Check for Desired Consistency: After the incubation time, check the consistency of the yogurt. It should be thick, creamy, and slightly tangy. If it’s not thick enough for your liking, you can leave it to incubate for a bit longer.
Remember that the longer you incubate the yogurt, the tangier it will become. It’s important to find the right balance and adjust the incubation time according to your preferences.
Once the yogurt has reached your desired consistency, it’s time to proceed to the next step of straining the yogurt, which is optional but can result in a thicker, Greek-style yogurt. We will discuss this step in the following section.
Straining the Yogurt (Optional)
Straining the yogurt is an optional step, but it can greatly enhance the texture and thickness of the yogurt, creating a luscious and creamy Greek-style yogurt. Here’s how you can do it:
- Prepare a Strainer: Place a fine-mesh strainer or cheesecloth over a large bowl or container. Make sure the strainer is large enough to hold the amount of yogurt you have.
- Pour the Yogurt: Carefully pour the incubated yogurt into the strainer. The strainer will catch the whey (liquid) and allow the thickened yogurt to remain in the strainer.
- Allow to Strain: Leave the yogurt to strain for at least 2 to 4 hours, or even overnight in the refrigerator. The longer you strain, the thicker the yogurt will become.
- Collect the Whey: The liquid that collects in the bowl underneath is called whey. You can either discard it or use it in other recipes, such as smoothies, soups, or as a protein-rich addition to baked goods.
- Transfer the Thickened Yogurt: Once the desired consistency is achieved, transfer the thickened yogurt from the strainer into a clean container. It is now ready to be enjoyed!
Straining the yogurt removes excess liquid, resulting in a rich and velvety texture. You can choose the level of thickness that suits your preference by adjusting the straining time. Remember to save the whey if you plan to use it in other recipes.
Now that your yogurt is strained and ready, it’s time to add some flavorful touches and learn about proper storage. We will cover these final steps in the following sections.
Flavoring and Storing the Yogurt
Now that your homemade yogurt is ready, it’s time to add some delicious flavors and ensure its proper storage for long-lasting freshness. Follow these steps to flavor and store your yogurt:
- Flavoring Options: You have endless possibilities when it comes to flavoring your yogurt. You can add fresh or frozen fruits, granola, nuts, honey, maple syrup, or a dash of vanilla extract. Get creative and experiment with different combinations to find your favorite flavors.
- Mix in the Flavors: If you’re using fruits or other mix-ins, simply spoon the desired amount into a serving container, followed by a generous dollop of homemade yogurt. Stir gently to incorporate the flavors throughout the yogurt.
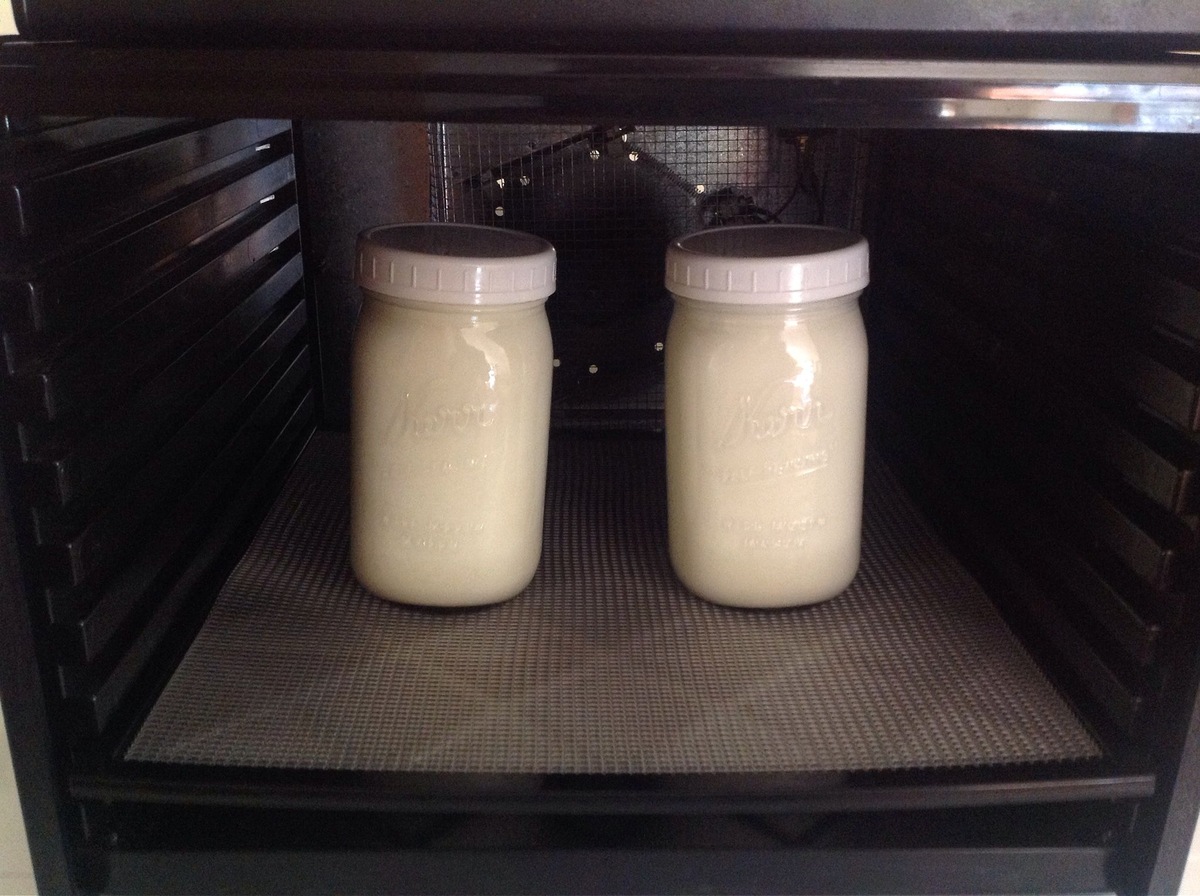
- Storage Containers: Transfer any remaining yogurt into airtight containers or jars. Make sure the containers are clean and dry before adding the yogurt to prevent contamination and extend its shelf life.
- Refrigeration: Place the yogurt containers in the refrigerator for at least 4 hours to allow it to set and further develop its flavors. Chilled yogurt is refreshing and perfect for a quick and healthy snack or breakfast.
- Shelf Life: Homemade yogurt typically lasts up to 1 to 2 weeks when properly stored in the refrigerator. However, be sure to check for any signs of spoilage, such as off-putting odors or mold growth, before consuming it.
By adding your favorite flavors and storing the yogurt properly, you can enjoy the freshness and deliciousness of homemade yogurt for an extended period. Remember to save a portion of the yogurt as a starter culture for your next batch, ensuring a continuous supply of homemade goodness.
Now that you know how to make yogurt in a slow cooker, go ahead and indulge in the creamy, tangy, and flavorful treat you’ve created. Enjoy it on its own, with fresh fruits, as a topping for desserts, or in smoothies. The possibilities are endless, and you have the satisfaction of knowing that you made it from scratch with love.
So, grab your slow cooker and start making your own homemade yogurt today. Your taste buds and your body will thank you!
Read more: How To Make Barbacoa In A Slow Cooker
Troubleshooting Common Issues
While making yogurt in a slow cooker is generally a straightforward process, you may encounter some common issues along the way. Here are a few troubleshooting tips to help you overcome these challenges:
- Runny Yogurt: If your yogurt turns out too runny, it may be due to insufficient incubation time. Try incubating it for a longer period to allow the bacteria to ferment the milk further. Straining the yogurt can also help remove excess moisture and thicken it.
- Watery Whey: If you notice a significant amount of whey collecting in the strained yogurt, it could be a result of overstraining. Reduce the straining time or use a thicker strainer to retain some of the moisture for a creamier consistency.
- No Tanginess: The tangy flavor of yogurt comes from the fermentation process. If your yogurt lacks tanginess, try increasing the incubation time or adding more yogurt starter next time. The bacteria need sufficient time to convert the lactose into lactic acid, resulting in a tangy taste.
- Curdling or Separation: If your yogurt appears curdled or separated, it may be due to overheating the milk or adding the starter culture when the milk is too hot. Ensure that the milk cools to the recommended temperature range before adding the starter.
- Foul Odor or Mold Growth: If your yogurt has a foul odor or shows signs of mold growth, it may have been contaminated. Ensure that all equipment and containers are properly cleaned and sanitized. Also, check the freshness of the milk and yogurt starter used.
Remember, making yogurt is a learning process, and it may take some experimentation to achieve the desired results. Don’t be discouraged by initial setbacks, and use these troubleshooting tips as a guide to improve your yogurt-making skills.
With practice, patience, and a bit of experimentation, you’ll soon be able to overcome any issues and consistently produce delicious, homemade yogurt in your slow cooker.
So, don’t give up! Keep trying, and before you know it, you’ll be enjoying perfectly thick, tangy, and creamy yogurt at home.
Conclusion
Learning how to make yogurt in a slow cooker opens up a world of possibilities for enjoying homemade goodness. The convenience, cost-saving benefits, and ability to customize flavors make this method a popular choice for yogurt enthusiasts and health-conscious individuals.
In this article, we have explored the step-by-step process of making yogurt in a slow cooker. From choosing the right ingredients to troubleshooting common issues, we have provided you with the knowledge and guidance to embark on your yogurt-making journey.
By using high-quality ingredients, properly preparing the slow cooker, heating the milk, adding the yogurt culture, incubating the yogurt, and optionally straining it, you can create luscious, creamy, and tangy yogurt in the comfort of your own home.
Remember, practice makes perfect. Don’t be discouraged if your first batch is not exactly as you envisioned. Each attempt will teach you something new and help you improve your technique.
So, gather your slow cooker, select your desired ingredients, and get ready to embark on the delightful journey of making your own homemade yogurt. Experiment with flavors, savor the creaminess, and enjoy the health benefits of this probiotic-packed treat.
With time and practice, you’ll master the art of slow cooker yogurt-making, impressing yourself and others with your culinary skills. So, grab a spoon and indulge in the pleasure of homemade yogurt—it’s a treat that will leave you craving for more!
Frequently Asked Questions about How To Make Yogurt Slow Cooker
Was this page helpful?
At Storables.com, we guarantee accurate and reliable information. Our content, validated by Expert Board Contributors, is crafted following stringent Editorial Policies. We're committed to providing you with well-researched, expert-backed insights for all your informational needs.


0 thoughts on “How To Make Yogurt Slow Cooker”