Articles
How To Measure A Ceiling
Modified: September 2, 2024
Learn how to measure a ceiling accurately with these informative articles. Find step-by-step guides and tips for accurate measurements.
(Many of the links in this article redirect to a specific reviewed product. Your purchase of these products through affiliate links helps to generate commission for Storables.com, at no extra cost. Learn more)
Introduction
Welcome to the ultimate guide on how to measure a ceiling! Whether you’re planning a renovation project, installing a new lighting fixture, or simply curious about the dimensions of your living space, accurately measuring your ceiling is essential. Proper measurements ensure that you choose the right materials and create a space that meets your design and functional needs.
In this comprehensive guide, we will walk you through the step-by-step process of measuring a ceiling. From gathering the necessary materials to calculating the ceiling area, we’ve got you covered.
But before we dive into the nitty-gritty details, it’s important to understand why measuring a ceiling correctly is so crucial. A well-measured ceiling helps architects, interior designers, and homeowners make informed decisions about the layout, furniture placement, and overall aesthetics of a room. Whether you’re aiming for a minimalist, modern, or traditional design, precise measurements play a pivotal role in creating a harmonious and visually appealing space.
Additionally, if you’re planning to install any fixtures or make modifications to your ceiling, knowing its dimensions is essential. Accurate measurements will save you time, money, and potential headaches down the line, ensuring that everything fits perfectly and matches your vision.
Now that we understand the significance of measuring a ceiling, let’s delve into the step-by-step process. Grab your measuring tape and let’s get started!
Key Takeaways:
- Accurate measurements of your ceiling’s height, width, slope, area, and shape are crucial for informed design decisions, renovations, and installations. Take your time and enjoy the process of transforming your living space.
- Gathering the right tools and materials, measuring with precision, and understanding the shape and dimensions of your ceiling are essential for successful home improvement projects. Let your creativity soar and turn your house into a home that reflects your unique personality.
Read more: How To Darken A Room With Blinds
Step 1: Gather Materials
Before you begin measuring your ceiling, it’s important to gather all the necessary tools and materials. By having everything at hand, you’ll be able to measure with accuracy and efficiency.
Here’s a list of materials you’ll need:
- Measuring tape: This is the most essential tool for measuring your ceiling. Make sure you have a tape measure with both metric and imperial measurements, as per your preference.
- Ladder or step stool: Depending on the height of your ceiling, you might need a ladder or step stool to reach the upper areas safely.
- Pencil and paper: You’ll need these to jot down your measurements and any additional notes or observations.
- Optional: Camera or smartphone: Taking pictures can be helpful, especially if you’re planning to share the measurements with contractors or designers.
Once you have these materials ready, you’re all set to move on to the next step. Ensure that your workspace is well-lit and free from any clutter or obstacles that might hinder your measurements.
Now that we have our materials in place, let’s move on to the next step: measuring the height of the ceiling.
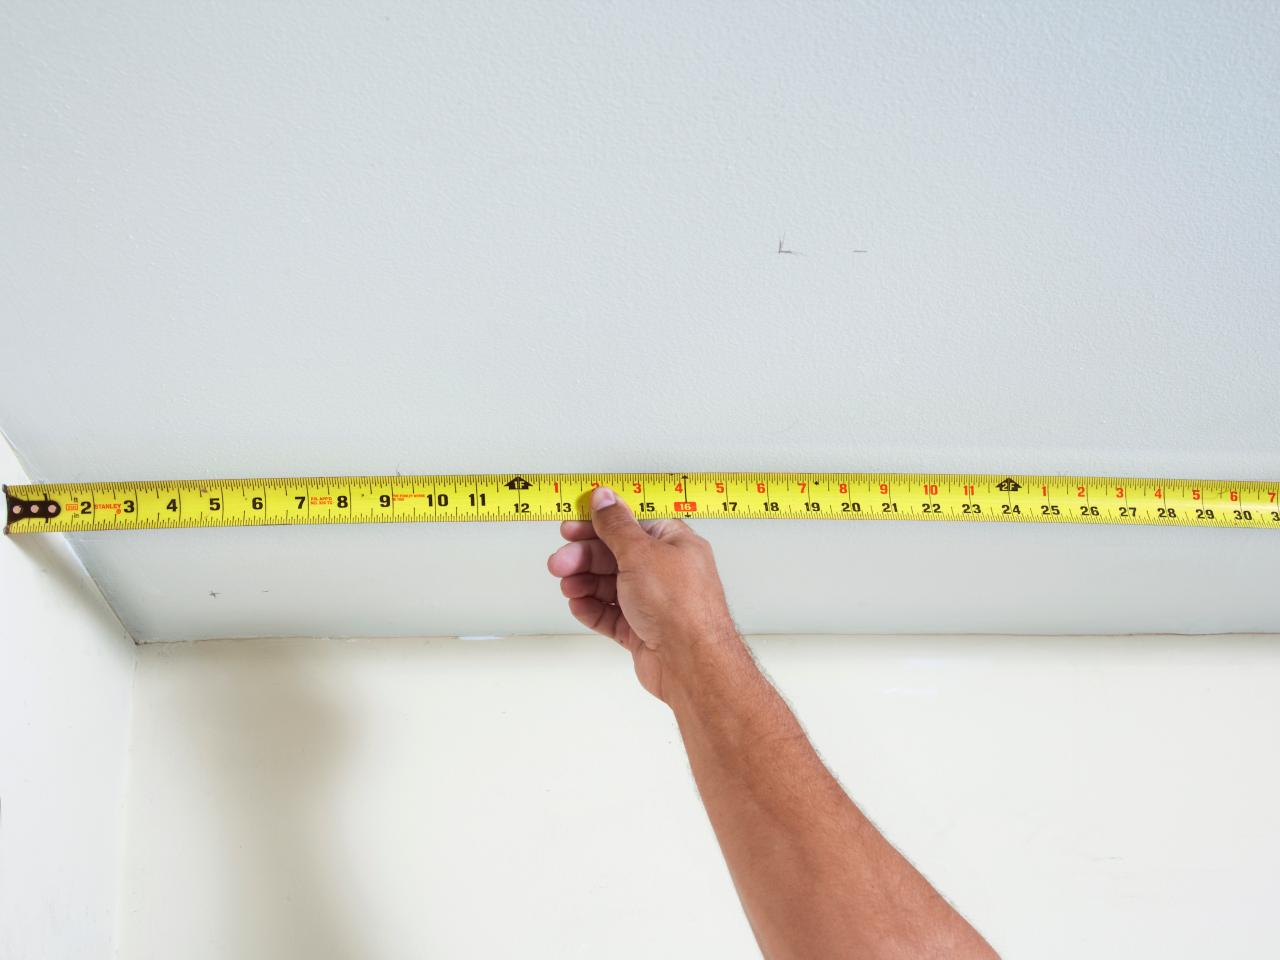
Step 2: Measure Ceiling Height
Measuring the height of the ceiling is the first and most crucial step in determining its dimensions. Here’s how you can do it:
- Position your ladder or step stool directly under the ceiling area you want to measure.
- Extend your measuring tape from the floor to the highest point of the ceiling. Make sure the tape measure is straight and securely fixed in place.
- Read and record the measurement indicated by the measuring tape. Be sure to note whether you’re using feet, inches, or meters.
- If your ceiling has multiple levels or sloping areas, repeat the process for each section, keeping track of the different measurements.
- For better accuracy, it’s recommended to measure the ceiling height at multiple points and take an average of the measurements.
Remember to exercise caution when working with a ladder or step stool. Ensure that it is stable and placed on an even surface to avoid any accidents.
Once you have obtained the measurements for the ceiling height, you can move on to the next step: measuring the width of the ceiling.
Step 3: Measure Ceiling Width
Now that you have measured the height of your ceiling, it’s time to determine its width. Here’s how you can accurately measure the width:
- Start by positioning your ladder or step stool so that you have a clear view of the entire width of the ceiling.
- Hold one end of the measuring tape against one side of the ceiling, ensuring it is straight and taut.
- Extend the tape across the width of the ceiling until it reaches the opposite side. Make sure the tape is parallel to the floor or the ceiling surface.
- Read and record the measurement indicated by the tape measure. Note the units of measurement (feet, inches, or meters).
- If your ceiling has irregular shapes or angled walls, you may need to take multiple measurements at different points along the width to get an accurate average.
- Repeat the process for any additional sections of the ceiling that have varying widths.
It’s essential to ensure the measuring tape is straight and parallel to obtain an accurate width measurement. Double-check that there are no obstructions or obstacles in the way that could alter the measurement.
Once you have the width measurements recorded, you can proceed to the next step: calculating the ceiling area.
Use a tape measure to measure the length and width of the ceiling. Multiply the two measurements to get the square footage. For irregular shapes, divide the area into smaller sections and measure each separately.
Step 4: Calculate the Ceiling Area
Calculating the area of your ceiling is essential for various purposes, such as determining the amount of paint or materials needed for renovations. Here’s how you can calculate the ceiling area:
- Start by multiplying the measured height of the ceiling by the width. For example, if your ceiling is 9 feet high and 12 feet wide, the calculation would be: 9 feet x 12 feet = 108 square feet.
- If your ceiling has irregular shapes or multiple sections, measure each section separately and calculate the area for each. Then, add up the individual areas to get the total ceiling area.
- If the width or height varies along the length of the ceiling, you may need to break it down into smaller sections and calculate the area for each section.
- When measuring for an angled or sloping ceiling, you can approximate the area by treating it as a triangle. Measure the base (width) and the height of the triangle formed by the sloping ceiling, then use the formula: Area = 0.5 x base x height.
- For a room with multiple levels or a vaulted ceiling, measure each level separately and calculate the area individually. Sum up the areas of all the levels to get the total ceiling area.
By accurately calculating the ceiling area, you’ll have a better understanding of the space and be able to plan accordingly for any renovations or installations.
Once you have calculated the ceiling area, you can move on to the next step: measuring the slope of the ceiling.
Read more: How To Fix Pleated Blinds
Step 5: Measure Ceiling Slope
Measuring the slope of your ceiling is crucial, especially if you’re planning to install lighting fixtures or work with angled walls. Here’s how you can accurately measure the slope of your ceiling:
- Position yourself directly underneath the sloping part of the ceiling, ensuring you have a clear view of the angle.
- Hold a level against the sloping surface, making sure it is aligned horizontally.
- Place the measuring tape against the level and extend it vertically until it touches the highest point of the slope.
- Read and record the measurement indicated by the measuring tape. Depending on the degree of the slope, the measurement may be in degrees or as a ratio.
- Repeat the process for any additional sloping areas of the ceiling, as each section may have a different slope.
When working with complex ceiling designs or multiple angles, it may be helpful to consult with a professional to ensure accurate measurements. They can provide guidance on how to measure and interpret the slope correctly.
Once you have measured the slope of your ceiling, you can move on to the final step: determining the shape of the ceiling.
Step 6: Determine Ceiling Shape
The shape of your ceiling not only adds architectural interest to the room but also influences the overall design and functionality. Identifying the shape of your ceiling allows you to make informed decisions when it comes to decorating and selecting fixtures. Here’s how you can determine the shape of your ceiling:
- Observe the overall structure of your ceiling. Is it flat, sloped, vaulted, or have any additional architectural details?
- Examine the angles and curves of the ceiling. Does it have any recessed or raised sections?
- Measure the different levels or sections of the ceiling, noting any variations or transitions in shape.
- Consider the symmetry or asymmetry of the ceiling. Does it have a consistent shape throughout the room, or does it change in different areas?
- Take into account any unique features, such as exposed beams, skylights, or coffered details, as they can contribute to the overall shape of the ceiling.
- Refer to architectural plans or consult with professionals if you are unsure about the exact shape of your ceiling or if it has complex geometries.
By determining the shape of your ceiling, you can make informed design decisions that complement its unique features and enhance the overall aesthetics of the room.
Now that you have successfully measured and assessed your ceiling, you are equipped with valuable information for your home improvement projects or design plans. You can confidently move forward with any installations, renovations, or aesthetic changes that align with the dimensions and characteristics of your ceiling.
Congratulations on completing the steps to measure your ceiling like a pro. With this newfound knowledge, you are ready to create a well-designed space that meets your needs and showcases your personal style.
Remember, accurate measurements are the foundation of any successful project, so take your time, be diligent, and enjoy the process of transforming your ceiling and space.
Conclusion
Measuring a ceiling may seem like a daunting task, but with the right tools and guidance, it can be a straightforward and rewarding process. By accurately measuring your ceiling’s height, width, slope, area, and shape, you can make informed decisions when it comes to renovations, installations, and design choices.
Remember, precision is key when measuring your ceiling. Take your time, double-check your measurements, and consider seeking professional help if you have a complex ceiling design or are unsure about any aspect of the measuring process.
With the measurements in hand, you can confidently plan your interior design, choose the right lighting fixtures, estimate the amount of paint or materials needed, and create a space that reflects your personal style and enhances the functionality of the room.
So, grab your measuring tape, gather your materials, and embark on the journey of measuring your ceiling like an expert. Get ready to transform your living space and bring your design visions to life.
Remember, measuring your ceiling is just the first step on your home improvement journey. Use the information you’ve obtained to embark on further projects, whether it’s repainting the walls, installing crown molding, or revamping the entire room. Let your creativity soar and turn your house into a home that reflects your unique personality.
Now that you've mastered measuring ceilings, why not dive into some hands-on home improvement with our guide on DIY projects? Discovering the joys and challenges of do-it-yourself tasks not only expands your skills but also brings a unique touch to your living space. Whether you're looking to tackle a new hobby or undertake a cost-saving project, our insights will guide you through the process, ensuring you get the most out of your efforts. Don't miss out on this opportunity to transform ordinary tasks into extraordinary achievements!
Frequently Asked Questions about How To Measure A Ceiling
Was this page helpful?
At Storables.com, we guarantee accurate and reliable information. Our content, validated by Expert Board Contributors, is crafted following stringent Editorial Policies. We're committed to providing you with well-researched, expert-backed insights for all your informational needs.


0 thoughts on “How To Measure A Ceiling”