Articles
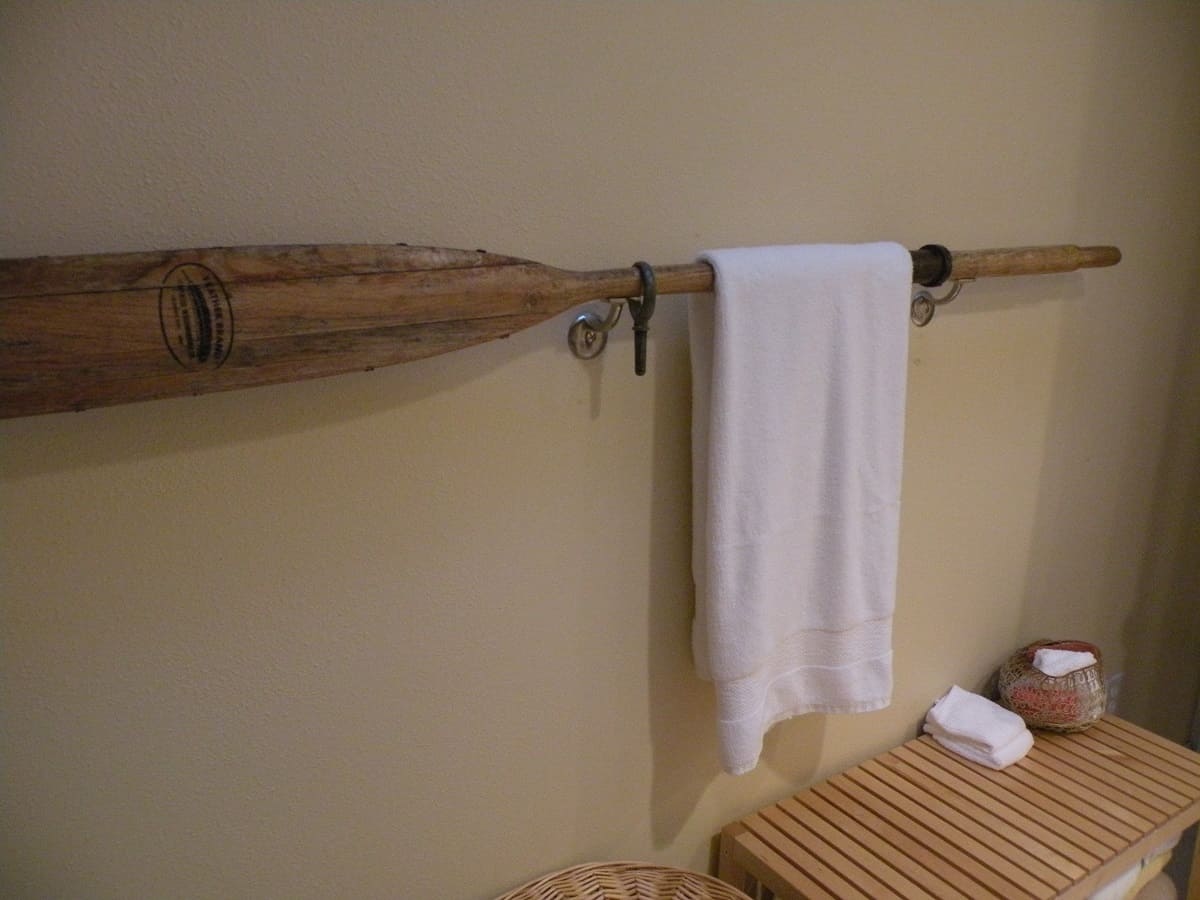
How To Mount An Oar On A Wall As A Towel Bar
Modified: January 19, 2024
Learn how to repurpose an oar as a unique towel bar with this step-by-step guide. Perfect for nautical-themed bathrooms. Find more articles on DIY projects and home decor ideas.
(Many of the links in this article redirect to a specific reviewed product. Your purchase of these products through affiliate links helps to generate commission for Storables.com, at no extra cost. Learn more)
Introduction
Welcome to our guide on how to mount an oar on a wall as a towel bar. If you’re looking to add a unique and nautical touch to your bathroom or any other space, repurposing an oar as a towel bar is a fantastic option. Not only does it provide a functional storage solution for your towels, but it also creates an eye-catching focal point that will impress your guests.
In this article, we will walk you through the step-by-step process of mounting an oar on a wall as a towel bar. You don’t have to be an expert DIY-er to accomplish this project – just gather the necessary tools and materials, and get ready to unleash your creativity!
Before we dive into the steps, it’s important to note that there are various types of oars available, each with its own unique style and size. The process we outline here can be customized to suit the specific dimensions and appearance of the oar you choose.
Now, let’s gather our tools and materials and get started on this fun and rewarding project!
Key Takeaways:
- Transform a simple oar into a stylish and practical towel bar by following the step-by-step guide. Add a unique nautical or rustic touch to your space while providing a functional storage solution for your towels.
- Enjoy the satisfaction of completing a customized DIY project and impress your guests with a conversation piece. Regularly maintain your towel bar to keep it looking fresh and inviting, and don’t be afraid to get creative with towel colors, patterns, and textures.
Read more: What To Use To Mount Towel Bar Into Drywall
Tools and Materials Needed
Before you begin mounting an oar on a wall as a towel bar, make sure you have the following tools and materials on hand:
Tools:
- Measuring tape
- Pencil
- Drill
- Screwdriver
- Level
Materials:
- An oar (new or vintage)
- Wall mounts or brackets
- Screws and wall anchors (if necessary)
- Decorative hooks (optional)
- Towels or fabric for styling
The tools listed are basic DIY essentials that will help you measure, secure, and install the oar properly. A measuring tape and pencil are essential for marking where you want the oar to be placed on the wall. A drill and screwdriver are needed for installing the wall mounts or brackets securely.
The materials required include an oar, which you can purchase new or find a vintage one for a more rustic look. Wall mounts or brackets are necessary to hold the oar in place on the wall. Choose mounts or brackets that are sturdy and can support the weight of the oar and towels.
If the wall you are mounting the oar on is not made of sturdy material like wood, you may need to use screws and wall anchors to ensure a secure installation. Decorative hooks can be added to the oar for extra towel hanging space or to add a personalized touch to the design. Finally, gather some towels or fabric to style and hang on the towel bar once it’s installed.
With the tools and materials ready, let’s move on to the step-by-step process of mounting an oar on a wall as a towel bar!
Step 1: Choose an Oar
The first step in mounting an oar on a wall as a towel bar is to choose the right oar for your project. There are several factors to consider when selecting an oar:
Size and Length:
Determine the ideal size and length of the oar based on your available wall space and the number of towels you plan to hang. Measure the wall area where you intend to mount the oar to ensure it fits properly and allows enough space for towels to hang comfortably.
Material and Finish:
Oars come in a variety of materials, such as wood or composite. Choose a material that matches your personal style and complements the existing decor of your space. Consider the finish of the oar as well, whether you want a natural wood look or a painted finish.
Style and Design:
Consider the overall style and design of your space. If you prefer a more rustic or nautical theme, you might opt for a vintage oar with weathered markings. For a modern and sleek look, a clean and polished oar will work best. Select an oar that aligns with your aesthetic preferences.
Sourcing the Oar:
You can find oars at various places such as sporting goods stores, online marketplaces, antique shops, or even through local classified ads. Take your time to research and explore different options to find the perfect oar for your project.
Once you have chosen the ideal oar, move on to the next step, which involves preparing the oar for mounting on the wall.
Read more: How To Get A Towel Bar Off The Wall
Step 2: Prepare the Oar
After selecting the oar for your towel bar project, it’s important to properly prepare it before mounting it on the wall. This step involves cleaning, sanding, and any necessary modifications to ensure the oar is ready for installation.
Cleaning:
Start by giving the oar a thorough cleaning. If it is a vintage oar, it may have accumulated dirt, dust, or grime over the years. Use a mild detergent and a soft cloth or sponge to gently clean the surface of the oar. Rinse it with clean water and allow it to dry completely before moving on to the next step.
Sanding:
If the oar has rough or uneven surfaces, it’s recommended to sand it to create a smooth and even finish. Use sandpaper with a medium or fine grit and gently sand the entire surface of the oar, including the handle and blade. Pay attention to any rough spots or splinters, and sand them down until they are smooth to the touch. Remember to wipe away any dust or debris after sanding.
Modifications:
Depending on the type of oar you have chosen, you may need to make certain modifications to prepare it for mounting. For example, if the oar has a rounded handle, you might need to flatten the surface where the wall mounts will be attached. Use a saw or a plane to create a flat surface that will make it easier to secure the oar to the wall.
By cleaning, sanding, and making necessary modifications to the oar, you are ensuring that it is in the best condition for mounting on the wall. Once the oar is prepared, you can proceed to the next step, which involves measuring and marking the wall for installation.
Step 3: Measure and Mark the Wall
Now that you have prepared the oar, it’s time to measure and mark the wall where you will be mounting it. This step is essential to ensure that the oar is positioned correctly and securely on the wall.
1. Determine Placement:
Decide where on the wall you want to mount the oar. Consider the height and accessibility, as well as the overall aesthetic of the space. You may want to center the oar above a towel rack or vanity, or place it off-center for a more asymmetrical look.
2. Measure and Mark:
Using a measuring tape, measure the width of the oar. Align the tape measure with the center of the oar and extend it outwards to find the desired placement on the wall. Mark the two outer edges of the oar with a pencil.
3. Find Studs or Use Wall Anchors:
Next, use a stud finder to locate the studs in the wall. Studs are the vertical wooden beams that provide extra support. If the outer edges of the oar align with the studs, you can proceed with drilling. However, if the oar’s placement does not match the studs, you will need to use wall anchors for a secure mount.
Read more: How To Fix Towel Bar Pulled Out Of Wall
4. Mark the Mounting Holes:
Place the wall mounts or brackets on the wall, aligning them with the marked pencil lines. Use a level to ensure they are straight. Mark the screw holes with a pencil, making sure they align with the holes in the mounts or brackets.
5. Double-Check Measurements:
Before drilling any holes, double-check the measurements and alignment of the marks. Use a level to ensure that the oar will be mounted straight and even. Adjust the positioning if necessary.
Once you have measured, marked, and double-checked the wall, you’re ready to move on to the next step: installing the wall mounts or brackets!
Step 4: Install Wall Mounts
Now that you have measured and marked the wall for the oar, it’s time to install the wall mounts or brackets. These will serve as the support system for securing the oar onto the wall.
1. Gather the Required Tools:
Before you begin, make sure you have the necessary tools at hand, including a drill, screwdriver, and the screws provided with the wall mounts or brackets.
Read more: How To Fold Towel On Towel Bar
2. Align the Mounts:
Align the first mount or bracket with the pencil marks you made on the wall. Ensure it is level and straight by using a level. If you are using multiple mounts or brackets, make sure they are evenly spaced apart.
3. Mark the Screw Holes:
Using a pencil or a fine-point marker, mark the points where the screws will go through the mounting holes of the wall mounts or brackets onto the wall. Double-check the accuracy of the marks.
4. Pre-drill the Holes (if necessary):
If you are installing the wall mounts or brackets onto a hard surface or tile, it is recommended to pre-drill small pilot holes at the marked points. This will make it easier to insert the screws and prevent any potential damage to the wall surface.
5. Install the Wall Mounts:
Using a drill and the appropriate screwdriver attachment, secure the wall mounts or brackets onto the wall by screwing them tightly into place. Make sure they are firmly attached and level with one another.
Read more: How To Arrange Towels On Towel Bar
6. Test the Stability:
Once you have installed the wall mounts, give them a gentle tug or shake to ensure they are securely anchored to the wall. If there is any movement or instability, re-tighten the screws or consider using wall anchors for added support.
With the wall mounts securely installed, you are now ready to move on to the next step: attaching the oar to the wall mounts.
Step 5: Attach the Oar to the Wall Mounts
Now that you have installed the wall mounts or brackets, it’s time to attach the oar to the wall. This step will secure the oar in place and ensure that it is properly aligned and balanced.
1. Position the Oar:
Hold the oar up against the wall, aligning it with the installed wall mounts or brackets. Make sure the oar is centered and level. Adjust the position accordingly until you are satisfied with the placement.
2. Mark the Mounting Holes:
Using a pencil or a fine-point marker, carefully mark the points on the oar where the screws will go through to attach it to the wall mounts or brackets. Double-check the accuracy of the marks.
3. Pre-drill Holes (if necessary):
Depending on the material of the oar and the size of the screws, it may be necessary to pre-drill small pilot holes at the marked points. This will prevent the wood from splitting and make it easier to insert the screws later.
4. Attach the Oar:
With the pre-drilled holes (if applicable), align the oar with the wall mounts or brackets and carefully attach it using the screws provided. Use a screwdriver to tighten the screws, ensuring a secure and stable connection between the oar and the wall mounts.
5. Check Stability and Alignment:
Once the oar is attached, give it a gentle tug or shake to test its stability. It should be firmly in place without wobbling or shifting. Use a level to ensure that the oar is still straight and level after it has been secured to the wall.
6. Make Adjustments if Needed:
If the oar is not level or aligned properly, remove the screws and readjust the position. Repeat the process of attaching the oar to the wall mounts until it is perfectly level and aligned.
With the oar securely attached to the wall mounts or brackets, you are now ready to move on to the next step: securing the oar to ensure long-lasting stability.
Read more: How To Arrange Towels On Double Towel Bar
Step 6: Secure the Oar
After attaching the oar to the wall mounts or brackets, it’s important to take additional steps to ensure that it remains secure and stable on the wall. This will help prevent any accidents or damage and ensure that your towel bar remains functional for a long time.
1. Tighten the Screws:
Using a screwdriver, double-check the tightness of the screws that are holding the oar onto the wall mounts or brackets. Make sure they are firmly secured and tightened. This will ensure that the oar does not become loose over time.
2. Use Adhesive or Epoxy (Optional):
If desired or necessary, you can apply a small amount of strong adhesive or epoxy to the area where the oar and the wall mounts or brackets meet. This will provide an extra layer of security and ensure that the oar remains firmly in place.
3. Add Support Braces (Optional):
If you feel that the oar needs additional support, especially if it is longer or heavier, you can consider adding support braces or brackets. These can be installed underneath the oar and attached to the wall or studs for added stability.
Read also: 14 Best Paper Towel Rack Wall Mount For 2025
4. Consider Reinforcing with Decorative Hooks (Optional):
To further enhance the design and functionality of your towel bar, you can optionally install decorative hooks on the oar. These can be placed on either side of the oar, providing additional hanging space for towels or other accessories.
5. Test Stability and Adjust if Necessary:
After securing the oar, give it a gentle shake or tug to test its stability. If there is any movement or instability, go back and check the screws, adhesive, or supports. Make any necessary adjustments until the oar feels secure and stable.
By taking the time to properly secure the oar, you can ensure that your towel bar not only looks great but also functions reliably. Once you are satisfied with the stability of the oar, you can move on to the final step: hanging towels on your unique and stylish towel bar!
Step 7: Hang Towels on the Oar
Now that your oar is securely mounted on the wall, it’s time to start using it as a towel bar. This final step involves hanging towels on the oar, adding a practical and decorative touch to your space.
1. Choose Your Towels:
Select the towels you want to hang on the oar. Consider the colors, textures, and sizes of the towels to create a visually pleasing display. You can mix and match different towel types to add visual interest.
Read more: How To Buy A Towel Bar
2. Fold or Roll the Towels:
Depending on your preference, you can fold the towels neatly or roll them for a more casual look. Experiment with different folding techniques to create a stylish and inviting display.
3. Hang the Towels:
Starting from one side of the oar, hang the towels on the oar’s handle or on decorative hooks if you have installed them. Ensure that the towels are evenly spaced and properly aligned to maintain a tidy appearance.
4. Style and Arrange:
Take some time to arrange the towels in an aesthetically pleasing way. You can create a uniform look by using towels of the same color or pattern, or mix it up by incorporating towels with different designs or textures.
5. Add Finishing Touches:
Consider adding additional elements to enhance the towel display. This could include decorative accents such as seashells, candles, or small potted plants that complement the overall theme of your space.
Read more: How To Measure Towel Bar
6. Regular Maintenance:
To keep your towel bar looking fresh and clean, regularly rotate the towels, wash them, and replace them as needed. This will ensure that your oar towel bar remains both functional and visually appealing.
Congratulations! You have successfully completed all the steps to mount an oar on a wall as a towel bar. Enjoy the unique and decorative touch it adds to your space, and make use of it to keep your towels organized and easily accessible.
Remember, customizing the oar towel bar to fit your style and preferences is key. Feel free to get creative and add your own personal touches to make it truly unique. Now, step back and admire your handiwork!
Conclusion
Mounting an oar on a wall as a towel bar is a creative and unique way to add a nautical or rustic touch to your space while providing a functional storage solution for your towels. By following the steps outlined in this guide, you have learned how to transform a simple oar into a stylish and practical towel bar.
From choosing the right oar to preparing, measuring, and securing it onto the wall, each step is crucial in ensuring a successful installation. Taking the time to properly clean, sand, and modify the oar, as well as accurately measure and mark the wall, will result in a professional and secure outcome.
With the oar securely attached to the wall mounts or brackets, the final steps of hanging your towels and styling the display allow you to express your personal taste and elevate the overall look and feel of your space. Whether you opt for a neat and coordinated towel arrangement or a more eclectic and casual display, the towel bar will serve as a functional and decorative element in your home.
Remember to regularly maintain your towel bar by rotating, washing, and replacing the towels as needed to keep it looking fresh and inviting. Don’t be afraid to get creative and experiment with different towel colors, patterns, and textures to create a visually appealing arrangement.
By incorporating a mounted oar as a towel bar, you have not only added a practical storage solution but also a conversation piece that will impress your guests. So go ahead, enjoy your newly mounted oar towel bar, and revel in the satisfaction of a completed and customized DIY project!
Frequently Asked Questions about How To Mount An Oar On A Wall As A Towel Bar
Was this page helpful?
At Storables.com, we guarantee accurate and reliable information. Our content, validated by Expert Board Contributors, is crafted following stringent Editorial Policies. We're committed to providing you with well-researched, expert-backed insights for all your informational needs.


0 thoughts on “How To Mount An Oar On A Wall As A Towel Bar”