Articles
How To Remove Refrigerant From Car AC
Modified: October 20, 2024
Learn how to easily remove refrigerant from your car's AC system with our informative articles. Get step-by-step instructions and expert tips.
(Many of the links in this article redirect to a specific reviewed product. Your purchase of these products through affiliate links helps to generate commission for Storables.com, at no extra cost. Learn more)
Introduction
Removing refrigerant from a car air conditioning (AC) system is a task that may need to be performed for various reasons. Whether you’re replacing a faulty compressor, repairing a leak, or simply decommissioning the AC system, properly removing the refrigerant is crucial. Not only is it important for the safety of the environment, but it is also required by law in many jurisdictions.
Handling refrigerants can be dangerous if not done correctly, as they are chemicals that can cause harm to both humans and the environment. Therefore, it is essential to follow the appropriate safety precautions and use the right tools throughout the process.
In this article, we will guide you through the step-by-step process of removing refrigerant from your car’s AC system. We will also provide important safety tips and highlight the necessary tools you’ll need to have on hand. Let’s get started!
Key Takeaways:
- Safely and effectively remove refrigerant from your car’s AC system by following step-by-step procedures, prioritizing safety, and ensuring proper disposal to protect the environment and comply with regulations.
- Prioritize safety, gather necessary tools, locate the low-pressure port, prepare the AC system, attach the recovery machine, monitor the process, and dispose of recovered refrigerant to successfully remove refrigerant from your car’s AC system.
Read also: 5 Amazing Car AC Refrigerant for 2025
Safety Precautions
Before diving into the process of removing refrigerant from your car’s AC system, it’s crucial to prioritize safety. Handling refrigerants can be hazardous, and taking the necessary precautions will ensure a safe and smooth operation. Here are some important safety measures to keep in mind:
- Use Protective Gear: When working with refrigerants, always wear protective gear, including goggles, gloves, and a face mask. This will protect you from potential contact with harmful chemicals and fumes.
- Work in a Well-Ventilated Area: Conduct the refrigerant removal process in a well-ventilated area to minimize exposure to harmful fumes. If possible, perform the task outdoors or in a garage with open doors and windows.
- Avoid Skin Contact: Liquefied refrigerant can cause frostbite if it comes into contact with your skin. Ensure that you handle the refrigerant carefully and avoid any direct contact by wearing appropriate protective gloves.
- Keep Fire Extinguisher Nearby: It’s important to have a fire extinguisher handy when working with refrigerants. Although rare, there is always a risk of refrigerant ignition, so be prepared to extinguish any potential fires.
- Follow Local Regulations: Different regions have specific regulations regarding the handling and disposal of refrigerants. Familiarize yourself with the local laws and ensure compliance throughout the process.
By following these safety precautions, you can minimize the risks associated with handling refrigerants and carry out the task safely.
Step 1: Gather the Necessary Tools
Before you can begin removing refrigerant from your car’s AC system, it’s essential to gather all the necessary tools. Having the right equipment on hand will ensure a smooth and efficient process. Here are the tools you will need:
- Refrigerant Recovery Machine: This is the main tool used to remove the refrigerant from the AC system. Ensure that the recovery machine is specifically designed for automotive applications and is capable of handling the refrigerant used in your vehicle.
- Manifold Gauge Set: A manifold gauge set allows you to monitor the pressure levels in the AC system. It consists of high and low-pressure gauges, as well as valves and hoses, which connect to the AC system components.
- Personal Protective Equipment (PPE): As mentioned in the safety precautions, you will need appropriate PPE, including safety goggles, gloves, and a face mask, to protect yourself from the refrigerant and fumes.
- Leak Detection Kit: Before removing the refrigerant, it’s advisable to check for any leaks in the AC system. A leak detection kit, which includes UV dye and a UV light, can help identify any leaks that may require repair.
- Refrigerant Identifier: If you’re unsure about the type of refrigerant in your vehicle, a refrigerant identifier can be used to determine the specific type. This is important for proper handling and disposal.
- Sealing Caps and Valve Core Removal Tool: To prevent the escape of refrigerant during the removal process, it’s essential to have sealing caps and a valve core removal tool on hand. These will help ensure a tight seal and prevent any refrigerant leaks.
Once you have gathered all the necessary tools, you’re ready to move on to the next step: locating the low-pressure port in your car’s AC system.
Step 2: Locate the Low-Pressure Port
Locating the low-pressure port in your car’s AC system is an important step in the refrigerant removal process. The low-pressure port is where you will connect the manifold gauge set and the refrigerant recovery machine. Follow these steps to locate the low-pressure port:
- Refer to the Owner’s Manual: The first step is to consult your car’s owner’s manual. It will provide detailed information about the location of the low-pressure port for your specific make and model.
- Inspect the AC Components: If you’re unable to find the information in the owner’s manual, visually inspect the AC components under the hood. Look for the AC lines, compressor, and accumulator/dryer. The low-pressure port is usually located on the larger-diameter line, which is known as the suction line.
- Identify the Port Cap: Once you’ve located the suction line, look for a removable cap. This cap covers the low-pressure port and is typically labeled with an “L” or “LOW.” Remove the cap to expose the port.
It’s important to note that the low-pressure port is different from the high-pressure port. The high-pressure port is typically smaller and is used for diagnostic purposes. Avoid connecting the manifold gauge set and the recovery machine to the high-pressure port, as it may damage the equipment or the AC system.
Once you have located the low-pressure port, you’re ready to move on to the next step: preparing the AC system for refrigerant removal.
Step 3: Prepare the AC System
Before you can begin removing the refrigerant from your car’s AC system, it’s crucial to properly prepare the system. This involves a few important steps to ensure a safe and effective refrigerant removal process. Follow these steps to prepare the AC system:
- Turn Off the Engine: Before proceeding, make sure the engine is turned off. This will prevent any accidents or injuries during the preparation process.
- Check for Leaks: Perform a visual inspection of the AC system components to check for any obvious leaks. Look for signs of oil or refrigerant stains around the fittings, hoses, and connections. If you notice any leaks, it’s important to address them before continuing.
- Inspect the Seals and Gaskets: Check the condition of the seals and gaskets in the AC system. Over time, these can deteriorate and cause refrigerant leaks. Replace any worn-out or damaged seals and gaskets before proceeding.
- Connect the Manifold Gauge Set: Take the manifold gauge set and connect it to the low-pressure port you located earlier. Ensure a secure connection by tightening the fittings properly.
- Open the High and Low-Pressure Valves: Once the gauge set is connected, open the valves on the high and low-pressure gauges. This will allow pressure equalization in the AC system and prepare it for refrigerant removal.
- Check the Gauge Readings: Take a moment to check the readings on the manifold gauge set. The low-pressure gauge should show a low pressure reading, while the high-pressure gauge should read zero or close to zero. If the readings are abnormal, it may indicate a problem with the AC system that needs to be addressed before continuing.
By following these steps, you will ensure that the AC system is properly prepared for the refrigerant removal process. Once everything is in order, you can proceed to the next step: attaching the refrigerant recovery machine.
Read more: How To Remove Freon From A Refrigerator
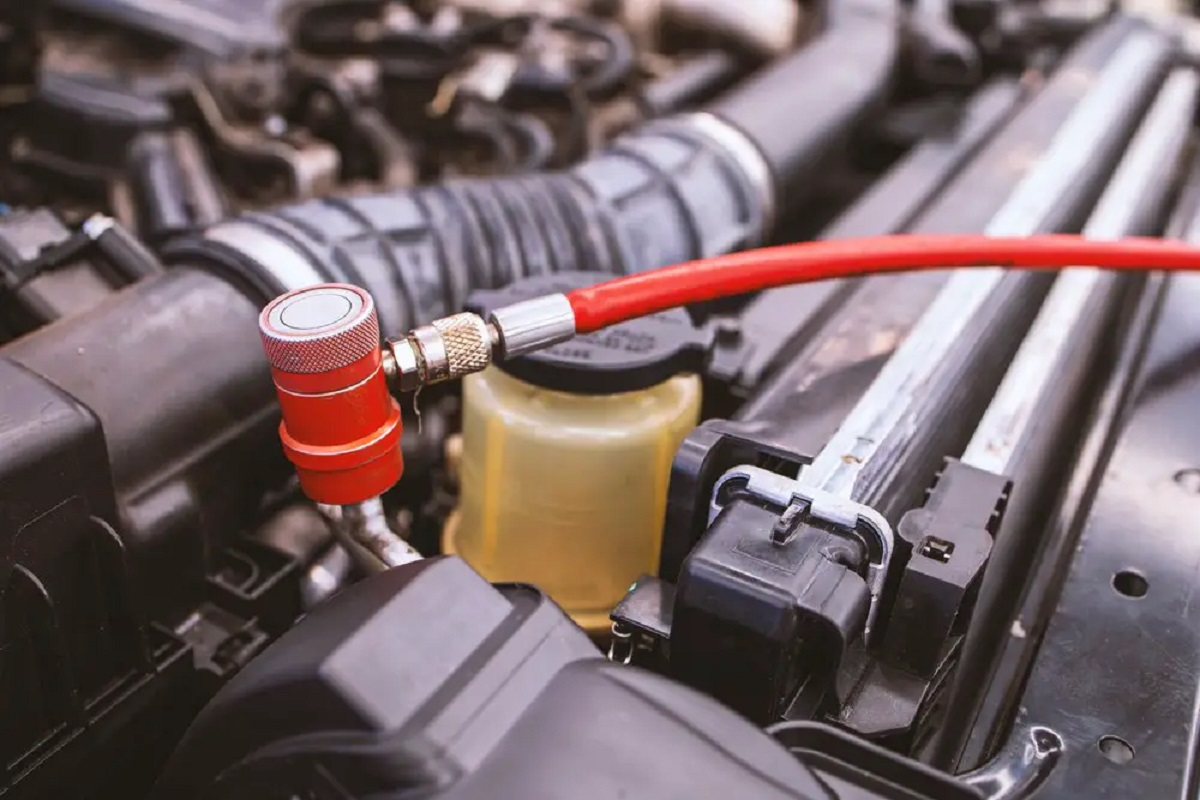
Step 4: Attach the Refrigerant Recovery Machine
Now that you have prepared the AC system, it’s time to attach the refrigerant recovery machine. This machine is designed to safely and effectively remove the refrigerant from the system. Follow these steps to properly attach the refrigerant recovery machine:
- Ensure the Recovery Machine is Off: Before connecting the machine, ensure that it is turned off. This will prevent any accidental operation during the attachment process.
- Connect the Hoses: Take the hoses provided with the recovery machine and connect them to the corresponding ports on the manifold gauge set. The high-pressure hose should be connected to the high-pressure gauge fitting, and the low-pressure hose to the low-pressure gauge fitting. Ensure a tight connection by securely tightening the fittings.
- Connect the Other End of the Hoses: The other end of the hoses should be connected to the inlet and outlet ports of the recovery machine. Again, ensure a secure and tight connection to prevent any refrigerant leaks.
- Secure the Recovery Machine: Place the recovery machine in a stable and secure location near the vehicle. Make sure it is positioned in an area where it will not be at risk of tipping over or being damaged during operation.
- Power On the Recovery Machine: Once the machine is securely connected and positioned, you can turn it on. Follow the manufacturer’s instructions to power on the machine and prepare it for the recovery process.
It’s important to note that each recovery machine may have slightly different instructions and specifications. Be sure to consult the user manual provided by the manufacturer for detailed guidance on connecting and operating your specific recovery machine.
With the recovery machine properly attached and powered on, you’re ready to move on to the next step: beginning the refrigerant recovery process.
Before removing refrigerant from your car AC, make sure to use a proper recovery machine to capture and store the refrigerant in a safe and environmentally friendly manner. Always follow the manufacturer’s guidelines and local regulations.
Step 5: Begin the Refrigerant Recovery Process
With the refrigerant recovery machine properly attached, it’s time to start the actual process of removing the refrigerant from your car’s AC system. Follow these steps to begin the refrigerant recovery process:
- Check the Machine Settings: Before starting, make sure the recovery machine is set to the appropriate recovery mode for automotive AC systems. Adjust any necessary settings according to the manufacturer’s instructions.
- Open the AC System Valves: Slowly open the valves on the manifold gauge set to allow the refrigerant to flow through the recovery machine. Start by opening the low-pressure valve, followed by the high-pressure valve.
- Observe the Recovery Machine Display: Keep an eye on the recovery machine’s display screen. It will provide you with important information such as the pressure levels and the amount of refrigerant being recovered.
- Monitor the Recovery Process: Allow the recovery machine to run until it has removed the majority of the refrigerant from the AC system. The process may take some time, depending on the amount of refrigerant present. Be patient and let the machine complete its cycle.
- Close the AC System Valves: Once the recovery machine has completed the process and the gauge readings show that little to no refrigerant is being recovered, close the valves on the manifold gauge set. This will stop the flow of refrigerant through the recovery machine.
It’s important to note that the recovery machine will automatically shut off once it has completed the recovery process or reached its maximum capacity. If the machine shuts off before you have removed all the refrigerant, you may need to empty the machine and start a new recovery cycle.
By following these steps, you will successfully begin the refrigerant recovery process and remove the majority of the refrigerant from your car’s AC system. However, the process is not yet complete. In the next step, you will monitor the recovery process to ensure it is properly carried out.
Step 6: Monitor the Recovery Process
While the refrigerant recovery machine is running, it’s important to monitor the process to ensure everything is progressing smoothly. Keeping a close eye on the recovery machine and the AC system will help you identify any issues or abnormalities. Follow these steps to effectively monitor the recovery process:
- Observe the Recovery Machine Display: Continuously monitor the recovery machine’s display screen to check the pressure levels and the amount of refrigerant being recovered. Ensure that the readings are within the expected range and that the recovery machine is operating correctly.
- Inspect the AC System Components: Keep an eye on the AC system components, such as the hoses, fittings, and connections, during the recovery process. Look for any signs of leaks or abnormalities, such as frost formation or unusual sounds. If you notice any issues, stop the recovery process and address them before proceeding.
- Watch for Pressure Fluctuations: Pay attention to any fluctuations in pressure on the manifold gauge set. Sudden changes in pressure could indicate a problem with the AC system or the recovery machine. If you notice significant fluctuations, it’s important to investigate and address the issue before continuing.
- Check for Proper Functioning: Along with pressure readings, ensure that the recovery machine is functioning smoothly and consistently. Listen for any unusual sounds, vibrations, or excessive heat coming from the machine. If you detect any abnormalities, stop the process and consult the manufacturer’s instructions or seek professional assistance.
- Keep an Eye on the Recovery Progress: Monitor the progress of the recovery process by verifying the amount of refrigerant being recovered. Take note of the levels on the recovery machine’s display screen and compare them to the expected amount. This will help ensure that the majority of the refrigerant is properly removed from the AC system.
By actively monitoring the recovery process, you can identify and address any issues or concerns that may arise during the process. It’s important to prioritize safety and proper functioning to ensure effective refrigerant removal.
In the next step, you will learn how to remove the recovery machine and properly close the AC system.
Step 7: Remove the Recovery Machine and Close the System
After the refrigerant recovery process is complete, it’s time to remove the recovery machine and properly close the AC system. This step ensures that the system is sealed and prevents any potential refrigerant leaks. Follow these steps to remove the recovery machine and close the system:
- Power Off the Recovery Machine: Before disconnecting anything, ensure that the recovery machine is powered off. This will prevent any accidental operation during the removal process.
- Close the AC System Valves: Close the valves on the manifold gauge set by turning them clockwise. This will stop the flow of refrigerant and prevent any leakage.
- Disconnect the Hoses: Starting with the recovery machine, disconnect the hoses from the inlet and outlet ports. Next, remove the hoses from the manifold gauge set fittings. Take care not to spill any remaining refrigerant during the disconnection process.
- Cap the Low-Pressure Port: Place a sealing cap on the low-pressure port to prevent any debris or moisture from entering the system. Ensure that the cap is securely tightened to maintain the seal.
- Inspect for Any Abnormalities: Take a moment to inspect the AC system and the recovery machine for any abnormalities, such as leaks or damage. Address any issues before proceeding to ensure the system is properly functioning.
- Store the Recovery Machine Properly: Once disconnected, store the recovery machine in a safe and secure location. Follow the manufacturer’s instructions for proper storage to maintain the longevity of the machine.
By effectively removing the recovery machine and closing the AC system, you can prevent any potential refrigerant leaks and ensure the system remains sealed. This step is important for the overall maintenance and functioning of your car’s AC system.
Before concluding the refrigerant removal process, it’s essential to dispose of the recovered refrigerant properly. In the next step, we will discuss how to handle the disposal of the refrigerant.
Read more: How To Remove Fog From Car Windows
Step 8: Properly Dispose of the Refrigerant
Properly disposing of the recovered refrigerant is a crucial step in the refrigerant removal process. It is important to handle the refrigerant in an environmentally responsible manner. Follow these steps to ensure the proper disposal of the refrigerant:
- Consult Local Regulations: Research and familiarize yourself with the regulations and guidelines regarding the disposal of refrigerants in your region. Different areas may have specific requirements, so it’s important to comply with local laws.
- Transfer the Refrigerant to Appropriate Containers: Transfer the recovered refrigerant from the recovery machine to specifically designated, approved containers. These containers should be suitable for storing and transporting refrigerants safely.
- Label the Containers: Clearly label the containers with the type of refrigerant they contain. This will help identify the contents and ensure proper handling in the future. Include any necessary information required by local regulations.
- Contact a Licensed Waste Management Facility: Check with licensed waste management facilities in your area to inquire about their refrigerant disposal services. These facilities are equipped to handle and properly dispose of refrigerants in an environmentally safe manner.
- Coordinate the Disposal Process: Arrange for the transportation and disposal of the refrigerant with the licensed waste management facility. Work closely with them to ensure all necessary permits, documentation, and safety protocols are followed.
- Keep a Record: Maintain a record of the disposal process, including the date, receptacle details, and any relevant documentation. This documentation may be required to demonstrate proper disposal compliance in the future.
Disposing of refrigerant properly is vital to protect the environment and comply with legal regulations. By following these steps and working with licensed waste management facilities, you can ensure that the refrigerant is handled and disposed of in a responsible and safe manner.
With the completion of Step 8, you have successfully removed the refrigerant from your car’s AC system and completed the entire process. Properly disposing of the recovered refrigerant is the final step in ensuring that the task is carried out safely and in line with regulations.
Congratulations on successfully removing the refrigerant from your car’s AC system! By following the steps outlined in this guide, you have safeguarded the environment, complied with legal requirements, and completed a crucial maintenance task. If you have further questions or need assistance, don’t hesitate to seek professional help or consult with an automotive specialist.
Conclusion
Removing refrigerant from a car’s AC system is an important task that requires proper knowledge, tools, and safety precautions. By following the step-by-step guide outlined in this article, you have learned how to safely and effectively remove refrigerant from your vehicle’s AC system.
Throughout the process, it is crucial to prioritize safety by wearing the appropriate protective gear, working in a well-ventilated area, and following local regulations. Gathering the necessary tools, locating the low-pressure port, preparing the AC system, attaching the refrigerant recovery machine, and monitoring the recovery process are all essential steps to ensure a successful refrigerant removal.
After completing the refrigerant recovery, it is important to properly dispose of the recovered refrigerant. Consult local regulations, transfer the refrigerant to approved containers, label the containers, and coordinate with licensed waste management facilities to ensure environmentally responsible disposal.
By following these steps, you have not only protected the environment but also ensured the safe and efficient operation of your car’s AC system. Properly maintaining and servicing the AC system will help prolong its lifespan and preserve its cooling capabilities.
If you are unsure about any step or have concerns about handling refrigerants, it is always recommended to seek professional assistance or consult with an automotive specialist. They can provide expert guidance and ensure that the refrigerant removal is performed correctly.
Now that you have completed the process of removing refrigerant from your car’s AC system, you can feel satisfied knowing that you have taken the necessary steps to maintain both the environment and the functionality of your vehicle. Keep these guidelines in mind whenever you need to remove refrigerant, and your AC system will remain in top condition for years to come.
Now that you know how to remove refrigerant from your car's AC, you might be wondering about other car AC services. If issues persist after extracting refrigerant, consider visiting a professional who can fix your system. Maybe you're also curious about how often car ACs need recharging to maintain optimal performance. Both processes are vital for ensuring your vehicle's air conditioning is effective and reliable.
Frequently Asked Questions about How To Remove Refrigerant From Car AC
Was this page helpful?
At Storables.com, we guarantee accurate and reliable information. Our content, validated by Expert Board Contributors, is crafted following stringent Editorial Policies. We're committed to providing you with well-researched, expert-backed insights for all your informational needs.


0 thoughts on “How To Remove Refrigerant From Car AC”