Articles
How To Clean AC Air Filter
Modified: October 20, 2024
Learn the best techniques and tips for cleaning your AC air filter in this informative article. Ensure optimal airflow and extend the lifespan of your air conditioning system.
(Many of the links in this article redirect to a specific reviewed product. Your purchase of these products through affiliate links helps to generate commission for Storables.com, at no extra cost. Learn more)
Introduction
Welcome to this comprehensive guide on how to clean your AC air filter. Whether you are a homeowner or a renter, taking care of your HVAC system is essential to ensure its optimal performance and longevity. One crucial aspect of maintaining your AC unit is regularly cleaning the air filter. This simple yet important task can greatly improve the efficiency of your system, enhance indoor air quality, and ultimately save you money on energy bills.
Over time, dust, dirt, pet dander, and other particles accumulate on the filter, restricting airflow and diminishing the cooling capabilities of your air conditioner. Additionally, a dirty air filter can lead to increased allergens and pollutants circulating in your home, potentially affecting your health and comfort. Therefore, it is crucial to incorporate filter cleaning into your routine maintenance plan.
In this article, we will provide you with a step-by-step guide on how to clean your AC air filter effectively and safely. We will also discuss the tools and materials you will need, as well as some tips and considerations to keep in mind during the cleaning process.
Before we dive into the steps, it’s important to note that the frequency of cleaning your air filter will depend on several factors, including the type of filter, the air quality in your area, and how often you use your air conditioning system. However, a general guideline is to clean or replace the air filter every 30 to 90 days.
Now that we understand the importance of cleaning the AC air filter and how often it should be done, let’s move on to the next section, where we will discuss the tools and materials you will need for the cleaning process.
Key Takeaways:
- Regularly cleaning or replacing your AC air filter improves air quality, energy efficiency, and extends the lifespan of your HVAC system, ultimately saving you money on energy bills and contributing to a healthier living environment.
- Prioritizing the maintenance of your AC air filter ensures optimal performance, cleaner air, and a more comfortable home environment. Follow the step-by-step guide to keep your HVAC system running efficiently.
Read more: How To Clean Portable AC Filter
Why is it important to clean your AC air filter?
Cleaning your AC air filter is vital for several reasons. Let’s explore why maintaining a clean air filter is crucial for the optimal functioning of your HVAC system:
1. Improved Air Quality:
The primary purpose of an air filter is to capture dust, pollen, pet dander, mold spores, and other airborne particles. A dirty air filter cannot effectively trap these contaminants, leading to poor indoor air quality. This can be particularly problematic for individuals with allergies or respiratory conditions. Regularly cleaning or replacing your air filter helps ensure clean and healthy air in your home.
2. Enhanced Energy Efficiency:
A dirty air filter obstructs the proper airflow in your HVAC system. When the airflow is restricted, your air conditioner has to work harder to circulate and cool the air, resulting in increased energy consumption. By cleaning your air filter regularly, you remove the accumulated debris and allow for proper airflow, improving the energy efficiency of your AC unit and reducing your energy bills.
3. Extended Lifespan of Your HVAC System:
A clogged air filter puts additional strain on your HVAC system. This strain can lead to overheating, component damage, and even system failure. By cleaning or replacing the air filter on a regular basis, you alleviate the strain and ensure that your AC unit operates at its optimal level, extending its lifespan and saving you from expensive repairs or replacements.
4. Cost Savings:
A clean air filter contributes to lower energy consumption. When your AC unit doesn’t have to work as hard to cool your home, it uses less energy, resulting in cost savings on your utility bills. Additionally, regular maintenance, including cleaning or replacing the air filter, can help identify potential issues with your HVAC system before they become major problems, saving you from costly repairs down the line.
5. Maintenance of Manufacturer’s Warranty:
Many HVAC manufacturers require regular maintenance, including keeping the air filter clean, to maintain the validity of the warranty. By neglecting this essential task, you risk voiding your warranty and losing coverage for any potential repairs.
By understanding the importance of cleaning your AC air filter, you can ensure that your HVAC system operates efficiently, provides clean air, and lasts for years to come. In the following sections, we will guide you through the step-by-step process of cleaning your air filter, starting with the tools and materials you’ll need.
Tools and Materials Needed
Before you begin cleaning your AC air filter, gather the necessary tools and materials. Having everything prepared beforehand will streamline the process and ensure you have everything you need. Here is a list of what you’ll need:
1. Screwdriver:
A screwdriver might be necessary to remove any screws or clips holding the filter in place, depending on your AC unit’s design. Make sure you have the appropriate type and size of screwdriver for your specific unit.
2. Cleaning Solution:
You can use a mild detergent or a specialized air filter cleaning solution to remove dirt and grime from the filter. Avoid using harsh chemicals or bleach, as they can potentially damage the filter material.
3. Water Source:
You’ll need access to a water source, such as a sink or garden hose, to rinse the air filter. Ensure that you have a stable water supply with adequate pressure for effective cleaning.
4. Towels or Cloth:
Keep some clean towels or cloths nearby to dry the air filter after cleaning. It’s important to completely dry the filter before reinstalling it to prevent moisture-related issues, such as mold growth.
5. Optional: Vacuum Cleaner:
If your air filter is lightly soiled or you prefer a more convenient cleaning method, a vacuum cleaner with a brush attachment can be used to remove loose debris from the filter.
6. Optional: Gloves:
To protect your hands, you may want to wear gloves while handling the air filter, especially if it is particularly dirty or if you have sensitivities to dust or cleaning solutions.
Make sure you have all these tools and materials ready before you start the cleaning process. With everything at hand, you’ll be able to proceed smoothly through the steps without any unnecessary delays.
Now that you’re prepared with the necessary tools and materials, let’s move on to the step-by-step process of cleaning your AC air filter.
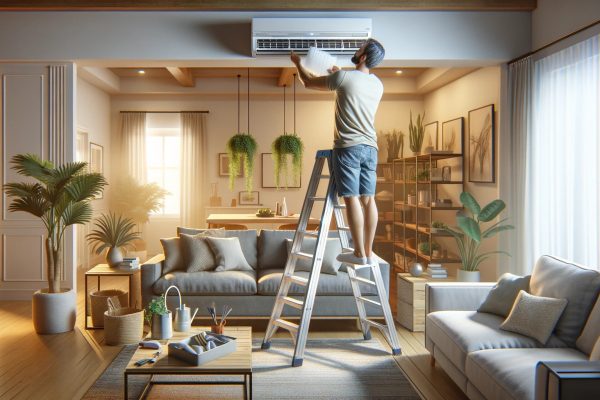
Step 1: Turn off the AC unit
Before you begin cleaning your AC air filter, it is crucial to turn off the AC unit. This ensures your safety and prevents any potential damage to the system during the cleaning process. Here’s how to safely turn off your AC unit:
1. Locate the AC Unit:
Find the main control panel or thermostat that controls your AC unit. This is typically located on the wall inside your home or in an area near the unit itself.
2. Adjust the Thermostat:
Adjust the thermostat settings to turn off the air conditioning system. Set the thermostat to the “Off” position or raise the temperature to a level that will not trigger the AC unit to turn on during the cleaning process.
3. Shut off the Power:
Locate the circuit breaker panel that supplies power to your AC unit. Open the panel door and identify the breaker switch or switches designated for your AC unit. Flip the switch to the “Off” position to shut off power to the unit.
4. Double-check the Power:
It’s always a good idea to double-check that the AC unit is completely powered off. Ensure that the control panel or thermostat displays no active indicators, and confirm that the air conditioning system is not running by listening for the sound of the fan or compressor.
By turning off the AC unit before cleaning the air filter, you prevent any potential accidents or damage that could occur when working around live electrical components. This step ensures your safety and allows you to clean the air filter without any interference from the system.
Once you have successfully turned off the AC unit, we can move on to the next step: locating the air filter.
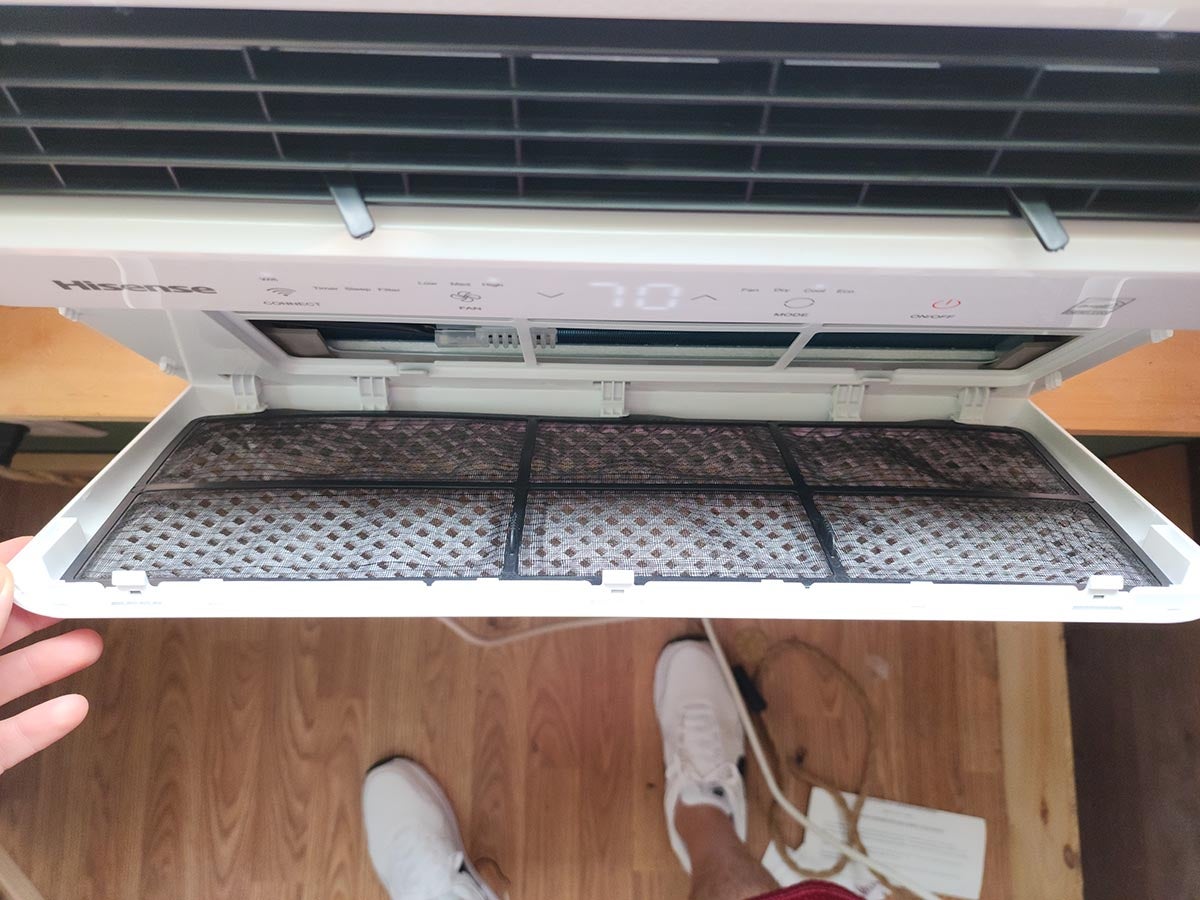
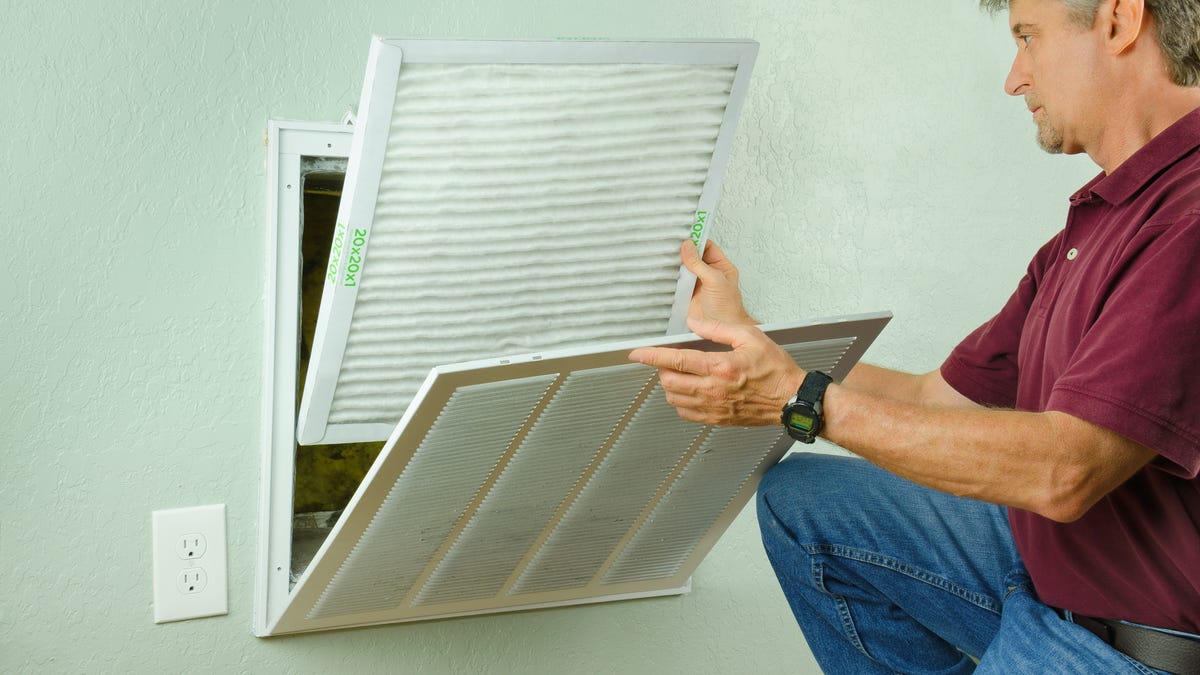
Step 2: Locate the air filter
In order to clean the air filter, you first need to locate it within your AC system. The air filter is typically found in one of two places:
1. Return Air Duct:
Many AC units have a return air duct where the air is pulled in from your home to be cooled and circulated. The air filter is often located inside this duct, either attached to the side or positioned in a dedicated slot.
2. Furnace or Air Handler:
If you have a central HVAC system that includes a furnace or air handler, the air filter may be located near the blower motor. Check your furnace or air handler unit to locate the air filter compartment.
Once you have determined where the air filter is located, follow these steps to access it:
1. Open the Access Panel:
If the air filter is in the return air duct, locate the access panel covering the filter. Use a screwdriver or any necessary tool to remove the screws or clips holding the panel in place. Set the screws aside in a safe place to avoid losing them.
2. Remove the Filter Compartment Cover:
In the case of a furnace or air handler unit, carefully open the cover of the filter compartment. It may be hinged or secured with screws or clips. Again, use the appropriate tool to remove any fasteners.
3. Take Note of the Filter Size and Orientation:
As you remove the access panel or filter compartment cover, take note of the filter’s size and the direction it is facing. This information is important to ensure you reinstall the filter correctly after cleaning.
By locating the air filter and accessing it properly, you are ready to move on to the next step of the cleaning process: removing the air filter.
Read more: How To Clean A Lawnmower Air Filter
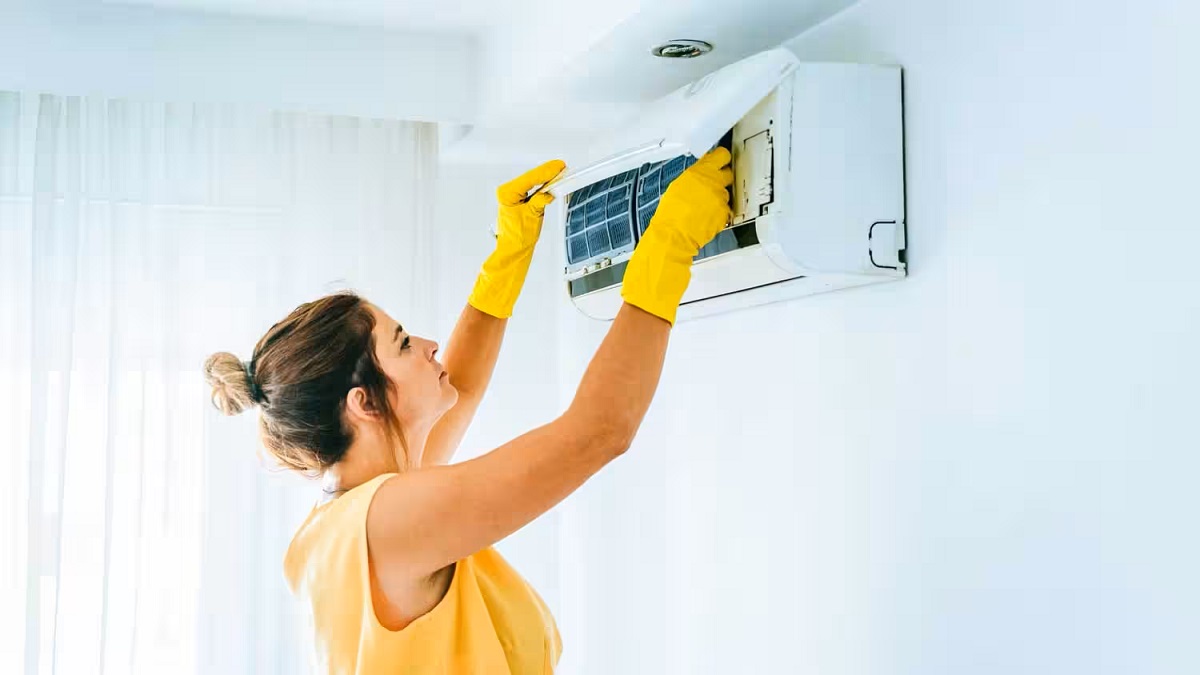
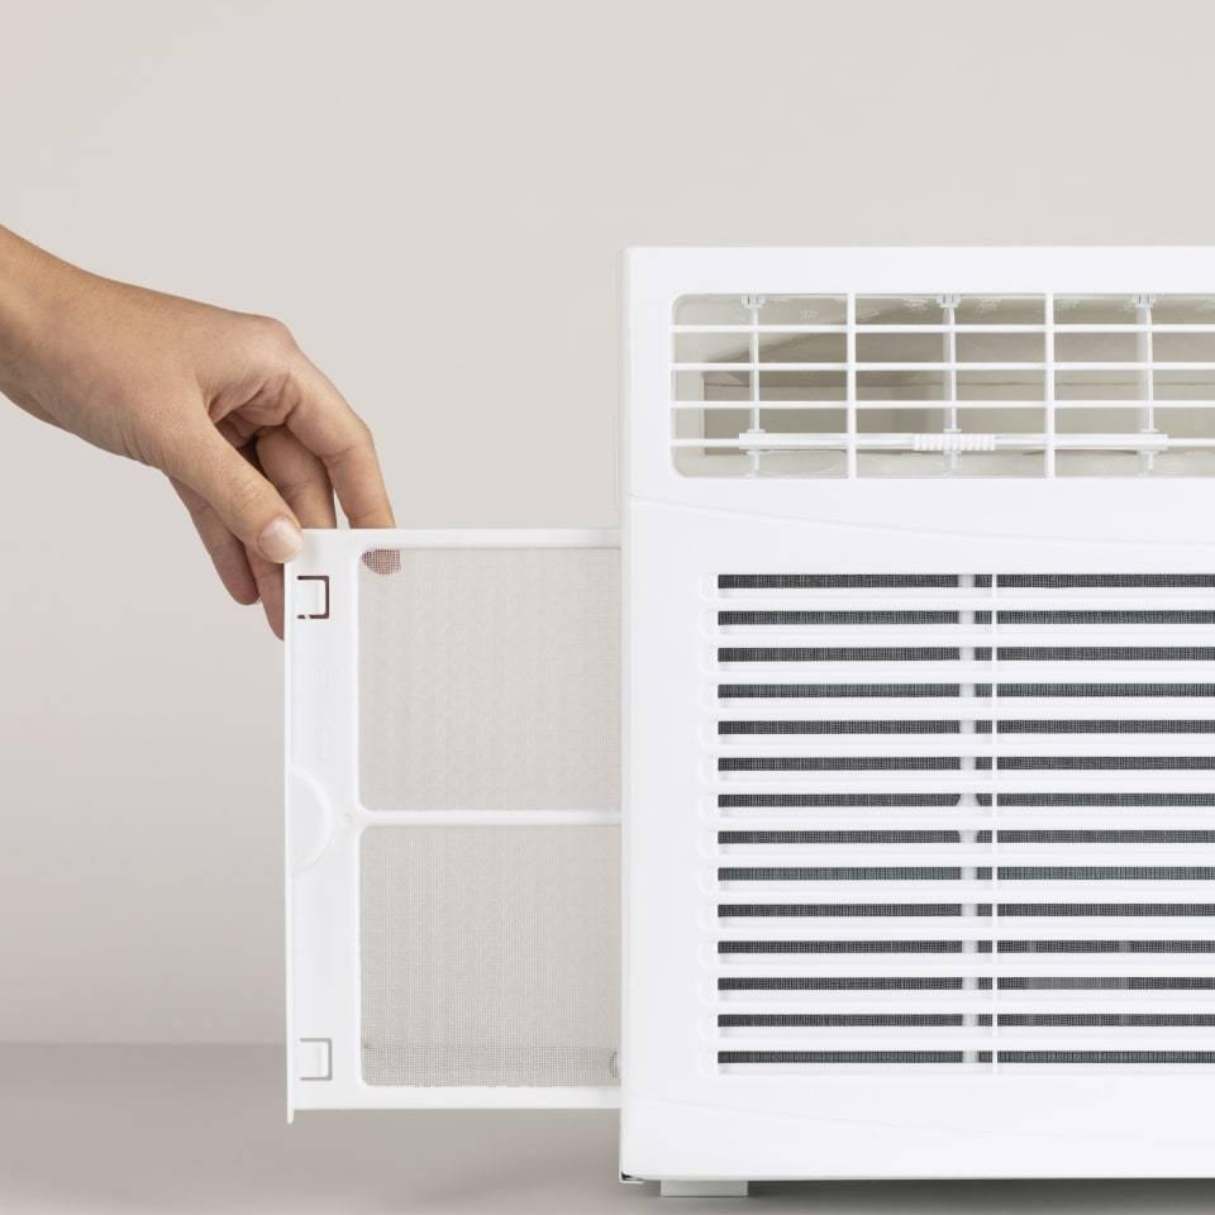
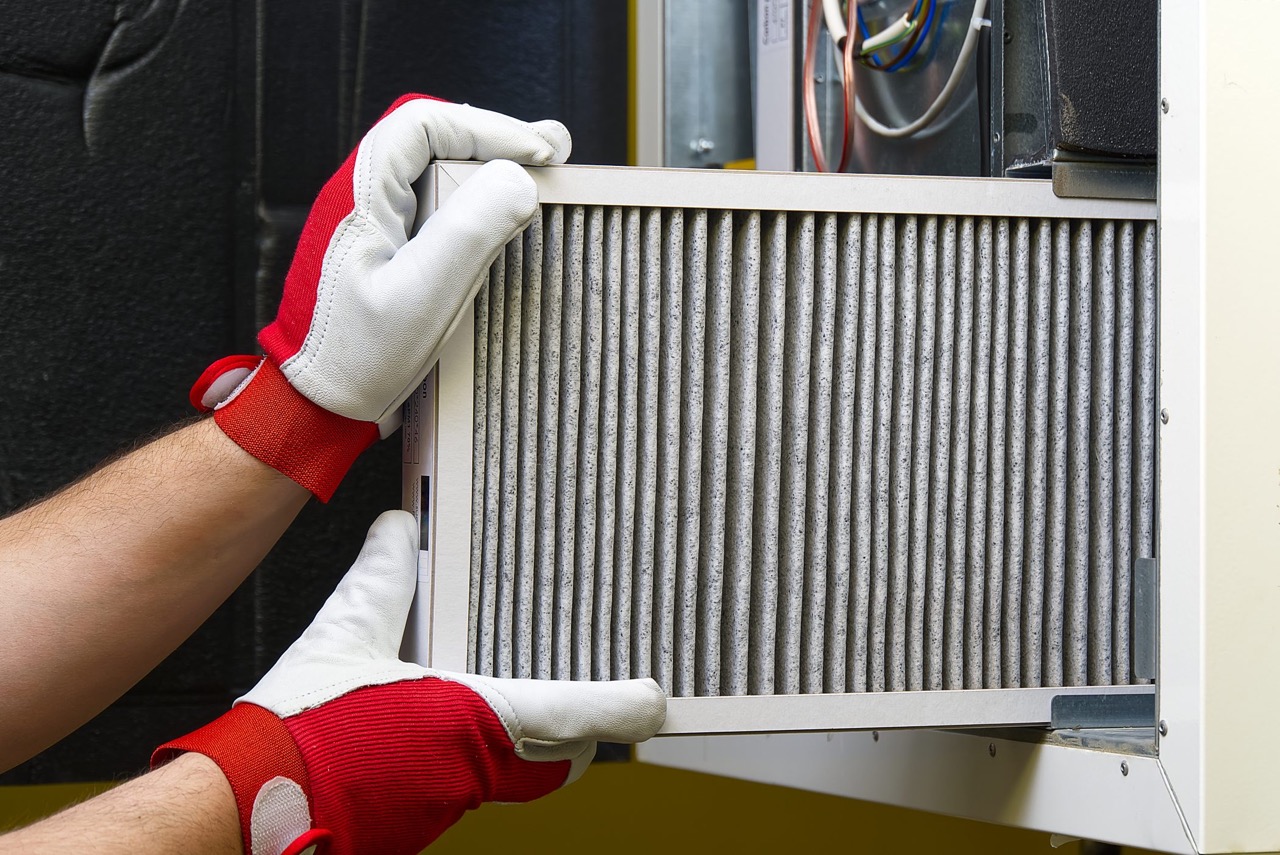
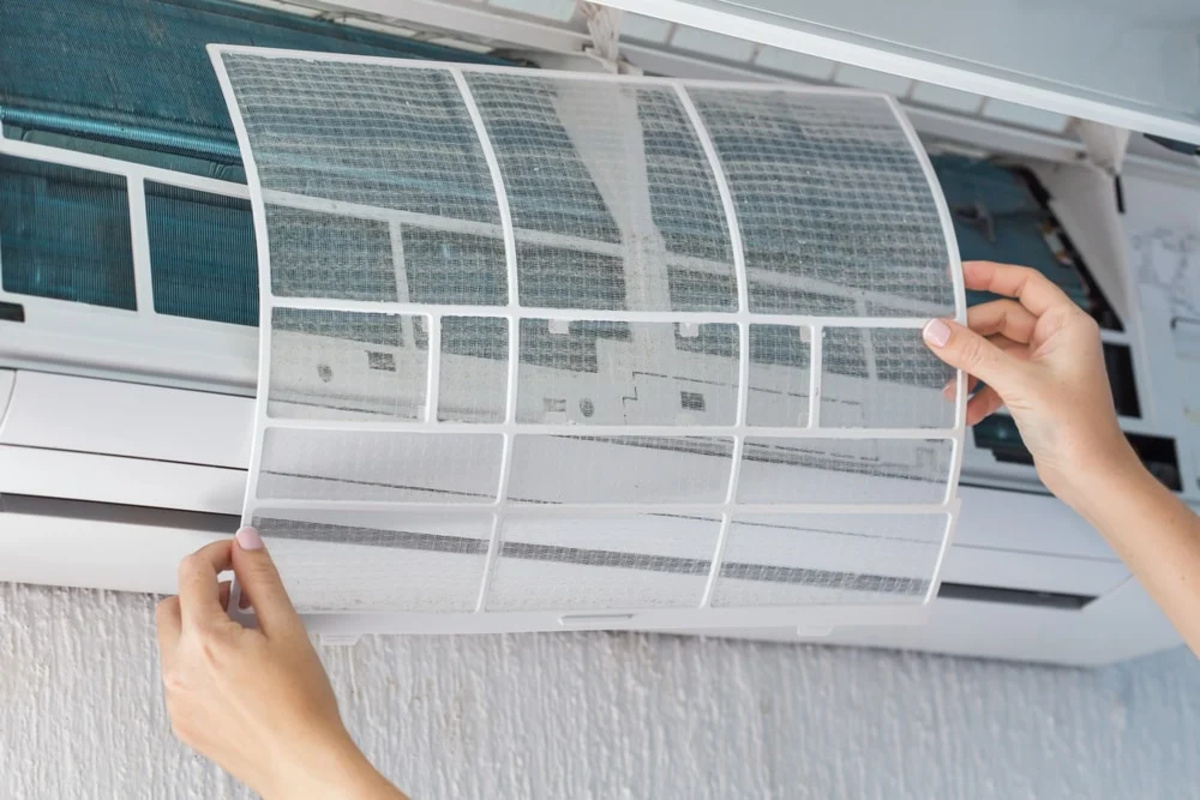
Step 3: Remove the air filter
Now that you have located the air filter, it’s time to remove it from your AC system. Follow these steps to safely and efficiently remove the air filter:
1. Handle with Care:
Take caution when handling the air filter, as it may contain dirt, dust, or other debris that can potentially be released into the air if mishandled. Consider wearing gloves if you have sensitivities or allergies.
2. Check for Damages or Signs of Wear:
Before removing the air filter, inspect it for any damages or signs of wear. If you notice any large tears, holes, or excessive dirt buildup that cannot be adequately cleaned, it may be time to replace the filter.
3. Note the Airflow Direction:
Take note of the direction of the airflow indicated on the air filter. This is typically indicated by arrows or markings on the filter. It’s important to remember this information to ensure you reinstall the filter correctly later on.
4. Slide or Unclip the Filter:
Depending on the type of air filter and the design of your AC system, you may need to slide the filter out of its slot or unclip it from its housing. Be gentle and use caution to prevent any damage to the filter or surrounding components.
5. Set the Filter Aside:
Once you have successfully removed the air filter, set it aside in a safe and clean area. Avoid placing it on any contaminated surfaces or near any moisture sources. This will prevent any further accumulation of dirt or damage to the filter.
By removing the air filter properly, you are now ready to move on to the next step: inspecting the air filter for any issues that may require further attention or replacement.
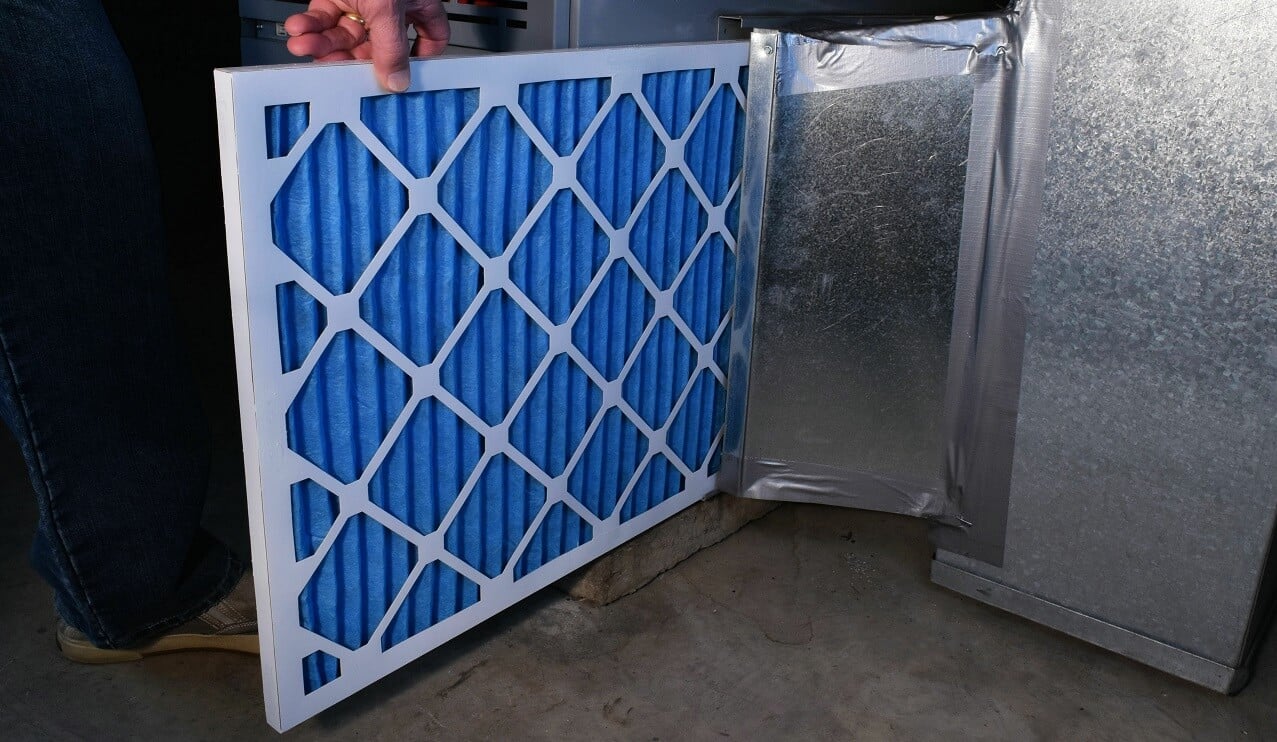
Step 4: Inspect the air filter
Now that you have removed the air filter from your AC system, it’s time to inspect it for any issues that may require attention or replacement. Follow these steps to thoroughly inspect the air filter:
1. Observe the Filter’s Condition:
Take a close look at the air filter and observe its overall condition. Look for signs of excessive dust and dirt accumulation, tears, holes, or damage that may affect its ability to filter the air effectively. If the filter appears too damaged or heavily soiled, it’s best to replace it rather than attempting to clean it.
2. Check the Filter Material and Frame:
Inspect the filter material itself, whether it’s made of fiberglass, pleated paper, or another material. Ensure that the material is intact and not coming apart. Additionally, check the condition of the filter frame or housing to ensure it is sturdy and free from any cracks or damage.
3. Assess the Airflow Resistance:
Hold the air filter up to the light and assess how easily the light passes through it. If you notice a significant reduction in the amount of light passing through the filter, it indicates high airflow resistance due to clogging. This is a clear sign that the filter needs to be cleaned or replaced.
4. Consider the Replacement Schedule:
Take into account how long it has been since the last replacement or cleaning of the air filter. Refer to the manufacturer’s guidelines or recommended timeframe for replacement to determine if it’s time for a new filter. If it falls within the suggested replacement schedule, it’s a good idea to replace the filter rather than cleaning it.
After thoroughly inspecting the air filter, you will have a better understanding of its condition and whether it can be cleaned or needs to be replaced. In the next step, we will discuss two cleaning options: vacuuming and rinsing the air filter to remove dirt and debris.
Regularly clean your AC air filter by removing it from the unit and gently vacuuming or washing it with mild detergent and water. Allow it to dry completely before reinstalling.
Step 5: Clean the air filter
Now that you have inspected the air filter and determined that it can be cleaned, it’s time to proceed with the cleaning process. There are two common methods you can choose from: vacuuming the air filter or rinsing it with water. Let’s explore both options:
Option 1: Vacuum the air filter:
This method is suitable for air filters that have light to moderate dust and debris buildup. Here’s how to vacuum the air filter:
1. Set up your vacuum cleaner:
Attach the brush attachment to your vacuum cleaner. Ensure that the vacuum cleaner is clean and free of dirt and debris that could potentially be released back into the air.
2. Place the filter on a stable surface:
Find a clean and stable surface to place the air filter on. This can be a table, countertop, or even a clean floor area. Ensure that the surface is free of any contamination that could stick to the filter.
3. Gently vacuum the surface:
Using the brush attachment, gently vacuum the surface of the air filter, moving in straight strokes from one end to the other. Be cautious not to apply too much pressure, as this could damage the filter material. The vacuum will help remove loose dirt and debris from the filter.
4. Flip and repeat:
Once you have vacuumed one side of the air filter, carefully flip it over and repeat the process on the other side. Ensure that you cover the entire surface of the filter.
Option 2: Rinse the air filter:
This method is suitable for air filters with heavier dirt and debris buildup. Here’s how to rinse the air filter:
1. Prepare a cleaning solution (optional):
If desired, you can prepare a mild cleaning solution by diluting a small amount of detergent with water. However, make sure to check the manufacturer’s recommendations, as some filters may not require any cleaning solution.
2. Rinse the filter with water:
Take the air filter and rinse it with water. Use a gentle stream of water from a sink faucet or a garden hose. Direct the water flow in the opposite direction from the airflow arrow marked on the filter. This helps to dislodge and remove dirt and debris from the filter material.
3. Repeat if necessary:
If the filter is still dirty after the initial rinse, repeat the process until the water runs clear and the filter appears clean.
After cleaning the air filter using one of the above methods, you’re ready to move on to the next step: drying the air filter.
Option 1: Vacuum the air filter
If your air filter has a light to moderate buildup of dust and debris, you can choose to clean it by vacuuming. This method is quick and effective, ensuring that your filter remains in good condition. Here’s a step-by-step guide on how to vacuum the air filter:
1. Set up your vacuum cleaner:
Start by attaching the brush attachment to your vacuum cleaner. Before beginning the process, make sure that the vacuum cleaner is clean and free from any dirt or debris that could be released back into the air.
2. Prepare a clean and stable surface:
Find a suitable area to clean the air filter, such as a table, countertop, or even a clean section of the floor. Ensure that the surface is stable and free from any contaminants that might end up sticking to the filter.
3. Gently vacuum the filter’s surface:
Take the air filter and place it on the stable surface. Using the brush attachment on your vacuum cleaner, gently vacuum the surface of the air filter. Move the vacuum cleaner in straight strokes from one end of the filter to the other. Be careful not to apply too much pressure, as this could damage the filter material.
4. Flip and repeat the process:
Once you have vacuumed one side of the air filter, carefully flip it over and repeat the process on the other side. Make sure to cover the entire surface of the filter, removing any loose dirt and debris.
By vacuuming the air filter, you effectively remove the accumulated dust and debris, allowing for improved airflow and filtration. This method is especially useful for filters with a lighter buildup of dirt. However, if you have a heavily soiled filter, it may be more effective to rinse it with water, which we will discuss in Option 2.
After vacuuming the air filter, you can proceed to the next step: drying the filter before reinstalling it into your AC unit.
Option 2: Rinse the air filter
If your air filter has a heavier buildup of dirt and debris, you can choose to clean it by rinsing it with water. This method is effective in removing stubborn particles and restoring the filter’s functionality. Here’s a step-by-step guide on how to rinse the air filter:
1. Prepare a cleaning solution (optional):
If desired, you can prepare a mild cleaning solution by diluting a small amount of detergent with water. However, check the manufacturer’s recommendations for your specific air filter, as some filters may have specific cleaning requirements and may not need any cleaning solution.
2. Rinse the filter with water:
Start by taking the air filter and rinsing it with water. You can use a gentle stream of water from a sink faucet or a garden hose. Direct the water flow in the opposite direction from the airflow arrow marked on the filter. This helps dislodge and remove dirt and debris from the filter material.
3. Gently agitate the filter:
To remove the dirt and debris more effectively, gently agitate the filter while rinsing it. You can use your hands or a soft-bristle brush to lightly scrub the surface of the filter. Be gentle to avoid damaging the filter material.
4. Repeat if necessary:
If the filter is still dirty after the initial rinse, repeat the process until the water runs clear and the filter appears clean. This ensures that all dirt and debris are thoroughly removed from the filter material.
5. Allow the filter to dry:
After rinsing, it’s essential to let the filter dry completely before reinstalling it. Place the filter on a clean and dry surface or use clean towels to sop up any excess water. Allow the filter to air dry naturally, ensuring that it is completely dry to prevent mold or mildew growth.
By rinsing the air filter, you remove the accumulated dirt and debris more effectively, restoring the filter’s efficiency in trapping pollutants and ensuring good airflow. However, always consult the manufacturer’s guidelines for your particular filter to ensure that rinsing is a suitable cleaning method.
After cleaning and drying the air filter, you can move on to the next step: reinstalling the filter into your AC unit.
Step 6: Dry the air filter
After cleaning the air filter through either vacuuming or rinsing, it is crucial to ensure that the filter is completely dry before reinstalling it into your AC unit. Properly drying the air filter prevents the growth of mold or mildew and ensures optimal performance. Follow these steps to effectively dry the air filter:
1. Remove Excess Water:
If you have rinsed the air filter with water, gently shake the filter to remove any excess water. Be careful not to squeeze or wring the filter, as this could damage the filter material.
2. Place on a Clean Surface:
Find a clean and dry surface to place the air filter on. It could be a clean countertop, a dry towel, or even an elevated surface with good airflow. Ensure that the surface is free from any contaminants that could stick to the filter.
3. Air Dry Naturally:
Allow the air filter to dry naturally. Place it in a well-ventilated area or near a fan to facilitate air circulation. Avoid using artificial heat sources, such as hairdryers or direct sunlight, as they can potentially damage the filter material.
4. Ensure Complete Drying:
It’s important to ensure that the air filter is completely dry before reinstalling it. Depending on the humidity levels and the filter’s thickness, drying times may vary. Generally, it may take a few hours to overnight for the filter to dry thoroughly.
5. Confirm Dryness:
Perform a visual and tactile inspection to confirm that the air filter is completely dry. Gently touch the filter’s surface with clean, dry hands to check for any remaining moisture. If it feels damp or cool to the touch, it needs more time to dry.
By following these steps, you ensure the air filter is fully dry and ready for reinstallation. Taking the time to thoroughly dry the filter helps maintain its integrity and prevents any potential issues that could arise from moisture remaining in the filter. Now that the air filter is dry, you can proceed to the next step: reinstalling the filter into your AC unit.
Step 7: Reinstall the air filter
After cleaning and drying the air filter, it’s time to reinstall it back into your AC unit. Properly reinstalling the filter ensures effective filtration and optimal airflow. Follow these steps to reinstall the air filter:
1. Check the Airflow Direction:
Before reinstalling the air filter, double-check the airflow direction indicated by arrows or markings on the filter itself. It’s important to align the filter correctly to ensure optimal performance.
2. Position the Filter Correctly:
Slide the air filter into the designated slot or compartment, making sure it fits snugly. If your filter has clips or fasteners, secure them in place to hold the filter securely.
3. Replace the Access Panel or Cover:
If you had to remove an access panel or cover to access the air filter, now is the time to replace it. Align the panel or cover properly and use the appropriate screws or clips to secure it in place.
4. Ensure Proper Fit:
Make sure that the access panel or cover is secured tightly. This ensures that the air filter remains in place during the operation of your AC unit and prevents any potential air leaks.
5. Follow Manufacturer’s Guidelines:
Refer to the manufacturer’s instructions or guidelines for any specific recommendations or requirements on how to install the air filter correctly. Different AC units may have unique filter installation methods, so it’s essential to follow the manufacturer’s guidelines for your specific unit.
That’s it! You have successfully reinstalled the air filter back into your AC unit. With the filter in place, you can now proceed to the final step: turning on the AC unit and enjoying the benefits of a clean and efficient air filter.
Step 8: Turn on the AC unit
After reinstalling the air filter, it’s time to turn on your AC unit and enjoy the benefits of a clean and efficient system. Follow these steps to safely and effectively turn on your AC unit:
1. Double-check the Filter Installation:
Before turning on the AC unit, make sure that the air filter has been properly installed. Ensure that it is securely in place and that any access panels or covers have been reattached and fastened correctly.
2. Adjust the Thermostat Settings:
Next, adjust the thermostat to the desired temperature settings. Set it to a comfortable level, ensuring that the AC unit will start cooling when needed. If you had initially turned off the unit during the cleaning process, it’s essential to adjust the thermostat accordingly to activate the cooling function.
3. Turn on the AC Unit:
Locate the main control panel or power switch for your AC unit and turn it on. Depending on your system, you may need to flip a switch, press a button, or adjust a dial to activate the unit. Listen for the sound of the fan or compressor starting, indicating that your AC unit is operational.
4. Monitor the AC Unit:
After turning on the AC unit, monitor its performance for a few minutes to ensure that it is functioning correctly. Observe the airflow and listen for any unusual sounds or vibrations. If you notice any issues or abnormalities, consider contacting a professional HVAC technician for further assistance.
5. Set Up a Maintenance Schedule:
To keep your AC unit running efficiently, it’s important to establish a regular maintenance schedule. Cleaning the air filter is just one aspect of maintaining your HVAC system. Refer to the manufacturer’s instructions or consult with a professional to determine the appropriate frequency for maintenance tasks like filter cleaning and replacement.
By following these steps, you have successfully turned on your AC unit with a clean air filter in place. Enjoy the improved air quality and energy efficiency that come with a properly maintained HVAC system.
Remember to periodically check and clean your air filter, following the recommended schedule, to ensure continued optimal performance. Regular filter maintenance contributes to a healthier and more comfortable indoor environment.
Congratulations on completing the cleaning process and taking steps to maintain your AC system effectively!
Read more: How To Clean Air Conditioning Filter
Conclusion
Cleaning your AC air filter is a simple yet essential task that can greatly benefit your comfort, health, and energy efficiency. By regularly cleaning or replacing your air filter, you improve the air quality in your home, enhance the performance of your AC unit, and save on energy costs. Proper maintenance of your HVAC system, including filter cleaning, also contributes to its longevity and helps maintain its manufacturer’s warranty.
In this comprehensive guide, we have walked you through the step-by-step process of cleaning your AC air filter. From turning off the AC unit to locating and removing the air filter, inspecting and cleaning it, and finally, reinstalling and turning on the AC unit, you now have the knowledge and tools to effectively maintain your filter.
Remember to follow the manufacturer’s guidelines for your specific AC unit and air filter, as well as any safety precautions outlined in the user manual. It’s also important to establish a regular maintenance schedule and adhere to it to ensure the long-term health and efficiency of your HVAC system.
By cleaning your AC air filter, you improve the indoor air quality, enhance energy efficiency, extend the lifespan of your AC unit, and save money on energy bills. Additionally, you contribute to a healthier living environment for yourself and your loved ones.
Take the time to prioritize the maintenance of your AC air filter and enjoy the benefits it brings. With a well-maintained air filter, you can breathe clean, fresh air and keep your home comfortable all year round.
Thank you for following this guide, and we hope you found it informative and helpful. Remember to keep up with regular maintenance to ensure your AC system continues to operate at its best. Stay cool and enjoy the crisp, clean air!
Frequently Asked Questions about How To Clean AC Air Filter
Was this page helpful?
At Storables.com, we guarantee accurate and reliable information. Our content, validated by Expert Board Contributors, is crafted following stringent Editorial Policies. We're committed to providing you with well-researched, expert-backed insights for all your informational needs.


0 thoughts on “How To Clean AC Air Filter”