Articles
How To Roast Almonds On Stove Top
Modified: August 17, 2024
Learn how to easily roast almonds on your stove top with this step-by-step guide. Discover the best techniques and tips in this informative article.
(Many of the links in this article redirect to a specific reviewed product. Your purchase of these products through affiliate links helps to generate commission for Storables.com, at no extra cost. Learn more)
Introduction
Welcome to the world of homemade roasted almonds! Whether you want a nutritious snack, a crunchy topping for salads or desserts, or a flavorful ingredient for your favorite recipes, learning how to roast almonds on the stovetop is a valuable skill to have. Not only does it allow you to control the roasting time and level of desired crunchiness, but it also fills your kitchen with an irresistible aroma.
In this article, we’ll walk you through the step-by-step process of roasting almonds on the stovetop. You don’t need a fancy oven or any special equipment. With just a few basic kitchen tools and a little bit of patience, you’ll be able to achieve golden-brown, perfectly roasted almonds that are sure to impress your friends and family.
Roasting almonds on the stovetop offers a unique advantage over other methods. The direct heat allows for more even and precise roasting, ensuring that each almond gets that satisfying crunch without getting burned. Plus, you have the added benefit of being able to monitor the progress of the roasting almonds in real-time.
Before we jump into the process, let’s gather all the necessary equipment you’ll need to roast almonds on the stovetop.
Key Takeaways:
- Master the art of roasting almonds on the stovetop to achieve perfectly golden-brown, crunchy almonds with a delightful aroma. Enjoy as a snack or elevate your recipes with this simple, rewarding process.
- With just a few basic kitchen tools and a little patience, you can customize the roasting process to achieve the perfect level of crunchiness. Enjoy the cost-effective and convenient option of stovetop roasting for a flavorful, homemade snack.
Read more: How To Cook Beef Roast On Stove Top
Equipment Needed
Roasting almonds on the stovetop requires only a handful of basic kitchen tools. Here’s what you’ll need:
- A heavy-bottomed frying pan or a skillet: Choose a pan with a thick, even bottom to ensure proper heat distribution. A non-stick pan will also come in handy to prevent the almonds from sticking.
- A spatula or wooden spoon: Use this to stir and toss the almonds while they’re roasting.
- A timer: This will help you keep track of the roasting time and prevent the almonds from overcooking.
- A measuring cup: Use this to measure the desired amount of almonds.
- A colander or a cooling rack: You’ll need this to cool the roasted almonds quickly and prevent them from steaming or becoming soggy.
Now that you’ve gathered all the necessary equipment, let’s move on to the step-by-step process of roasting almonds on the stovetop.
Step 1: Prepping Almonds
Before you start roasting almonds on the stovetop, you’ll need to prep them properly. Here’s what you need to do:
- Measure the almonds: Decide on the amount of almonds you want to roast. Keep in mind that they will shrink slightly during the roasting process.
- Rinse and drain the almonds: Place the almonds in a colander and give them a quick rinse under cold water. This will help remove any dust or debris that may have accumulated on the surface. After rinsing, allow the almonds to drain thoroughly.
- Dry the almonds: Once the almonds have drained, gently pat them dry using a clean kitchen towel or paper towels. It’s essential to remove excess moisture, as any remaining water can interfere with the roasting process.
- Optional: Remove the almond skins (optional): If you prefer roasted almonds without the skins, you have the option to remove them before roasting. To do this, blanch the almonds by placing them in boiling water for 1-2 minutes, then immediately transfer them to a bowl of ice water. The skins should easily slip off when you gently pinch the almonds.
By following these preparation steps, you’ll ensure that your almonds are clean, dry, and ready for the roasting process. With your prepped almonds in hand, it’s time to move on to the next step – roasting!
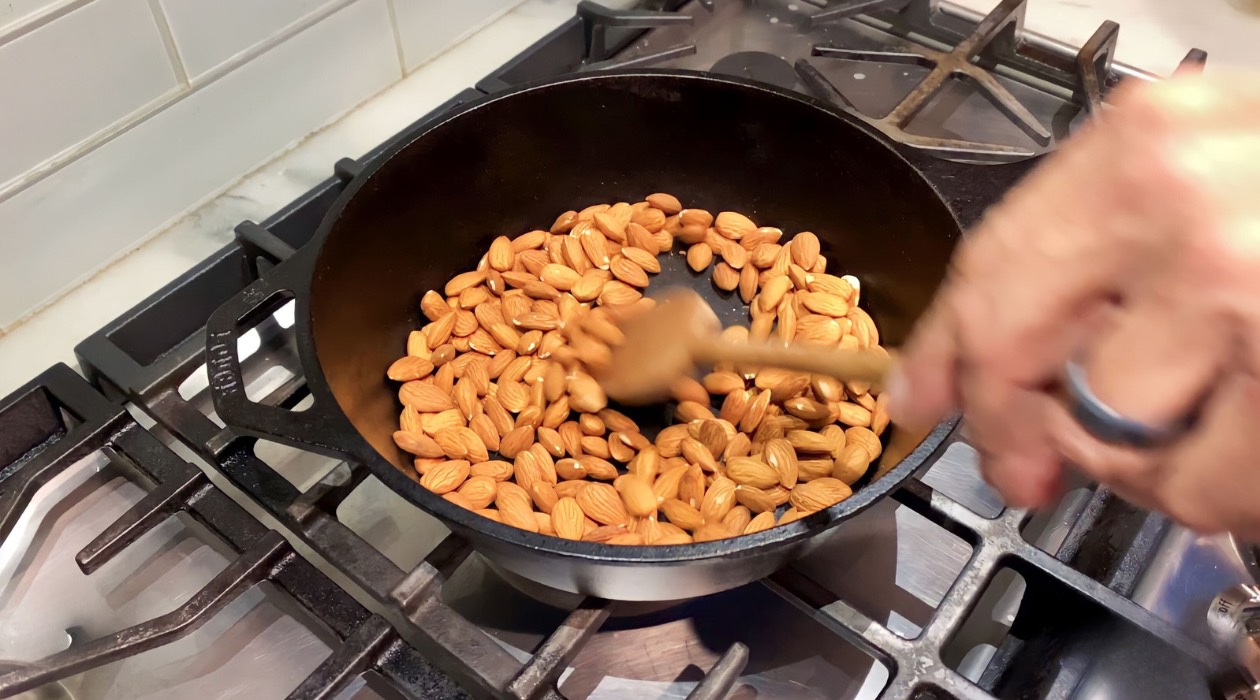
Step 2: Roasting Almonds
Now that your almonds are prepped and ready, it’s time to start the roasting process. Follow these steps to achieve perfectly roasted almonds:
- Heat the pan: Place your heavy-bottomed frying pan or skillet over medium heat. Allow the pan to preheat for a couple of minutes until it’s hot.
- Add the almonds to the pan: Once the pan is hot, add the prepped almonds to it in a single layer. This ensures that each almond receives even heat distribution.
- Stir and toss: Use a spatula or a wooden spoon to stir and toss the almonds continuously. This helps to prevent any hot spots and ensures that the almonds roast evenly on all sides.
- Watch for color change: As the almonds heat up, they will start to change color. Keep a close eye on them and continue stirring to avoid over-roasting or burning. The almonds will progress from a pale yellow to a golden brown color.
- Adjust the heat if needed: If you notice that the almonds are browning too quickly or unevenly, adjust the heat accordingly. Lower the heat if they are browning too quickly, or raise it slightly if they are taking too long to brown.
- Roast until aromatic and golden brown: Continue roasting the almonds, stirring constantly, until they become aromatic and develop a golden brown color. This usually takes around 8-10 minutes, but the timing may vary depending on the heat of your stovetop and the quantity of almonds.
Remember to stay attentive as the almonds roast, as they can go from perfectly golden to burnt in a matter of seconds. Once you achieve the desired color and aroma, it’s time to move on to the next step – testing for doneness.
To roast almonds on the stovetop, heat a dry skillet over medium heat, add the almonds, and stir frequently for 5-7 minutes until they are golden brown and fragrant. Be careful not to burn them.
Step 3: Testing for Doneness
As you approach the end of the roasting process, it’s important to ensure that your almonds are perfectly cooked. Follow these steps to test for doneness:
- Take a sample almond: Using a spoon or a spatula, carefully remove one almond from the pan. Allow it to cool slightly before testing.
- Bite or cut the almond: Take a bite or cut the almond in half to check its texture. It should be crunchy and have a uniformly roasted color throughout, with no visible rawness in the center. If the almond feels soft or has a raw taste, it needs more time to roast.
- Adjust the roast time if needed: If the sample almond is not yet perfectly roasted, continue cooking the remaining almonds for a few more minutes. Keep a close eye on them and test for doneness again as needed.
Remember that the almonds will continue to cook a bit even after you remove them from the heat. So, it’s better to slightly undercook them rather than overcooking and ending up with burnt almonds. Once you’re satisfied with the level of doneness, it’s time to move on to the final step – cooling and storing the roasted almonds.
Read more: How Long To Cook Pork Roast On Stove Top
Step 4: Cooling and Storing
After successfully roasting your almonds, it’s important to cool them properly and store them to maintain their freshness and crunchiness. Follow these steps to cool and store your roasted almonds:
- Transfer the almonds: Using a spatula or a spoon, transfer the hot roasted almonds to a colander or a cooling rack. This allows air to circulate around the almonds and helps them cool down faster.
- Avoid stacking or overcrowding: Spread the almonds out in a single layer, allowing space between them. This prevents them from steaming or becoming soggy as they cool.
- Allow the almonds to cool completely: Let the roasted almonds sit undisturbed until they have cooled completely. This can take up to 30 minutes depending on the ambient temperature.
- Store in an airtight container: Once cooled, transfer the roasted almonds to an airtight container to preserve their freshness. A glass jar or a resealable plastic bag works well for this purpose.
- Label and date the container: To keep track of the freshness of the roasted almonds, label the container with the date of roasting. This will help you ensure that you consume them within a reasonable time frame.
- Store in a cool, dry place: Place the airtight container of roasted almonds in a cool, dry area of your pantry or cupboards. Avoid exposing them to heat or direct sunlight, as this can cause the almonds to become rancid and lose their crunchiness.
Proper cooling and storage of your roasted almonds will help them retain their delicious flavor and crunch for an extended period. Enjoy them as a snack, add them to your favorite recipes, or share them with family and friends!
Conclusion
Roasting almonds on the stovetop is a simple yet rewarding process that allows you to enjoy the delightful crunch and rich flavor of homemade roasted almonds. With just a few basic kitchen tools and a little bit of patience, you can achieve perfectly roasted almonds that can be enjoyed as a snack or used to enhance a variety of recipes.
By following the step-by-step process outlined in this article, you can master the art of roasting almonds on the stovetop. Prepping the almonds, carefully roasting them, testing for doneness, and properly cooling and storing the roasted almonds are all essential steps to ensure the best possible outcome.
Not only is roasting almonds on the stovetop a cost-effective and convenient option, but it also allows you to have more control over the roasting process. You can adjust the cooking time and level of crunchiness according to your preference, resulting in a customized roasted almond experience.
So why wait? Start experimenting with roasting almonds on your stovetop and discover the joy of creating your own perfectly roasted, flavorful, and crunchy snacks. Whether you’re enjoying them on their own, incorporating them into recipes, or sharing them with loved ones, these homemade roasted almonds are sure to satisfy your cravings and impress your taste buds.
So roll up your sleeves, gather your ingredients, and create a batch of delicious roasted almonds that will tantalize your senses and make your kitchen smell absolutely divine.
Frequently Asked Questions about How To Roast Almonds On Stove Top
Was this page helpful?
At Storables.com, we guarantee accurate and reliable information. Our content, validated by Expert Board Contributors, is crafted following stringent Editorial Policies. We're committed to providing you with well-researched, expert-backed insights for all your informational needs.


0 thoughts on “How To Roast Almonds On Stove Top”