Articles
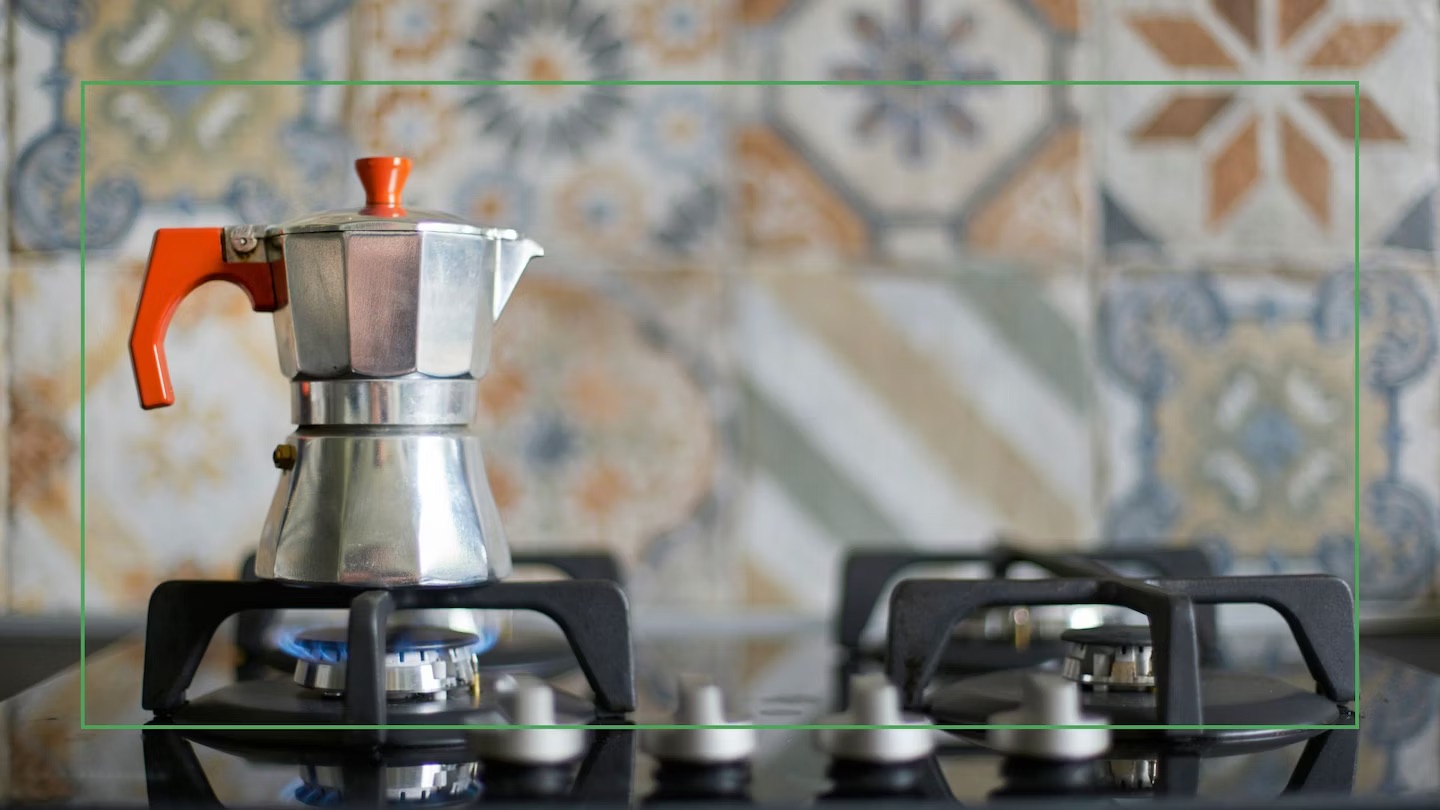
How To Make Espresso With Stove Top
Modified: January 6, 2024
Learn how to make espresso with a stove top method in this informative article. Discover step-by-step instructions and expert tips for brewing the perfect cup of espresso at home.
(Many of the links in this article redirect to a specific reviewed product. Your purchase of these products through affiliate links helps to generate commission for Storables.com, at no extra cost. Learn more)
Introduction
Welcome to the world of espresso! There’s nothing quite like the rich, bold flavor and aroma of a perfectly brewed shot of espresso. While you may be accustomed to getting your daily fix from your local coffee shop, did you know that you can easily make espresso right at home using a stove top espresso maker? Whether you’re a beginner eager to learn the art of espresso brewing or a seasoned coffee aficionado looking for a new method, this guide will walk you through the steps to make espresso with a stovetop espresso maker.
Stovetop espresso makers, also known as Moka pots, have been in use for over a century and are a popular choice for brewing espresso in many households. These compact and affordable devices are designed to produce strong and flavorful espresso without the need for more expensive espresso machines. With a little practice and the right technique, you can enjoy a delicious cup of espresso in the comfort of your own kitchen.
In this article, we will explore the step-by-step process of making espresso with a stovetop espresso maker, from grinding the coffee beans to serving up a perfect shot. We will also provide helpful tips and tricks along the way to ensure you achieve the best possible results.
So, get ready to embark on a coffee adventure as we dive into the wonderful world of stovetop espresso brewing. Grab your favorite coffee beans, prepare your stovetop espresso maker, and let’s get started!
Key Takeaways:
- Brewing espresso with a stovetop espresso maker is a delightful journey that requires attention to detail, from grinding the beans to savoring the rich flavors. With practice, you can become your own barista and enjoy the convenience of homemade espresso.
- The art of making espresso at home involves mastering the equipment, perfecting the grind size, and controlling the brewing process. Embrace the adventure of crafting your own barista-quality espresso and relish in the satisfaction of a well-brewed cup.
Read more: How To Make A Stove Top Distiller
Equipment needed
Before you can begin making espresso with a stovetop espresso maker, it’s important to gather all the necessary equipment. Here’s a list of what you’ll need:
- Stovetop espresso maker: Also known as a Moka pot, this is the main tool you’ll be using to brew espresso. It consists of three parts: the bottom chamber for water, the middle filter basket for ground coffee, and the top chamber for the brewed espresso.
- Coffee grinder: Opt for a burr grinder if possible, as it will ensure a consistent grind size. Freshly ground coffee is vital to achieving the best flavor in your espresso.
- Coffee beans: Choose high-quality coffee beans specifically suited for espresso brewing. Look for beans labeled as espresso blend or dark roast.
- Filtered water: Using filtered water will improve the taste of your espresso by removing any impurities or off-flavors.
- Stove or heat source: You’ll need a heat source, such as a stovetop burner, to heat the water and brew the espresso.
- Hot pad or towel: Since the stovetop espresso maker can become hot during the brewing process, it’s a good idea to have a heat-resistant pad or towel to handle the pot safely.
- Demitasse cups or espresso shot glasses: These small cups are perfect for serving espresso and enjoying its concentrated flavor.
- Optional accessories: While not essential, you might consider having a tamper, a milk frother for cappuccinos or lattes, and a scale for precise coffee bean measurements.
Now that you have all the necessary equipment ready, it’s time to move on to the next step: grinding the coffee beans.
Step 1: Grinding the coffee beans
The first step in making espresso with a stovetop espresso maker is to grind the coffee beans. Grinding your beans just before brewing ensures maximum freshness and flavor in your espresso.
For stovetop espresso makers, you’ll want a fine to medium-fine grind size. This allows for proper extraction of the flavors without resulting in a bitter or over-extracted brew. If the grind is too coarse, the water will pass through too quickly and result in weak espresso. If the grind is too fine, it can clog the filter and make the brewing process difficult.
If you have a coffee grinder with adjustable settings, set it to a medium-fine setting. If you don’t have a grinder, you can purchase pre-ground espresso coffee, but keep in mind that the flavor may not be as fresh as freshly ground beans.
Measure the appropriate amount of coffee beans for your desired number of servings. As a general guideline, use about 1 tablespoon of coffee grounds per 1 ounce of water. Adjust the measurements to your taste preferences.
Once you’ve measured the coffee beans, it’s time to grind them. Place the beans in the grinder, close the lid securely, and grind until you achieve the desired grind size. If using a manual grinder, it may require a bit of arm strength and a few turns of the handle to achieve the desired consistency.
After grinding, transfer the coffee grounds to a clean, airtight container to preserve freshness until you’re ready to brew. Do not leave them exposed to air for too long, as this can cause the aroma and flavor to deteriorate.
With the coffee beans freshly ground, you’re now prepared to move on to the next step: preparing the stovetop espresso maker.
Step 2: Preparing the stovetop espresso maker
Now that you have freshly ground coffee beans, it’s time to prepare the stovetop espresso maker for brewing. This step ensures that the brewing process goes smoothly and that you achieve the best results.
Begin by disassembling the stovetop espresso maker. Separate the bottom chamber (water chamber), the middle filter basket (coffee chamber), and the top chamber (espresso chamber).
Now, inspect the various components and make sure everything is clean and free of any leftover coffee residue or debris. It’s important to maintain cleanliness to prevent any off-flavors in your espresso.
Next, fill the bottom chamber with fresh, cold filtered water. Be mindful not to exceed the safety valve inside the chamber to avoid any potential pressure issues during brewing. It’s recommended to fill the water chamber up to just below the valve.
Once the water chamber is filled, place the middle filter basket on top of it. This is the chamber where you’ll be adding your coffee grounds.
Before adding the coffee grounds, ensure that the rubber gasket or seal is properly positioned on the filter basket. This is crucial to create a tight seal and prevent any leaks or espresso grounds from getting into the brewed coffee.
With the rubber gasket in place, it’s time to add your freshly ground coffee into the filter basket. Use a spoon or your fingers to level the coffee grounds, but avoid compacting them too tightly as this can impede the brewing process.
Once you have added the coffee grounds, ensure that the rim of the filter basket is clean and free of any coffee grounds. This helps to create a proper seal when assembling the stovetop espresso maker.
Now, before moving on to the next step, wipe the bottom chamber and the rim of the filter basket to remove any excess moisture or coffee grounds. A clean and dry surface promotes a better seal and a more efficient brewing process.
The stovetop espresso maker is now prepared and ready for assembly. In the next step, we will learn how to add water and coffee to the stovetop espresso maker for brewing the espresso.
Step 3: Adding water and coffee
Now that your stovetop espresso maker is prepared, it’s time to add water and coffee to begin the brewing process. This step is crucial in achieving a flavorful and balanced shot of espresso.
Start by placing the filter basket with the coffee grounds onto the bottom chamber of the espresso maker. Ensure that it fits snugly and securely in place.
Next, fill the bottom chamber with cold, filtered water. Be careful not to exceed the maximum fill line indicated on the inside of the chamber. It’s essential to use the right amount of water to prevent any uneven extraction or overflow.
When adding water, it’s recommended to use pre-heated water rather than cold water. Pre-heating the water helps to maintain a more consistent brewing temperature, leading to better extraction and a more flavorful espresso.
Fill the bottom chamber with water just up to the release valve or just below the valve, depending on the design of your stovetop espresso maker. Be cautious not to cover the release valve with water, as it serves as a safety feature to regulate pressure.
Now that you have added water, it’s time to close the stovetop espresso maker by screwing the top chamber onto the bottom chamber. Make sure to screw it tightly but do not overtighten, as this can make it difficult to open after brewing.
Before placing the stovetop espresso maker on the stove, give it a quick wipe to remove any water or coffee grounds spills on the exterior. This will ensure a clean and safe brewing process.
With the water and coffee grounds in place, you’re now ready to move on to the next step: assembling the stovetop espresso maker for brewing.
When making espresso with a stovetop espresso maker, make sure to use finely ground coffee and pack it tightly into the filter basket to ensure a strong and flavorful brew.
Read more: How To Use A Stove Top Espresso Maker
Step 4: Assembling the stovetop espresso maker
Now that you have added water and coffee to the stovetop espresso maker, it’s time to assemble all the components and get ready for brewing. Proper assembly ensures that the brewing process goes smoothly and that you achieve the best possible results.
To start, double-check that the top chamber of the stovetop espresso maker is securely screwed onto the bottom chamber. Make sure it is tightened but not overly tight, as this can make it difficult to separate the chambers after brewing.
Next, it’s important to ensure that the valves in the stovetop espresso maker are clean and free from any obstructions. Check that the pressure release valve, also known as the safety valve, is clear and not blocked by any debris. This valve helps regulate the pressure inside the espresso maker during the brewing process.
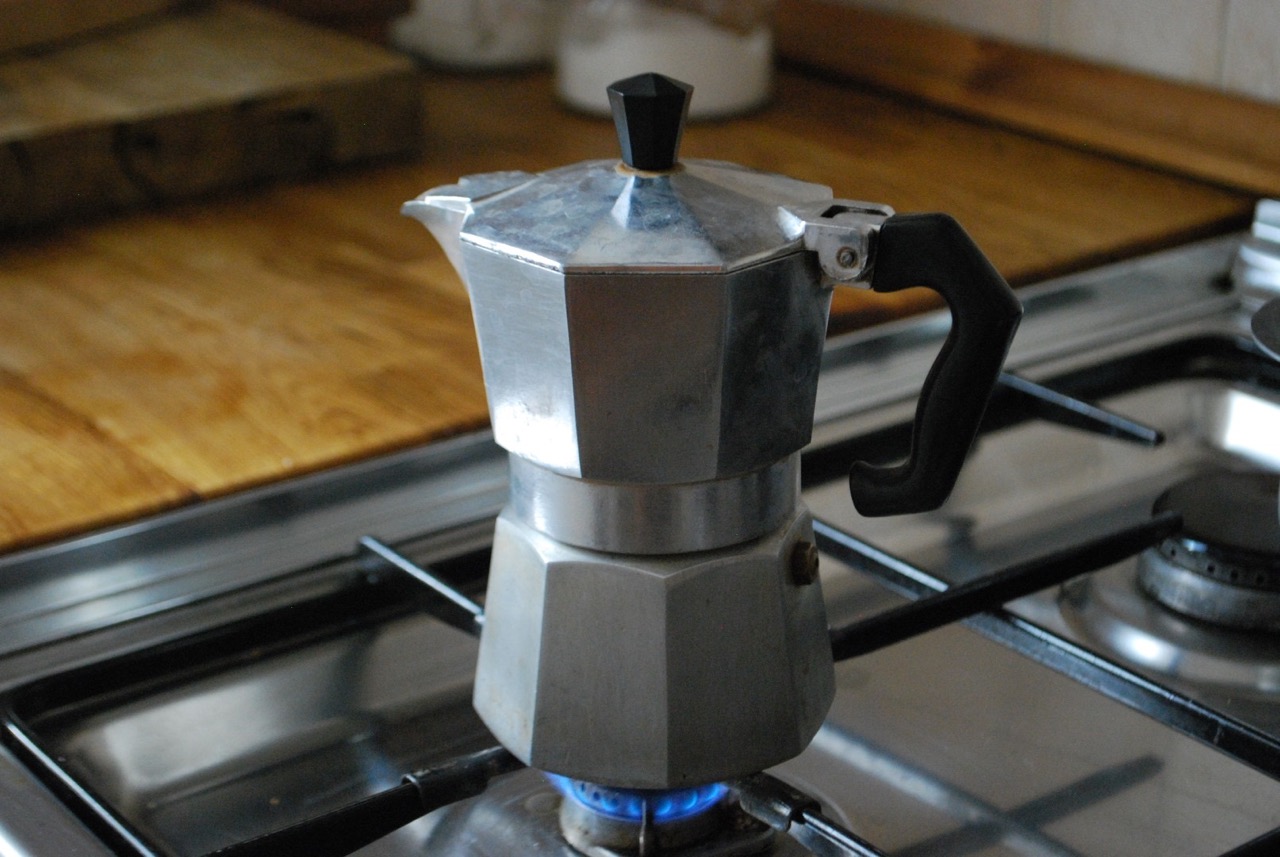
Now, place the fully assembled stovetop espresso maker onto a heat source such as a stove burner. Make sure to match the size of the heat source with the base of the pot to ensure even heat distribution.
Position the pot on the burner so that the handle is away from direct heat. This will prevent the handle from becoming too hot and ensure safe handling during and after brewing.
Before turning on the heat, make sure that the pot is centered on the burner and stable. This will help to distribute heat evenly and prevent any potential accidents.
With the stovetop espresso maker in position, it’s time to heat it up and start brewing the espresso. In the next step, we will explore the process of brewing the espresso and extracting that delicious flavor from the coffee grounds.
Step 5: Brewing the espresso
Now that your stovetop espresso maker is assembled and positioned on the heat source, it’s time to start brewing the espresso. This step is where the magic happens as the water heats up, creates steam, and pushes it through the coffee grounds to extract the rich flavors and aromas.
Begin by turning on the heat to medium-low. It’s important to use a gentle heat setting to prevent the espresso from being brewed too quickly, which can result in a bitter taste.
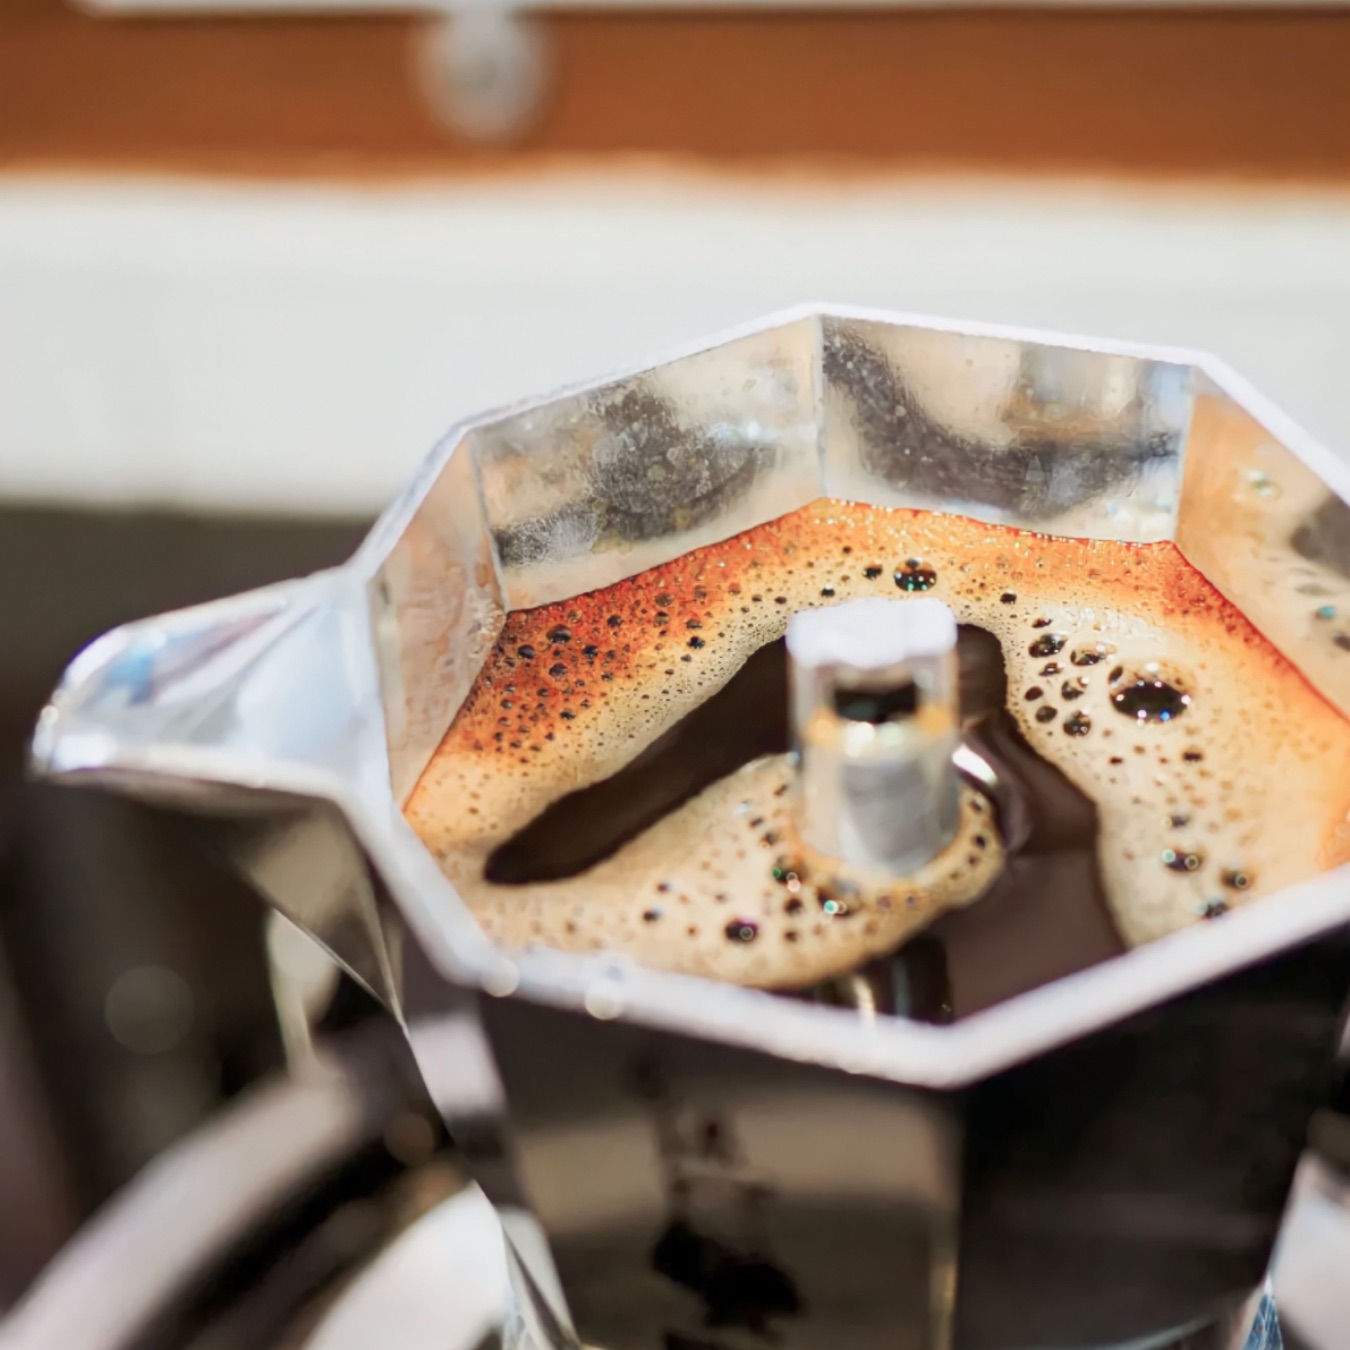
As the heat is applied, the water in the bottom chamber will slowly reach its boiling point and start generating steam. The steam will create pressure, pushing the hot water up through the coffee grounds in the filter basket and into the top chamber, where it collects as brewed espresso.
At this point, keep an eye on the espresso maker as the brewing process unfolds. You’ll notice that the espresso starts to fill the top chamber. It’s important not to let it boil for too long as it can over-extract the flavors and lead to a bitter taste.
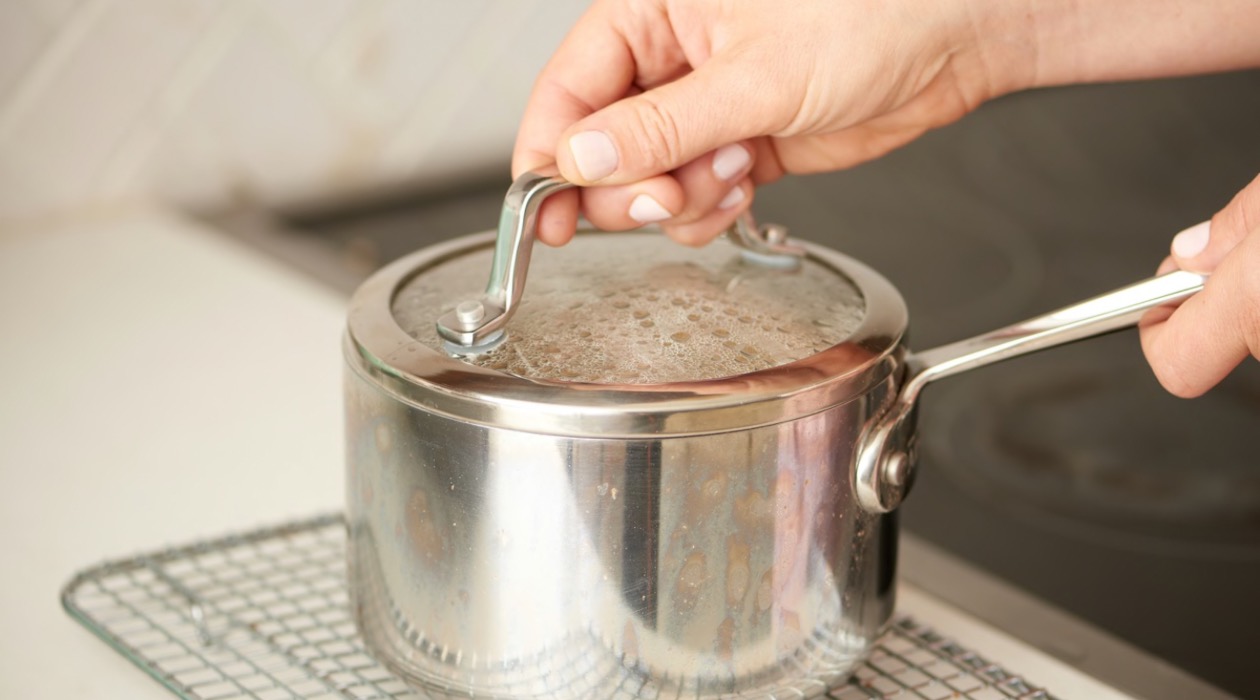
Once you see the espresso filling the top chamber and hear a sputtering sound, it’s time to remove the stovetop espresso maker from the heat source. This indicates that most of the water has been pushed through the coffee grounds, and further brewing may result in over-extraction.
Using caution, use a towel or oven mitts to hold the stovetop espresso maker firmly and carefully transfer it to a cool surface. Placing it on a heat-resistant pad or a folded towel can help protect your countertop.
Allow the stovetop espresso maker to sit for a minute or two. This short resting period allows the espresso to settle and ensures that the flavors fully develop before serving.
With the brewing process complete, it’s time to move on to the final step: serving and enjoying your homemade espresso.
Step 6: Serving and enjoying your espresso
Congratulations! You’ve successfully brewed your espresso using a stovetop espresso maker. Now, it’s time to indulge in the rich flavors and aromas of your homemade creation.
To serve your espresso, carefully unlock and separate the top chamber from the bottom chamber of the stovetop espresso maker. Be cautious as the top chamber may still be hot, so use a towel or oven mitts to handle it safely.
Once separated, you’ll see the beautifully brewed espresso in the top chamber. Give it a gentle stir using a spoon or a stirring stick to ensure that any concentrated flavors are evenly dispersed.
Now, it’s time to pour the espresso into your demitasse cups or espresso shot glasses. Espresso is typically served in small, 1-2 ounce cups, as its concentrated nature allows for a more intense and enjoyable flavor experience.
If desired, you can also add a touch of foam or frothed milk to your espresso to create popular coffee drinks like cappuccinos or lattes. This can be achieved using a milk frother or by manually frothing milk using a separate container and a whisk.
As you savor every sip of your espresso, take note of its aroma, body, and taste. Appreciate the nuanced flavors and the efforts you put into brewing your own espresso at home.
Remember, practice makes perfect when it comes to brewing espresso with a stovetop espresso maker. Don’t be discouraged if your first attempt isn’t as perfect as you imagined. With time, you’ll discover your preferred grind size, brewing time, and coffee-to-water ratio to achieve your ideal espresso.
Now that you’ve learned the art of making espresso with a stovetop espresso maker, you can enjoy the convenience and satisfaction of creating your own espresso-based beverages whenever you desire.
So, sit back, relax, and relish in the delightful experience of sipping on your homemade, barista-quality espresso.
Cheers to your brewing success!
Conclusion
Making espresso with a stovetop espresso maker is a rewarding and enjoyable process that allows you to brew delicious coffee right in the comfort of your own home. With the right equipment, proper technique, and a little practice, you can achieve barista-quality espresso that rivals your favorite coffee shop.
In this guide, we explored the step-by-step process of making espresso with a stovetop espresso maker. From grinding the coffee beans to assembling and brewing the espresso, each step plays a crucial role in ensuring a flavorful and satisfying cup of espresso.
Remember, the key to a great espresso lies in using high-quality coffee beans, grinding them to the appropriate size, properly preparing the stovetop espresso maker, and controlling the brewing process to achieve the desired taste and strength.
By following the steps outlined in this guide and making small adjustments according to your personal preferences, you’ll be able to create espresso that suits your taste perfectly.
So, next time you’re craving a cup of rich, aromatic espresso, skip the trip to the coffee shop and put your stovetop espresso maker to good use. Experiment with different coffee blends, try out new brewing techniques, and don’t forget to enjoy the process along the way.
Now, go ahead and impress your friends and family with your newfound barista skills. Whether you’re starting your day with a strong espresso shot or treating yourself to a velvety cappuccino, you can take pride in the fact that you brewed it yourself.
So, grab your stovetop espresso maker, get those coffee beans ready, and let the aromatic journey begin. Cheers to the joys of homemade espresso!
Frequently Asked Questions about How To Make Espresso With Stove Top
Was this page helpful?
At Storables.com, we guarantee accurate and reliable information. Our content, validated by Expert Board Contributors, is crafted following stringent Editorial Policies. We're committed to providing you with well-researched, expert-backed insights for all your informational needs.


0 thoughts on “How To Make Espresso With Stove Top”