Articles
How To Sharpen Outdoor Hand Tools
Modified: December 7, 2023
Learn how to sharpen your outdoor hand tools with our informative articles. Enhance the longevity and performance of your tools for a more efficient gardening experience.
(Many of the links in this article redirect to a specific reviewed product. Your purchase of these products through affiliate links helps to generate commission for Storables.com, at no extra cost. Learn more)
Introduction
Outdoor hand tools play a crucial role in maintaining and enhancing the beauty of our gardens and landscapes. From spades and shovels to pruners and axes, these tools help us tackle a wide range of outdoor tasks. However, over time, these tools can become dull and blunt, making them ineffective and difficult to use. That’s where sharpening comes in.
Sharpening outdoor hand tools is an essential maintenance task that ensures their optimal performance. Whether you’re a gardening enthusiast or a professional landscaper, knowing how to sharpen your tools properly can make a world of difference in your outdoor projects. Not only does sharpening improve cutting efficiency, but it also prolongs the lifespan of your tools, saving you money in the long run.
In this article, we will discuss the importance of sharpening outdoor hand tools and provide a step-by-step guide on how to sharpen them effectively. Whether you’re new to gardening or a seasoned pro, these tips and techniques will help you keep your tools in top shape, making your outdoor tasks more enjoyable and efficient.
So, gather your tools and let’s dive into the world of sharpening outdoor hand tools!
Key Takeaways:
- Regularly sharpening outdoor hand tools improves cutting efficiency, reduces strain, prevents plant damage, extends tool lifespan, and ensures safer use, making gardening tasks more efficient and enjoyable.
- Proper maintenance, including cleaning, lubrication, and regular touch-ups, is essential for keeping outdoor hand tools sharp, efficient, and ready for any gardening task.
Read more: Who Sharpens Hand Tools In Winchester Va
Why Sharpening Outdoor Hand Tools is Important
Sharpening outdoor hand tools may seem like a tedious and time-consuming task, but it is a vital part of maintaining a functional and efficient garden tool collection. Here are a few reasons why sharpening is important:
- Improved Cutting Efficiency: A sharp tool cuts through materials with ease, requiring less force and effort. When your outdoor hand tools are sharp, you can achieve cleaner cuts, making your gardening tasks more efficient and precise.
- Reduced Strain and Fatigue: Dull tools are not only ineffective but also require more effort to use. By sharpening your hand tools, you can reduce the strain on your muscles and joints, preventing fatigue and discomfort during long gardening sessions.
- Prevention of Plant Damage: Dull blades can crush and tear plant materials instead of making clean cuts. This can lead to unnecessary damage and stress to your plants, making them more susceptible to disease and pests. By keeping your tools sharp, you minimize the risk of plant damage and promote healthier growth.
- Longevity of Tools: Regular sharpening helps to maintain the integrity of your outdoor hand tools. By removing nicks, burrs, and dull edges, you prevent further damage and extend the lifespan of your tools. This saves you money in the long run by avoiding frequent replacements.
- Safety: Dull tools are more likely to slip or bounce off their intended target, posing a safety risk to both you and your surroundings. Sharp tools, on the other hand, provide better control and stability, reducing the risk of accidents and injuries during use.
Now that you understand the importance of sharpening your outdoor hand tools, let’s move on to the tools you will need to get started!
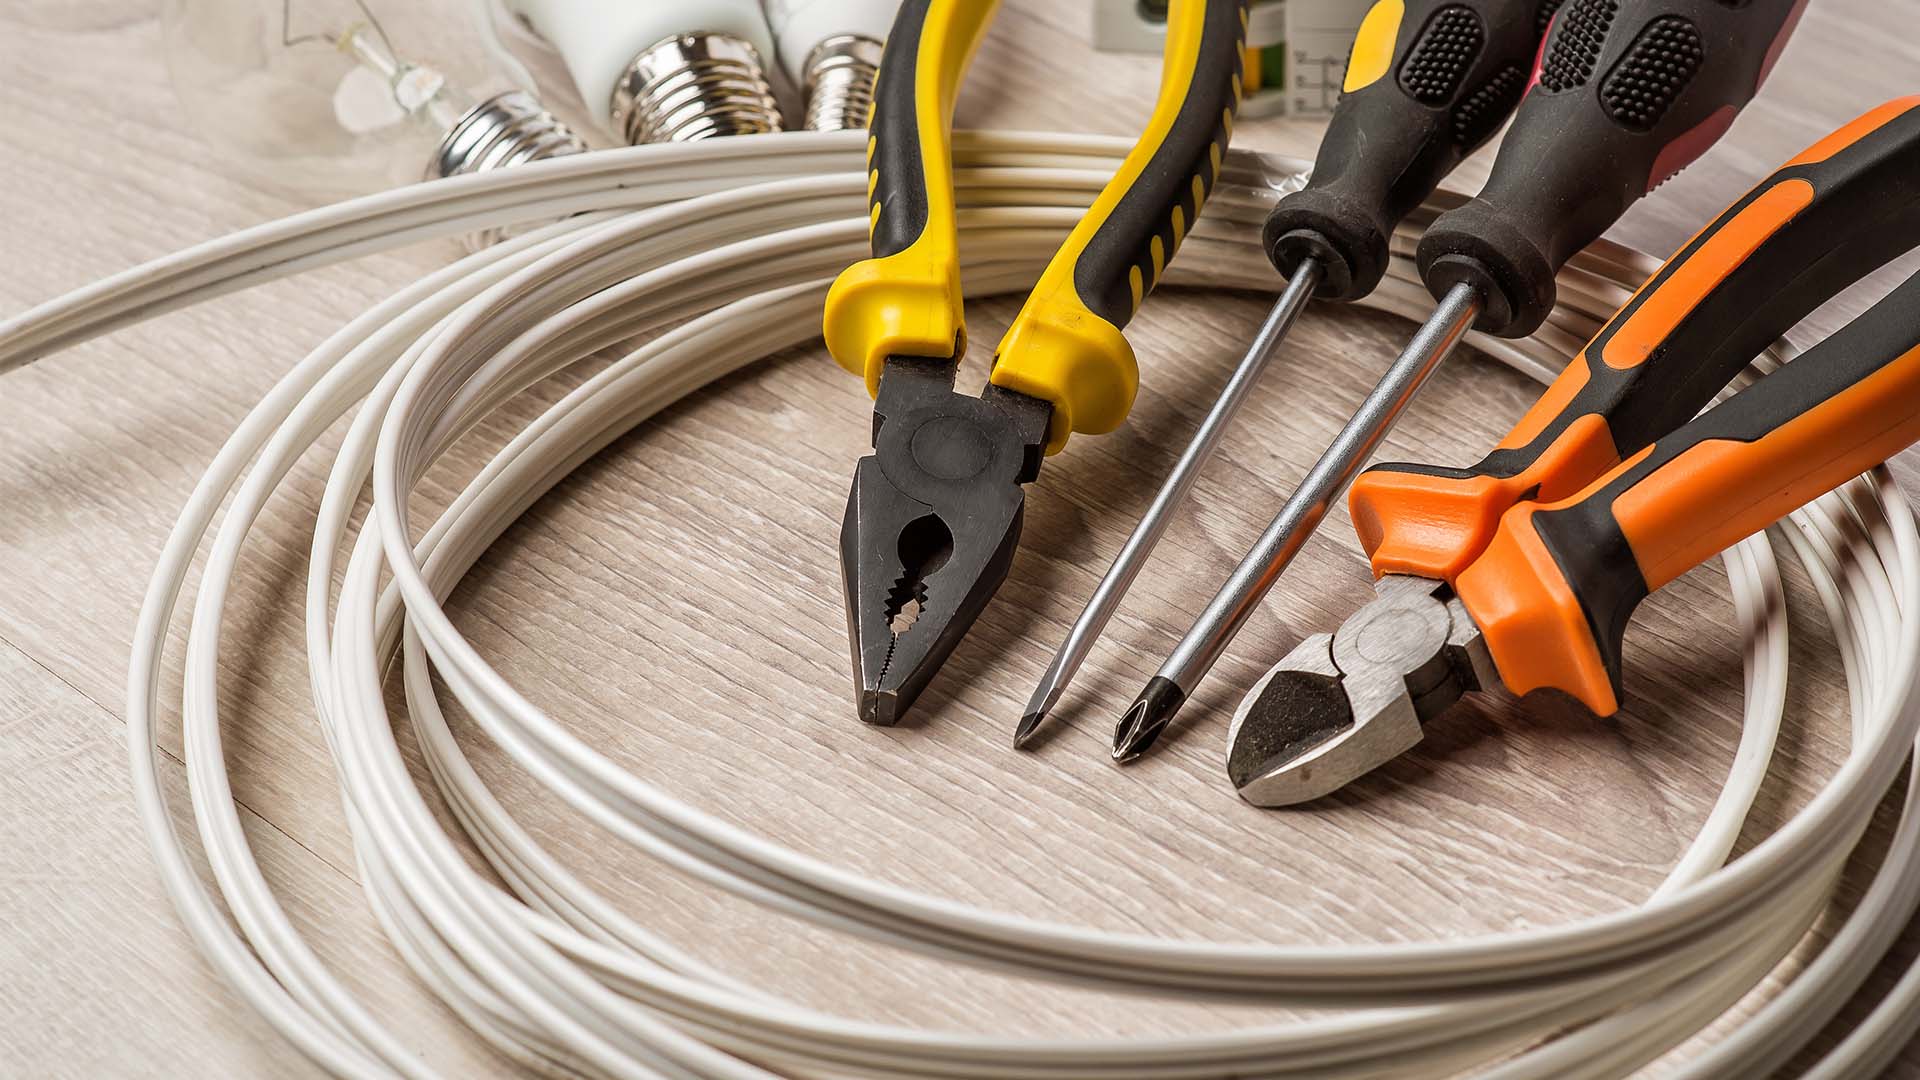
Tools You Will Need
Before you begin sharpening your outdoor hand tools, it’s essential to gather the necessary tools and equipment. Here’s a list of items you will need:
- Sharpening Stone: Choose a sharpening stone with a grit suitable for the type of tool you are sharpening. Coarse grit stones (around 200-400) are ideal for reshaping damaged or heavily dulled edges, while medium (800-1200) and fine (2000-3000) grit stones are used for finer sharpening and honing.
- File: A file is useful for sharpening larger tools with wider edges, such as axes and shovels. Choose a file with a suitable size and coarseness depending on the condition of your tool.
- Sharpening Guide: A sharpening guide is a helpful tool for maintaining consistent sharpening angles. It attaches to the blade and ensures that you maintain a consistent angle during the sharpening process.
- Honing Oil or Water: When sharpening with a stone, you will need a lubricant to keep the stone and the blade lubricated. Honing oil or water can help reduce friction and prevent overheating of the blade.
- Protective Gear: While sharpening your tools, it’s important to protect yourself. Wear safety goggles to shield your eyes from any metal filings or debris. Additionally, consider wearing gloves to protect your hands from sharp edges.
- Cleaning Tools: Before sharpening, it’s crucial to clean your tools thoroughly. Gather a stiff brush, mild soap, and water to remove any debris, rust, or dirt that may hinder the sharpening process.
- Rags or Towels: Keep some rags or towels handy to wipe away excess oil or water, keeping your workspace clean and preventing any slipping accidents.
Once you have gathered the necessary tools and equipment, you’re ready to start sharpening your outdoor hand tools. In the next section, we’ll provide a step-by-step guide to help you through the process.
Step-by-Step Guide to Sharpening Outdoor Hand Tools
Sharpening your outdoor hand tools may seem daunting at first, but with the right approach, it can be a straightforward and rewarding process. Follow these steps to sharpen your tools effectively:
- Inspecting and Cleaning the Tools: Before sharpening, examine your tools for any signs of damage or excessive wear. Look for chips, nicks, or rust. If there is any dirt or debris on the tool, use a stiff brush, mild soap, and water to clean it thoroughly. Dry the tools completely before proceeding.
- Choosing the Right Sharpening Method: Different tools require different sharpening methods. For smaller hand tools like pruners, loppers, and shears, a sharpening stone is generally the best option. Larger tools such as axes, shovels, and hoes may require a file or grinder for efficient sharpening.
- Sharpening Techniques for Different Tools: Let’s explore specific sharpening techniques for common outdoor hand tools:
- Sharpening a Garden Spade: Secure the spade in a vice or hold it firmly on a solid surface. Use a file or sharpening stone to remove any nicks or dull edges along the cutting edge. Maintain a consistent angle (usually around 20-30 degrees) and apply even pressure as you move the file or stone along the edge.
- Sharpening Pruners and Loppers: Disassemble the pruning tool and inspect the blades for any damage. Use a sharpening stone to gently file away any nicks or burrs, maintaining the original beveled edge. Repeat the process on both blades, ensuring they are equally sharp.
- Sharpening a Shovel: Similar to sharpening a spade, secure the shovel in a vice or hold it firmly on a solid surface. Use a file or sharpening stone to remove any nicks or dull edges along the shovel’s cutting edge. Apply even pressure and maintain a consistent angle as you work along the edge.
- Sharpening a Hoe: Place the hoe on a solid surface and use a file or sharpening stone to remove any nicks or dull areas on the cutting edge. Maintain a consistent angle and apply even pressure as you work along the edge. Repeat the process on both sides of the hoe.
- Sharpening an Axe: Secure the axe in a vice or place it on a sturdy surface at a comfortable working height. Use a file or grinder to remove any chips or dull edges on the blade. Maintain a consistent bevel angle (usually around 20 degrees) and work along the edge, applying even pressure.
- Tips for Maintaining Sharpness: To keep your outdoor hand tools sharp for longer, here are a few tips to follow:
- Regularly inspect and clean your tools after each use to prevent debris build-up.
- Store your tools in a dry and protected area to avoid exposure to moisture.
- Apply a thin layer of oil or lubricant to the blades to prevent rust and corrosion.
- Sharpen your tools at the first sign of dullness to maintain their cutting efficiency.
- Use proper cutting techniques and avoid forcing the tool through tough materials, as this can quickly dull the blade.
By following these steps and implementing maintenance tips, you can ensure that your outdoor hand tools are sharp and ready for any gardening task. With properly sharpened tools, you’ll enjoy more efficient and enjoyable gardening experiences.
So, roll up your sleeves and start sharpening those outdoor hand tools to unleash their true potential!
Inspecting and Cleaning the Tools
Before you begin the sharpening process, it’s essential to thoroughly inspect and clean your outdoor hand tools. This step ensures that you have a clear understanding of their condition and helps in achieving optimal sharpening results. Here’s a step-by-step guide:
- Remove any dirt or debris: Use a stiff brush to remove any dirt, mud, or debris from the tool’s surface. Pay attention to crevices, joints, and hard-to-reach areas where debris may accumulate.
- Inspect for damage: Carefully examine the tool for any signs of damage, such as chips, bends, cracks, or excessive wear. Identifying and addressing these issues before sharpening will ensure that the tool performs effectively and safely.
- Check for rust: Rust can hinder the sharpening process and compromise the integrity of the tool. Look for rust spots on the blade or other metal components. If you find any, use a mild soap and water to gently scrub away the rust. Dry the tool thoroughly afterwards.
- Assess the blade alignment: Ensure that the blade is properly aligned with the handle or shaft. If there is any misalignment or looseness, consider tightening or adjusting the tool according to the manufacturer’s instructions.
- Inspect the cutting edge: Carefully examine the cutting edge of the tool, such as the blade or cutting surface. Look for nicks, burrs, or dull areas that need to be addressed during the sharpening process.
- Determine the sharpening method: Depending on the type of tool and the condition of the blade, you may choose to use a sharpening stone, file, grinder, or other appropriate tools. Assess the tool’s sharpening needs and select the method that will yield the best results.
Once you have thoroughly inspected and cleaned your tools, you’re ready to move on to the next step – choosing the right sharpening method. By taking the time to prepare your tools properly, you set the foundation for a successful sharpening process and ensure the longevity and effectiveness of your outdoor hand tools.
Read more: How To Sharpen Garden Shears
Choosing the Right Sharpening Method
When it comes to sharpening outdoor hand tools, there are various methods to choose from. The right method depends on the type of tool you’re sharpening and the condition of the blade. Here are some common sharpening methods and when to use them:
- Sharpening Stone: A sharpening stone, also known as a whetstone, is a versatile tool suitable for sharpening a wide range of outdoor hand tools. It comes in different grits, which determine the coarseness of the stone. Coarse grit stones (around 200-400) are ideal for reshaping heavily dulled edges and removing large nicks. Medium (800-1200) and fine (2000-3000) grit stones are used for finer sharpening and honing.
- File: A file is an excellent tool for sharpening larger tools with wider cutting edges, such as axes and shovels. Files come in various shapes, with flat or round profiles. Choose a file with a suitable size and coarseness depending on the condition of the tool.
- Grinder: For heavy-duty sharpening and significant reshaping of blades, a grinder can be a useful tool. Grinders use high-speed rotating wheels or stones to remove material quickly. Keep in mind that grinders can generate a lot of heat, so use caution and ensure the blade stays cool during the sharpening process.
- Sharpening Jigs and Guides: These tools provide a secure and consistent sharpening angle. They attach to the blade and guide the motion of the sharpener, ensuring that you maintain a precise angle throughout the sharpening process. Sharpening jigs and guides are especially useful for maintaining a consistent bevel on tools with complex blade shapes.
- Electric Sharpeners: Electric sharpeners are convenient and efficient for quick touch-ups and maintenance sharpening. They are equipped with motor-driven abrasive belts or grinding wheels that make sharpening quick and easy.
When choosing the right sharpening method, consider the type of tool, the level of damage or dullness, and your own experience and comfort level with the chosen method. It’s always a good idea to refer to the manufacturer’s instructions or seek guidance from experts if you’re unsure about the appropriate sharpening method for a particular tool.
Now that you have chosen the right sharpening method for your tools, you can proceed to the next step – sharpening techniques specific to each tool. We’ll explore these techniques in detail in the following section.
Sharpening Techniques for Different Tools
Each outdoor hand tool requires a specific sharpening technique to achieve optimal results. Here are sharpening techniques for common tools:
3.1 Sharpening a Garden Spade:
Secure the spade in a vice or hold it firmly on a solid surface. Use a file or sharpening stone to remove any nicks or dull edges along the cutting edge. Maintain a consistent angle (usually around 20-30 degrees) and apply even pressure as you move the file or stone along the edge. Start at the base of the blade, near the handle, and work your way towards the tip.
3.2 Sharpening Pruners and Loppers:
Disassemble the pruners or loppers and inspect the blades for any damage. Use a sharpening stone to gently file away any nicks or burrs, ensuring that you maintain the original beveled edge. Hold the stone at a slight angle, matching the existing bevel, and make small, controlled strokes along the edge. Repeat the process on both blades, ensuring that they are equally sharp.
3.3 Sharpening a Shovel:
Secure the shovel in a vice or hold it firmly on a solid surface. Use a file or sharpening stone to remove any nicks or dull edges along the shovel’s cutting edge. Apply even pressure and maintain a consistent angle as you work along the edge. Start at the base of the blade and move towards the tip, using long, sweeping motions. Take care to maintain the original bevel angle of the shovel.
3.4 Sharpening a Hoe:
Place the hoe on a solid surface and use a file or sharpening stone to remove any nicks or dull areas on the cutting edge. Maintain a consistent angle and apply even pressure as you work along the edge. Start at one edge of the hoe and move towards the other, using smooth, even strokes. Repeat the process on both sides of the hoe until the cutting edge is sharp and free of imperfections.
3.5 Sharpening an Axe:
Secure the axe in a vice or place it on a sturdy surface at a comfortable working height. Use a file or grinder to remove any chips or dull edges on the blade. Maintain a consistent bevel angle (usually around 20 degrees) and work along the edge, applying even pressure. Start at one end of the blade and move towards the other, using smooth, controlled strokes. Periodically cool the axe blade with water to prevent overheating.
Remember to refer to the manufacturer’s guidelines or seek expert advice if you are unsure about the specific sharpening technique for a particular tool. Practice proper safety measures, such as wearing gloves and safety goggles, during the sharpening process to protect yourself from accidents and injuries.
In the next section, we’ll explore some tips for maintaining the sharpness of your outdoor hand tools, ensuring they stay in top condition for future use.
1 Sharpening a Garden Spade
A garden spade is an essential tool for digging and cultivating soil in your garden. Over time, the cutting edge of the spade can become dull, making it less efficient and effective. Sharpening your garden spade will not only improve its cutting ability but also make your garden tasks easier and more enjoyable. Here’s a step-by-step guide on how to sharpen a garden spade:
- Secure the spade: Begin by securing the spade firmly in a vice or holding it securely on a solid surface. This will provide stability and control while sharpening the blade.
- Inspect the blade: Take a close look at the cutting edge of the spade. Identify any nicks, burrs, or dull areas that need to be addressed during the sharpening process. It’s important to assess the condition of the blade before proceeding.
- Choose the sharpening tool: Depending on your preference and the condition of the blade, you can use either a file or a sharpening stone to sharpen the garden spade. A file is suitable for removing larger nicks and reshaping the edge, while a sharpening stone is effective for honing and refining the cutting edge.
- Apply lubrication: Before you start sharpening, it’s a good idea to apply a thin layer of honing oil or water to the cutting edge of the spade. This will reduce friction and prevent excessive heat buildup during the sharpening process.
- Position the file or sharpening stone: Hold the file or sharpening stone at a consistent angle against the cutting edge of the spade. The recommended angle is usually around 20 to 30 degrees. Maintaining a consistent angle is crucial for achieving a sharp and even edge. You can use a sharpening guide or visually estimate the angle while sharpening.
- Sharpen the cutting edge: Start at one end of the cutting edge and work your way towards the other end. Apply even pressure and move the file or sharpening stone across the blade in smooth, controlled strokes. Repeat this motion several times, ensuring that you cover the entire cutting edge. Be mindful of the angle and pressure to maintain a uniform edge along the entire length of the spade.
- Check and refine: After sharpening, carefully inspect the cutting edge to ensure that it appears sharp and free of any imperfections. If necessary, make further passes with the file or sharpening stone to refine the edge and remove any remaining dull areas or burrs.
- Clean and protect: Once you are satisfied with the sharpness of the spade, clean off any residual oil or debris. Wipe down the blade with a clean cloth or towel to remove excess lubrication. Consider applying a thin layer of oil or rust protectant to prevent corrosion and keep the blade in good condition.
By following these steps, you can sharpen your garden spade and restore its cutting ability. Remember to exercise caution while sharpening and wear appropriate protective gear, such as gloves and safety goggles. With a sharpened spade, you’ll be ready to tackle your gardening tasks efficiently and with ease.
In the next section, we’ll explore the process of sharpening pruners and loppers.
Read more: How To Hand Form Body Panels With Hand Tools
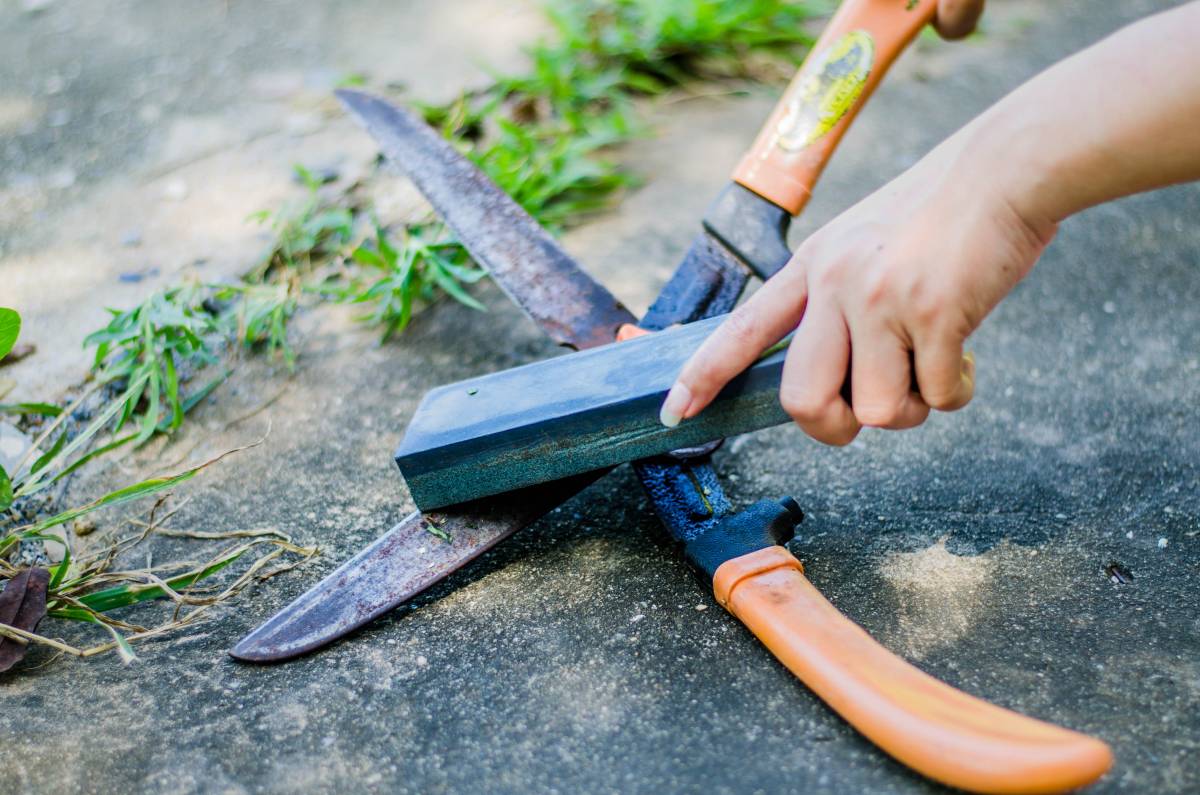
2 Sharpening Pruners and Loppers
Pruners and loppers are indispensable tools for maintaining the health and appearance of your plants. Over time, the blades of these tools can become dull, resulting in less clean and precise cuts. Sharpening your pruners and loppers will not only improve their performance but also promote the overall health of your plants. Here’s a step-by-step guide on how to sharpen pruners and loppers:
- Disassemble the tool: Start by disassembling your pruners or loppers. Typically, this involves removing the retaining bolt or screw that holds the two blades together. Follow the manufacturer’s instructions to safely disassemble your specific tool. This step will allow you to access and sharpen the individual blades more effectively.
- Inspect the blades: Examine the blades for any signs of nicks, burrs, or dullness. It’s essential to identify and address any blade imperfections before proceeding with the sharpening process. If there is any rust present, clean it off using a mild solution of soap and water.
- Choose the sharpening tool: Depending on personal preference, you can use either a sharpening stone or a file to sharpen pruners and loppers. A sharpening stone is an excellent choice for maintaining the original beveled edge, while a file is useful for removing larger nicks or reshaping the blade.
- Secure the first blade: Grip the first blade firmly, either in a vice or with a workbench clamp, ensuring that the sharpening area is accessible. This will provide stability and control during the sharpening process.
- Sharpen the beveled edge: Hold the sharpening stone or file against the beveled edge of the blade. Maintain a consistent angle, typically around 20 degrees, and make smooth, controlled strokes along the cutting edge. Start at the base of the blade and work towards the tip, applying even pressure as you sharpen. Repeat this motion several times, covering the entire length of the blade.
- Repeat for the second blade: After sharpening the first blade, securely hold the second blade and repeat the sharpening process. Ensure that both blades are equally sharp for optimal cutting performance.
- Inspect and refine: Once you have sharpened both blades, inspect them to ensure they are free of burrs and have a clean, sharp edge. If necessary, make further passes with the sharpening stone or file to refine the cutting edge and remove any remaining dull areas or imperfections.
- Reassemble the tool: After sharpening, carefully clean off any debris or lubrication from the blades. Follow the manufacturer’s instructions to safely reassemble the tool, ensuring that the blades are aligned properly and the retaining bolt or screw is securely tightened.
By following these steps, you can effectively sharpen your pruners and loppers, restoring their cutting efficiency and ensuring clean and precise cuts. Remember to exercise caution while sharpening and wear appropriate protective gear, such as gloves and safety goggles. With sharp and well-maintained pruners and loppers, you’ll be able to care for your plants with ease and precision.
In the next section, we’ll explore the process of sharpening a shovel.
3 Sharpening a Shovel
A shovel is an essential tool for digging, lifting, and moving soil. Over time, the cutting edge of a shovel can become dull and less efficient. Sharpening your shovel will not only make your gardening tasks easier but also extend the life of your tool. Here’s a step-by-step guide on how to sharpen a shovel:
- Secure the shovel: Begin by securing the shovel in a vice or holding it firmly on a solid surface. This will provide stability and control while sharpening the blade.
- Inspect the blade: Examine the blade of the shovel for any nicks, dents, or dull edges. Identifying any imperfections will help you determine the amount of sharpening needed.
- Choose the sharpening tool: Depending on personal preference, you can use a file, sharpening stone, or handheld grinder to sharpen the shovel. A file or sharpening stone is suitable for general maintenance, while a grinder can be used for more significant reshaping or repair.
- Apply lubrication: Before you start sharpening, it’s a good idea to apply a thin layer of honing oil or water to the cutting edge of the shovel. This will reduce friction and prevent excessive heat buildup during the sharpening process.
- Position the file or sharpening stone: Hold the file or sharpening stone at a consistent angle against the cutting edge of the shovel. The recommended angle is usually between 20 and 30 degrees. Maintaining a consistent angle is crucial for achieving a sharp and even edge.
- Sharpen the cutting edge: Start at one end of the cutting edge and work your way towards the other end. Apply even pressure and move the file or sharpening stone across the blade in smooth, controlled strokes. Repeat this motion several times, ensuring that you cover the entire cutting edge of the shovel.
- Check and refine: After sharpening, carefully inspect the cutting edge to ensure that it appears sharp and free of any imperfections. If necessary, make further passes with the file or sharpening stone to refine the edge and remove any remaining dull areas or burrs.
- Clean and protect: Once you are satisfied with the sharpness of the shovel, clean off any residual oil or debris. Wipe down the blade with a clean cloth or towel to remove excess lubrication. Consider applying a thin layer of oil or rust protectant to prevent corrosion and keep the blade in good condition.
By following these steps, you can sharpen your shovel and restore its cutting ability. Remember to exercise caution while sharpening and wear appropriate protective gear, such as gloves and safety goggles. With a sharpened shovel, you’ll be able to tackle your gardening tasks efficiently, making digging and moving soil a breeze.
In the next section, we’ll explore the process of sharpening a hoe.
When sharpening outdoor hand tools, use a file or sharpening stone to maintain a consistent angle and remove any nicks or burrs. Always wear gloves and eye protection for safety.
4 Sharpening a Hoe
A hoe is a versatile tool used for cultivating soil, removing weeds, and shaping garden beds. Over time, the blade of a hoe can become dull and less effective. Sharpening your hoe will improve its cutting ability, making your gardening tasks more efficient. Here’s a step-by-step guide on how to sharpen a hoe:
- Position the hoe: Start by placing the hoe on a solid surface, such as a workbench or concrete floor. Ensure that it is stable and won’t move during the sharpening process.
- Inspect the blade: Examine the blade of the hoe for any nicks, dents, or dull areas. Identifying any imperfections will help you determine the extent of sharpening required.
- Choose the sharpening tool: For sharpening a hoe, a file or sharpening stone is usually the best choice. These tools allow you to remove nicks and restore the sharpness of the blade.
- Apply lubrication: Before you begin sharpening, it’s a good idea to apply a thin layer of oil or water to the cutting edge of the hoe. This will reduce friction and prevent excessive heat buildup during the sharpening process.
- Position the file or sharpening stone: Hold the file or sharpening stone at a consistent angle against the cutting edge of the hoe. The recommended angle is usually between 20 and 30 degrees. Maintaining a consistent angle is crucial for achieving a sharp and even edge.
- Sharpen the cutting edge: Start at one end of the cutting edge and work your way towards the other end. Apply even pressure and move the file or sharpening stone along the blade in smooth, controlled strokes. Repeat this motion several times, ensuring that you cover the entire cutting edge of the hoe.
- Check and refine: After sharpening, carefully inspect the cutting edge to ensure that it appears sharp and free of any imperfections. If necessary, make further passes with the file or sharpening stone to refine the edge and remove any remaining dull areas or burrs.
- Clean and protect: Once you are satisfied with the sharpness of the hoe, clean off any residual oil or debris. Wipe down the blade with a clean cloth or towel to remove excess lubrication. Consider applying a thin layer of oil or rust protectant to prevent corrosion and keep the blade in good condition.
By following these steps, you can sharpen your hoe and restore its cutting ability. Remember to exercise caution while sharpening and wear appropriate protective gear, such as gloves and safety goggles. With a sharpened hoe, you’ll be able to tackle your gardening tasks more efficiently, making the cultivation and weeding process easier and more effective.
In the next section, we’ll explore the process of sharpening an axe.
5 Sharpening an Axe
An axe is a powerful tool used for chopping wood, splitting logs, and completing various outdoor tasks. Over time, the blade of an axe can become dull, making it less effective and requiring more effort from the user. Sharpening your axe will restore its cutting ability and make your woodcutting tasks more efficient. Here’s a step-by-step guide on how to sharpen an axe:
- Secure the axe: Begin by securing the axe in a vice or placing it on a sturdy surface at a comfortable working height. This will ensure stability and safety during the sharpening process.
- Inspect the blade: Examine the blade of the axe for any nicks, dents, or dull areas. Identifying these imperfections will help determine the extent of sharpening required.
- Choose the sharpening tool: For sharpening an axe, a file or grinder is commonly used. A file is effective for removing nicks and reshaping the cutting edge, while a grinder can be used for more significant reshaping or repair.
- Protective gear: Wear gloves and safety goggles to protect yourself from any flying sparks, debris, or potential hazards during the sharpening process.
- Secure the grinding tool: If using a grinder, ensure that it is firmly secured or mounted according to the manufacturer’s instructions. Make sure the grinder’s wheel is suitable for sharpening axes and in good condition.
- Start sharpening: Hold the axe securely with both hands and firmly press the bit or cutting edge against the grinder wheel or file. Maintain a consistent angle, usually around 20 degrees, as you move the axe back and forth along the edge. Apply even pressure to achieve a uniform and sharp cutting edge.
- Test the edge: After sharpening, carefully run your finger gently along the blade to check for sharpness. Be cautious and avoid applying excessive pressure to prevent any accidental cuts. The blade should feel sharp to the touch, without any dull spots or imperfections.
- Remove burrs: After sharpening, use a honing stone or sandpaper to remove any burrs or rough edges along the blade. This step will help smoothen the edge for a clean and effective cut.
- Clean and protect: Once you are satisfied with the sharpness of the axe, clean off any debris or oil residue from the blade. Apply a thin coat of oil to protect the metal and prevent rusting. Store the axe in a dry environment to maintain its sharpness.
By following these steps, you can sharpen your axe and ensure its cutting ability is restored. Remember to exercise caution while sharpening and secure the axe properly to prevent accidents. With a sharp and well-maintained axe, you’ll have a reliable tool for all your woodcutting needs.
In the next section, we’ll explore some tips for maintaining the sharpness of your outdoor hand tools.
Tips for Maintaining Sharpness
Proper maintenance is key to keeping your outdoor hand tools sharp and in optimal condition. By following these tips, you can extend the lifespan of your tools and ensure they stay sharp for longer:
- Regularly inspect and clean your tools: After each use, inspect your tools for any signs of damage, such as nicks, chips, or rust. Clean them thoroughly with soap and water to remove any debris, sap, or dirt that may have accumulated. Dry the tools completely before storing them.
- Store tools in a dry environment: Moisture can lead to rust and corrosion, which can dull the blades of your tools. Store them in a dry area, such as a shed or garage, to protect them from humidity and dampness.
- Apply a thin layer of lubrication: After cleaning, apply a thin coat of oil or lubricant to the blades of your tools. This helps prevent rust and keeps the blades moving smoothly. Be sure to wipe off any excess oil before using the tools.
- Sharpen at the first sign of dullness: Pay attention to how your tools perform. If you notice a decrease in cutting efficiency or clean cutting ability, it’s time to sharpen them. Avoid using dull tools, as this can cause unnecessary strain and damage to both the tools and your plants.
- Use proper cutting techniques: Use your tools in a way that minimizes stress on the blades. Avoid excessive force or twisting motions that can cause the blades to twist or chip. Cut with clean, controlled motions to maintain the sharpness of the blades.
- Protect and store tools properly: When not in use, protect your tools by storing them in toolboxes, sheaths, or protective covers. This helps prevent accidental damage and keeps the blades from coming into contact with other objects that could dull them.
- Regularly inspect handles and connections: In addition to blade maintenance, regularly check the handles and connections of your tools for any signs of wear or damage. Loose or damaged handles can affect the performance and safety of your tools, so repair or replace them as needed.
- Keep tools sharp with touch-ups: As you work, occasionally check the sharpness of your tools. If you notice a slight decrease in cutting ability, use a sharpening stone or file to quickly touch up the blades. Regular touch-ups will prolong the time between major sharpening sessions.
- Seek professional help if needed: If you’re unsure about sharpening a particular tool or if it requires significant repair, it’s best to seek the help of a professional. They can provide expert guidance and ensure your tools are sharpened and maintained correctly.
By incorporating these maintenance tips into your routine, you can keep your outdoor hand tools sharp, efficient, and ready for any gardening task. Proper maintenance not only saves you time and effort but also ensures the longevity of your tools, making them a valuable long-term investment.
Now that you have learned how to maintain sharpness, you can confidently tackle your outdoor projects with sharp and reliable tools.
Is there anything else I can assist you with?
Conclusion
Sharpening outdoor hand tools is a crucial part of maintaining their performance and effectiveness. By regularly sharpening your tools, you can improve cutting efficiency, reduce fatigue and strain on your body, prevent plant damage, and prolong the lifespan of your tools. With the right tools and techniques, sharpening can be a straightforward and rewarding process.
In this article, we discussed the importance of sharpening outdoor hand tools and provided a step-by-step guide for sharpening different tools. We explored techniques for sharpening a garden spade, pruners and loppers, a shovel, a hoe, and an axe. Each tool requires specific sharpening methods to achieve optimal results.
We also provided tips for maintaining the sharpness of your tools, including regularly inspecting and cleaning them, storing them properly in a dry environment, applying lubrication, and using proper cutting techniques. By following these tips and incorporating them into your maintenance routine, you can extend the lifespan of your tools and ensure they are always ready for use.
Remember, safety should always be a top priority. Wear protective gear such as gloves and safety goggles when sharpening your tools to prevent accidents and injuries.
So, whether you’re a seasoned gardener or a novice enthusiast, sharpening your outdoor hand tools is a skill that will greatly benefit your gardening experience. With sharp and well-maintained tools, you’ll be able to tackle any outdoor task with ease, efficiency, and confidence.
Now it’s time to roll up your sleeves, gather your tools, and embark on the journey of sharpening your outdoor hand tools. Happy gardening!
Frequently Asked Questions about How To Sharpen Outdoor Hand Tools
Was this page helpful?
At Storables.com, we guarantee accurate and reliable information. Our content, validated by Expert Board Contributors, is crafted following stringent Editorial Policies. We're committed to providing you with well-researched, expert-backed insights for all your informational needs.


0 thoughts on “How To Sharpen Outdoor Hand Tools”