Articles
How To Remove A Tire With Hand Tools
Modified: December 7, 2023
Learn the step-by-step process to remove a tire using only hand tools in this informative article. Find out the essential tools and techniques for a successful tire removal.
(Many of the links in this article redirect to a specific reviewed product. Your purchase of these products through affiliate links helps to generate commission for Storables.com, at no extra cost. Learn more)
Introduction
When it comes to taking care of your vehicle, knowing how to remove a tire with hand tools is a valuable skill. Whether you find yourself with a flat tire on a remote road or simply need to change a tire in your garage, being able to do so without relying on a professional can save you time, money, and stress.
In this article, we will guide you through the step-by-step process of removing a tire using only hand tools. You don’t need to be a car expert or have access to complicated machinery – all you need are a few basic tools and a little bit of patience. By following these instructions, you’ll be well-equipped to handle any tire troubles that come your way.
Before we dive into the step-by-step process, let’s quickly go over the hand tools you’ll need to gather before getting started.
Key Takeaways:
- Master the art of removing a tire with hand tools by following a step-by-step process, empowering you to handle unexpected tire changes confidently and independently, saving time, money, and stress.
- Prioritize safety, practice tire changes in a controlled setting, and keep your spare tire in good condition to ensure smooth and hassle-free tire changes when needed, enabling safe travels and confident handling of tire-related issues.
Read more: How To Remove A Broken Bolt With Hand Tools
Step 1: Gather the necessary hand tools
Before you can start removing a tire with hand tools, it’s essential to gather all the necessary equipment. Here are the key tools you’ll need:
- Lug wrench: This tool is specifically designed to loosen and tighten the lug nuts on your vehicle’s wheels. It usually has a cross or L-shaped design, providing the leverage needed to turn the nuts.
- Jack: A jack is used to lift the vehicle off the ground, allowing you to easily remove the tire. It’s crucial to choose a jack that is suitable for your vehicle’s weight and type. Consult your vehicle’s manual for the recommended jack specifications.
- Spare tire: Ensure you have a properly inflated spare tire that matches the specifications of the tires on your vehicle. It’s essential to regularly check the spare tire’s condition and tire pressure to ensure it’s ready for use when needed.
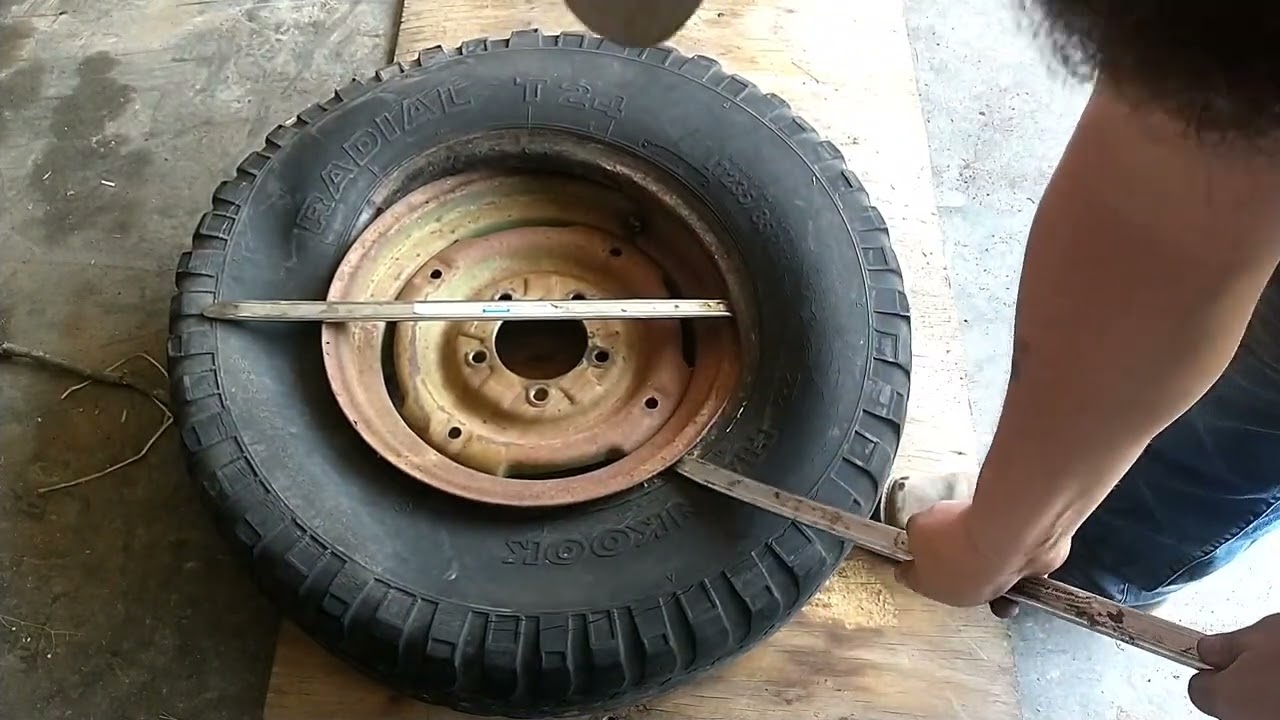
- Tire iron: A tire iron, also known as a pry bar or tire lever, is a handy tool for removing the tire from the wheel. It helps in prying the tire off the rim and can be a valuable tool if the tire is stubborn or stuck.
- Gloves: While not necessarily a tool, wearing protective gloves is highly recommended. They provide a better grip and protect your hands from any sharp edges or dirt that may be present while handling the tire.
Once you have gathered all the necessary tools, you’ll be ready to proceed to the next steps of removing the tire.
Remember, always exercise caution and follow safety procedures when working with hand tools. Safety should be your top priority throughout the entire process.
Step 2: Loosen the lug nuts
Now that you have all the necessary tools, it’s time to start removing the tire. The first step is to loosen the lug nuts that secure the tire to the wheel. Follow these steps:
- Locate the lug nuts: The lug nuts are typically found at the center of the wheel, holding the tire in place. They are usually circular in shape and can range from four to six or more, depending on the vehicle.
- Position the lug wrench: Take the lug wrench and fit it onto one of the lug nuts. Ensure that the wrench is securely placed over the nut to avoid slipping.
- Loosen the lug nuts: Apply force in a counterclockwise direction to loosen the lug nuts. Use your hands or the foot of the lug wrench for extra leverage if needed. It’s essential to loosen the nuts but not fully remove them just yet.
- Repeat for all lug nuts: Move around the wheel, repeating the process for each lug nut. Loosen them gradually, working in a diagonal pattern. This helps to prevent the wheel from tilting or becoming misaligned.
By loosening the lug nuts before lifting the vehicle, you make it easier to remove the tire once the vehicle is raised. This is because the tire won’t spin or rotate while you’re trying to loosen the nuts.
Once you have successfully loosened all the lug nuts, you’re ready to move on to the next step: jacking up the vehicle.
Step 3: Jack up the vehicle
With the lug nuts loosened, it’s time to jack up the vehicle to create enough clearance to remove the tire. Follow these steps:
- Locate the jacking points: Every vehicle has designated jacking points, which are reinforced areas underneath the vehicle’s chassis. Consult your vehicle’s manual to determine the correct jacking points.
- Position the jack: Place the jack on the ground and position it under the designated jacking point. Ensure that the jack is aligned properly and securely in place.
- Pump the jack: Use the jack’s handle or lever to pump it up. Gradually raise the vehicle until it is high enough to provide sufficient clearance for tire removal. Avoid exceeding the maximum recommended height specified by the jack’s manufacturer.
- Stabilize the vehicle: Once the vehicle is lifted, it’s important to stabilize it to prevent any accidental movements. Place wheel chocks or blocks behind the tires that are not being removed to ensure stability.
Always take extra precautions when working with a jack to ensure your safety. Make sure the vehicle is on a stable and level surface, and never place any part of your body underneath the vehicle while it is lifted.
Once the vehicle is securely jacked up, you can proceed to the next step: removing the lug nuts and the tire.
Step 4: Remove the lug nuts and the tire
Now that the vehicle is safely lifted, it’s time to remove the lug nuts and take off the tire. Follow these steps:
- Completely remove the lug nuts: Using your hands, unscrew and remove each lug nut from the wheel. Set them aside in a safe place where they won’t roll away or get lost.
- Remove the tire: With the lug nuts off, grab the tire firmly with both hands, gripping it on opposite sides. Wiggle the tire gently while pulling it towards you to loosen it from the wheel hub.
- Remove the tire completely: Once the tire is loose, carefully lift it off the wheel hub and set it aside. Make sure to place it on a stable surface, avoiding any direct contact with the ground to prevent damage.
Removing the tire can sometimes require a bit of strength, especially if it’s been on the vehicle for an extended period or if it’s stuck due to rust or other factors. If you encounter resistance, you can use a tire iron or a rubber mallet to gently tap the backside of the tire to help loosen it.
It’s also worth noting that some vehicles may have hubcaps or wheel covers that need to be removed before accessing the lug nuts. If your vehicle has these, carefully pry off the hubcaps using a flathead screwdriver or a tool specifically designed for the task.
Once the lug nuts are removed and the tire is off, you’re ready to move on to the next step: installing the spare tire.
When removing a tire with hand tools, always loosen the lug nuts before lifting the vehicle off the ground. This will prevent the wheel from spinning while you try to loosen the nuts.
Read more: How To Remove Tree Stump With Hand Tools
Step 5: Install the spare tire
Now that the old tire has been removed, it’s time to install the spare tire. Follow these steps:
- Align the spare tire: Take the spare tire and align it with the wheel hub. Ensure that the holes on the wheel hub match the holes on the spare tire.
- Place the spare tire on the wheel hub: Carefully lift the spare tire and position it onto the wheel hub. Make sure it sits flush and is centered properly. Align the holes on the spare tire with the studs on the wheel hub.
- Hand-tighten the lug nuts: Begin threading the lug nuts onto the studs by hand. Start with one lug nut and tighten it only a few turns. Move to the lug nut opposite from the one you just tightened and repeat the process. Continue this pattern until all the lug nuts are hand-tightened.
- Use the lug wrench to tighten the lug nuts: Now, use the lug wrench to fully tighten the lug nuts. Apply force in a clockwise direction, turning each lug nut until it is securely tightened. Be careful not to over-tighten, as this can damage the studs or distort the wheel.
It’s important to note that spare tires are usually designed for temporary use and may have speed and mileage limitations. Check your vehicle’s manual for any specific guidelines or restrictions regarding the spare tire.
Once you have installed the spare tire and tightened the lug nuts, you can move on to the next step: tightening the lug nuts.
Step 6: Tighten the lug nuts
After installing the spare tire, it’s crucial to properly tighten the lug nuts to ensure the tire is securely fastened. Follow these steps:
- Use the lug wrench: Take your lug wrench and, starting from the first lug nut you tightened, apply firm pressure in a clockwise direction to fully tighten the lug nut. Repeat this process for each lug nut, working in a diagonal pattern.
- Ensure a snug fit: As you tighten the lug nuts, make sure they are snug and secure. Use your judgment to gauge the appropriate tightness, but take care not to over-tighten, as excessive force can damage the studs or even strip the threads.
- Double-check the lug nuts: Once all the lug nuts have been tightened, go around the wheel one more time to double-check each lug nut’s tightness. It’s better to be safe than sorry, and this extra step can help prevent any potential issues while driving.
Remember, properly tightened lug nuts are essential for the safe operation of your vehicle. Loose lug nuts can lead to the tire coming off while driving, which can result in a serious accident. Take the time to ensure each lug nut is securely tightened before proceeding.
With the lug nuts tightened, you’re almost finished. The next step is to lower the vehicle safely.
Step 7: Lower the vehicle
Now that the lug nuts are properly tightened, it’s time to lower the vehicle back down to the ground. Follow these steps:
- Securely grip the jack handle: If your jack has a handle or lever, hold it firmly with both hands.
- Slowly lower the vehicle: Gradually turn the jack handle in a counterclockwise direction to lower the vehicle. Take your time and ensure that the descent is controlled and steady.
- Remove the jack: Once the vehicle is completely on the ground, remove the jack carefully. Store it in its designated place in your vehicle.
It’s important to keep your body clear of the vehicle while lowering it to avoid any potential injuries. Pay attention to your surroundings and make sure there are no loose or unstable objects nearby that could interfere with the vehicle’s descent.
With the vehicle safely lowered, you’re almost done. The final step is to double-check the tightness of the lug nuts to ensure everything is secure.
Step 8: Double-check the lug nuts
Before you hit the road, it’s crucial to double-check the tightness of the lug nuts to ensure the safety and stability of the tire. Follow these steps:
- Using the lug wrench, go around each lug nut and give it a final check. Apply force in a clockwise direction to verify that the lug nuts are still securely tightened.
- Ensure all lug nuts are snug: Make sure each lug nut feels tight and doesn’t have any noticeable play or wobble. This step is crucial to prevent any potential issues while driving.
- Re-tighten if necessary: If you find any lug nuts that are not adequately tightened, use the lug wrench to tighten them further. Again, exercise caution not to over-tighten.
Double-checking the lug nuts is a crucial step to avoid any mishaps caused by loose or improperly tightened lug nuts. It only takes a few moments, but it can provide peace of mind and ensure a safe driving experience.
Once you have verified the lug nut tightness, you’re ready to hit the road. However, it’s essential to remember that a spare tire is not a permanent solution. Make sure to have the damaged tire repaired or replaced as soon as possible.
Congratulations! You have successfully learned how to remove a tire with hand tools. By following these steps, you have gained a valuable skill that can come in handy in various situations.
Remember to always exercise caution and prioritize your safety when working on your vehicle. If you’re unsure about any step or encounter difficulties, don’t hesitate to seek professional assistance.
Safe travels!
Conclusion
Knowing how to remove a tire with hand tools is a practical and empowering skill for any vehicle owner. By following the step-by-step process outlined in this article, you can confidently handle tire changes in various situations, whether on the road or in your own garage.
Throughout the process, we highlighted the importance of safety. Always prioritize your well-being by working in a controlled and stable environment, using protective gloves, and following safety guidelines provided by your vehicle’s manual.
From gathering the necessary hand tools to loosening the lug nuts, jacking up the vehicle, removing the tire, installing the spare tire, tightening the lug nuts, lowering the vehicle, and double-checking the lug nuts, each step plays a crucial role in the successful removal and replacement of a tire.
Remember, practice makes perfect. Familiarize yourself with the process by practicing tire changes in a controlled setting before facing real-world situations. This will help build your confidence and proficiency in handling tire-related issues.
Lastly, always keep your spare tire in good condition. Regularly check its inflation level and inspect it for any signs of wear or damage. Knowing that you have a reliable spare tire is essential for a smooth and hassle-free tire change when the need arises.
We hope this article has provided you with valuable insights, enabling you to handle tire changes with ease and confidence. With your newfound knowledge, you can face tire-related issues head-on, saving time, money, and unnecessary stress.
Safe travels and happy tire changing!
Frequently Asked Questions about How To Remove A Tire With Hand Tools
Was this page helpful?
At Storables.com, we guarantee accurate and reliable information. Our content, validated by Expert Board Contributors, is crafted following stringent Editorial Policies. We're committed to providing you with well-researched, expert-backed insights for all your informational needs.


0 thoughts on “How To Remove A Tire With Hand Tools”