Articles
How To Store Meat Long Term
Modified: October 20, 2024
Learn effective methods for storing meat long term in this informative articles. Find out the best techniques to keep your meat fresh and safe for extended periods.
(Many of the links in this article redirect to a specific reviewed product. Your purchase of these products through affiliate links helps to generate commission for Storables.com, at no extra cost. Learn more)
Introduction
In times of uncertainty or emergencies, having a long-term supply of food is crucial. One of the most essential items to include in your emergency food storage is meat. However, storing meat for an extended period can be challenging without proper knowledge and techniques. In this article, we will explore the factors to consider before storing meat long-term and provide you with the best practices to ensure its safety and quality.
When it comes to storing meat, there are several key factors to keep in mind. First and foremost is the method of preservation. Depending on the type of meat and your specific needs, different preservation methods may be more suitable. Additionally, factors such as temperature, humidity, and packaging also play significant roles in determining the longevity and quality of the stored meat. By understanding these factors and employing the right techniques, you can ensure that your meat remains safe for consumption and retains its flavor even after an extended period of storage.
Before diving into the details of long-term meat storage, it’s essential to remember that the methods discussed in this article are suitable for home use, but might not be applicable for commercial purposes or large-scale storage. Let’s explore the factors to consider before embarking on the journey of long-term meat storage.
Key Takeaways:
- Proper meat storage requires considering factors like type, quality, and duration. Best practices include vacuum sealing, freezing, canning, dehydrating, and using salt or sugar. Maintain quality by monitoring conditions and practicing food safety.
- Storing meat long-term demands careful attention to factors like temperature, packaging, and organization. Best practices include vacuum sealing, freezing, canning, dehydrating, and using salt or sugar. Regularly inspect and maintain storage conditions for optimal results.
Read more: How To Store Beef Jerky Long Term
Factors to Consider Before Storing Meat Long Term
Before you begin the process of storing meat long term, there are several important factors to take into consideration. These factors will help ensure the safety and quality of the stored meat, allowing you to enjoy it for an extended period of time. Let’s explore these factors in detail.
- Type of Meat: The type of meat you intend to store is a crucial factor to consider. Different meats have different properties and storage requirements. For example, fatty meats tend to spoil faster than lean meats, so they may require extra precautions.
- Quality of Meat: It is essential to start with high-quality meat when storing it long term. Fresh meat, free from any signs of spoilage, will have a longer shelf life and better taste when properly preserved.
- Temperature: The temperature at which you store your meat plays a vital role in determining its shelf life. Ideally, the temperature should be below 40°F (4°C) but above freezing point to prevent bacterial growth.
- Humidity: Humidity levels should be kept low to minimize the risk of microbial growth and spoilage. It is recommended to store meat in a dry environment or use moisture-absorbing packets to maintain an optimal environment.
- Packaging: Proper packaging is crucial for long-term meat storage. It helps prevent moisture loss, freezer burn, and contamination. Vacuum-sealing, airtight containers, freezer bags, or canning jars are commonly used packaging methods.
- Freezer Quality: If you plan to store meat in the freezer, ensure that your freezer maintains a consistent temperature and has adequate capacity. A freezer that experiences frequent temperature fluctuations or lacks proper insulation may affect the quality of the stored meat.
- Dietary Restrictions: Consider any special dietary restrictions or preferences when selecting and storing meat. For example, if you follow a low-sodium diet, it’s important to choose preservation methods that allow for reduced salt content.
- Storage Duration: The length of time you plan to store the meat will also influence the preservation method you choose. Some methods are better suited for shorter-term storage, while others can preserve meat for several months or even years.
By considering these factors, you can make informed decisions about your long-term meat storage strategy. Next, we will explore the best practices for storing meat to ensure its freshness, taste, and safety for an extended period.
Best Practices for Storing Meat
Now that we have discussed the factors to consider before storing meat long term, let’s delve into the best practices for ensuring its safety, quality, and longevity. By following these guidelines, you can confidently store meat for an extended period while preserving its freshness and flavor.
- Choosing the Right Packaging Method: Selecting the appropriate packaging method is crucial for long-term meat storage. Vacuum-sealing is one of the most effective methods as it removes air from the package, preventing freezer burn and reducing the risk of bacterial growth. Airtight containers, freezer bags, or canning jars are also suitable options.
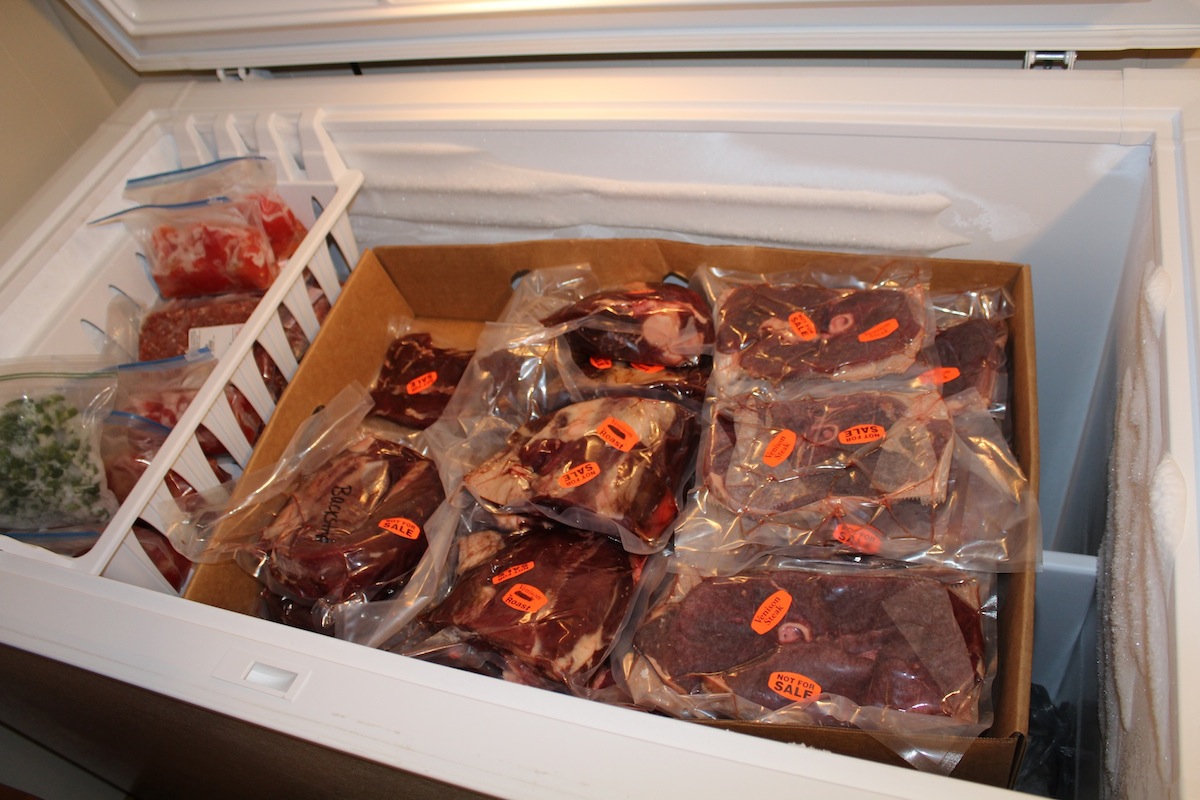
- Freezing Meat: Freezing is one of the most common methods for long-term meat storage. To ensure optimal results, follow these steps: wrap the meat tightly in plastic wrap or aluminum foil, place it in an airtight container or freezer bag, label it with the date, and store it in the coldest part of the freezer.
- Canning Meat: Canning meat is another excellent method for long-term storage. It involves pressure canning at a specific temperature and time to kill any potential bacteria. Follow canning guidelines carefully, ensuring the proper processing time and pressure for the type of meat you are canning.
- Dehydrating Meat: Dehydrating meat removes moisture, making it less susceptible to spoilage. Slice the meat thinly, marinate if desired, and place it in a dehydrator or oven at a low temperature until fully dried. Store the dehydrated meat in airtight containers or vacuum-sealed bags.
- Vacuum Sealing Meat: Vacuum sealing is an effective method for preserving meat for an extended period. It involves removing air from the package using a vacuum sealer, providing a tight seal and preventing the growth of bacteria. Vacuum-sealed meat should be stored in a cool, dry place or in the freezer.
- Using Salt or Sugar to Preserve Meat: Salt and sugar have been used for centuries to preserve meat. Salt acts as a natural preservative by drawing out moisture and inhibiting bacterial growth, while sugar creates an inhospitable environment for bacteria. Use curing methods or brining techniques to prepare the meat before storage.
- Storing Meat in a Root Cellar or Cold Storage Room: If you have access to a root cellar or a cold storage room, these can provide an excellent environment for long-term meat storage. These areas are naturally cool, humid, and well-ventilated, helping to maintain meat quality.
By employing these best practices, you can store meat for extended periods while maintaining its taste, texture, and nutritional value. However, it’s essential to keep in mind that the quality and shelf life of stored meat can vary depending on factors such as the type of meat, storage method, and environmental conditions. Regularly inspect the stored meat and practice proper food safety guidelines to ensure its suitability for consumption.
In the next section, we will discuss some tips for maintaining the quality of meat during the storage process.
Choosing the Right Packaging Method
When it comes to storing meat long term, selecting the appropriate packaging method is crucial to ensure its safety and quality throughout the storage period. The right packaging method will help protect the meat from freezer burn, moisture loss, and contamination, preserving its flavor, texture, and nutritional value. Let’s explore some of the common packaging methods for long-term meat storage.
Vacuum Sealing: Vacuum sealing is one of the most effective methods for preserving meat. This technique involves removing all air from the packaging to create a tight seal. Vacuum-sealed bags or containers eliminate oxygen, which reduces the risk of bacterial growth and freezer burn. Vacuum sealing also helps retain the natural juices and flavors of the meat. Use a vacuum sealer machine to properly seal the bags or containers, ensuring airtight packaging.
Airtight Containers: Airtight containers are another suitable option for storing meat long term. Choose high-quality, food-grade containers that have a tight-fitting lid or seal. Glass or plastic containers with airtight gaskets can help keep air out and prevent contamination. Ensure the containers are clean and dry before placing the meat inside. Label them with the date to keep track of the storage duration.
Freezer Bags: Freezer bags are a convenient and cost-effective option for packaging meat. Choose heavy-duty freezer bags that are specifically designed to withstand low temperatures. It’s important to remove as much air as possible from the bag before sealing it. A useful technique is partially submerging the bag in water, allowing the water to push out the air. Seal the bag tightly to prevent air from re-entering.
Canning Jars: Canning jars are an excellent choice for storing meat that has been properly processed through pressure canning. The high temperatures attained during pressure canning kill bacteria and create a vacuum seal inside the jars. This seal prevents oxygen from entering, ensuring long-term preservation. Ensure the jars are clean and undamaged before use. Follow proper canning procedures, including checking for proper seals and storing the jars in a cool, dry place.
Foil Wrapping: Foil wrapping is a simple and effective method for storing individual cuts of meat. Wrap the meat tightly in aluminum foil, ensuring there are no tears or gaps. The foil provides a protective barrier against air and moisture, helping to preserve the meat’s quality. It’s important to use heavy-duty foil to prevent punctures or tears during storage.
Regardless of the packaging method you choose, it’s crucial to label the packages with the type of meat and the date of packaging. This will help you keep track of the storage duration and ensure that older meat gets used first. Remember to store the packaged meat in a freezer or cold storage area at the appropriate temperature for optimal preservation.
By selecting the right packaging method for your specific needs, you can ensure that your stored meat remains safe, flavorful, and fresh for an extended period.
Freezing Meat
Freezing meat is one of the most common and effective methods for long-term storage. When done correctly, freezing can help preserve the quality and safety of the meat for several months or even longer. To ensure optimal results, follow these guidelines for freezing meat:
- Choose Quality Meat: Start with fresh, high-quality meat. Look for meat that is firm, free from any signs of spoilage, and well within its expiration date. If possible, select lean cuts of meat as they tend to freeze and thaw better than fatty cuts.
- Wrap and Package: Properly wrapping and packaging the meat before freezing is crucial to protect it from freezer burn and maintain its quality. If the meat is not already individually packaged, wrap it tightly in plastic wrap or aluminum foil. Make sure there are no air pockets or gaps. For an extra layer of protection, place the wrapped meat in airtight freezer bags or containers. Remove as much air from the packaging as possible to prevent freezer burn.
- Label and Date: Clearly label each package with the type of meat and the date of freezing. This will help you keep track of the storage duration and ensure that older meat gets used first.
- Store at the Right Temperature: Set your freezer temperature to 0°F (-18°C) or below. It’s important to maintain a consistently cold temperature to prevent bacterial growth and maintain the quality of the meat. Avoid frequent temperature fluctuations by keeping the freezer door closed as much as possible and avoiding overpacking the freezer.
- Organize Properly: Arrange the meat in your freezer in a way that allows for proper air circulation. Avoid stacking meat packages on top of each other, as this can lead to uneven freezing and potential freezer burn. Instead, lay the packages flat or stack them side by side, leaving space between them for air to circulate.
- Thawing Properly: When you’re ready to use the frozen meat, it’s important to thaw it properly to maintain its quality and safety. Thaw the meat in the refrigerator, as this is the safest method that helps prevent bacterial growth. Plan ahead and allow enough time for the meat to thaw fully in the refrigerator. If you need to thaw it quickly, you can use the defrost setting on your microwave or place the packaged meat in a sealed plastic bag and submerge it in cold water. Avoid thawing meat at room temperature, as this can lead to bacterial growth.
- Use within Recommended Time: While properly frozen meat can last a long time, it’s best to use it within the recommended time frame to ensure optimal quality. The exact storage duration varies depending on the type of meat, but as a general guideline, use frozen beef, pork, veal, and lamb within 6-12 months, chicken and turkey within 9-12 months, and ground meat within 3-4 months.
By following these guidelines for freezing meat, you can ensure that it remains safe and maintains its flavor and texture even after being stored for an extended period. Proper freezing techniques can help you build a reliable supply of meat for your long-term storage needs.
Read more: How To Store Barley Long Term
Canning Meat
Canning meat is an excellent method for long-term storage as it allows you to safely preserve meat without relying on refrigeration or freezing. The process of canning involves packing cooked meat into sterilized jars and using heat and pressure to create a seal that keeps bacteria at bay. Here’s a step-by-step guide on how to can meat:
- Select the Right Type of Meat: Choose meat with low fat content as fatty meat has a higher risk of spoilage. Lean cuts of beef, pork, chicken, and seafood can all be successfully canned.
- Prepare the Jars and Lids: Wash your canning jars, lids, and rings in warm, soapy water before sterilizing them. You can sterilize them by boiling them in water for a few minutes or running them through a dishwasher cycle. Ensure the jars and lids are in good condition without chips or cracks.
- Cook the Meat: Cook the meat thoroughly, removing excess fat and bones. Cut the meat into smaller pieces that will fit easily into the jars. Season the meat with salt and any desired herbs or spices for added flavor.
- Fill the Jars: Pack the cooked meat tightly into the sterilized jars, leaving about one inch of headspace at the top. Avoid getting any grease or liquid on the jar rims, as this can prevent a proper seal.
- Add the Liquid: Depending on the meat being canned, you may need to add liquid to the jar. For meats such as beef or pork, you can add a small amount of broth or water to cover the meat. Be sure to leave the recommended headspace in the jar.
- Secure the Lids: Wipe the rims of the jars to ensure they are clean and free from any food particles or grease. Place a sterilized lid on each jar, followed by a ring. Tighten the rings until they are finger-tight; do not overtighten.
- Process the Jars: Place the filled and sealed jars in a pressure canner. Follow the instructions for your specific canner model, adjusting for altitude if necessary. Process the jars at the recommended pressure and time for the type of meat being canned.
- Allow the Jars to Cool and Seal: Once the processing time is complete, remove the canner from the heat and allow it to cool naturally. As the jars cool, you will hear a distinctive popping sound indicating that the lids have sealed properly. Once cooled, check the seals by pressing down on the center of each lid. If it doesn’t pop back up, the jar is properly sealed. Any unsealed jars should be refrigerated and consumed promptly.
- Store and Label: Store the sealed jars in a cool, dark place away from direct sunlight. Label each jar with the contents and date of canning to keep track of the storage time.
Canned meat can be stored for an extended period, often up to one year or more, if properly processed and sealed. It’s important to follow proper canning procedures and guidelines to ensure the safety and quality of the canned meat. Always consult reputable sources or canning guides for specific instructions based on the type of meat and canning equipment you are using. By canning meat, you can build a reliable supply of protein-rich food for your long-term storage needs.
To store meat long term, wrap it tightly in plastic wrap or aluminum foil to prevent freezer burn. Place it in an airtight container or freezer bag before storing it in the freezer.
Dehydrating Meat
Dehydrating meat is an ancient yet effective method of preserving meat for long-term storage. By removing moisture from the meat, you create an environment that inhibits the growth of bacteria and mold, allowing the meat to remain edible for an extended period. Here’s a step-by-step guide on how to dehydrate meat:
- Select the Right Type of Meat: Choose lean cuts of meat with minimal connective tissues and visible fat. Beef, venison, turkey, and chicken are commonly used for dehydration.
- Prepare the Meat: Start by partially freezing the meat for easier slicing. Slice the meat into thin strips, about ¼ to ⅛ inch thick. It’s important to slice the meat evenly for consistent drying.
- Marinate (optional): If desired, marinate the meat to enhance the flavor. You can use a combination of herbs, spices, soy sauce, Worcestershire sauce, or other marinades. Let the meat marinate in the refrigerator for a few hours or overnight to allow the flavors to penetrate.
- Preheat the Dehydrator: Follow the manufacturer’s instructions to preheat your dehydrator to the appropriate temperature, typically between 130°F (54°C) and 155°F (68°C).
- Arrange the Meat: Lay the marinated or plain meat strips in a single layer on the dehydrator trays. Ensure that the pieces do not touch each other to allow for proper air circulation and even drying.
- Dehydrate the Meat: Place the loaded trays into the dehydrator and let the machine do the work. The drying time can vary depending on factors such as meat thickness, type of dehydrator, and ambient humidity. Generally, it takes between 6 to 12 hours for meat to fully dry. Rotate the trays and check the meat periodically for dryness. The meat should be firm, leathery, and bend without breaking.
- Cool and Condition: Once the meat is dehydrated, remove it from the dehydrator and let it cool. “Conditioning” the dried meat involves allowing it to rest in airtight containers for a week. This helps redistribute any remaining moisture, ensuring the meat is fully dried and safe for long-term storage.
- Store and Label: Place the dried meat in airtight containers, such as vacuum-sealed bags or glass jars with tight-fitting lids. Store the containers in a cool, dry place away from direct sunlight. Label each container with the type of meat and date of dehydration.
- Rehydrating: To use the dehydrated meat, it can be rehydrated by soaking it in warm water or adding it directly to soups, stews, or other recipes with sufficient liquid. Rehydration times may vary based on the thickness and texture of the dried meat.
Dried meat can be stored for several months or even years if properly dehydrated and stored in airtight containers. It’s important to ensure that the meat is thoroughly dried to prevent the growth of bacteria or mold during storage. Regularly check the stored meat for signs of spoilage and discard if you notice any unusual odors, colors, or textures. By dehydrating meat, you can create lightweight, portable, and protein-rich food for your long-term storage needs.
Vacuum Sealing Meat
Vacuum sealing is a popular and effective method for preserving meat for long-term storage. By removing the air from the packaging, vacuum sealing creates an oxygen-free environment, which helps prevent the growth of bacteria and slows down the process of oxidation, ultimately extending the shelf life of the meat. Here’s a step-by-step guide on how to vacuum seal meat:
- Prep and Season the Meat: Start by preparing the meat for vacuum sealing. Trim off any excess fat or connective tissues and season the meat as desired, using spices, marinades, or rubs to enhance its flavor. Let the meat marinate for some time if desired.
- Select the Right Vacuum Sealer: Choose a high-quality vacuum sealer that is suitable for sealing meat. There are two main types of vacuum sealers: handheld sealers and countertop sealers. Handheld sealers are compact and portable, while countertop sealers have more features and are better suited for heavy-duty use.
- Prepare the Vacuum Sealer: Before using the vacuum sealer, make sure it is clean and in good working condition. Ensure that you have vacuum-sealing bags or rolls that are compatible with your sealer. Cut the bags or rolls to the desired size, leaving enough room for sealing.
- Place the Meat in the Bag: Lay the prepared meat in a single layer inside the vacuum-sealing bag. Be sure to leave enough space at the top of the bag to allow for sealing.
- Seal the Bag: Place the open end of the bag into the vacuum sealer and close the lid. Activate the vacuum sealing process according to the instructions provided with your vacuum sealer model. The sealer will remove the air from the bag and create a tight seal. Some vacuum sealers also offer the option to add an extra seal for added security.
- Label and Store: Once the bag is sealed, use a permanent marker to label it with the type of meat and the date of vacuum sealing. Proper labeling will help you keep track of the storage duration and ensure that older meat gets used first. Store the vacuum-sealed meat in a freezer or a cool, dry place, away from direct sunlight.
- Thawing Properly: When you’re ready to use the vacuum-sealed meat, it’s important to thaw it properly for the best results. Thaw the meat in the refrigerator, allowing it to thaw slowly and safely. If you need to thaw it quickly, you can submerge the vacuum-sealed package in cold water. Avoid thawing meat at room temperature to prevent bacterial growth.
- Inspect for Quality: Before cooking or consuming the vacuum-sealed meat, inspect it to ensure that the package is intact and there are no signs of spoilage. If you notice any unusual odors, discoloration, or texture changes, discard the meat.
Vacuum-sealed meat can typically be stored in the freezer for an extended period, ranging from several months to even years, depending on the quality of the seal and the storage conditions. Ensure that the vacuum-sealing bags or rolls are of good quality and provide a reliable barrier against air and moisture. By vacuum sealing meat, you can enjoy the convenience of ready-to-use portions while ensuring the long-term preservation of its flavor, texture, and nutritional value.
Using Salt or Sugar to Preserve Meat
Using salt or sugar to preserve meat is an age-old method that has been used for centuries. Both salt and sugar act as natural preservatives by drawing out moisture from the meat and creating an environment that inhibits the growth of bacteria. Here’s how you can use salt or sugar to preserve meat:
Using Salt:
- Curing: Curing involves the use of salt to remove moisture from meat. To cure meat, coat it thoroughly with salt, paying particular attention to the nooks and crannies. Use kosher salt or a curing salt mixture that contains sodium nitrite or sodium nitrate.
- Flavoring: Add additional flavorings such as herbs, spices, or sugar to the salt mixture to enhance the taste of the cured meat. This step is optional but can add depth and complexity to the flavor.
- Refrigerate: Once the meat is coated in the salt mixture, place it in a non-reactive container or a sealable plastic bag. Make sure the meat is completely covered with the salt mixture. Refrigerate the meat for the recommended amount of time, usually a few hours to several days, depending on the size and thickness of the meat.
- Rinse and Dry: After the prescribed curing time, remove the meat from the refrigerator and rinse off the excess salt under cold running water. Pat the meat dry with paper towels or a clean cloth, ensuring that it is completely dry before proceeding.
- Store: Store the cured meat in a cool, dry place, such as a cellar or a cold storage room. Ensure that the temperature and humidity are suitable for long-term storage.
- Slicing and Using: Before consuming or cooking the cured meat, slice it thinly and check for any signs of spoilage. If the meat looks or smells off, discard it immediately. Cured meat can be used in various recipes or enjoyed as-is.
Using Sugar:
- Brining: Brining involves soaking the meat in a solution of water, salt, and sugar. The sugar adds a touch of sweetness to balance the flavors. You can customize the brine by adding additional herbs, spices, or aromatics to enhance the taste.
- Prepare the Brine: Dissolve the salt and sugar in water, ensuring that they are fully dissolved before adding the meat. The ratio of salt to sugar will depend on personal preference and the recipe you are following.
- Soak the Meat: Place the meat in a container or sealable bag and pour the brine over it, making sure the meat is fully immersed. Refrigerate the meat in the brine for the recommended duration, usually several hours to overnight.
- Rinse and Dry: Remove the meat from the brine and rinse it under cold running water to remove any excess salt or sugar. Pat the meat dry with paper towels or a clean cloth.
- Store: Store the brined meat in a cool, dry place, such as a refrigerator or a cellar. Ensure that the temperature and humidity are suitable for long-term storage.
- Cooking and Using: Cook the brined meat as desired, following your preferred recipes. The sugar in the brine adds flavor and moisture to the meat, resulting in tender and succulent dishes.
Both salt and sugar preservation methods can extend the shelf life of meat, but it’s important to note that the preserved meat may have a saltier or sweeter taste than regular meat. Additionally, be mindful of any dietary restrictions, such as high sodium intake or diabetes, when consuming preserved meat. By using salt or sugar to preserve meat, you can enjoy the flavors of cured or brined meat for an extended period of time.
Read more: How To Store Fabric Long Term
Storing Meat in a Root Cellar or Cold Storage Room
If you have access to a root cellar or a cold storage room, it can provide an ideal environment for long-term meat storage. These spaces offer natural cooling and humidity levels that help preserve the quality and safety of stored meat. Here’s how you can effectively store meat in a root cellar or cold storage room:
- Inspect the Storage Space: Before using a root cellar or cold storage room, ensure that it is suitable for meat storage. The storage space should have stable temperatures ranging between 32°F (0°C) and 50°F (10°C) and a humidity level between 60% and 70%. Additionally, check for any signs of pest infestation or excessive moisture.
- Prepare the Meat: Start by properly preparing the meat for storage. Trim off excess fat and connective tissues, and portion the meat into appropriate sizes for your needs.
- Package the Meat: Package the meat in suitable containers or wrapping materials that provide a barrier against air and moisture. Vacuum-sealed bags, airtight containers, or tightly wrapped butcher paper are common choices. If using butcher paper, be sure to wrap it tightly and secure it with butcher’s twine or tape.
- Label and Organize: Label each package with the type of meat and the date of storage. This will help you keep track of the storage duration and prioritize the use of older meat. Organize the packages in a way that allows for proper airflow and easy access.
- Place the Meat in the Storage Area: Arrange the packaged meat in the root cellar or cold storage room, ensuring that there is sufficient space between them for air circulation. Keep the meat off the floor and away from any walls to prevent contact with moisture or pests.
- Monitor the Storage Conditions: Regularly monitor the temperature and humidity levels in the storage area using a thermometer and hygrometer. Make adjustments if necessary, such as opening windows or using fans to regulate airflow and maintain the desired environment.
- Inspect for Spoilage: Periodically check the stored meat for any signs of spoilage. Look out for changes in color, texture, or odor. If you notice any abnormalities, discard the affected meat immediately to prevent contamination of the remaining stored meat.
- Rotate and Use the Meat: As time goes on, rotate and use the stored meat, starting with the oldest packages first. Proper rotation ensures that none of the meat goes to waste, and you always have fresh supplies on hand.
Storing meat in a root cellar or cold storage room can provide a natural and reliable method for long-term preservation. The cool temperature and optimal humidity levels slow down the growth of bacteria and help maintain the quality of the meat over an extended period. However, it’s important to regularly monitor the conditions and inspect the stored meat to ensure its safety and suitability for consumption.
Remember that the specifics of a root cellar or cold storage room can vary based on the location, climate, and construction of the storage space. It’s best to consult resources specific to your situation or seek advice from local experts for the most accurate guidance.
Tips for Maintaining Meat Quality During Storage
Proper storage techniques are crucial for maintaining the quality and safety of meat during long-term storage. By following these tips, you can ensure that your stored meat retains its flavor, texture, and nutritional value:
- Maintain Proper Temperature: Temperature control is vital for meat storage. The ideal temperature for storing meat is below 40°F (4°C) but above freezing point. Use a refrigerator or freezer to ensure a consistent temperature. Regularly monitor the temperature to avoid fluctuations that can impact meat quality.
- Minimize Exposure to Air: Exposure to air can lead to oxidation, freezer burn, and spoilage. Use airtight packaging methods such as vacuum-sealing, airtight containers, or freezer bags to minimize contact with air. This helps maintain the quality and flavor of the meat.
- Prevent Freezer Burn: Freezer burn can occur when the surface of meat is exposed to air. To prevent freezer burn, remove as much air as possible from packaging, ensuring a tight seal. Wrap meat tightly in plastic wrap or use freezer bags to provide an additional layer of protection.
- Organize and Rotate: Properly organize stored meat to easily access and use older packages first. This helps prevent meat from exceeding its recommended storage time. Implement a first-in, first-out system to ensure that stored meat is used before it reaches its expiration date.
- Avoid Temperature Fluctuations: Fluctuating temperatures can negatively impact the quality of stored meat. Avoid frequent temperature changes by keeping the freezer door closed as much as possible. Additionally, do not overload the freezer, as it can obstruct proper airflow and temperature regulation.
- Regularly Inspect for Spoilage: Routinely inspect stored meat for any signs of spoilage. Look for changes in color, texture, or odor. If you notice any abnormalities, such as slime, off-putting smells, or freezer burn, discard the meat immediately to prevent cross-contamination with other food.
- Label and Date Packages: Properly label each package with the type of meat and the date of storage. This helps you keep track of the storage duration and use older meat first. Use waterproof markers or labels to ensure the information remains visible and legible.
- Practice Proper Food Safety: Follow proper food safety guidelines during the handling and preparation of the stored meat. Thaw meat in the refrigerator or use safe thawing methods. Cook meat to the appropriate internal temperature to ensure it is safe for consumption. Practice good hygiene and sanitation to prevent cross-contamination.
- Use Quality Packaging Materials: Choose high-quality packaging materials specifically designed for freezer storage. Ensure that packaging materials are free from tears, punctures, or other damage that can compromise the integrity of the seal.
- Monitor and Maintain Storage Conditions: Continuously monitor the storage area, keeping an eye on temperature, humidity, and pest control. Regularly clean and organize the storage space to prevent the buildup of dirt, dust, and potential contaminants.
By implementing these tips, you can significantly improve the quality and longevity of your stored meat. Remember that the specific storage requirements may vary depending on the meat type, packaging method, and storage environment. Consult reliable sources or seek advice from experts to ensure the best practices for the specific meat you are storing.
With proper storage techniques, you can enjoy safe and flavorful meat for an extended period, providing you with peace of mind and a reliable food source during emergencies or long-term storage needs.
Conclusion
Storing meat long-term requires careful consideration and proper techniques to ensure its safety, quality, and longevity. By understanding the factors to consider before storage and implementing best practices, you can preserve meat for extended periods, providing a reliable source of food during emergencies or for your long-term storage needs.
Before storing meat, consider factors such as the type and quality of meat, storage duration, temperature, humidity, and packaging method. These factors will influence the preservation method you choose and the conditions required for successful storage.
Best practices for preserving meat include choosing the right packaging method, such as vacuum sealing, which removes air and prevents freezer burn. Freezing meat is a common and effective method that requires proper wrapping and organization to maintain its quality. Canning meat through pressure canning is another excellent option, providing a seal that keeps bacteria at bay. Dehydrating meat removes moisture, while using salt or sugar helps draw out moisture and acts as a natural preservative. Storing meat in a root cellar or cold storage room can maintain optimal temperature and humidity levels for long-term storage.
To maintain the quality of meat during storage, it’s important to follow tips such as maintaining proper temperature, minimizing air exposure, preventing freezer burn, organizing and rotating meat, avoiding temperature fluctuations, regularly inspecting for spoilage, and practicing proper food safety measures.
In conclusion, proper meat storage techniques are essential for preserving its flavor, texture, and safety. By considering the factors, implementing best practices, and following tips for maintaining meat quality, you can enjoy stored meat for an extended period, providing peace of mind and a reliable food source when needed.
Remember to consult reputable sources, guidelines, or experts for specific instructions and recommendations based on the type of meat and storage conditions. With careful planning and attention to detail, you can successfully store meat long term and have a readily accessible food supply when it is most needed. Stay prepared and ensure the quality and safety of your stored meat for a more secure future.
Frequently Asked Questions about How To Store Meat Long Term
Was this page helpful?
At Storables.com, we guarantee accurate and reliable information. Our content, validated by Expert Board Contributors, is crafted following stringent Editorial Policies. We're committed to providing you with well-researched, expert-backed insights for all your informational needs.


0 thoughts on “How To Store Meat Long Term”