Articles
What Is A Quilt And How Is It Made?
Modified: October 23, 2024
Discover the art of quilting and learn how these beautiful articles are made. From choosing fabrics to stitching patterns, explore the process of creating quilts.
(Many of the links in this article redirect to a specific reviewed product. Your purchase of these products through affiliate links helps to generate commission for Storables.com, at no extra cost. Learn more)
Introduction
Quilting is a time-honored craft that combines artistic expression with practical functionality. Whether you’ve admired quilts hanging on the walls of museums or snuggled up under one on a cold night, you’ve likely encountered the beauty and warmth that these handmade creations bring. But what exactly is a quilt, and how is it made?
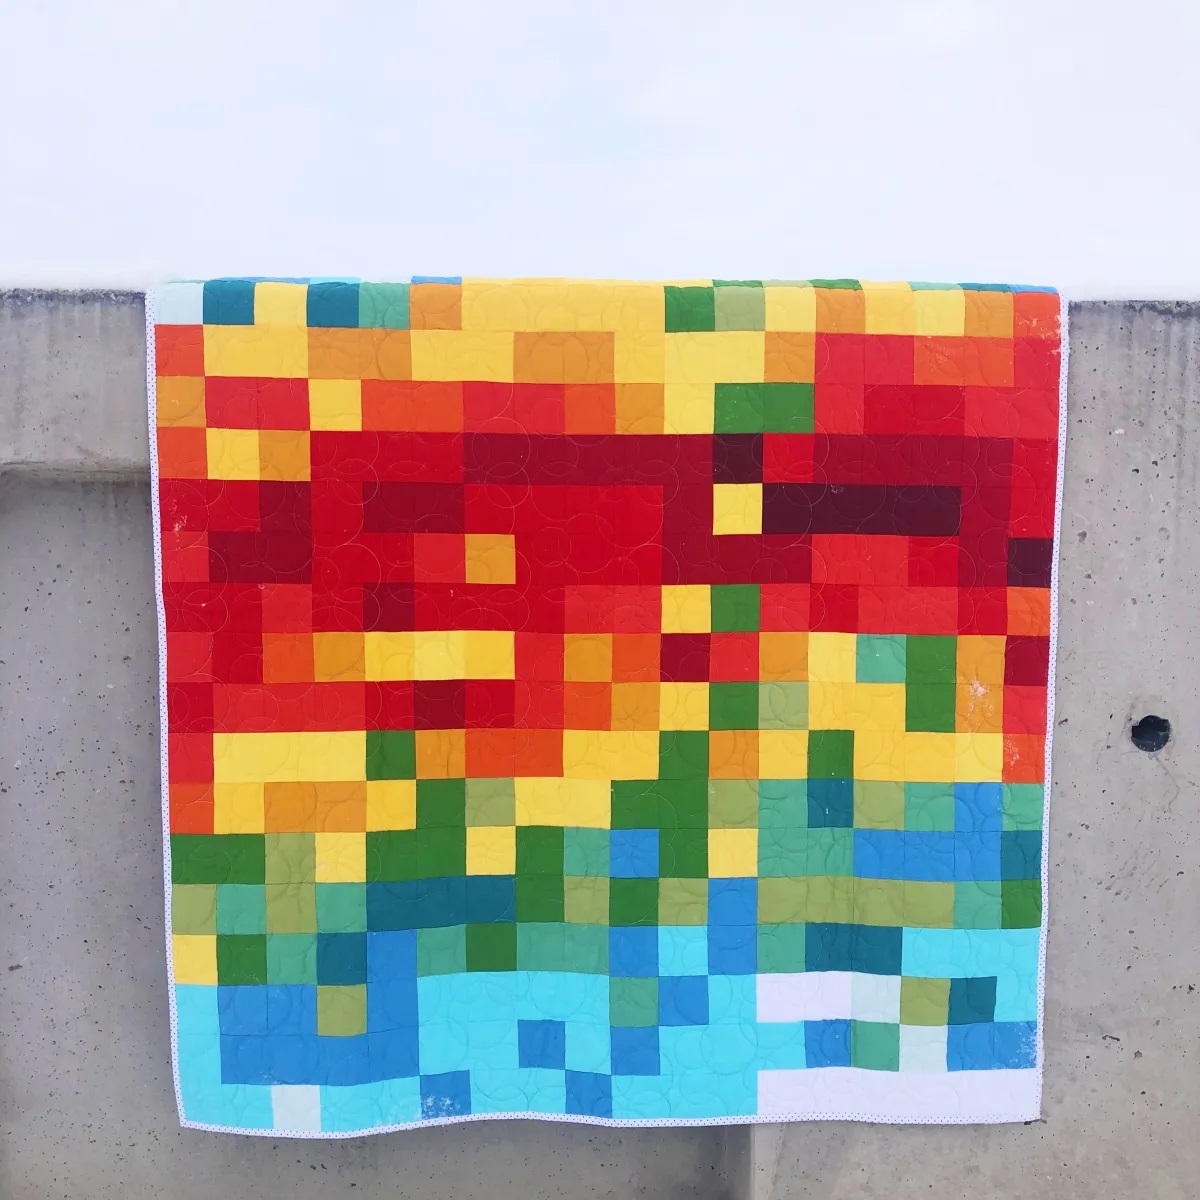
At its core, a quilt is a multi-layered textile that is created by stitching together pieces of fabric. It is typically composed of three layers: the quilt top, which is made up of various fabric pieces sewn together in a pattern; the batting or wadding, which provides insulation and thickness; and the backing fabric that covers the back of the quilt. These layers are then held together by intricate stitching patterns, forming a durable and visually stunning piece of functional art.
The tradition of quilting dates back thousands of years, with evidence of quilted textiles found in ancient Egypt, China, and the Middle East. Initially, quilts were primarily used for warmth, but over time they evolved to become intricate works of art and treasured heirlooms.
In this article, we will explore the fascinating world of quilt making. We’ll delve into the history of quilts, the techniques and materials used, and the step-by-step process of creating a quilt. Whether you’re a beginner quilter looking to dip your toes into this creative endeavor or a seasoned pro seeking to expand your knowledge, this article will provide you with a comprehensive understanding of quilts and how they are made.
Key Takeaways:
- Quilting is a rich tradition that combines artistry and functionality, with a history spanning centuries. From selecting fabrics to adding finishing touches, each step contributes to creating a cherished and meaningful quilt.
- Quilting is a journey of creativity and self-expression, allowing individuals to connect with the past, express the present, and leave a lasting legacy for the future. Whether a beginner or experienced quilter, the process offers endless possibilities for creating unique and treasured quilts.
Read more: When Was The First Quilt Made
Definition of a Quilt
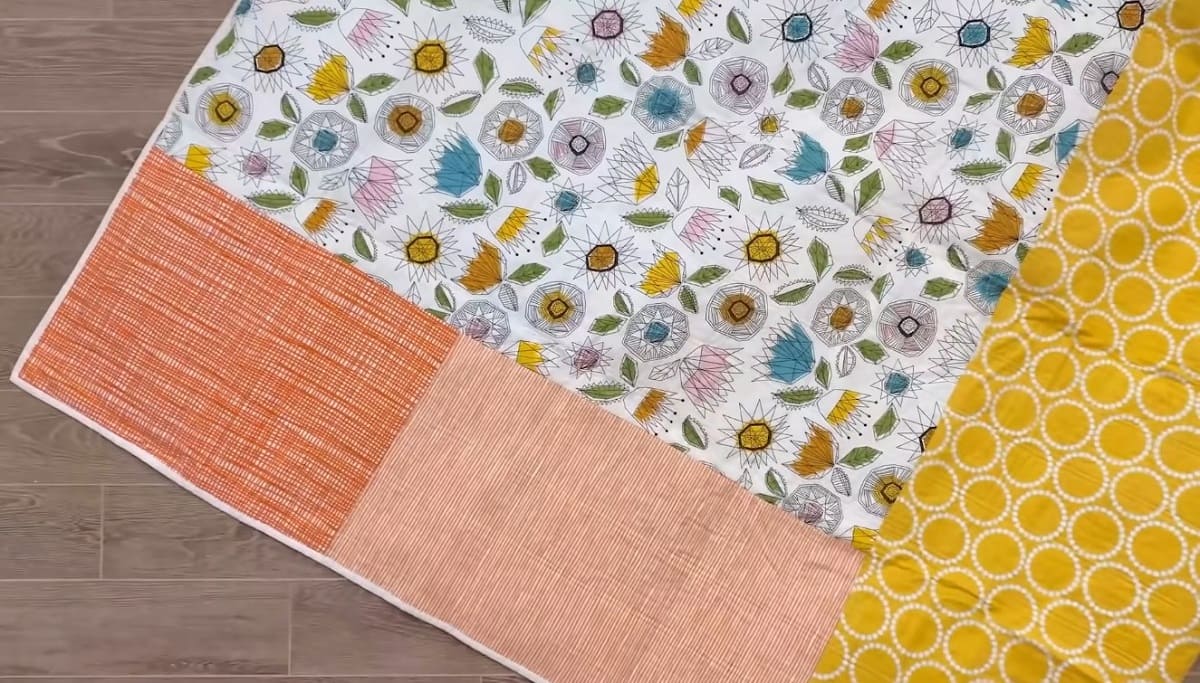
A quilt is a textile creation that consists of three layers stitched together. The top layer, known as the quilt top, is made up of various fabric pieces sewn together in a specific pattern or design. This is where the creativity and artistry of the quilt maker shines through. The second layer, called the batting or wadding, provides insulation and adds thickness to the quilt. It can be made of various materials such as cotton, wool, or polyester. Lastly, the backing fabric covers the back of the quilt, providing stability and protecting the batting.
Quilts are often recognized for their intricate stitching patterns, which secure the layers together. This stitching process, known as quilting, can be done by hand or by using a sewing machine. Quilting not only adds aesthetic appeal but also reinforces the layers, ensuring the quilt remains intact over time.
What sets quilts apart from other blankets or coverings is the meticulous attention to detail and craftsmanship involved. Quilts are often adorned with intricate designs, such as patchwork, appliqué, or embroidery. These designs can reflect cultural heritage, personal stories, or simply be an expression of the artist’s creativity.
Quilts also hold special significance as they are often handmade with love and care. They can be passed down through generations, becoming cherished family heirlooms. Quilts have a unique ability to evoke feelings of nostalgia, comfort, and warmth, both literally and figuratively.
While quilts are primarily used for their functional purpose of providing warmth, they have also become highly regarded for their artistic value. Many quilts are displayed as decorative pieces in art galleries and museums. They are appreciated for their craftsmanship, innovation, and use of color and pattern.
Throughout history, quilts have played a significant role in communities, serving as a symbol of unity and creativity. Quilting bees, where groups of quilters gather to work on quilts together, have fostered a sense of camaraderie and provided an avenue for women to socialize, share knowledge, and support each other.
In the next sections, we will dive deeper into the rich history of quilts and explore the various techniques and materials used in quilt making.
History of Quilts
The history of quilts spans centuries and offers a fascinating glimpse into the lives and cultures of different societies. While the exact origins of quilting are unclear, evidence of quilted textiles can be traced back to ancient civilizations.
Early quilts were primarily made for practical reasons, serving as warm bedding or protective coverings. In ancient Egypt, for example, quilted textiles were discovered in tombs, indicating that they were used to provide comfort and warmth in the afterlife.
In Medieval Europe, quilting became more widespread as a way to insulate clothing and linens. Wealthier individuals would commission quilts made with silk, velvet, and intricate stitching patterns.
As European settlers arrived in America, quilting became an integral part of pioneer life. Quilting was a practical way to repurpose worn-out fabrics and create warm coverings for bedding and protection against the harsh winters.
Quilting bees, where women gathered to quilt together, became a social activity in colonial America. These gatherings allowed women to share patterns, exchange ideas, and strengthen community bonds.
During the 19th century, the Industrial Revolution brought changes to quilting. Advances in technology, such as the invention of the sewing machine, made quilting more accessible and efficient.
Quilt making also played a significant role in American history during the Civil War. Women on both sides of the conflict would create quilts to raise funds for soldiers or express their political views through quilted propaganda.
In the early 20th century, quilting experienced a revival with the rise of the Arts and Crafts movement. Quilts became more than just functional items; they became works of art. Artists such as the Gee’s Bend quilters in Alabama gained recognition for their innovative designs and bold use of color.
Today, quilting continues to thrive as both a traditional craft and a form of artistic expression. Quilt shows, conferences, and guilds provide platforms for quilters to showcase their creations and exchange inspiration.
The history of quilts is not only a tale of creativity and skill but also a reflection of the social, cultural, and political contexts in which they were produced. From their humble beginnings as utilitarian bedding to their current status as artistic masterpieces, quilts have indeed left an indelible mark on human history.
Quilt Making Techniques
Quilt making involves a variety of techniques that come together to create beautiful and functional quilts. Whether you’re a beginner or an experienced quilter, mastering these techniques is essential to bring your vision to life.
1. Patchwork: Patchwork is a technique where small fabric pieces, often in different shapes and sizes, are sewn together to create a larger design. This technique allows quilters to incorporate a wide range of colors, patterns, and textures into their quilt tops.
2. Appliqué: Appliqué involves sewing fabric shapes onto a background fabric to create decorative elements or motifs. This technique allows quilters to add intricate designs or personalize their quilts with shapes like flowers, animals, or geometric patterns.
3. English Paper Piecing: English Paper Piecing is a hand-sewing technique that involves wrapping fabric pieces around paper templates and sewing them together. This technique is often used to create intricate and precise shapes, such as hexagons or diamonds.
4. Foundation Paper Piecing: In Foundation Paper Piecing, fabric is sewn onto a printed or traced pattern on a piece of paper or fabric. This technique helps achieve accurate and complex designs by providing a guide for sewing the fabric pieces together.
5. Quilting: Quilting refers to the stitching that holds the layers of the quilt together. Quilting can be done by hand or with a sewing machine. Common quilting techniques include straight-line quilting, free-motion quilting, and stippling, where small, dense stitches create a textured effect.
6. Binding: Binding is the final step in quilt making, where fabric strips are sewn around the raw edges of the quilt to create a finished border. Binding not only provides a polished look but also strengthens the edges of the quilt.
7. Embellishments: Embellishments such as embroidery, beads, or buttons can be added to enhance the design or add personal touches to the quilt. These embellishments can be hand-sewn or attached with a sewing machine, depending on the desired effect.
Each technique requires different skills and tools, and mastering them may take time and practice. However, by combining these techniques, quilters can create unique and stunning quilts that reflect their artistic vision and skill.
Next, let’s explore the process of choosing fabrics for quilts and selecting a quilt pattern that suits your style and preferences.
Choosing Fabrics for Quilts
Choosing the right fabrics is a crucial step in quilt making as it sets the foundation for your design and determines the overall look and feel of your quilt. Here are some considerations to keep in mind when selecting fabrics for your quilt:
1. Color: Consider the color scheme you want to achieve in your quilt. Decide whether you want a cohesive, monochromatic look or a vibrant mix of colors. Pay attention to the contrast between fabrics to ensure that your quilt design stands out.
2. Pattern: Fabrics with different patterns can add visual interest and dimension to your quilt. You can choose fabrics with floral prints, geometric designs, stripes, or even novelty prints to suit your style and theme.
3. Scale: When selecting fabrics, consider the scale of the prints or patterns. Mixing fabrics with different scales can add depth and variation to your quilt design. You can combine large-scale prints with smaller ones for a balanced and visually pleasing effect.
4. Texture: Fabrics with different textures can create a tactile and dimensional look in your quilt. Consider using fabrics with different weaves, such as cotton, linen, or silk, to add texture and interest to your design.
5. Fabric Type: The type of fabric you choose will affect the drape, weight, and overall feel of your quilt. Common fabric types used in quilting include cotton, flannel, batik, and even specialty fabrics like wool or denim. Consider the purpose of your quilt and choose fabrics that suit your desired level of warmth, durability, and softness.
It’s important to keep in mind that prewashing fabrics before starting your quilt can help prevent any shrinkage or color bleeding later on. Additionally, using high-quality quilting cotton or fabric specifically designed for quilting will ensure the longevity of your quilt.
Don’t be afraid to experiment, mix and match fabrics, and trust your artistic instincts when choosing fabrics for your quilt. Remember that creating a quilt is a personal and creative endeavor, and the fabric choices you make will contribute to the overall beauty and uniqueness of your finished piece.
Once you have selected your fabrics, the next step is to choose a quilt pattern that complements your fabric choices and brings your vision to life.
Read more: What Is A Quilt
Selecting a Quilt Pattern
Choosing the right quilt pattern is an exciting part of the quilt making process. The pattern you select will not only showcase your chosen fabrics but also determine the overall layout and design of your quilt. Here are some factors to consider when selecting a quilt pattern:
1. Skill Level: Consider your skill level as a quilter. If you’re a beginner, you may want to start with a simple pattern that doesn’t involve complex techniques or intricate piecing. As you gain experience and confidence, you can gradually move on to more challenging patterns.
2. Size and Purpose: Determine the size and purpose of your quilt. Are you making a small wall hanging, a baby quilt, or a large bed-sized quilt? The size of your quilt will influence the pattern you choose and the amount of fabric you’ll need.
3. Design Elements: Pay attention to the design elements of the pattern, such as blocks, borders, and sashing. Do you prefer a pattern with uniform blocks or one with a more improvisational layout? Consider how the design elements will showcase your fabric choices and enhance your overall quilt design.
4. Theme or Style: Decide on the theme or style you want to reflect in your quilt. Do you prefer traditional patterns like Log Cabin or Ohio Star, or are you drawn to modern, minimalist designs? Choose a pattern that aligns with your personal style or the intended purpose of the quilt.
5. Complexity: Consider the complexity of the pattern and the techniques involved. Some patterns may require precise piecing, curved seams, or appliqué. Make sure you feel comfortable with the techniques required or be prepared to learn and practice new skills.
6. Pattern Sources: Explore various sources for quilt patterns, such as books, magazines, online platforms, and quilt guilds. You can also find inspiration from quilting communities and social media platforms like Pinterest and Instagram.
Ultimately, the perfect quilt pattern is one that resonates with you and allows you to express your creativity. Don’t be afraid to customize or modify a pattern to make it uniquely yours. Remember, quilt making is an art form, and the pattern you choose is just the starting point for your creative journey.
Once you’ve selected your quilt pattern, it’s time to start piecing together the quilt top, the central component of your quilt.
When making a quilt, be sure to use a consistent seam allowance to ensure that all of your pieces fit together properly and your finished quilt lays flat.
Piecing the Quilt Top
Piecing the quilt top is the process of sewing together fabric pieces to create the main design or pattern of the quilt. This step requires precision, attention to detail, and a good understanding of the chosen quilt pattern. Here’s a step-by-step guide to piecing the quilt top:
1. Read the Pattern: Familiarize yourself with the pattern instructions before you begin. Understand the cutting measurements, seams allowances, and any special techniques or considerations mentioned in the pattern.
2. Fabric Preparation: Prepare your fabrics by washing, pressing, and cutting them according to the pattern requirements. Use a rotary cutter, ruler, and cutting mat for accurate and clean cuts.
3. Sewing Seam Allowances: Most quilt patterns will instruct you to use a ¼ inch seam allowance. Use a quilting foot on your sewing machine or mark the ¼ inch seam allowance on your machine’s throat plate to guide your stitches consistently.
4. Chain Piecing: Chain piecing is a time-saving technique where you sew multiple pieces together without stopping and starting with each piece. This involves sewing one piece to another, continuously feeding the next set of pieces through the machine until all the pairs are stitched. Snip the chains apart, and then press the seams open or to one side as per the pattern instructions.
5. Accuracy and Alignment: Pay attention to accurate cutting and aligning the fabric pieces. Use pins or sewing clips to hold the pieces together before sewing. Check for precise corners, points, and intersections to ensure your quilt blocks come together accurately.
6. Pressing: Press your seams after each sewing step. Set the seam by pressing it flat, and then open or press the seam to one side as directed by the pattern. Use an iron set to the appropriate temperature for your fabric type to achieve crisp seams.
7. Assembling the Blocks: Once you have pieced the individual blocks according to the pattern, start arranging and sewing them together to form the quilt top. Follow the pattern instructions for the block layout and the order of piecing them together.
8. Borders and Sashing: Some quilt patterns may require adding borders or sashing strips to frame or separate the blocks. Measure and cut the border or sashing strips as directed by the pattern. Sew them in place, aligning the corners and edges accurately. Press the seams flat.
9. Square up the Quilt Top: After piecing all the blocks and adding any necessary borders or sashing, square up the quilt top by trimming the edges to ensure they are straight and even.
Piecing the quilt top is an exciting and creative process. Take your time, be patient, and enjoy the journey as you watch your quilt design come to life. Once the quilt top is completed, it’s time to move on to the next step: layering the quilt.
Layering the Quilt
Layering the quilt is a crucial step in the quilting process as it involves assembling the quilt top, batting, and backing fabric to create a three-layered quilt sandwich. This step sets the foundation for the quilting stitches that will hold everything together. Here’s a step-by-step guide on how to layer your quilt:
1. Prepare the Backing Fabric: Start by preparing the backing fabric. Ensure the fabric is larger than the quilt top on all sides, providing ample room for quilting and binding. Press the fabric to remove any wrinkles or creases.
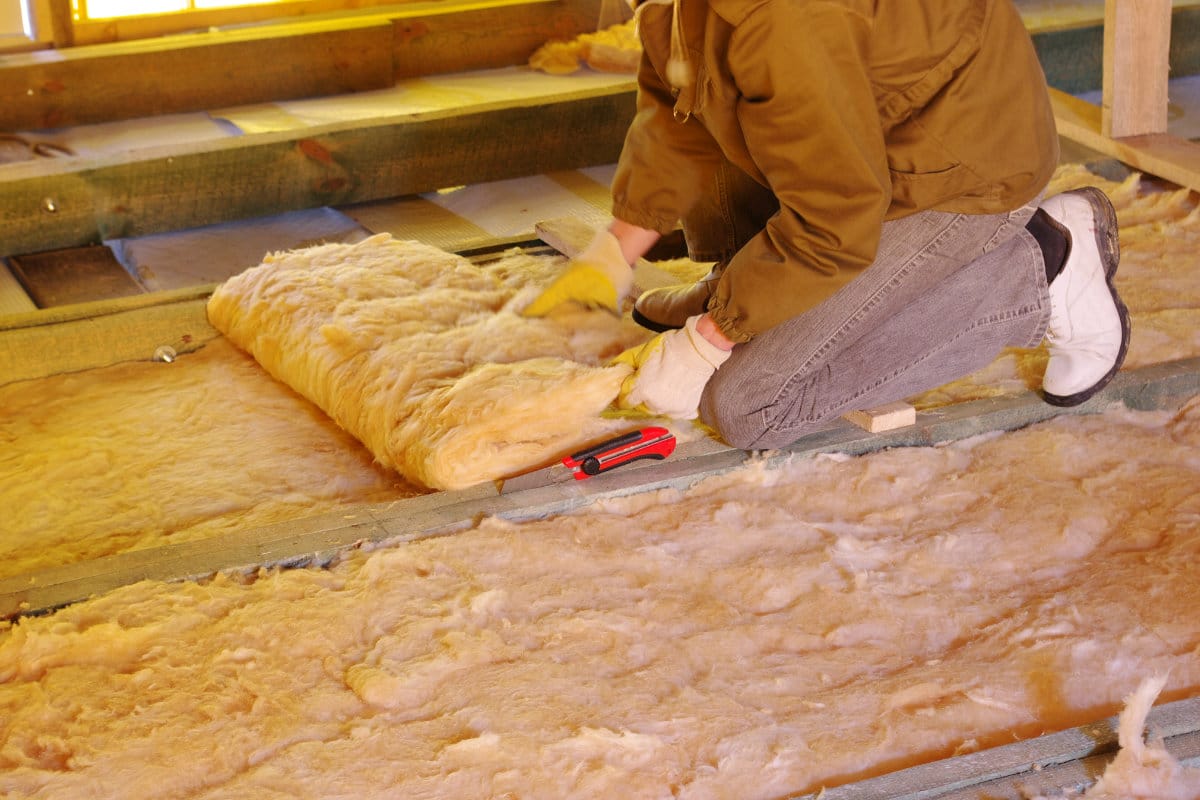
2. Batting Selection: Choose a batting that suits your desired level of warmth, loft, and drape. Batting comes in various materials, such as cotton, wool, polyester, and blends. Measure and cut the batting to match the size of your quilt top.
3. Work on a Flat Surface: Lay the backing fabric on a flat surface, wrong-side up. Use masking tape or quilting safety pins to secure the edges of the fabric to the surface, ensuring it remains taut and wrinkle-free throughout the layering process.
4. Center the Batting: Place the cut batting in the center of the backing fabric, aligning the edges. Smooth out any wrinkles or folds in the batting to ensure an even and flat surface.
5. Add the Quilt Top: Carefully place the quilt top on the batting, right-side up. Align the edges of the quilt top with the edges of the backing fabric and batting, ensuring everything is centered and straight.
6. Smooth and Secure: Smooth out any wrinkles or ripples in the layers, starting from the center and working your way towards the edges. Use quilting safety pins or basting spray to secure the layers together, placing pins or spraying at regular intervals to hold everything in place.
7. Check for Tautness: As you secure the layers, periodically check that the quilt top, batting, and backing fabric are taut and even throughout the quilt. Adjust and reposition as needed.
8. Quilt Basting: Once the layers are secure, baste the quilt by stitching large, loose stitches through all layers. This temporary basting will hold the quilt together during the quilting process.
Layering the quilt is a crucial step that ensures the durability and stability of your finished quilt. Taking the time to properly align and secure the layers will result in a smoother quilting process and a professionally finished quilt. With the layers in place, you are now ready to explore the various quilting techniques to bring your quilt to life.
Quilting Techniques
Quilting techniques refer to the stitching methods used to secure the layers of the quilt together. Quilting not only provides functional strength but also adds decorative elements and enhances the overall aesthetic appeal of the quilt. Here are some popular quilting techniques to consider:
1. Hand Quilting: Hand quilting is a traditional technique that involves stitching the layers together by hand. Quilters use a needle and thread to create even, small stitches that traverse the quilt top, batting, and backing fabric. Hand quilting allows for intricate designs and a unique overall look.
2. Machine Quilting: Machine quilting involves using a sewing machine to stitch the layers together. This technique provides greater speed and precision compared to hand quilting. Quilters can choose from various machine quilting methods, such as free-motion quilting, where the machine’s feed dogs are lowered, allowing the quilter to move the quilt freely under the needle.
3. Longarm Quilting: Longarm quilting refers to using a specialized longarm quilting machine to quilt the layers together. Longarm machines have a large frame that holds the layers taut, allowing for intricate and continuous stitching patterns. This technique is often used by professional quilters or quilt services.
4. Walking Foot Quilting: Walking foot quilting is a machine quilting technique that utilizes a specialized walking foot attachment. This foot helps feed the layers evenly, preventing fabric shifting and puckering. Walking foot quilting is ideal for straight-line quilting, stitch-in-the-ditch quilting, or gentle curves.
5. Free-Motion Quilting: Free-motion quilting is a technique that allows quilters to create intricate and personalized designs by moving the fabric and the machine’s needle freely in any direction. This technique requires practice to achieve smooth and fluid movements.
6. Quilting Stencils: Quilting stencils are pre-cut or pre-printed templates that provide guidelines for quilting designs. Quilters can trace the design onto the quilt top and use it as a guide for hand or machine quilting.
7. Computerized Quilting: Computerized quilting involves using computer software and a specialized quilting machine to create intricate quilting patterns. Quilters can choose from a vast library of pre-loaded designs or create their own custom quilting patterns.
When selecting a quilting technique, consider your skill level, the desired look of your quilt, and the time and resources available to you. Experimentation and practice will help you develop your quilting skills and find the techniques that suit your style and quilting goals. Once the quilting is complete, it’s time to finish the edges of the quilt with binding.
Read more: What Is A Trampoline Made Of
Binding the Quilt
Binding is the final step in completing a quilt. It involves attaching a fabric strip around the raw edges of the quilt to create a finished frame and secure the layers together. Binding not only provides a polished look to the quilt but also strengthens and protects the edges. Here’s a step-by-step guide on how to bind a quilt:
1. Fabric Selection: Choose a fabric for the binding that complements your quilt design. You can use a matching fabric, a contrasting fabric, or even a scrappy binding made from leftover pieces. Make sure to cut enough binding strips to cover the perimeter of your quilt, plus a little extra for seams.
2. Binding Preparation: Trim the selvage edges from the binding fabric and cut it into strips. The width of the strips will depend on your desired finished binding width, typically between 2.5 to 3 inches. You can join the strips together by sewing them diagonally to create a continuous length of binding.
3. Prepare the Quilt: Trim the excess batting and backing fabric, leaving a clean edge around the quilt top. Ensure the quilt edges are neat and squared-off.
4. Sewing the Binding: Starting on one side of the quilt, leave a tail of binding and align the raw edges of the binding strip with the raw edges of the quilt. Sew the binding to the quilt using a ¼ inch seam allowance, leaving a few inches of binding unsewn at the beginning.
5. Mitered Corners: When you approach a corner, stop sewing a ¼ inch away from the edge. Fold the binding up vertically, then fold it back down horizontally, aligning the fold with the next side of the quilt. Begin sewing the next side, making sure to backstitch at the start and end of each seam.
6. Joining the Binding Ends: When you reach the starting point, trim the excess binding and overlap it with the tail. Open up the binding strips, align and mark a 45-degree angle on each strip, sew along the marked line, and trim the seam allowances. Fold the binding back in place and finish sewing to complete the binding.
7. Final Steps: Press the binding away from the quilt top and then fold it over the raw edges to the back of the quilt. Pin or clip in place. Hand stitch the folded edge of the binding to the back of the quilt using a slipstitch or blind hem stitch.
Binding adds the final touch to your quilt, giving it a polished and professional appearance. Take your time with the binding process to ensure clean and even stitches. Once the binding is complete, your quilt is ready for the finishing touches.
Finishing Touches
With the quilt top pieced, the layers quilted, and the binding attached, it’s time to add the finishing touches to your quilt. These final steps will give your quilt a polished and professional look while ensuring its durability and longevity. Here are some essential finishing touches to consider:
1. Labeling: Adding a label to your quilt is a thoughtful and personal touch. A label can include your name, the date, the quilt’s name, and any other relevant details. It serves as a reminder of your creative process and preserves the story behind the quilt for future generations.
2. Washing and Blocking: Before showcasing or gifting your quilt, it’s recommended to wash and block it. Washing removes any remaining marking lines, basting stitches, or excess dye, and can enhance the quilt’s texture. Blocking involves gently stretching and shaping the quilt to ensure it lies flat and square.
3. Sleeve or Hanging Tabs: If you intend to hang your quilt, consider adding a sleeve or hanging tabs to the back. This allows for easy display on a wall or quilt rack. The sleeve should be a strip of fabric stitched to the upper back edge of the quilt, wide enough to accommodate a dowel or rod.
4. Embellishments: Depending on your quilt design and personal preference, you may choose to add embellishments. This could include embroidery, buttons, beads, or appliqué. Be mindful of the functionality and intended use of the quilt when adding decorative elements.
5. Photography: Capture the beauty of your quilt by taking photographs. High-quality images will preserve the memories and allow you to share your quilt with others online or in print. Capture both close-up details and full-sized shots to showcase the intricacies of your work.
Remember, the finishing touches are part of the final presentation of your quilt. Take the time to add these details and ensure that your quilt is clean, pressed, and ready to be enjoyed or gifted. Admire your hard work and dedication as your completed quilt becomes a cherished piece of art.
As you embark on your next quilting adventure, don’t forget to have fun and experiment with new techniques, colors, and designs. With each quilt, you will continue to refine your skills and create unique and beautiful quilts that will be treasured for years to come.
Conclusion
Quilting is not just a craft; it’s a journey of creativity, passion, and dedication. Throughout history, quilts have served as a functional and artistic expression of craftsmanship, community, and personal stories. Understanding the process of quilt making, from choosing fabrics to adding the finishing touches, allows us to appreciate the artistry and skill that goes into creating these beautiful and meaningful pieces.
We’ve explored the definition of a quilt, delved into the rich history of quilt making, learned about various quilting techniques, and discovered the importance of selecting fabrics, patterns, and binding methods. Each step in the quilting process contributes to the final creation, resulting in a quilt that is not only visually appealing but also holds sentimental value.
Quilting is a form of self-expression. It allows us to showcase our creativity, tell our stories, and honor our traditions. The act of cutting, piecing, quilting, and binding fabric together is a way to connect with our past, express our present, and leave a lasting legacy for the future.
Whether you are a beginner just starting your quilting journey or an experienced quilter looking for new challenges, quilting offers endless possibilities. With the right tools, techniques, and a spirit of exploration, you can create quilts that are as unique as you are.
So, gather your fabrics, select your pattern, unleash your creativity, and let the hum of the sewing machine or the smooth glide of the needle and thread guide you on this delightful quilting adventure. Whether you make a cozy lap quilt, an intricately designed wall hanging, or a treasured heirloom, your quilts will not only warm the body but also touch the soul.
Embrace the art of quilt making, and let your stitches weave together memories, stories, and love that will be passed down for generations to come. Happy quilting!
Frequently Asked Questions about What Is A Quilt And How Is It Made?
Was this page helpful?
At Storables.com, we guarantee accurate and reliable information. Our content, validated by Expert Board Contributors, is crafted following stringent Editorial Policies. We're committed to providing you with well-researched, expert-backed insights for all your informational needs.


0 thoughts on “What Is A Quilt And How Is It Made?”