Articles
Why Is My Water Pump Making Noise
Modified: January 6, 2024
Discover why your water pump is making noise with our informative articles. Learn how to troubleshoot and fix common pump issues.
(Many of the links in this article redirect to a specific reviewed product. Your purchase of these products through affiliate links helps to generate commission for Storables.com, at no extra cost. Learn more)
Introduction
A water pump is an essential component of various systems, including residential, commercial, and industrial setups. It plays a crucial role in circulating water, maintaining water pressure, and ensuring proper functioning of the system it is installed in. However, there are instances where water pump noise becomes a concern for users. The unusual sounds emitted by a water pump can be annoying, disruptive, and even indicate potential issues with the pump.
In this article, we will explore the common causes of water pump noise and provide troubleshooting tips and solutions to address them. By understanding the underlying reasons behind the noise and implementing appropriate measures, you can ensure the smooth and silent operation of your water pump.
So, let’s dive into the common causes of water pump noise and how to fix them!
Key Takeaways:
- Addressing water pump noise requires systematic troubleshooting, including bleeding the system, checking for cavitation, inspecting the impeller, maintaining the motor, addressing water hammer, and aligning the pump. Regular maintenance is crucial for noise prevention.
- If water pump noise persists, seek professional assistance for further evaluation and resolution. Understanding the common causes and implementing appropriate solutions is essential for restoring a quiet and efficient water pump system.
Read more: Why Is My Projector Making Noise
Common Causes of Water Pump Noise
Water pump noise can be caused by various factors. Identifying the root cause is essential for effectively troubleshooting and resolving the issue. Here are some common reasons why water pumps may produce noise:
- Air in the System: Air trapped in the water pump or the associated pipes can cause a gurgling or hissing sound. This can happen due to improper installation, leaks, or air pockets that form over time.
- Cavitation: Cavitation occurs when the pressure of the fluid passing through the water pump drops too low, leading to the formation and collapse of gas bubbles. This can result in a rattling or grinding noise. Cavitation can be caused by a restriction in the water flow, an undersized pump, or pump suction problems.
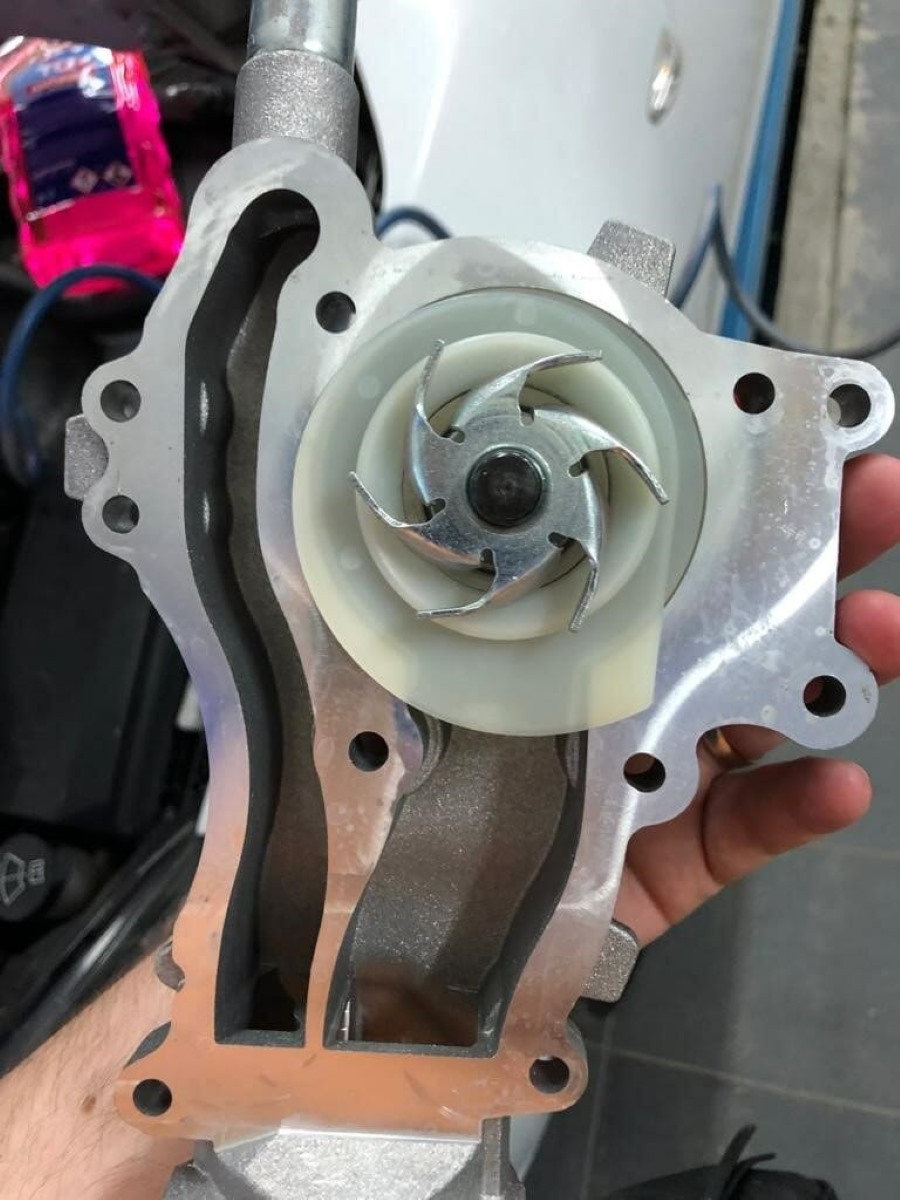
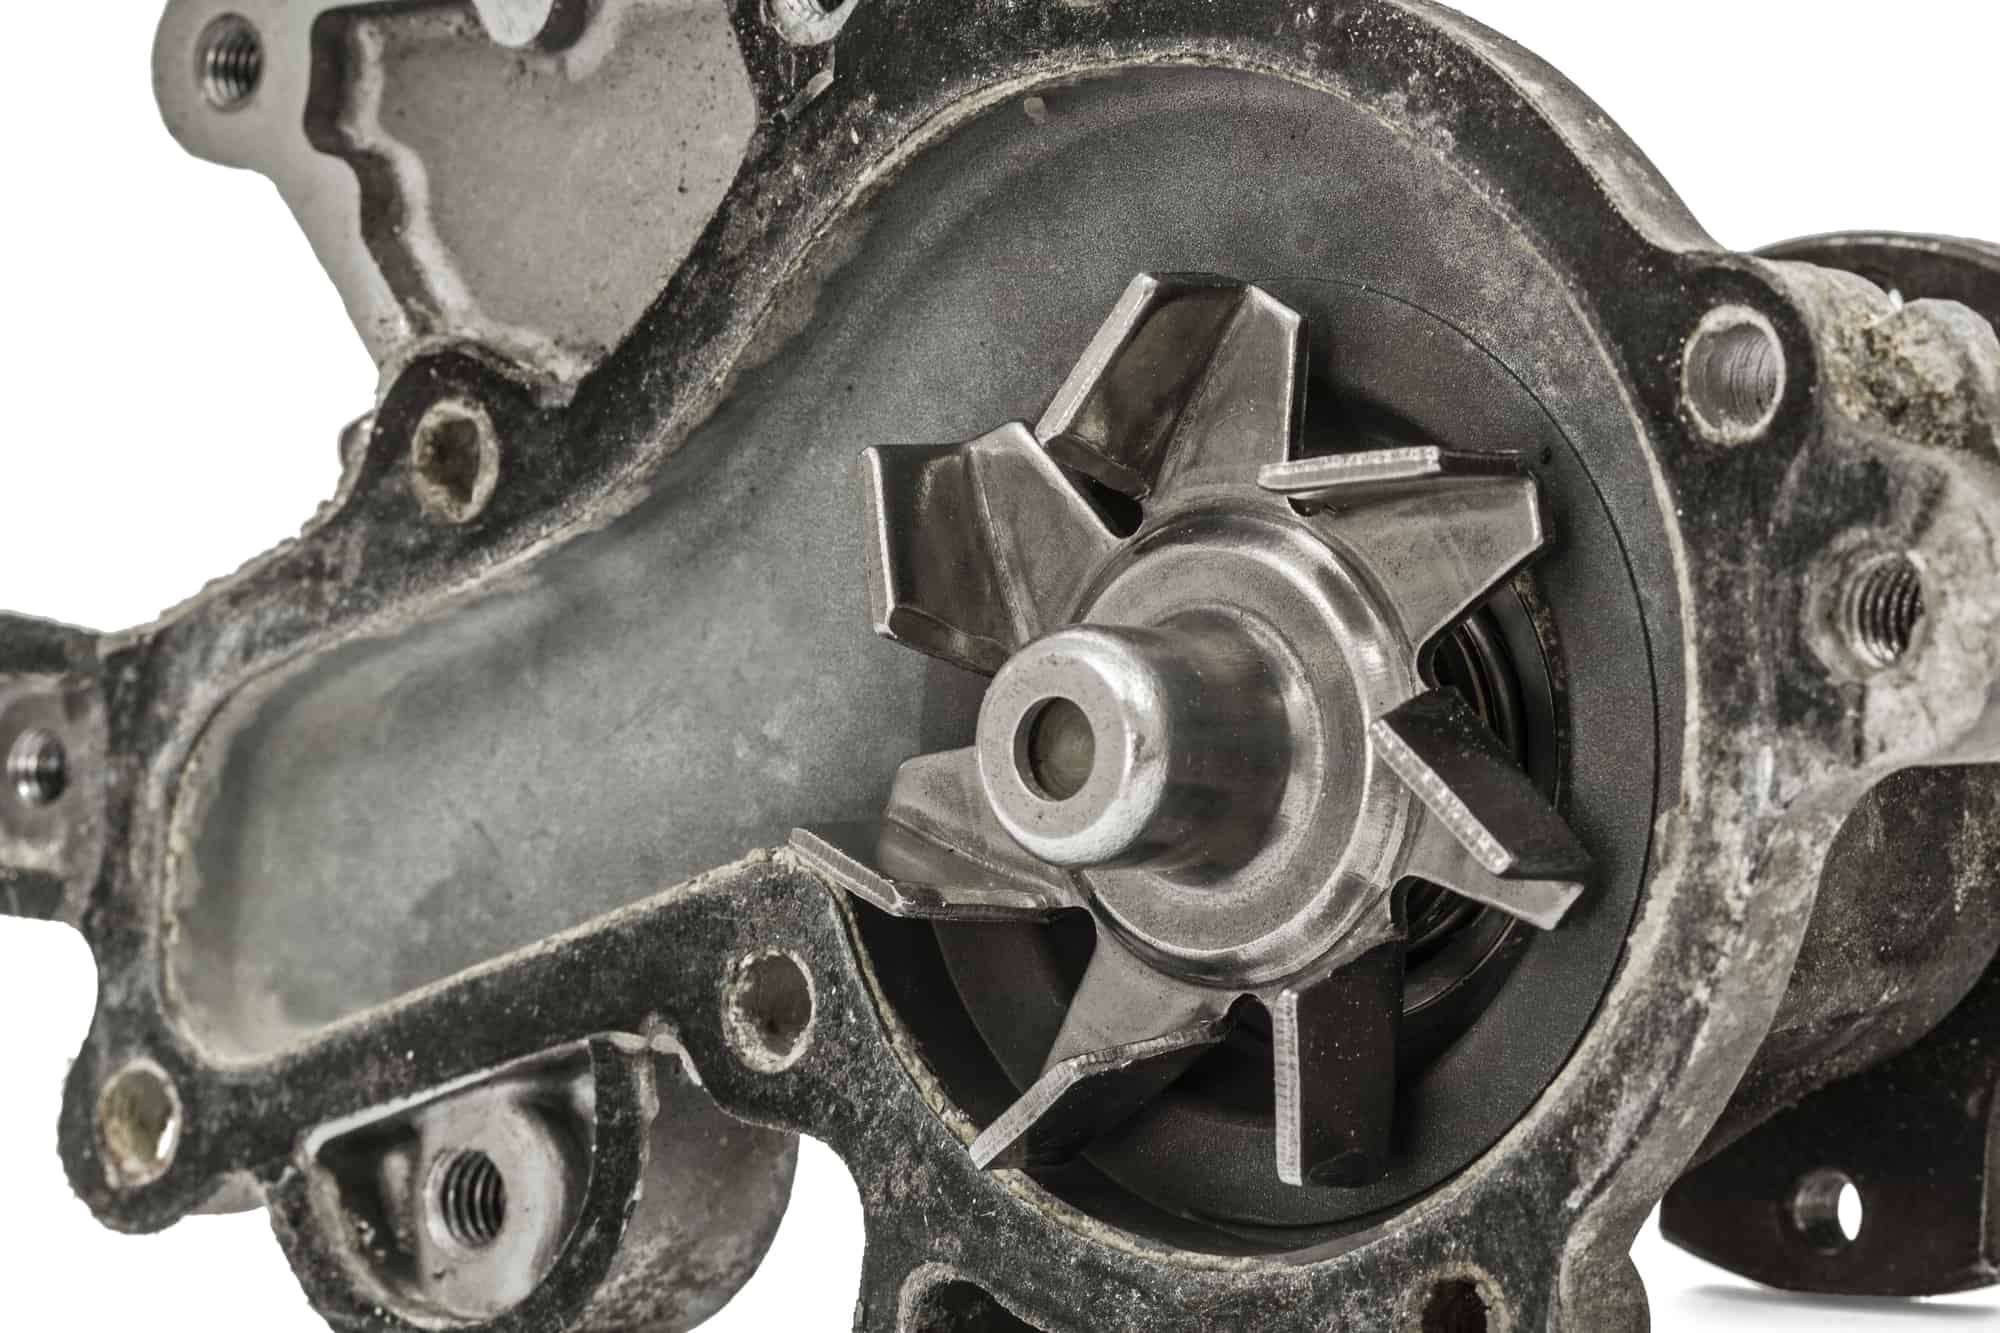
- Loose or Damaged Impeller: The impeller is responsible for moving the water through the pump. If it becomes loose or damaged, it can create a banging or whining noise. This can happen due to wear and tear, debris accumulation, or improper maintenance.
- Motor Issues: The water pump’s motor can also be a source of noise. Worn-out bearings, misalignment, or motor malfunctions can cause grinding, squeaking, or humming sounds.
- Water Hammer: Water hammer occurs when the flow of water is suddenly stopped or redirected, causing a shockwave that can generate loud banging noises. This can happen due to sudden valve closures, pressure surges, or incorrect pipe installation.
- Vibrations and Misalignment: Excessive vibrations can occur if the water pump is not properly mounted or aligned. These vibrations can produce a rumbling or buzzing noise. Misalignment can be caused by poor installation, worn-out mounting pads, or structural issues.
Understanding these common causes of water pump noise is the first step towards troubleshooting and solving the problem. In the next section, we will discuss effective solutions for each issue to help you restore the quiet and efficient operation of your water pump.
Air in the System
One of the common causes of water pump noise is air trapped in the system. When air is present, it can create gurgling or hissing sounds as water passes through the pump and pipes. Air can enter the system due to improper installation, leaks, or air pockets that develop over time.
To address this issue, you need to bleed the air from the system. Here’s how you can do it:
- Start by shutting off the water pump and closing any valves connected to it.
- Locate the bleed valve on the pump or in the pipe system. This valve is usually a small screw or knob that can be opened to release trapped air.
- Place a container underneath the valve to catch any water that may flow out during the bleeding process.
- Slowly open the bleed valve to release the air. You should hear a hissing sound as the air escapes.
- Keep the valve open until a steady stream of water comes out without any air bubbles.
- Once all the air is purged, close the bleed valve tightly and reopen any valves that were closed earlier.
- Restart the water pump and observe if the noise has subsided. If not, move on to the next troubleshooting step.
If the air in the system persists or if you are unable to locate the bleed valve, it is recommended to seek assistance from a professional plumber or technician. They can further diagnose the issue and provide appropriate solutions.
Remember, proper installation and regular maintenance are essential to prevent the recurrence of air pockets and ensure the smooth and quiet operation of your water pump.
Cavitation
Cavitation is another common cause of water pump noise. It occurs when the pressure of the fluid passing through the pump drops too low, leading to the formation and collapse of gas bubbles. This can result in a rattling or grinding noise.
To address cavitation and reduce the associated noise, follow these troubleshooting steps:
- Check for any restrictions in the water flow, such as clogged filters or blocked intake pipes. Clear any obstructions to allow for a smooth flow of water.
- Verify that the pump is properly sized for the intended application. An undersized pump can lead to cavitation. Consult the pump’s specifications or an expert to ensure it meets the requirements.
- Inspect the pump’s suction line for any leaks or air leaks. These can contribute to cavitation. Repair or replace damaged or faulty components as needed.
- Consider installing a pressure relief valve or a vacuum relief valve in the system. These valves help mitigate pressure variations and prevent cavitation.
- Ensure that the water level in the source or reservoir remains adequate to prevent the pump from drawing in air. If necessary, adjust the water level or the pump’s intake location.
- Regularly maintain and clean the pump to prevent debris buildup, which can exacerbate cavitation. Remove any accumulated debris from the impeller and the pump’s internal components.
Addressing cavitation effectively will not only reduce the noise but also help maintain the pump’s performance and extend its lifespan. If the noise persists despite troubleshooting efforts, it is advisable to consult a qualified technician or pump specialist for further diagnosis and resolution.
Loose or Damaged Impeller
The impeller is a crucial component of a water pump as it is responsible for moving the water through the pump. If the impeller becomes loose or damaged, it can create a banging, clanking, or whining noise.
To address this issue and resolve the noise caused by a loose or damaged impeller, follow these troubleshooting steps:
- Shut off the water pump and disconnect the power supply to ensure safety during inspection and maintenance.
- Locate the pump’s housing or casing and remove any covers or access panels to gain access to the impeller.
- Inspect the impeller for any signs of looseness, damage, or debris accumulation. Rotate the impeller manually to check for any grinding or rubbing.
- If the impeller is loose, tighten the impeller nut or screw according to the manufacturer’s instructions. Ensure it is securely fastened but be cautious not to overtighten.
- If the impeller is damaged or worn out, it may need to be replaced. Consult the manufacturer’s guidelines or seek professional assistance to determine the appropriate replacement impeller and the necessary installation steps.
- While inspecting the impeller, also check the pump’s bearings and shaft for any signs of wear or damage. If needed, lubricate or replace these components as per the manufacturer’s recommendations.
- After completing the maintenance and reassembly, power up the water pump and monitor for any noise. The noise should be eliminated or significantly reduced if the loose or damaged impeller was the cause.
Regular inspection and maintenance of the impeller are essential to prevent issues and ensure optimal performance of the water pump. Routinely clean the impeller and remove any debris that may interfere with its operation. Also, be mindful of correct installation techniques to avoid impeller-related noise in the future.
If the noise persists after conducting these troubleshooting steps, it is advisable to consult a qualified technician or pump specialist for further evaluation and resolution of the issue.
Read more: What Noise Does A Cold Water Pump Make?
Motor Issues
The water pump’s motor can also be a common source of noise. Worn-out bearings, misalignment, or motor malfunctions can cause grinding, squeaking, or humming sounds. Addressing motor issues is crucial to restore the quiet and efficient operation of the water pump.
Here are some troubleshooting steps to help resolve motor-related noise:
- Start by shutting off the water pump and disconnecting the power supply to ensure safety during inspection and maintenance.
- Inspect the motor for any visible signs of damage or wear, such as loose connections, frayed wires, or damaged components. Address any noticeable issues promptly, either by tightening connections or repairing/replacing damaged parts.
- Check the motor’s bearings for wear or lack of lubrication. If the bearings are worn out or dry, they can emit grinding or squeaking noises. Lubricate the bearings following the manufacturer’s instructions or seek professional assistance to replace them if necessary.
- Inspect the motor’s alignment by visually examining the coupling between the motor and the pump. Ensure that they are properly aligned and free from any obstructions or damage. If misalignment is detected, realign the motor and the pump according to the manufacturer’s guidelines.
- If the motor emits a humming sound without any movement, it may indicate an electrical fault. Check for loose or faulty electrical connections, blown fuses, or tripped breakers. Address any electrical issues and restore proper power supply to the motor.
- For complex motor issues or if you are unsure about electrical troubleshooting, it is recommended to seek assistance from a professional electrician or pump technician to diagnose and resolve the problem safely and effectively.
Regular motor maintenance, including cleaning, lubrication, and periodic inspection, is essential to prevent motor-related noise and ensure the longevity of the water pump. Follow the manufacturer’s recommendations for motor maintenance and adhere to a preventive maintenance schedule.
If the noise persists after taking these troubleshooting steps, it is advisable to consult a qualified technician or pump specialist for further evaluation and resolution of the motor-related issues.
Water Hammer
Water hammer is a common phenomenon in plumbing systems that can cause loud banging or knocking noises. It occurs when the flow of water is suddenly stopped or redirected, creating a shockwave that travels through the pipes. Water hammer can be caused by various factors, including sudden valve closures, pressure surges, or incorrect pipe installation.
To address water hammer and reduce the associated noise, follow these troubleshooting steps:
- Inspect the plumbing system for any loose or faulty valves. Ensure that all valves, such as shut-off valves or check valves, are functioning properly and closing gently to avoid abrupt water flow changes.
- Consider installing water hammer arrestors. These devices absorb the shockwaves caused by sudden water flow changes, preventing the noise associated with water hammer. Consult a professional plumber to determine the appropriate type and position of water hammer arrestors for your system.
- Check the water pressure in your system. High water pressure can contribute to water hammer. If the pressure exceeds the recommended levels, install a pressure reducing valve to regulate the water pressure and mitigate the risk of water hammer.
- Inspect the pipe installation for any issues that may aggravate water hammer, such as inadequate supports or improper pipe sizing. Make sure the pipes are securely fastened, properly insulated, and protected from excessive movement or vibration.
- If possible, install air chambers in the plumbing system. Air chambers act as shock absorbers, preventing the shockwave caused by sudden water flow changes from reaching the pipes and generating noise.
- Consider using water hammer arrestor devices that incorporate advanced technology, such as mechanical or electronic controls, to further reduce water hammer and noise. These devices can help regulate water flow and minimize pressure surges.
By addressing water hammer effectively, you can not only eliminate the noise but also protect your plumbing system from potential damage caused by the repeated shockwaves. If the noise persists or if you require assistance with installing water hammer prevention devices, it is advisable to consult a professional plumber for further evaluation and resolution.
Vibrations and Misalignment
Excessive vibrations and misalignment can contribute to noise in a water pump. These issues can occur if the pump is not properly mounted or aligned, leading to a rumbling or buzzing noise. Addressing vibrations and misalignment is crucial for the smooth and quiet operation of the pump.
Follow these troubleshooting steps to resolve vibrations and misalignment:
- Start by shutting off the water pump and disconnecting the power supply to ensure safety during inspection and maintenance.
- Inspect the mounting pads or brackets that secure the pump. Ensure that they are in good condition and free from any damage or wear. If the pads are worn out, replace them to provide proper support and reduce vibrations.
- Check the coupling between the motor and the pump. Verify that it is securely connected and properly aligned. If misalignment is detected, adjust the coupling following the manufacturer’s guidelines to ensure proper alignment.
- Inspect the pump and its associated components for any loose parts or fittings. Securely tighten any loose fittings, bolts, or screws to prevent vibrations and noise.
- Verify that the pump is mounted on a solid and stable surface. If necessary, reinforce the mounting surface or use vibration-absorbing materials to reduce vibrations and noise transmission.
- Consider using vibration isolation pads or mounts to further reduce vibrations. These pads or mounts help absorb and dampen vibration energy, minimizing noise transmission in the surrounding environment.
- If the pump operates at high speeds, it may require dynamic balancing to correct any unbalanced forces. Consult a professional technician or pump specialist to perform dynamic balancing if needed.
Proper installation and maintenance are key to preventing vibrations and misalignment in a water pump. Routine inspection, checking for secure connections and wear, and addressing any issues promptly can help maintain the pump’s stability and reduce noise levels.
If the noise persists after following these troubleshooting steps, it is recommended to consult a qualified technician or pump specialist for further evaluation and resolution of the vibration and misalignment issues.
Check for any loose or damaged parts in the water pump, such as the impeller or bearings. Also, make sure the pump is properly lubricated and the water flow is not restricted.
Troubleshooting and Solutions
When dealing with water pump noise, it is important to follow a systematic troubleshooting approach to identify the underlying cause and implement effective solutions. Here are some general troubleshooting steps that can help address water pump noise:
- Step 1: Identify the source of the noise: Listen closely to pinpoint the location of the noise. Determining whether it originates from the pump itself, the motor, or other components can help narrow down the possible causes.
- Step 2: Inspect for visible damage and wear: Check the pump, motor, impeller, and associated components for any signs of damage, wear, or loose connections. Address any visible issues promptly to prevent further damage and noise.
- Step 3: Check for proper installation and alignment: Ensure that the pump is correctly installed and aligned according to the manufacturer’s guidelines. Misalignment or incorrect installation can cause noise and affect the pump’s performance.
- Step 4: Perform regular maintenance: Maintain a regular maintenance schedule for the water pump. Clean the impeller, check for debris accumulation, and lubricate bearings if needed. Regular maintenance helps prevent noise-causing issues and ensures optimal pump performance.
- Step 5: Address specific causes: Once you identify the specific cause of the water pump noise, implement the appropriate solutions. This may involve bleeding the system, addressing cavitation, inspecting and repairing the impeller, resolving motor issues, mitigating water hammer, or correcting vibrations and misalignment.
- Step 6: Seek professional help if needed: If the noise persists or if you are unsure about performing troubleshooting steps, it is advisable to consult a qualified plumber or technician. They can provide expert guidance, diagnose complex issues, and offer effective solutions.
Remember, resolving water pump noise requires a combination of proper troubleshooting, maintenance, and timely implementation of solutions. Regularly monitor your water pump for any unusual sounds and address noise-related issues promptly to ensure a quiet and efficient water pumping system.
Read more: Why Is My HVAC Making Noise
Bleeding the System
One common solution to address water pump noise is to bleed the system, specifically if the noise is caused by air trapped in the system. Bleeding the system involves removing the trapped air and allowing for smooth water flow, which can help reduce noise and restore the proper functioning of the pump.
Here are the steps to bleed the system:
- Shut off the water pump and close any valves connected to it to prevent water flow.
- Locate the bleed valve, typically found near the topmost part of the pump or at high points in the piping system. This valve is often a small screw or knob that can be opened to release trapped air.
- Place a container or towel underneath the bleed valve to catch any water that may flow out during the process.
- Using a screwdriver or a suitable tool, slowly open the bleed valve in a counterclockwise direction to release the air. You may hear a hissing sound as the air escapes from the system.
- Keep the valve open until a steady stream of water flows out without any air bubbles. This indicates that the air has been fully purged from the system.
- Once the air is removed, tightly close the bleed valve by turning it clockwise.
- Reopen any valves that were previously closed and restore power to the water pump.
- Monitor the pump while it operates to see if the noise has been resolved. If not, additional troubleshooting steps may be required.
Bleeding the system is a straightforward process and can often effectively eliminate noise caused by air pockets. However, if the noise persists or if you are unsure about bleeding the system, it is recommended to consult a professional plumber or technician for assistance.
Checking for Cavitation
If you suspect cavitation is the cause of the water pump noise, it is important to check for this issue and take appropriate measures. Cavitation can disrupt the smooth flow of water and generate rattling or grinding noises. Here’s how you can check for cavitation and address it:
- Inspect the water pump and associated components, including the suction line and intake pipe, for any visible signs of damage, blockages, or restrictions. Clear any obstructions or debris that may be hindering the water flow.
- Check the pump’s specifications and ensure that it is properly sized for the intended application. An undersized pump can result in cavitation issues. Consult the manufacturer’s guidelines or seek professional advice if you are unsure about the correct pump size.
- Monitor the pump’s suction pressure. Excessively low suction pressure can indicate the presence of cavitation. Use a pressure gauge to measure the suction pressure and compare it against the manufacturer’s recommended operating range.
- Inspect the impeller for signs of damage, wear, or debris accumulation. A damaged or clogged impeller can contribute to cavitation. Clean the impeller if necessary or consider replacing it if damage is detected.
- Verify that the intake pipe and suction line are properly installed and free from leaks or air leaks. Leaks or air infiltration in these components can disrupt the water flow and contribute to cavitation. Repair any leaks or replace damaged components as needed.
- Consider installing a pressure relief valve or a vacuum relief valve in the system. These valves can help mitigate pressure variations, preventing cavitation from occurring. Consult with a professional plumber or technician to determine the appropriate type and installation location for these valves.
- Ensure that the water level in the source or reservoir remains adequate to prevent the pump from drawing in air. If necessary, adjust the water level or the pump’s intake location to maintain the proper water supply.
- If the cavitation issue persists or if you are unable to determine the exact cause, it is advisable to consult a qualified technician or pump specialist for further evaluation and resolution.
Addressing cavitation promptly is crucial to prevent further damage to the pump and associated components. If left unattended, cavitation can lead to reduced pump performance and increased wear on the impeller, ultimately affecting the longevity of the pump.
By performing these checks and taking appropriate actions, you can effectively diagnose and resolve cavitation issues, restoring the quiet and efficient operation of your water pump.
Inspecting the Impeller
An impeller is a critical component of a water pump that helps move water through the system. If the impeller is loose, damaged, or clogged with debris, it can contribute to noise and impact the pump’s performance. Inspecting the impeller and taking appropriate measures can help address these issues. Here’s how you can inspect the impeller:
- Start by shutting off the water pump and disconnecting the power supply to ensure safety during inspection and maintenance.
- Locate the pump’s housing or casing and remove any covers or access panels necessary to access the impeller. Refer to the manufacturer’s guidelines or seek professional advice if you are unsure about the disassembly process.
- Visually inspect the impeller for any visible signs of damage, wear, or clogging. Check for any cracks, chips, or loose components. Clean the impeller carefully if it is clogged with debris or sediment buildup.
- Rotate the impeller manually to check for any grinding, rubbing, or imbalance. A damaged or misaligned impeller can cause noise and affect the pump’s efficiency. If you suspect an issue, contact a professional technician or pump specialist for further evaluation.
- If the impeller is loose, tighten the impeller nut or screw according to the manufacturer’s instructions. Ensure it is securely fastened, but be cautious not to overtighten.
- If the impeller is damaged or worn out beyond repair, it may need to be replaced. Consult the manufacturer’s guidelines or seek professional assistance to determine the appropriate replacement impeller and the necessary installation steps.
- While inspecting the impeller, also check the pump’s bearings and shaft for any signs of wear or damage. Lubricate or replace these components as per the manufacturer’s recommendations if necessary.
- After completing the inspection and maintenance, reassemble the pump and restore power to it.
Regular inspection and maintenance of the impeller are crucial to prevent issues and ensure the optimal performance of the water pump. Routinely clean the impeller and remove any debris that may interfere with its operation. Additionally, ensure that the impeller is properly aligned and mounted to prevent noise and reduce wear and tear.
If the noise persists after inspecting the impeller or if you are unsure about the inspection process, it is advisable to consult a qualified technician or pump specialist for further evaluation and resolution of the issue.
Motor Inspection and Maintenance
The water pump’s motor is a crucial component that can contribute to noise if it experiences issues such as worn-out bearings, misalignment, or motor malfunctions. By inspecting and maintaining the motor, you can identify and address the underlying problems to restore a quiet and efficient operation. Here’s how to inspect and maintain the motor:
- Start by shutting off the water pump and disconnecting the power supply to ensure safety during inspection and maintenance.
- Visually inspect the motor for any visible signs of damage, wear, or loose connections. Check for frayed wires, loose bolts, or any physical damage. Address any issues by tightening connections or replacing damaged parts.
- Check the motor’s bearings for wear or lack of lubrication. Worn-out bearings can cause grinding or squeaking noises. Lubricate the bearings following the manufacturer’s instructions or seek professional assistance to replace them if necessary.
- Inspect the motor’s alignment by visually examining the coupling between the motor and the pump. Ensure that they are properly aligned and free from any obstructions or damage. If misalignment is detected, realign the motor and the pump according to the manufacturer’s guidelines.
- Check the motor’s electrical components, such as capacitors, switches, and wiring. Look for signs of overheating, burning, or electrical faults. Replace any faulty components or seek professional assistance if electrical troubleshooting is required.
- Inspect the motor’s cooling mechanisms, such as fans or vents, for any accumulation of dust or debris. Clean them carefully to ensure proper airflow and prevent overheating.
- Verify that the motor is receiving the correct voltage and the power supply is stable. Irregular voltage or power fluctuations can affect motor performance and contribute to noise. Consult a qualified electrician or technician if you suspect electrical issues.
- After completing the inspection and maintenance, ensure that all connections are secure, reassemble any disassembled parts, and restore power to the water pump.
Regular motor inspection and maintenance are essential to prevent issues and ensure optimal performance. Engaging in routine cleaning, lubrication, and periodic inspection can help identify and address motor-related noise before it escalates.
If the noise persists after inspecting and maintaining the motor or if you are uncertain about the inspection process, it is advisable to consult a qualified technician or pump specialist for further evaluation and resolution of the motor-related issues.
Read more: Why Is My Water Pump Leaking
Addressing Water Hammer
Water hammer is a common issue that can cause loud banging or knocking noises in a plumbing system. It occurs when the flow of water is suddenly stopped or redirected, creating a shockwave that travels through the pipes. Addressing water hammer is crucial for restoring a quiet and efficient water pump operation. Here’s how you can address water hammer:
- Inspect the plumbing system for any loose or faulty valves. Ensure that all valves, such as shut-off valves or check valves, are functioning properly and closing gently to avoid abrupt water flow changes.
- Consider installing water hammer arrestors. These devices absorb the shockwaves caused by sudden water flow changes, preventing the noise associated with water hammer. Consult a professional plumber to determine the appropriate type and position of water hammer arrestors for your system.
- Check the water pressure in your system. High water pressure can contribute to water hammer. If the pressure exceeds the recommended levels, install a pressure reducing valve to regulate the water pressure and mitigate the risk of water hammer.
- Inspect the pipe installation for any issues that may aggravate water hammer, such as inadequate supports or improper pipe sizing. Make sure the pipes are securely fastened, properly insulated, and protected from excessive movement or vibration.
- If possible, install air chambers in the plumbing system. Air chambers act as shock absorbers, preventing the shockwave caused by sudden water flow changes from reaching the pipes and generating noise.
- Consider using water hammer arrestor devices that incorporate advanced technology, such as mechanical or electronic controls, to further reduce water hammer and noise. These devices can help regulate water flow and minimize pressure surges.
Addressing water hammer effectively can not only eliminate noise but also protect your plumbing system from potential damage caused by the repeated shockwaves. By implementing these solutions, you can prevent water hammer issues and ensure a quiet and efficient operation of your water pump.
If the noise persists after taking these steps, or if you require assistance with installing water hammer prevention devices, it is advisable to consult a professional plumber for further evaluation and resolution.
Aligning and Balancing the Pump
Proper alignment and balance of the water pump are essential for its smooth and quiet operation. Misalignment or imbalance can lead to excessive vibrations, which in turn cause noise and can affect the performance and lifespan of the pump. Here’s how you can align and balance the pump:
- Start by shutting off the water pump and disconnecting the power supply to ensure safety during the alignment and balancing process.
- Inspect the mounting pads or brackets that secure the pump. Ensure that they are in good condition and free from any damage or wear. If the pads are worn out, replace them to provide proper support and reduce vibrations.
- Check the coupling between the motor and the pump. Verify that it is securely connected and properly aligned. If misalignment is detected, adjust the coupling following the manufacturer’s guidelines to ensure proper alignment.
- Visually inspect the pump and its associated components for any signs of misalignment, such as gaps or uneven positioning. Make any necessary adjustments to align the pump properly.
- Check the impeller for any imbalance. An imbalanced impeller can cause vibrations and noise. If imbalance is detected, consider using dynamic balancing techniques to correct it. Consult a professional technician or pump specialist for dynamic balancing procedures.
- Ensure that the pump is mounted on a solid and stable surface. If necessary, reinforce the mounting surface or use vibration-absorbing materials to reduce vibrations and noise transmission.
- If excessive vibrations persist, check the motor’s alignment and balance as well. Misalignment or imbalance in the motor can contribute to noise and vibration in the pump. Consult a professional technician or motor specialist for assistance if needed.
- After aligning and balancing the pump, reassemble any disassembled parts, and restore power to the water pump.
Regular inspection and maintenance of the pump’s alignment and balance are crucial to prevent noise and ensure optimal performance. Monitoring for any signs of misalignment or imbalance and addressing them promptly can help reduce vibrations, noise, and potential damage to the pump.
If the noise persists after aligning and balancing the pump or if you are unsure about the alignment process, it is advisable to consult a qualified technician or pump specialist for further evaluation and resolution of the issue.
Conclusion
Water pump noise can be disruptive and indicate underlying issues with the pump. By understanding the common causes of water pump noise and implementing appropriate troubleshooting measures, you can restore a quiet and efficient operation, ensuring proper functioning of your water pump system.
We explored various causes of water pump noise, including air in the system, cavitation, loose or damaged impeller, motor issues, water hammer, and vibrations/misalignment. Each issue requires specific solutions to resolve the noise problem effectively.
Through bleeding the system, checking for cavitation, inspecting the impeller, inspecting and maintaining the motor, addressing water hammer, and aligning and balancing the pump, you can systematically troubleshoot and resolve water pump noise issues. Regular inspection, maintenance, and preventive measures are essential to prevent noise recurrence in the future.
If the noise persists despite troubleshooting efforts or if you are unsure about the diagnosis and resolution, it is recommended to seek professional assistance from plumbers, technicians, or pump specialists. They can provide expert guidance, conduct further evaluations, and ensure appropriate solutions.
By addressing water pump noise promptly and effectively, you can enjoy the benefits of a quiet and efficient water pump system. Remember to prioritize regular maintenance and monitoring to avoid potential issues and ensure the longevity of your water pump.
Frequently Asked Questions about Why Is My Water Pump Making Noise
Was this page helpful?
At Storables.com, we guarantee accurate and reliable information. Our content, validated by Expert Board Contributors, is crafted following stringent Editorial Policies. We're committed to providing you with well-researched, expert-backed insights for all your informational needs.


0 thoughts on “Why Is My Water Pump Making Noise”