Home>Furniture & Design>Interior Design Trends>How To Install A Tempered Glass Screen Protector
Interior Design Trends
How To Install A Tempered Glass Screen Protector
Modified: October 19, 2024
Learn how to properly install a tempered glass screen protector to keep up with the latest interior design trends. Follow our step-by-step guide for a flawless application.
(Many of the links in this article redirect to a specific reviewed product. Your purchase of these products through affiliate links helps to generate commission for Storables.com, at no extra cost. Learn more)
Introduction
Installing a tempered glass screen protector is a crucial step in safeguarding your device against scratches, cracks, and other forms of damage. Whether you're protecting a smartphone, tablet, or another electronic device, a tempered glass screen protector provides an additional layer of defense without compromising the device's touch sensitivity or display clarity.
By following a few simple steps, you can ensure a seamless and effective installation process. This article will guide you through the step-by-step process of installing a tempered glass screen protector, empowering you to protect your device and prolong its lifespan.
A tempered glass screen protector serves as a reliable shield, capable of absorbing impact and preventing damage to the underlying screen. Its durable composition and scratch-resistant surface make it an essential accessory for anyone seeking to preserve the pristine condition of their device.
With the prevalence of daily activities that pose a risk to electronic devices, such as accidental drops and abrasive contact with surfaces, the installation of a tempered glass screen protector is a proactive measure to mitigate potential harm. By taking the time to install this protective layer, you can enjoy peace of mind, knowing that your device is shielded from the wear and tear of everyday use.
In the following steps, you will learn how to gather the necessary materials, clean the screen, align the screen protector, apply it with precision, and ensure a bubble-free finish. By following these instructions, you can effectively safeguard your device and maintain its pristine appearance.
Now, let's embark on this journey to fortify your device with a tempered glass screen protector, ensuring that it remains unscathed and visually impeccable.
Key Takeaways:
- Protect your device with a tempered glass screen protector to prevent scratches and cracks. Follow the step-by-step guide for a seamless installation and enjoy peace of mind knowing your device is shielded from everyday wear and tear.
- Ensure a flawless installation by meticulously cleaning the screen, aligning the protector with precision, and smoothing out any air bubbles. Conduct thorough testing to confirm optimal functionality and visual appeal, preserving your device’s pristine condition.
Read more: How To Tell If Glass Is Tempered
Step 1: Gather the Necessary Materials
Before embarking on the installation process, it's essential to gather the required materials to ensure a smooth and successful application of the tempered glass screen protector. By having all the necessary items at hand, you can streamline the installation process and minimize the risk of interruptions or errors.
Here's a comprehensive list of the materials you'll need:
-
Tempered Glass Screen Protector: Select a high-quality tempered glass screen protector that is specifically designed for your device model. Ensure that the dimensions match the screen size of your device to guarantee a precise fit.
-
Microfiber Cloth: This soft, lint-free cloth is instrumental in preparing the screen surface by removing dust, fingerprints, and other particles that could hinder the adhesion of the screen protector.
-
Cleaning Wipes or Solution: Depending on the screen protector kit, you may need specialized cleaning wipes or a cleaning solution designed for electronic device screens. These are crucial for achieving a pristine, debris-free surface before applying the screen protector.
-
Dust Removal Stickers: These adhesive stickers are designed to lift away any remaining dust particles or lint from the screen, ensuring a clean and smooth surface for the screen protector.
-
Guide Stickers: These transparent stickers aid in aligning the screen protector accurately during the application process, preventing misalignment and ensuring a precise fit.
-
Dust-Free Environment: While not a physical material, it's crucial to work in a clean, dust-free environment to minimize the risk of debris getting trapped between the screen and the protector during installation.
By ensuring that you have all these materials readily available, you can proceed with confidence, knowing that you are fully equipped to install the tempered glass screen protector with precision and care. With the materials in hand, you are now prepared to move on to the next step in the installation process.
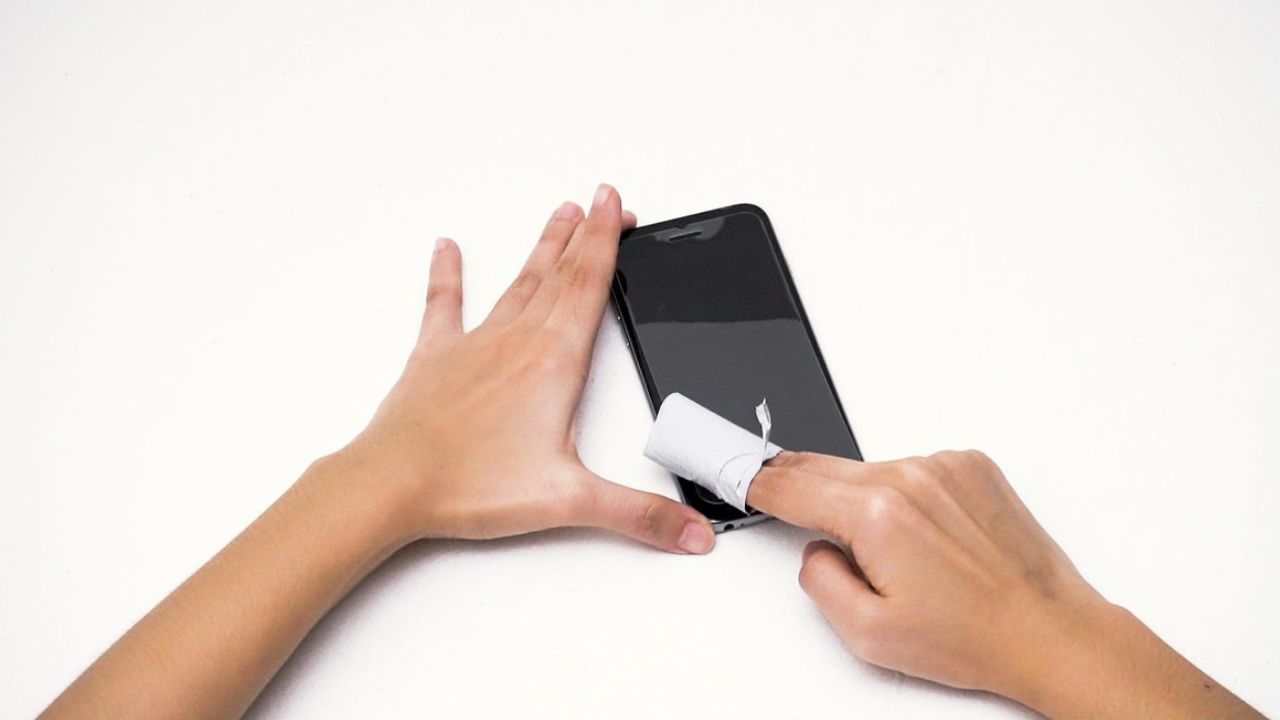
Step 2: Clean the Screen
The process of installing a tempered glass screen protector begins with ensuring that the device's screen is impeccably clean. This critical step is essential for promoting optimal adhesion and preventing any imperfections or debris from compromising the installation. By meticulously cleaning the screen, you can create an ideal surface for the tempered glass screen protector to adhere to, ensuring a seamless and durable application.
To initiate the cleaning process, start by powering off the device to enhance visibility and minimize the risk of overlooking any smudges or particles. Next, utilize a microfiber cloth to gently wipe the screen, effectively removing any visible dust, fingerprints, or smudges. The microfiber cloth's soft and lint-free composition ensures that the screen is thoroughly cleaned without leaving behind any residue or scratches.
Following the initial wipe-down, it's advisable to employ specialized cleaning wipes or a screen-cleaning solution designed for electronic devices. These cleaning agents are formulated to dissolve and eliminate stubborn smudges and grime, further enhancing the screen's cleanliness. When using cleaning wipes, ensure that the entire screen surface is meticulously treated, paying particular attention to the edges and corners to eliminate any hidden particles.
Once the screen has been thoroughly cleaned with the appropriate solution, it's time to address any remaining specks of dust or lint that may be lingering on the surface. Dust removal stickers are invaluable for this purpose, as they effectively lift away any residual particles without leaving behind any adhesive residue. Gently dab the screen with the dust removal sticker, focusing on areas where dust may be more likely to accumulate, such as around the edges and near the device's ports.
Throughout the cleaning process, it's crucial to work in a controlled environment to minimize the risk of dust or debris resettling on the screen. Choosing a location with minimal air circulation and avoiding activities that could stir up dust particles will contribute to a cleaner installation environment.
By meticulously cleaning the screen using the aforementioned steps and materials, you can ensure that the surface is pristine and free of any obstructions that could compromise the adhesion and appearance of the tempered glass screen protector. With the screen now immaculately clean, you are ready to proceed to the next step in the installation process, aligning the screen protector with precision and care.
Step 3: Align the Screen Protector
Achieving precise alignment is a pivotal aspect of installing a tempered glass screen protector, as it directly influences the overall appearance and functionality of the protector. Proper alignment ensures that the screen protector fits seamlessly onto the device's screen, covering it entirely without encroaching on the edges or obstructing the device's sensors and front-facing camera.
To commence the alignment process, it's advisable to position the device in a well-lit environment, ideally with a neutral or bright background to enhance visibility. This facilitates a clear view of the screen and the screen protector, allowing for accurate alignment without any visual obstructions.
Utilizing guide stickers is a highly effective method for achieving precise alignment. These transparent stickers are designed to facilitate the positioning of the screen protector, enabling you to adjust its placement before final adhesion. Begin by affixing the guide stickers to the edges of the screen protector, ensuring that they do not cover any essential areas such as the device's speaker or home button.
Once the guide stickers are in place, carefully align the screen protector with the device's screen, using the stickers as reference points to guide the positioning. Take your time to ensure that the screen protector is perfectly aligned with the screen's edges and that it sits flush with any existing bezels or borders. This meticulous approach is instrumental in achieving a seamless and professional-looking installation.
During the alignment process, it's beneficial to employ a steady and deliberate approach, making minor adjustments as needed to achieve optimal alignment. By taking the time to align the screen protector accurately, you can avoid potential misplacement and ensure a perfect fit that complements the device's design.
Once you are satisfied with the alignment, gently press down on the center of the screen protector, allowing the adhesive to make initial contact with the screen. This initial contact secures the screen protector in place, providing a stable foundation for the subsequent application steps.
By meticulously aligning the screen protector using guide stickers and a methodical approach, you can ensure a flawless fit that enhances the device's aesthetics and functionality. With the screen protector now accurately positioned, you are ready to proceed to the next step in the installation process, applying the screen protector with precision and care.
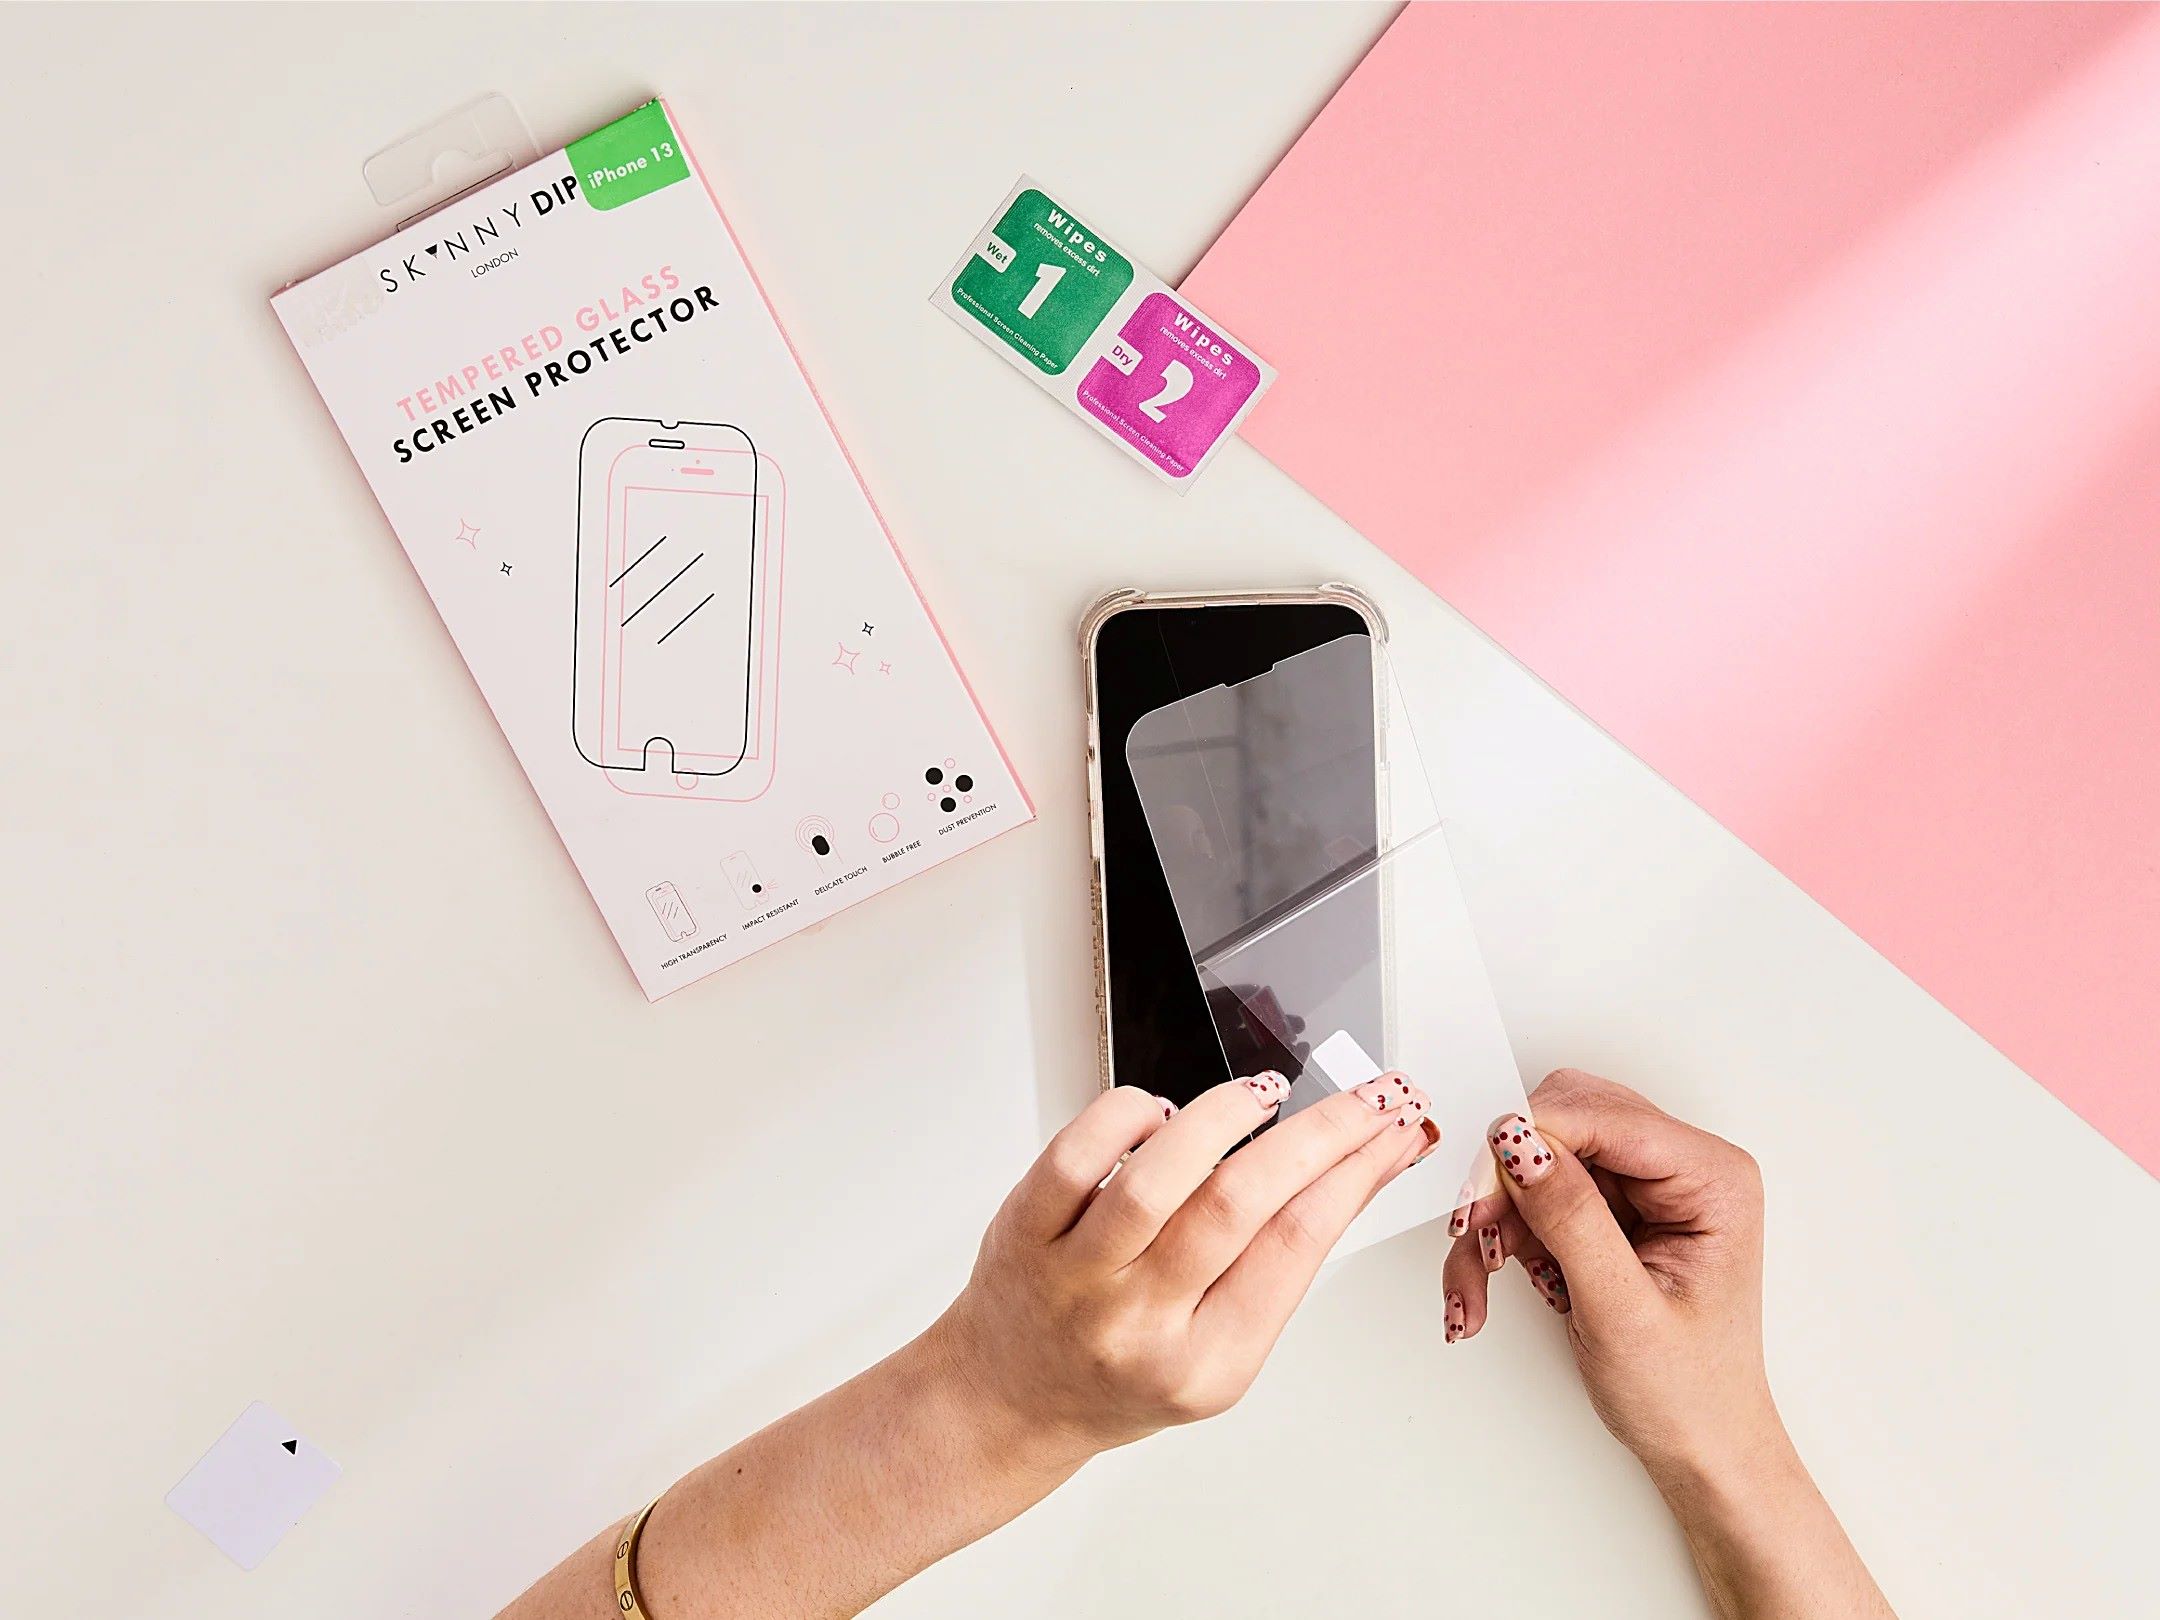
Before applying a tempered glass screen protector, make sure to clean your phone’s screen thoroughly to remove any dust or smudges. Use the provided cleaning cloth and dust removal sticker for best results.
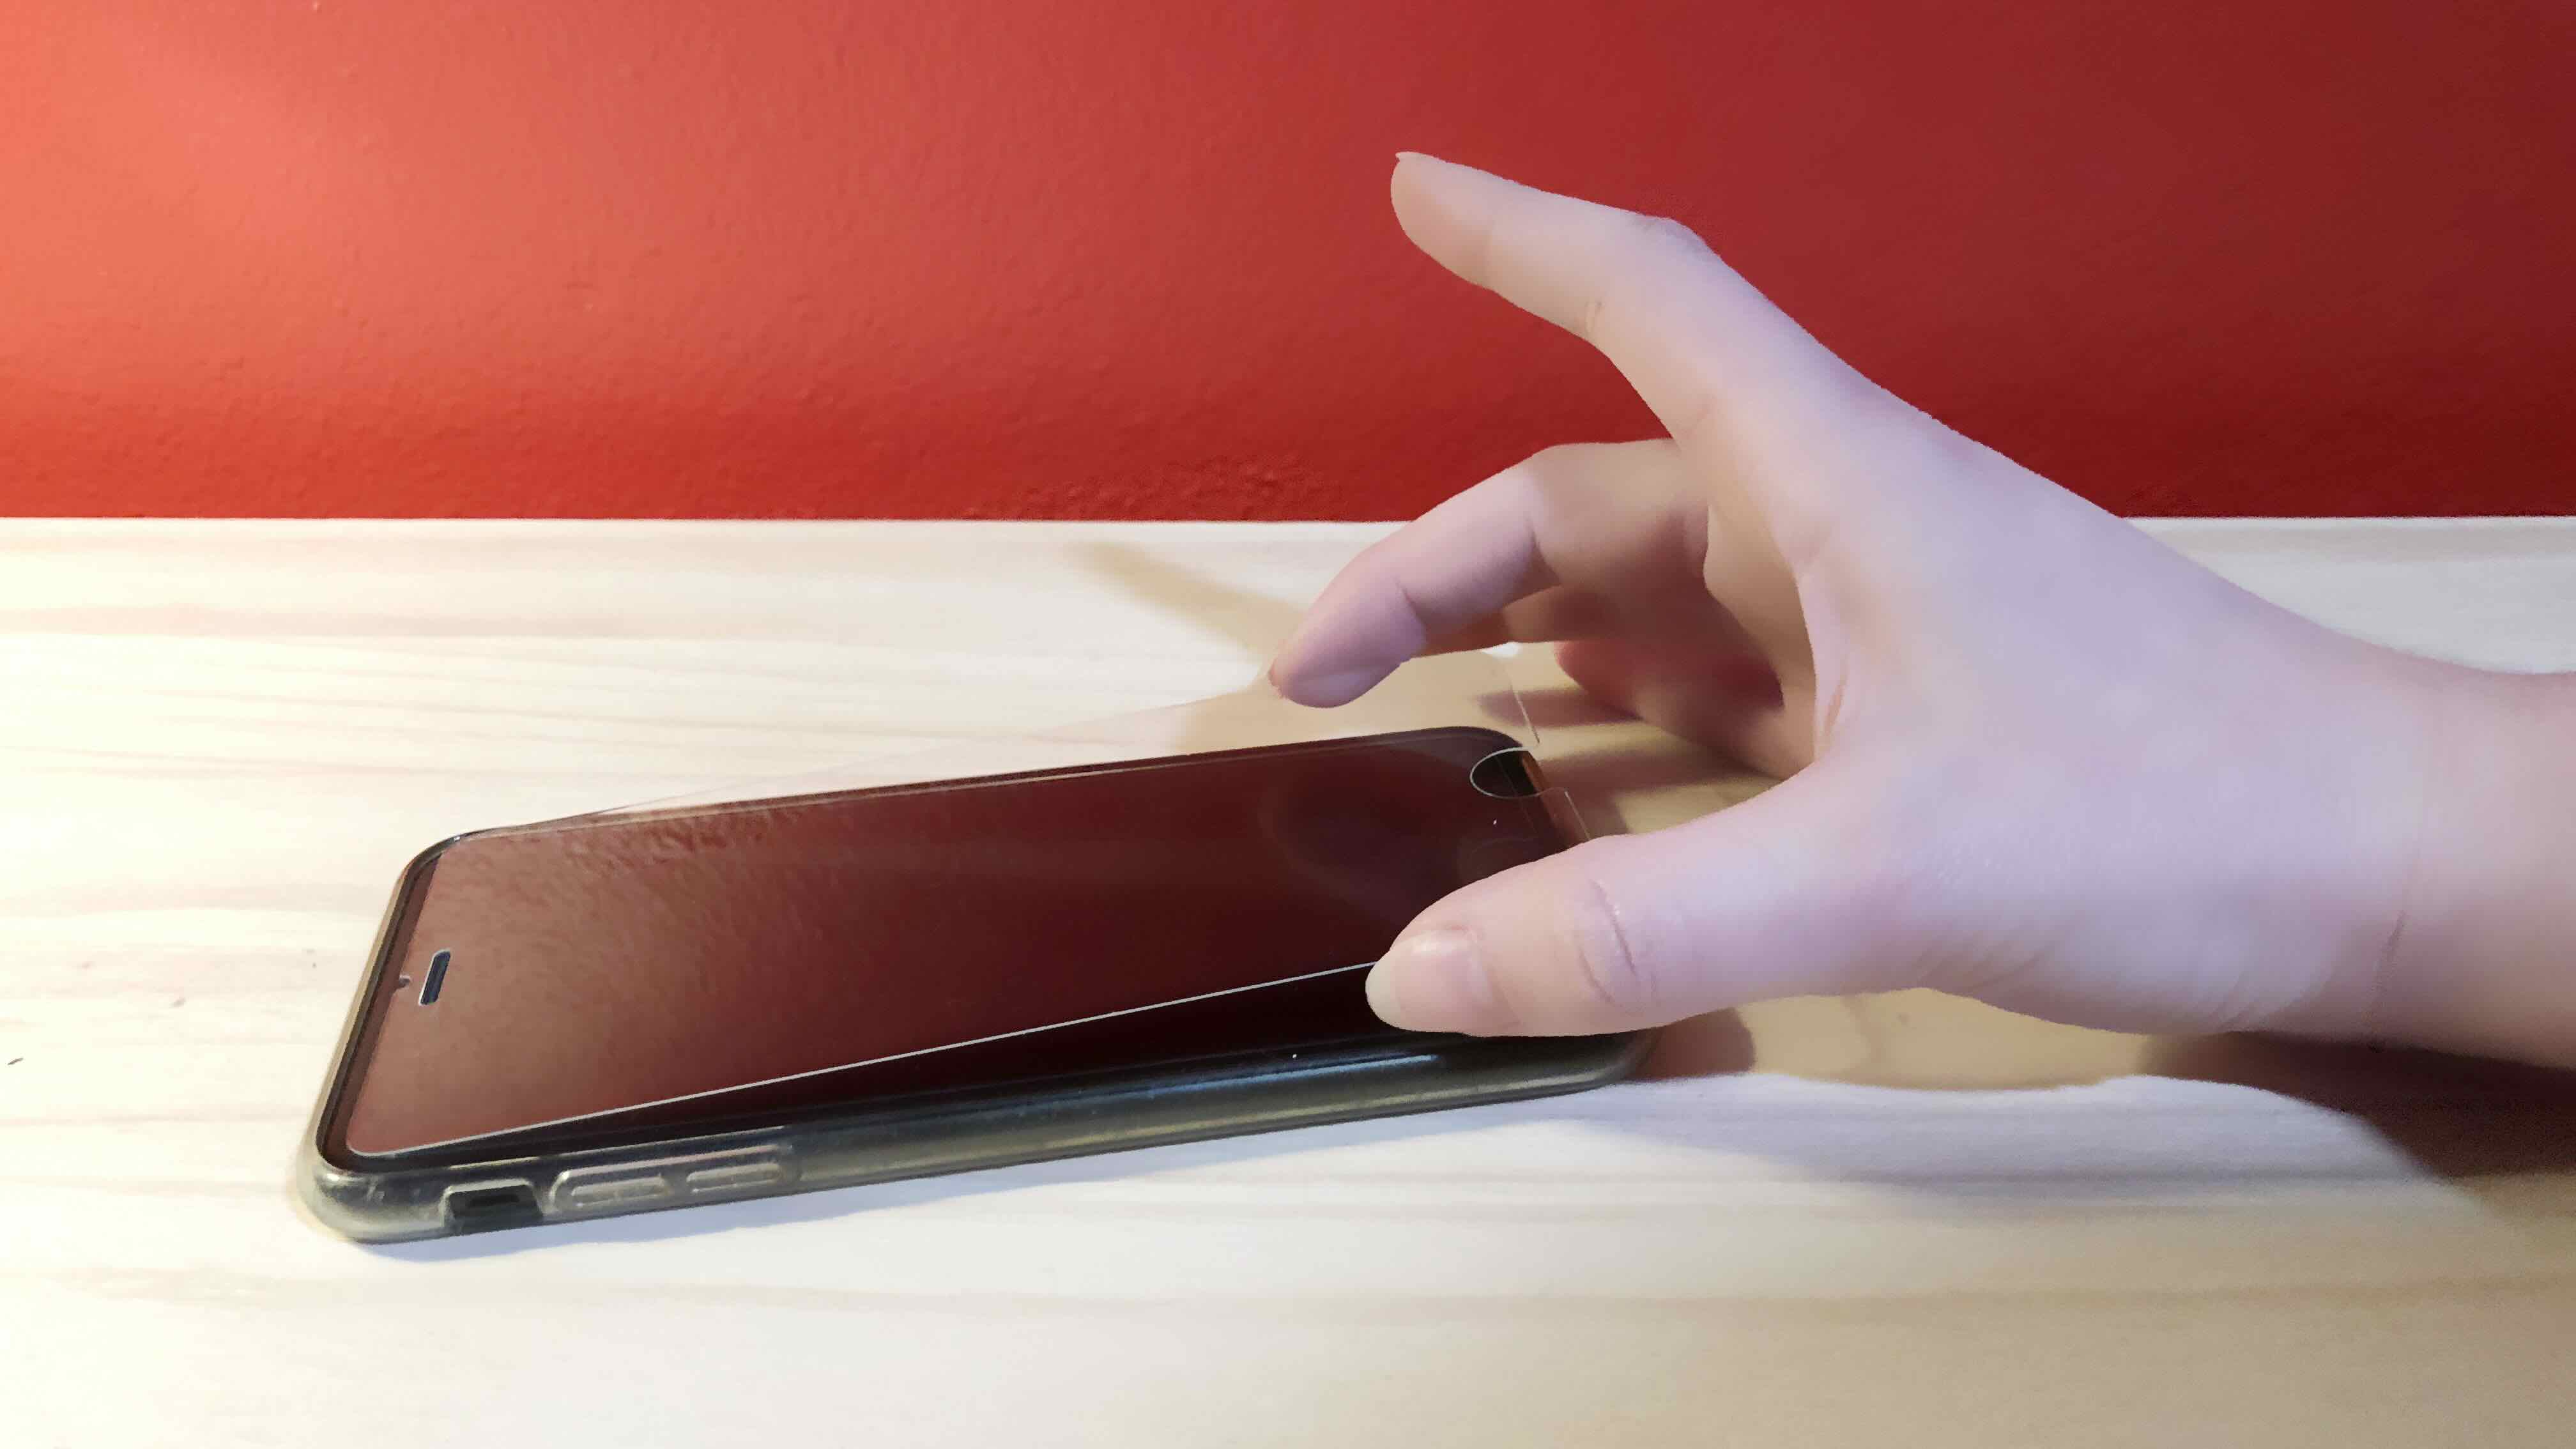
Step 4: Apply the Screen Protector
With the tempered glass screen protector meticulously aligned with the device's screen, the next crucial step is the precise application of the protector. This phase demands a steady hand and a methodical approach to ensure a seamless and bubble-free installation.
Begin by gently lifting the screen protector, using the guide stickers as a hinge to maintain its alignment. As you carefully peel back the protective film, be mindful to avoid touching the underside of the screen protector, as fingerprints or smudges could compromise the clarity of the adhesive surface.
Once the protective film is removed, delicately lower the screen protector onto the device's screen, aligning it with the previously established position. As the protector makes contact with the screen, the adhesive will gradually adhere, securing the protector in place.
Using a soft, lint-free cloth, apply gentle pressure to the center of the screen protector, gradually working outward toward the edges. This method expels any trapped air bubbles and ensures a uniform adhesion, resulting in a smooth and pristine surface.
In the event that air bubbles persist, utilize a squeegee or a flat, rigid card wrapped in a microfiber cloth to gently smooth them out. Starting from the center and working toward the edges, carefully maneuver the tool to release the trapped air and achieve a flawless finish.
It's essential to exercise patience during this process, as meticulous attention to detail is crucial for a successful application. By methodically addressing any air bubbles, you can achieve a flawless, bubble-free installation that enhances the device's visual appeal and functionality.
As the screen protector adheres to the screen, take a moment to inspect the edges and corners, ensuring that the protector is uniformly aligned and securely affixed. Any minor adjustments can be made at this stage to guarantee a perfect fit and a seamless transition between the protector and the device's screen.
With the screen protector now flawlessly applied and any air bubbles effectively removed, the final step involves conducting a thorough visual inspection to confirm the protector's pristine appearance and optimal adhesion. This meticulous approach ensures that the device's screen is effectively shielded and maintains its original clarity and touch sensitivity.
By following these precise application steps, you can achieve a flawless and durable installation of the tempered glass screen protector, safeguarding your device and preserving its pristine condition for long-term enjoyment.
Read more: What Is Tempered Glass
Step 5: Smooth Out Any Air Bubbles
Ensuring a bubble-free installation is essential for maximizing the effectiveness and visual appeal of the tempered glass screen protector. While the application process may initially introduce air bubbles, addressing them methodically will result in a flawless and seamless finish.
Upon applying the screen protector, it's common to observe small air bubbles trapped beneath the surface. Addressing these imperfections requires a patient and meticulous approach to achieve a pristine result. The following steps outline the process of smoothing out any air bubbles to ensure a flawless installation:
-
Identify the Air Bubbles: After the initial application of the screen protector, take a moment to identify any visible air bubbles. These may appear as small pockets of trapped air beneath the surface, often concentrated near the edges or corners of the screen.
-
Gentle Pressure Application: Using a soft, lint-free cloth, apply gentle pressure to the center of the screen protector, gradually working outward toward the edges. This method encourages the expulsion of trapped air and facilitates the uniform adhesion of the protector to the screen.
-
Utilize a Squeegee or Flat Card: In cases where air bubbles persist, employing a squeegee or a flat, rigid card wrapped in a microfiber cloth can effectively smooth them out. Starting from the center and working toward the edges, carefully maneuver the tool to release the trapped air and achieve a flawless finish.
-
Methodical Approach: Exercise patience and a methodical approach when addressing air bubbles, ensuring that each bubble is systematically targeted and smoothed out. By taking the time to address each imperfection individually, you can achieve a bubble-free surface that enhances the device's visual clarity and touch sensitivity.
-
Visual Inspection: As the air bubbles are smoothed out, conduct a thorough visual inspection to confirm the protector's pristine appearance and optimal adhesion. This meticulous approach ensures that the device's screen is effectively shielded and maintains its original clarity.
By following these steps and addressing any air bubbles with precision and care, you can achieve a flawless and durable installation of the tempered glass screen protector. This meticulous approach not only enhances the visual appeal of the device but also ensures that its screen remains effectively shielded from potential damage.
Step 6: Final Touches and Testing
With the tempered glass screen protector flawlessly applied and any air bubbles meticulously smoothed out, the final phase involves conducting comprehensive final touches and testing to ensure the protector's optimal functionality and visual appeal.
To commence this stage, carefully inspect the edges and corners of the screen protector, ensuring that it is uniformly aligned and securely affixed to the device's screen. Any minor adjustments can be made at this juncture to guarantee a perfect fit and a seamless transition between the protector and the screen.
Following the visual inspection, proceed to power on the device and verify the touch sensitivity and responsiveness of the screen. Run your fingers across the screen, testing various gestures and interactions to confirm that the tempered glass protector does not impede the device's touch capabilities. This step is crucial in ensuring that the protector seamlessly integrates with the device, preserving its original touch sensitivity and responsiveness.
Additionally, assess the visual clarity and transparency of the screen protector by viewing different content on the device's screen. Verify that the protector does not compromise the display's brightness, color accuracy, or overall visual quality. This meticulous evaluation guarantees that the tempered glass protector enhances, rather than detracts from, the device's visual appeal.
Once the functionality and visual integrity of the screen protector are confirmed, conduct a final wipe-down of the device's screen using a microfiber cloth. This gentle cleaning ensures the removal of any residual particles or smudges that may have accumulated during the installation process, culminating in a pristine and polished appearance.
As the final step, perform a comprehensive visual inspection to confirm the protector's flawless appearance and optimal adhesion. This meticulous approach guarantees that the device's screen is effectively shielded and maintains its original clarity and touch sensitivity, while also enhancing its overall durability and longevity.
By meticulously conducting final touches and testing, you can ensure that the tempered glass screen protector is seamlessly integrated with the device, providing reliable protection without compromising its functionality or visual appeal. This comprehensive approach culminates in a flawless installation, empowering you to safeguard your device and enjoy its pristine condition for an extended period.
Frequently Asked Questions about How To Install A Tempered Glass Screen Protector
Was this page helpful?
At Storables.com, we guarantee accurate and reliable information. Our content, validated by Expert Board Contributors, is crafted following stringent Editorial Policies. We're committed to providing you with well-researched, expert-backed insights for all your informational needs.


0 thoughts on “How To Install A Tempered Glass Screen Protector”