Home>Furniture & Design>Interior Design Trends>How To Make A Glass Pipe For Smoking
Interior Design Trends
How To Make A Glass Pipe For Smoking
Modified: August 27, 2024
Discover the latest interior design trends and learn how to make a glass pipe for smoking with our expert tips and guides. Explore unique ideas for creating a stylish and functional space.
(Many of the links in this article redirect to a specific reviewed product. Your purchase of these products through affiliate links helps to generate commission for Storables.com, at no extra cost. Learn more)
Introduction
Creating your own glass pipe for smoking can be a rewarding and creative endeavor. Whether you're a seasoned glassblower or a curious DIY enthusiast, making a glass pipe allows you to personalize your smoking experience and showcase your craftsmanship. With the right materials and techniques, you can craft a unique and functional glass pipe that reflects your style and preferences.
Designing and crafting a glass pipe provides an opportunity to explore the art of glassblowing and experiment with different shapes, colors, and textures. Each step of the process allows for artistic expression and precision, resulting in a one-of-a-kind smoking accessory that you can proudly call your own.
In this comprehensive guide, we will walk you through the step-by-step process of creating a glass pipe for smoking. From gathering the necessary materials to shaping and assembling the components, you will learn the essential techniques required to bring your vision to life. Whether you're interested in making a simple, classic pipe or a more intricate and ornate design, this guide will equip you with the knowledge and skills to embark on your glassblowing journey.
By following these instructions and unleashing your creativity, you can produce a custom glass pipe that not only serves a practical purpose but also serves as a testament to your ingenuity and passion for craftsmanship. So, roll up your sleeves, gather your supplies, and let's dive into the art of making a glass pipe for smoking.
Key Takeaways:
- Crafting a custom glass pipe for smoking allows you to unleash your creativity and showcase your craftsmanship. From shaping the glass to adding intricate details, each step offers an opportunity for artistic exploration and technical mastery.
- The process of creating a glass pipe involves meticulous preparation, skillful shaping, and controlled cooling. The result is a unique and personalized smoking accessory that reflects your individual style and passion for craftsmanship.
Read more: How To Smoke A Glass Pipe
Materials Needed
To embark on the journey of creating your own glass pipe for smoking, you will need a set of essential materials and tools. Each item plays a crucial role in the glassblowing process, enabling you to shape, mold, and assemble the components of your custom pipe. Here's a comprehensive list of the materials you'll need to get started:
-
Borosilicate Glass Rods: These specialized glass rods are the primary material used for crafting glass pipes. Borosilicate glass, known for its durability and heat resistance, is the preferred choice for smoking accessories due to its ability to withstand high temperatures without cracking or shattering.
-
Glass Tubing: Similar to glass rods, glass tubing is essential for creating the body of the pipe. It provides the hollow structure necessary for the smoke to travel through, and it can be shaped and manipulated to achieve the desired design.
-
Glass Cutter: A glass cutter is a vital tool for precisely cutting and shaping the glass rods and tubing. It allows you to create clean, straight cuts, ensuring that the components fit together seamlessly during the assembly process.
-
Torch: A high-quality torch is indispensable for glassblowing. It provides the intense heat required to melt and manipulate the glass, allowing you to shape and mold the material according to your design.
-
Graphite Paddle and Marver: These tools are used to shape and flatten the molten glass, facilitating the creation of smooth and uniform surfaces on the pipe.
-
Tweezers and Pliers: Tweezers and pliers are essential for handling the hot glass during the shaping and assembly stages. They enable you to manipulate the material with precision and control, ensuring that each component is crafted with accuracy.
-
Safety Equipment: Safety should always be a top priority when working with hot glass and open flames. Safety glasses, heat-resistant gloves, and a well-ventilated workspace are crucial for protecting yourself during the glassblowing process.
-
Colorants (Optional): If you wish to add a pop of color to your glass pipe, specialized glass colorants can be used to create vibrant and unique designs. These colorants are available in a variety of shades and can be incorporated into the molten glass to achieve stunning visual effects.
By gathering these materials and ensuring that you have a safe and well-equipped workspace, you'll be ready to dive into the exciting and intricate process of crafting your own glass pipe for smoking. With these tools at your disposal, you can unleash your creativity and bring your vision to life through the art of glassblowing.
Step 1: Gather Your Supplies
Before delving into the intricate art of glassblowing, it's essential to gather all the necessary supplies to ensure a smooth and efficient crafting process. Each item plays a pivotal role in shaping and assembling your custom glass pipe, allowing you to unleash your creativity and bring your vision to life. Here's a detailed overview of the supplies you'll need to kickstart your glassblowing journey:
Borosilicate Glass Rods and Glass Tubing
The foundation of your glass pipe lies in the quality of the materials you use. Borosilicate glass rods serve as the primary building blocks for crafting the intricate components of the pipe, while glass tubing provides the hollow structure necessary for the smoke to travel through. It's crucial to select high-quality, durable glass rods and tubing to ensure the longevity and functionality of your finished pipe.
Glass Cutter
A precision glass cutter is an indispensable tool for achieving clean and accurate cuts on the glass rods and tubing. This essential tool allows you to shape the components with precision, ensuring that they fit together seamlessly during the assembly process. A smooth and precise cut is crucial for the structural integrity and aesthetic appeal of your glass pipe.
Read more: How To Use A Glass Pipe
Torch
A high-quality torch is a fundamental tool for glassblowing, providing the intense heat required to melt and manipulate the glass. Whether you opt for a traditional hand torch or a specialized glassblowing torch, the ability to generate and control intense heat is essential for shaping and molding the glass according to your design.
Graphite Paddle and Marver
These specialized tools are utilized to shape and flatten the molten glass, allowing you to create smooth and uniform surfaces on the pipe. The graphite paddle and marver play a crucial role in refining the shape and texture of the glass, ensuring that each component is crafted with precision and attention to detail.
Tweezers and Pliers
Handling hot glass requires precision and control, which is where tweezers and pliers come into play. These essential tools enable you to manipulate the molten glass with accuracy, allowing you to shape and assemble the components of your glass pipe with finesse and dexterity.
Safety Equipment
Safety should always be a top priority when working with hot glass and open flames. Equipping yourself with safety glasses, heat-resistant gloves, and a well-ventilated workspace is crucial for protecting yourself during the glassblowing process. Prioritizing safety ensures that you can focus on the creative process with peace of mind.
Read more: How To Clean Glass Pipes
Colorants (Optional)
For those seeking to infuse their glass pipe with vibrant hues and visual flair, specialized glass colorants offer a creative avenue for customization. These colorants come in an array of shades and can be incorporated into the molten glass to achieve stunning visual effects, adding a personalized touch to your finished creation.
By assembling these essential supplies and creating a safe and well-equipped workspace, you'll be fully prepared to embark on the captivating journey of crafting your own glass pipe for smoking. With the right tools at your disposal, you can channel your creativity and passion into the art of glassblowing, setting the stage for an enriching and rewarding crafting experience.
Step 2: Prepare the Glass
Preparing the glass is a crucial step in the process of crafting a custom glass pipe for smoking. This stage sets the foundation for shaping and molding the glass, ensuring that it is primed for the intricate design and assembly phases. To prepare the glass effectively, it's essential to follow a series of meticulous steps that optimize the material for manipulation and transformation.
Cleaning and Inspecting the Glass
Before commencing the glassblowing process, it's imperative to thoroughly clean and inspect the glass rods and tubing. Any impurities or contaminants on the surface of the glass can compromise the integrity of the final product, making it essential to ensure that the material is pristine and free from any debris. Additionally, inspecting the glass allows you to identify any imperfections or irregularities that may impact the crafting process, enabling you to address them before proceeding further.
Preheating the Glass
To facilitate the shaping and manipulation of the glass, preheating the material is a critical preparatory step. By subjecting the glass rods and tubing to a controlled heating process, you can reduce the risk of thermal shock and make the material more malleable for shaping. This preheating stage sets the stage for seamless glassblowing, allowing you to work with the glass more effectively and achieve the desired form and structure.
Read more: How To Clean Smoking Glass
Creating a Controlled Working Environment
Maintaining a controlled working environment is essential for preparing the glass effectively. This includes ensuring that the workspace is free from drafts and fluctuations in temperature, as these factors can impact the consistency and workability of the glass. By creating a stable and controlled environment, you can optimize the conditions for shaping and manipulating the glass, setting the stage for a smooth and precise crafting process.
Aligning Tools and Equipment
As part of glass preparation, it's crucial to align all the necessary tools and equipment to streamline the crafting process. This involves organizing the glass cutter, torch, graphite paddle, marver, tweezers, pliers, and any additional tools in a systematic and accessible manner. Having the tools readily available ensures that you can transition seamlessly from glass preparation to the subsequent stages of shaping and assembly, maintaining a steady workflow throughout the crafting process.
By meticulously preparing the glass and establishing the optimal conditions for glassblowing, you can lay the groundwork for a successful and fulfilling crafting experience. This preparatory phase sets the stage for the intricate art of shaping and assembling the glass components, allowing you to channel your creativity and precision into the creation of a unique and functional glass pipe for smoking.
Step 3: Shape the Glass
Shaping the glass is a pivotal stage in the process of crafting a custom glass pipe for smoking, where the malleability of the material is harnessed to bring the envisioned design to life. This intricate phase requires precision, creativity, and a keen eye for detail, as each movement and manipulation contributes to the final form of the glass pipe.
Applying Heat and Manipulation
The shaping process begins by applying controlled heat to the preheated glass rods and tubing. The intense flame of the torch is directed onto the glass, gradually softening it to a pliable state. This critical step allows the glassblower to manipulate the material, shaping it according to the desired form and structure. The application of heat must be carefully regulated to avoid overheating or uneven distribution, ensuring that the glass remains workable and responsive to the glassblower's touch.
Read more: How To Clean Smoked Glass
Forming the Body and Chamber
With the glass in a malleable state, the glassblower skillfully shapes and forms the body of the pipe, defining its overall silhouette and dimensions. Using a combination of gentle rotations and controlled movements, the glass is coaxed into the desired shape, with attention to symmetry and balance. The creation of the chamber, where the smoke will be contained, requires meticulous precision to achieve the optimal size and curvature, ensuring an efficient and enjoyable smoking experience.
Crafting Intricate Details
As the basic structure of the pipe takes shape, the glassblower may choose to incorporate intricate details and embellishments to enhance the visual appeal of the design. This could involve creating decorative patterns, textured surfaces, or unique contours that add character and individuality to the finished pipe. The manipulation of the glass at this stage allows for artistic expression, as the glassblower brings their creative vision to fruition through the subtle nuances and intricacies of the design.
Refining and Perfecting
Throughout the shaping process, constant refinement and adjustments are made to ensure that the glass pipe embodies the intended design. The glassblower meticulously inspects and refines the contours, proportions, and overall aesthetics of the pipe, striving for a flawless and harmonious composition. This attention to detail is essential in achieving a refined and visually captivating glass pipe that reflects the artistry and skill invested in its creation.
By skillfully shaping the glass with precision and artistry, the glassblower transforms raw materials into a functional and visually striking smoking accessory. This stage of the crafting process embodies the fusion of technical expertise and creative expression, culminating in the realization of a custom glass pipe that embodies the unique vision and craftsmanship of its creator.
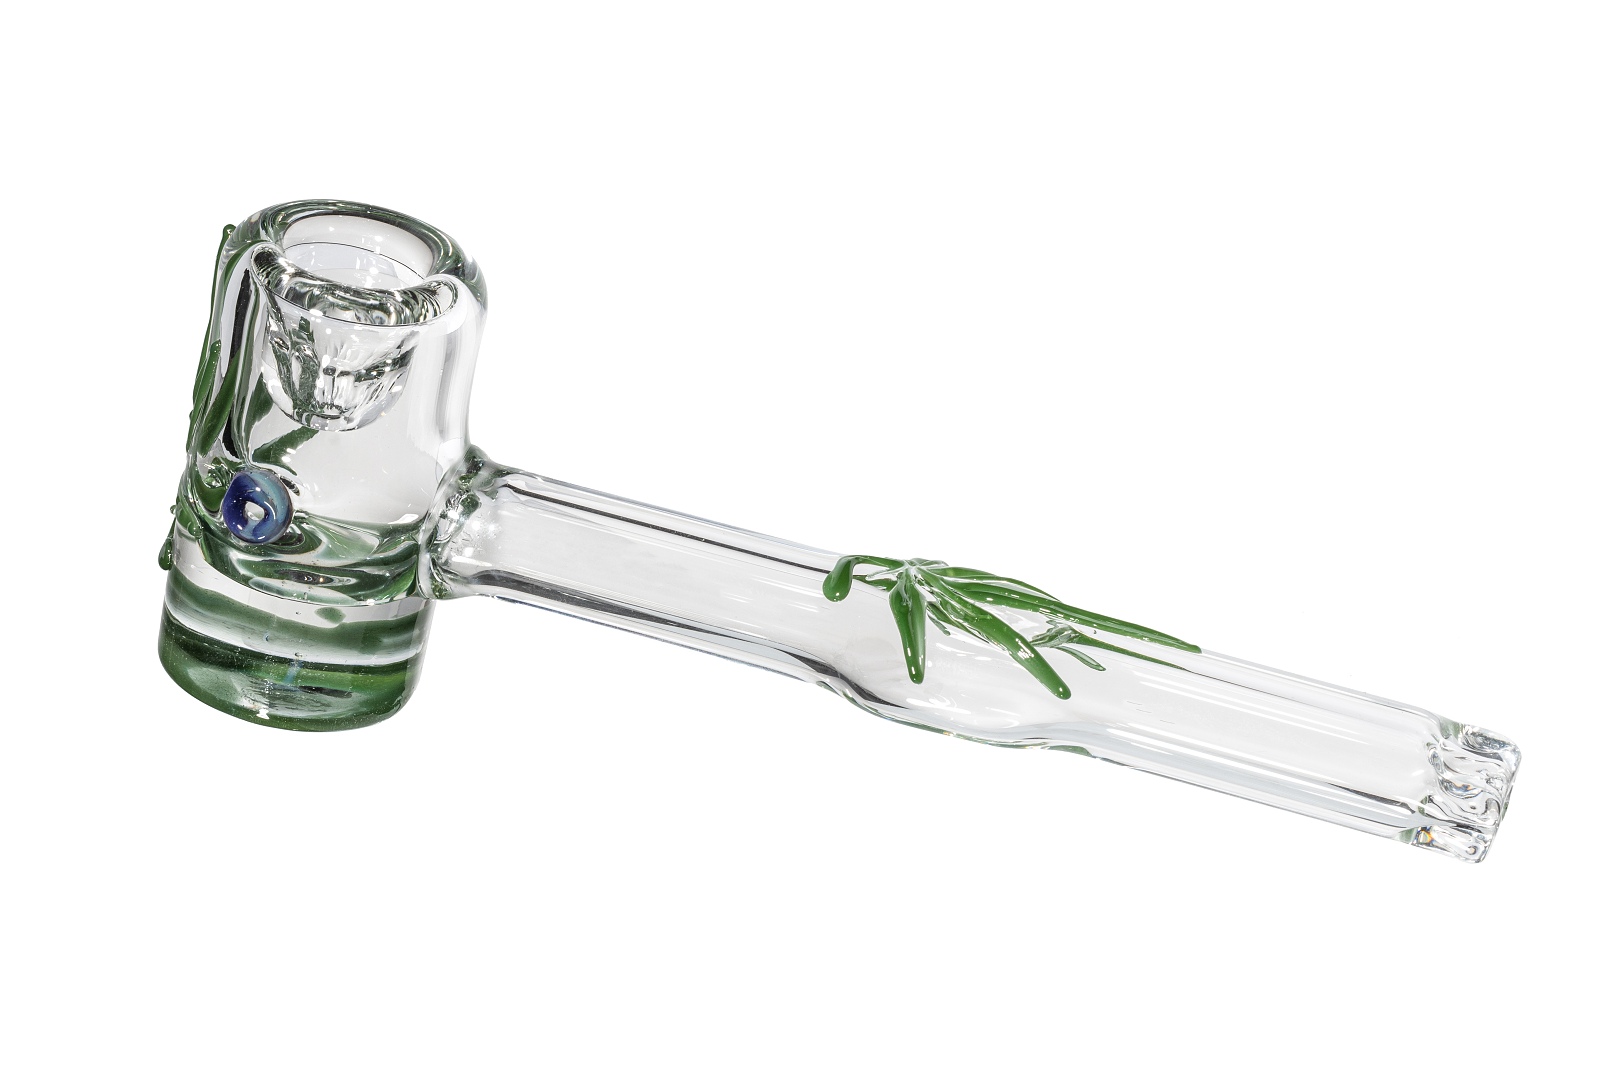
Step 4: Create the Bowl
Creating the bowl of the glass pipe is a pivotal step that demands precision and attention to detail. The bowl serves as the chamber where the smoking material is placed and ignited, making it a central element of the pipe's functionality. Crafting the bowl requires a delicate balance of form and function, ensuring that it not only complements the overall design of the pipe but also provides an optimal smoking experience.
The process of creating the bowl begins with the careful manipulation of the heated glass tubing. The glassblower skillfully shapes and expands a section of the tubing to form the bowl, paying close attention to the size, depth, and curvature of the chamber. This stage demands a steady hand and a keen understanding of the ideal dimensions for a functional and aesthetically pleasing bowl.
As the glass takes on the desired form, the glassblower refines the edges and contours of the bowl, ensuring a smooth and uniform finish. This meticulous attention to detail is essential for creating a bowl that not only accommodates the smoking material but also facilitates easy packing and ignition.
Incorporating a carburetor, or "carb," into the design of the bowl is a common practice that enhances the smoking experience. The carb serves as a secondary air inlet, allowing the user to control the airflow and clear the chamber of smoke. Skillfully adding a carb to the bowl requires precision drilling and shaping, ensuring that it seamlessly integrates into the overall design while providing functional utility.
The final touches involve inspecting the bowl for any imperfections and refining its form to achieve a flawless and cohesive appearance. The glassblower meticulously examines the bowl, addressing any irregularities and fine-tuning its structure to meet the highest standards of craftsmanship.
By creating a meticulously crafted bowl, the glassblower elevates the functionality and visual appeal of the glass pipe, ensuring that it embodies both artistry and practicality. The creation of the bowl represents a harmonious fusion of technical skill and creative vision, resulting in a custom glass pipe that exemplifies the artistry and dedication of its creator.
Read more: How To Sell Glass Pipes Legally
Step 5: Add the Mouthpiece
Adding the mouthpiece to the glass pipe is a pivotal stage that contributes to the functionality and comfort of the smoking accessory. The mouthpiece serves as the interface through which the user inhales the smoke, making it essential to craft a component that not only complements the overall design of the pipe but also provides a comfortable and enjoyable smoking experience.
The process of adding the mouthpiece begins with the careful manipulation of the heated glass tubing. The glassblower skillfully shapes and elongates a section of the tubing to form the mouthpiece, paying close attention to the size, curvature, and ergonomics. The goal is to create a smooth and tapered mouthpiece that facilitates a comfortable and secure grip for the user, enhancing the overall usability of the pipe.
As the glass takes on the desired form, the glassblower refines the edges and contours of the mouthpiece, ensuring a seamless transition from the body of the pipe. This meticulous attention to detail is crucial for creating a mouthpiece that not only aligns with the aesthetic of the pipe but also provides a pleasant tactile experience for the user.
Incorporating a flared or rounded lip at the end of the mouthpiece is a common practice that enhances comfort and usability. The flared design not only adds a touch of elegance to the pipe but also ensures a comfortable fit against the user's lips, allowing for a smooth and enjoyable smoking experience.
The final touches involve inspecting the mouthpiece for any imperfections and refining its form to achieve a flawless and cohesive appearance. The glassblower meticulously examines the mouthpiece, addressing any irregularities and fine-tuning its structure to meet the highest standards of craftsmanship.
By skillfully adding the mouthpiece to the glass pipe, the glassblower enhances the functionality and user experience of the smoking accessory. The creation of the mouthpiece represents a harmonious fusion of technical skill and ergonomic design, resulting in a custom glass pipe that embodies both artistry and practicality.
Step 6: Let It Cool
After the intricate process of shaping and assembling the components of the glass pipe, the crucial final step is allowing the newly crafted piece to cool thoroughly. This phase is essential for ensuring the structural integrity and durability of the glass pipe, as well as for preparing it for actual use.
As the glass pipe is carefully set aside to cool, the gradual reduction in temperature allows the molecular structure of the glass to stabilize. This controlled cooling process is vital for minimizing internal stresses within the material, which could compromise its strength and resilience. By allowing the glass to cool at its own pace, the risk of thermal shock, which can lead to cracking or breakage, is significantly reduced.
During the cooling period, the glass undergoes a gradual transition from a pliable and malleable state to a solid and stable form. This transformation is crucial for solidifying the intricate shapes and contours created during the glassblowing process, ensuring that the pipe retains its intended design and functionality.
In addition to preserving the structural integrity of the glass pipe, the cooling phase also provides an opportunity for the colors and textures within the glass to fully develop and settle. This gradual maturation process allows any added colorants or decorative elements to achieve their optimal vibrancy and clarity, enhancing the visual appeal of the finished piece.
As the glass pipe cools, it is essential to maintain a controlled environment to prevent sudden temperature fluctuations that could compromise the cooling process. This involves ensuring that the workspace is free from drafts and external disturbances, allowing the glass to cool uniformly and consistently.
Once the glass pipe has cooled to room temperature, it is carefully inspected to ensure that it has undergone a successful cooling process. Any signs of irregularities or imperfections are meticulously addressed, reaffirming the commitment to craftsmanship and quality.
By allowing the newly crafted glass pipe to cool thoroughly, the glassblower ensures that the finished piece embodies the highest standards of durability, functionality, and aesthetic appeal. This final phase marks the culmination of the intricate glassblowing process, resulting in a custom glass pipe that reflects the artistry, skill, and dedication of its creator.
Conclusion
Crafting a custom glass pipe for smoking is a captivating and rewarding endeavor that encompasses the artistry of glassblowing, the precision of craftsmanship, and the expression of individual creativity. From the initial gathering of materials to the meticulous shaping and assembly of the components, each step of the process offers an opportunity for artistic exploration and technical mastery.
The journey of creating a glass pipe begins with the selection of high-quality borosilicate glass rods and tubing, setting the stage for the transformation of raw materials into a functional and visually striking smoking accessory. The careful preparation of the glass, the skillful shaping of the components, and the addition of the bowl and mouthpiece all contribute to the realization of a unique and personalized piece that reflects the vision and skill of its creator.
As the glass pipe undergoes the final phase of controlled cooling, it transitions from a malleable form to a solid and stable state, ensuring its structural integrity and durability. This phase allows the colors and textures within the glass to fully develop, enhancing the visual allure of the finished piece.
The culmination of the glassblowing process yields a custom glass pipe that embodies the fusion of artistry and functionality. Each meticulously crafted pipe is a testament to the creativity, dedication, and skill of its creator, serving as a unique and personalized smoking accessory that reflects individual style and craftsmanship.
Whether embarking on the journey of glassblowing as a seasoned artisan or a curious enthusiast, the process of creating a glass pipe for smoking offers a canvas for self-expression and a platform for honing technical expertise. The resulting piece serves not only as a functional smoking accessory but also as a tangible representation of the passion and artistry invested in its creation.
In conclusion, the art of making a glass pipe for smoking is a captivating and enriching pursuit that celebrates the marriage of creativity and craftsmanship. Each custom glass pipe is a testament to the artistry and dedication of its creator, embodying a unique blend of functionality, visual appeal, and individual expression.
Frequently Asked Questions about How To Make A Glass Pipe For Smoking
Was this page helpful?
At Storables.com, we guarantee accurate and reliable information. Our content, validated by Expert Board Contributors, is crafted following stringent Editorial Policies. We're committed to providing you with well-researched, expert-backed insights for all your informational needs.


0 thoughts on “How To Make A Glass Pipe For Smoking”