Home>Furniture>Bedroom Furniture>How To Fill Up An Air Mattress
Bedroom Furniture
How To Fill Up An Air Mattress
Modified: August 23, 2024
Learn how to easily fill up an air mattress in your bedroom with our helpful guide. Discover the best tips and techniques for inflating your mattress for a comfortable night's sleep.
(Many of the links in this article redirect to a specific reviewed product. Your purchase of these products through affiliate links helps to generate commission for Storables.com, at no extra cost. Learn more)
Introduction
Welcome to the ultimate guide on how to fill up an air mattress! If you’ve ever found yourself in need of a comfortable sleeping surface while camping, accommodating guests, or simply as an extra bed, an air mattress is the perfect solution. However, inflating an air mattress may seem like a daunting task if you’re unfamiliar with the process. But fear not, we’re here to walk you through each step and ensure you have a fully inflated mattress in no time.
Before we dive into the steps, it’s important to note that there are various types of air mattresses available, ranging from manual hand pumps to electric pumps. The steps outlined in this guide will cover the general process of filling up an air mattress, applicable to most types. So, let’s get started!
Key Takeaways:
- Master the art of inflating an air mattress by gathering the right materials, locating the valve, and monitoring the inflation process. Enjoy a comfortable and convenient sleeping solution for various occasions.
- Customize the firmness of your air mattress to suit your preferences, and make necessary adjustments for optimal comfort. Embrace the versatility and convenience of this essential bedroom furniture.
Read more: How To Fill An Air Mattress Without A Pump
Step 1: Gather the necessary materials
Before you begin inflating your air mattress, it’s essential to gather all the materials you’ll need to ensure a smooth process. Here’s a list of the commonly required items:
- An air mattress: Choose a size and type that suits your needs. Whether it’s a twin size for solo camping or a queen size for accommodating guests, make sure you have the appropriate mattress on hand.
- A pump: Depending on the type of air mattress you have, you’ll need either a manual pump, an electric pump, or a rechargeable pump. Check the specifications of your mattress to determine the suitable pump.
- A power source (if using an electric pump): If you’re using an electric pump, ensure that you have access to a power outlet or a portable power source, such as batteries or a car adapter.
- An extension cord (if needed): If your power source is not within reach of the mattress, consider using an extension cord to provide the necessary flexibility.
- A repair kit: It’s always a good idea to have a repair kit handy in case of any potential leaks or punctures. This can help you quickly address any issues that may arise.
Once you have gathered all the required materials, you’re ready to move on to the next step of inflating your air mattress.
Step 2: Locate the valve on the air mattress
In order to inflate your air mattress, you need to locate the valve. The valve is where the pump will be attached to fill the mattress with air. The exact location of the valve may vary depending on the brand and model of your air mattress, but it is generally located on the side or bottom surface of the mattress.
Take a close look at the mattress and look for a small plastic or rubber cap. This cap can usually be unscrewed or pulled out to reveal the valve underneath. The valve may be a simple hole for manual inflation or a larger opening designed to fit different types of pumps.
If you’re having trouble finding the valve, consult the instruction manual that came with your air mattress. The manual will provide detailed information on the valve’s location and how to access it.
Once you have located the valve, make sure it is clear of any dirt, debris, or obstructions. Wipe it clean if necessary, as a clean valve will ensure a proper seal and smooth inflation of the mattress.
Locating the valve is an important step as it will allow you to properly attach the pump and begin inflating your air mattress. With the valve now found and prepared, you’re ready to move on to the next step in the process.
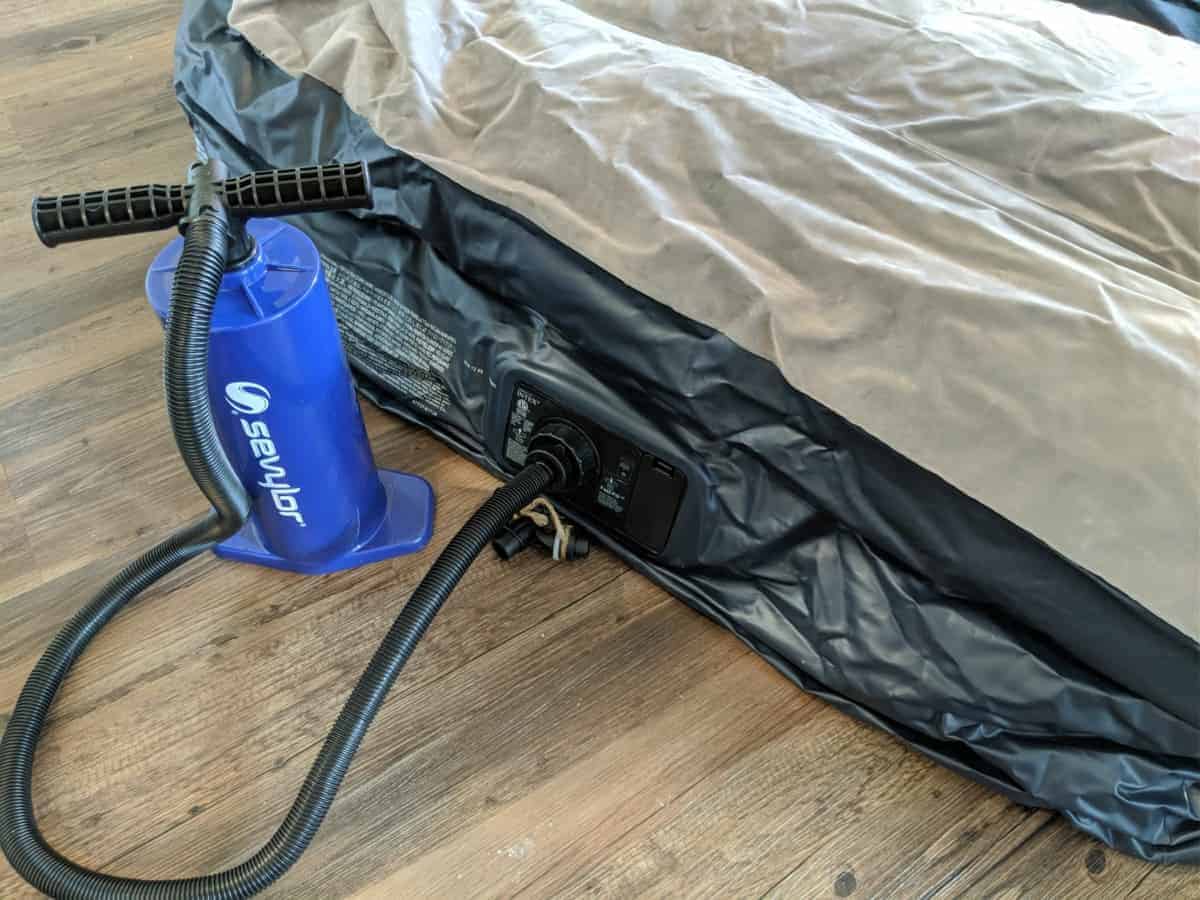
Step 3: Attach the pump to the valve
Now that you’ve located the valve on your air mattress, it’s time to connect the pump. The type of pump you have will determine the specific method of attachment. Here are the general steps to follow:
- If you have a manual pump, ensure that it is in good working condition and assembled properly according to the manufacturer’s instructions.
- For manual pumps, you will typically find a hose or nozzle that needs to be inserted into the valve. Use gentle pressure to insert it securely, ensuring a tight seal.
- If you have an electric pump, make sure it is plugged into a power source or has a fully charged battery. Position the pump close to the valve, ensuring that the hose or nozzle can easily reach it.
- Electric pumps usually have adapters or nozzles that fit different valve sizes. Select the appropriate adapter and attach it securely to the pump’s hose or nozzle.
- Once you have the pump and hose securely attached to the valve, double-check that the connection is tight and secure. This is crucial to prevent any air leaks during the inflation process, which can result in an underinflated mattress.
It’s important to follow the manufacturer’s instructions for attaching the pump, as different brands and models may have specific guidelines. If you’re unsure about the attachment process, consult the instruction manual or contact the manufacturer for assistance.
With the pump properly attached to the valve, you’re now ready to move on to the next step: inflating your air mattress!
Step 4: Begin inflating the air mattress
With the pump securely attached to the valve of your air mattress, it’s time to start inflating. The method will vary depending on the type of pump you’re using. Here are the general steps to begin the inflation process:
- If you’re using a manual hand pump, start operating the pump by using the handle or foot pedal, depending on the design. You may need to exert some physical effort to pump air into the mattress.
- For electric pumps, turn on the power switch or press the appropriate button to start the inflation process. The pump will automatically begin transferring air into the mattress.
- As the pump works its magic, you’ll start to notice the mattress expanding and taking shape. It’s important to monitor the inflation process to ensure it’s proceeding smoothly.
- Keep an eye on the mattress’s firmness as it inflates. If you prefer a softer mattress, you can stop the inflation process once you reach your desired level of comfort. Alternatively, continue inflating if you desire a firmer sleeping surface.
- Be patient and allow the mattress to inflate fully, ensuring that the air is evenly distributed throughout. Depending on the size and type of your mattress, the inflation process can take anywhere from a few minutes to several minutes.
While the mattress is inflating, avoid putting excessive weight on it or moving too close to the pump to prevent accidental disconnection or damage. It’s crucial to ensure a continuous flow of air until the mattress reaches the desired level of inflation.
Keep in mind that overinflating the mattress can put stress on the seams and may result in discomfort. Pay close attention to the mattress’s capacity and avoid exceeding the recommended inflation level.
Once the mattress is fully inflated, it’s time to move on to the next step: monitoring the inflation process.
Read more: Why Wont My Toilet Fill Up With Water
Step 5: Monitor the inflation process
Once you’ve started the inflation process, it’s important to monitor it closely to ensure your air mattress is filling up properly. Here’s what you need to keep an eye on:
- Check for any air leaks: During the inflation process, listen for any hissing or escaping air sounds, as this may indicate a leak. Inspect the valve connection and the mattress for any visible signs of air escaping. If you notice a leak, stop the inflation process and address the issue before continuing.
- Observe the mattress’s shape: As the mattress inflates, watch for any uneven or lumpy areas. Gently press on various sections of the mattress to ensure the air is evenly distributed. Adjust the position of the mattress if necessary to avoid any wrinkles or folds that may affect the overall comfort and support.
- Check the firmness: Depending on your personal preference, monitor the firmness of the mattress as it continues to inflate. If it feels too soft or lacks sufficient support, you can continue inflating until it reaches the desired level of firmness. Conversely, if it feels too firm, you can stop the inflation process earlier.
- Keep an eye on the pump and power source: If using an electric pump, ensure that it remains plugged in or has a sufficient battery charge throughout the inflation process. If you notice any issues with the pump or power source, address them promptly to avoid any disruptions in the inflation process.
By closely monitoring the inflation process, you can ensure that your air mattress inflates to the desired firmness and maintains optimal comfort. This step allows you to catch any potential problems early on and make the necessary adjustments.
Once you’re satisfied with the inflation and firmness of the mattress, it’s time to move on to the next step: removing the pump and closing the valve.
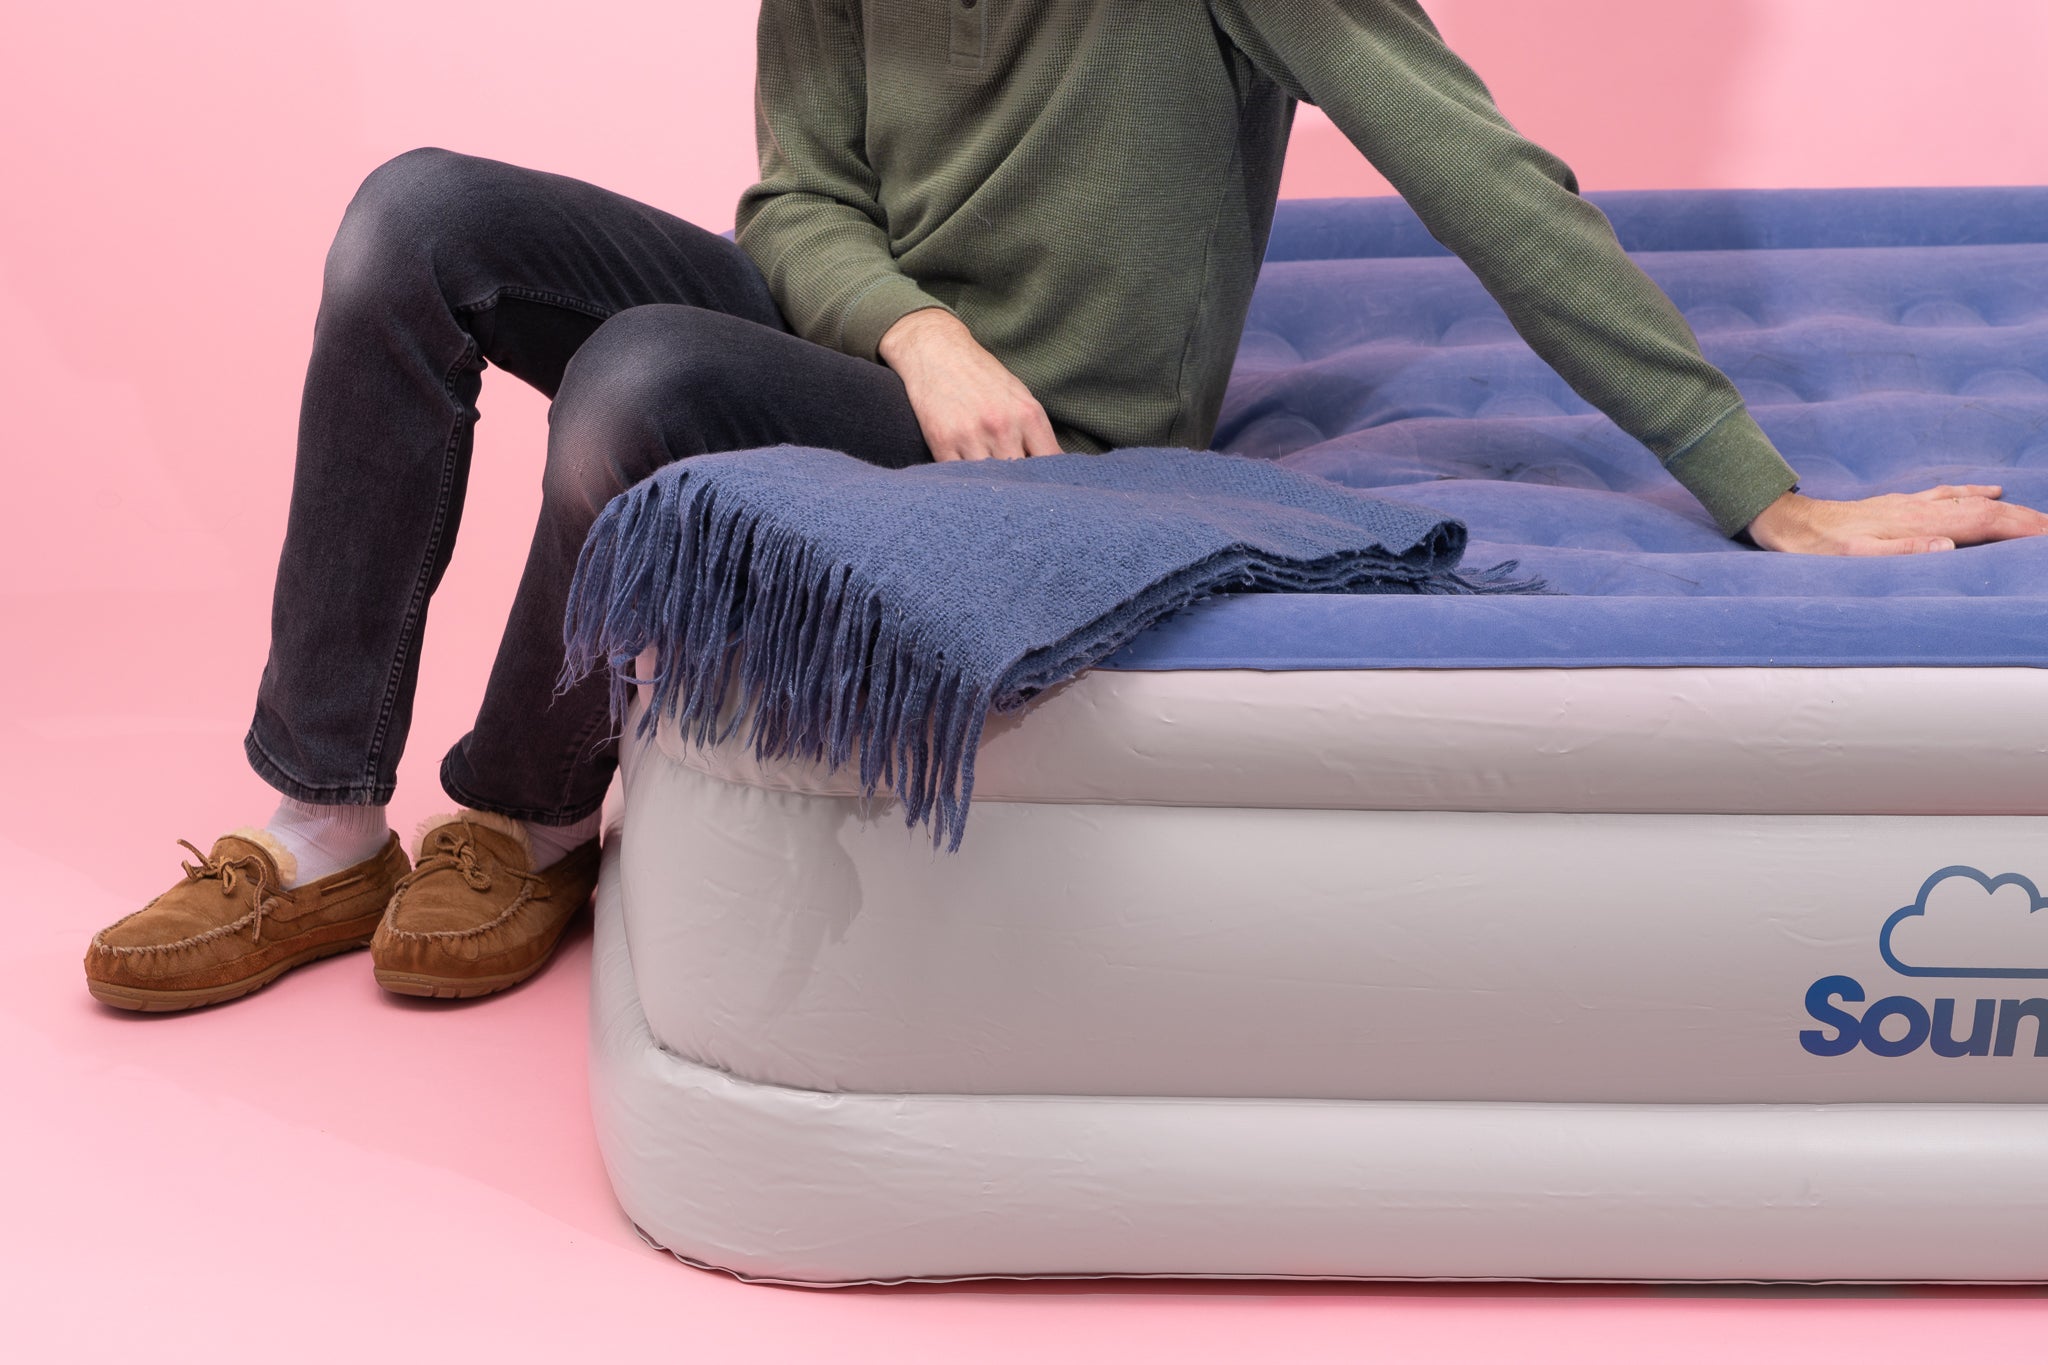
When filling up an air mattress, make sure to use the appropriate pump for the valve. Overfilling can cause damage, so stop when it feels firm. Always check for leaks before use.
Step 6: Remove the pump and close the valve
Now that your air mattress is fully inflated and at your desired firmness, it’s time to remove the pump and close the valve. Follow these steps to complete this process:
- If you used a manual hand pump, simply detach the pump from the valve by reversing the attachment process. Pull the hose or nozzle out of the valve carefully, ensuring not to let any air escape in the process.
- If you used an electric pump, turn off the power switch or unplug it from the power source. Then remove the nozzle or adapter from the valve, again being careful not to disrupt the airflow.
- With the pump detached, quickly but securely close the valve by replacing the plastic or rubber cap. Make sure the cap is tightly sealed to prevent any air from escaping overnight or during use.
- Give the mattress a gentle push to ensure that it remains properly inflated and that the valve is sealed tightly. A well-sealed valve will help maintain the firmness and comfort of your air mattress throughout the night.
By removing the pump and closing the valve, you are ensuring that your mattress retains its air and remains fully inflated for an extended period. This step is essential to prevent any accidental deflation or loss of firmness while using the air mattress.
Now that you have completed this step, it’s time to move on to the next step: checking the firmness of your air mattress.
Step 7: Check the firmness of the air mattress
Once you have removed the pump and closed the valve, it’s important to check the firmness of your air mattress. This step allows you to make any necessary adjustments to ensure optimal comfort. Here’s how to check the firmness:
- Lie down on the mattress and distribute your weight evenly across the surface. Take a moment to assess how the mattress feels beneath you.
- Pay attention to any areas that feel too soft or too firm. Note whether there are any uneven spots or if the mattress maintains a consistent level of firmness.
- If you find the mattress too firm, you can release some of the air by briefly opening the valve and pressing down on the mattress to allow some air to escape. Remember to close the valve securely after making adjustments.
- If you find the mattress too soft, you can add more air by opening the valve and using the pump to inflate the mattress further. Be mindful not to overinflate, as this can make the mattress uncomfortable.
- Continue making small adjustments until you find the perfect balance of firmness and comfort. Remember, everyone’s preferences are different, so trust your own judgment to determine the ideal firmness level for you.
By checking the firmness of your air mattress, you can ensure that it provides the desired level of support and comfort for a restful sleep or a comfortable lounging experience. This step allows you to customize the firmness to your preference, enhancing your overall satisfaction with the mattress.
Once you’ve adjusted the firmness to your liking, it’s time to move on to the next step: making any final adjustments if necessary.
Step 8: Make adjustments if necessary
After checking the firmness of your air mattress, you may find that some additional adjustments are needed to enhance your comfort. Here are some key considerations for making any necessary adjustments:
- If you notice any unevenness or lumps in the mattress, you can gently press down on those areas to redistribute the air. Smooth out any wrinkles or folds, ensuring that the mattress surface is even and supportive.
- If you’re using the air mattress for an extended period or plan on using it for multiple nights, monitor the firmness over time. Air mattresses may naturally lose a small amount of air during the initial hours of inflation. If you notice any significant loss in firmness, you can add a bit more air to maintain optimal comfort.
- Consider the external factors that may affect the firmness of your mattress. Temperature changes, altitude, and the weight distribution of the individuals using the mattress can impact the air pressure. Adjust accordingly to ensure consistent comfort.
- If you’re using the air mattress outdoors or in a temperature-controlled environment, remember that air expands in warm temperatures and contracts in cold temperatures. This may cause slight changes in the firmness of the mattress. Make adjustments as needed to accommodate these fluctuations.
- If you’re sharing the air mattress with a partner or another person, communicate and adjust the firmness together. It’s essential to find a compromise that suits both individuals’ preferences for a comfortable and restful sleep.
By making these necessary adjustments, you can optimize the firmness and comfort of your air mattress to ensure a great sleeping or lounging experience. Take the time to fine-tune the mattress to your liking, as personal comfort is key when it comes to enjoying a quality sleep or relaxation session.
Once you have completed any final adjustments, it’s time to move on to the final step: enjoying your fully inflated air mattress!
Read more: How To Fill Up A Swimming Pool
Step 9: Enjoy your fully inflated air mattress
Congratulations! You have successfully inflated and adjusted your air mattress to your desired firmness. Now it’s time to reap the rewards and enjoy a comfortable sleep or relaxing experience. Here’s how to make the most of your fully inflated air mattress:
- Prepare your bedding: Add a fitted sheet, a flat sheet, and pillows to make your air mattress cozy and inviting. Choose bedding that complements your personal style and enhances your overall comfort.
- Make it personal: Customize your sleeping or lounging area by adding blankets, throws, or cushions to create a warm and inviting space. Consider adding a mattress topper for added cushioning and support.
- Test it out: Take a moment to lie down or sit on the mattress to ensure it offers the level of comfort you desire. Shift positions and see if any further adjustments are needed to optimize your sleeping or lounging experience.
- Rest and relax: Whether you’re camping, hosting guests, or using your air mattress for everyday use, take the time to unwind and enjoy the comfort it provides. Allow yourself to relax, rejuvenate, or simply enjoy a good night’s sleep.
- Maintain its integrity: Throughout your usage, periodically check the firmness of the mattress and make minor adjustments as needed. Remember to follow the manufacturer’s guidelines for maintenance and care to prolong the lifespan of your air mattress.
By following these steps and considering your personal preferences and comfort, you can fully enjoy the benefits of your fully inflated air mattress. Whether you’re using it for camping adventures, accommodating guests, or as an extra bed at home, an air mattress can provide a comfortable and convenient sleeping solution.
Now that you’re ready to enjoy your fully inflated air mattress, make the most of the experience and embrace the comfort it offers. Sweet dreams and happy resting!
That concludes our guide on how to fill up an air mattress. We hope you found it helpful and informative. Sleep well and rest easy on your newly inflated air mattress!
Conclusion
Inflating an air mattress doesn’t have to be a complicated or intimidating task. With the right materials, proper steps, and a little patience, you can easily fill up an air mattress and enjoy a comfortable sleeping or lounging experience. By following the steps outlined in this guide, you’ll be able to inflate your air mattress to the desired firmness and make any necessary adjustments to enhance your comfort.
Remember to gather all the necessary materials, locate the valve, attach the appropriate pump, and monitor the inflation process closely. Check the firmness of the mattress and make any final adjustments to ensure optimal comfort. Once you’re satisfied, remove the pump, close the valve, and prepare the mattress for a restful sleep or enjoyable relaxation.
Whether you’re using an air mattress for camping trips, hosting guests, or as an extra bed at home, the versatility and convenience it offers make it a valuable piece of bedroom furniture. By properly inflating and maintaining your air mattress, you can ensure its longevity and continued comfort for years to come.
We hope this guide has provided you with the knowledge and confidence to fill up an air mattress effectively. Enjoy the convenience, comfort, and portability that an air mattress brings to your sleeping arrangements. Explore new adventures, rest well, and make the most of your inflatable mattress!
Frequently Asked Questions about How To Fill Up An Air Mattress
Was this page helpful?
At Storables.com, we guarantee accurate and reliable information. Our content, validated by Expert Board Contributors, is crafted following stringent Editorial Policies. We're committed to providing you with well-researched, expert-backed insights for all your informational needs.