Home>Furniture>Kitchen Furniture>What Is The Best Sensor Placement For A STC 1000 Kegerator

Kitchen Furniture
What Is The Best Sensor Placement For A STC 1000 Kegerator
Modified: January 5, 2024
Looking for articles on where to put the sensor for your STC 1000 kegerator? Find the best tips and tricks here to ensure optimal performance.
(Many of the links in this article redirect to a specific reviewed product. Your purchase of these products through affiliate links helps to generate commission for Storables.com, at no extra cost. Learn more)
Introduction
When it comes to kegerators, one important component that ensures the perfect serving temperature of your beer is the STC 1000 temperature controller. This versatile device allows you to monitor and regulate the temperature inside your kegerator, ensuring that your beer is always chilled to perfection. However, the placement of the sensor for the STC 1000 is critical for accurate temperature readings and optimal performance.
In this article, we will explore the importance of sensor placement for the STC 1000 kegerator and provide recommendations on the best locations to place the sensor. By following these guidelines, you can ensure that your kegerator operates at its best, delivering cold, refreshing beer with every pour.
Before we dive into the details of sensor placement, let’s briefly discuss the STC 1000 temperature controller and its role in maintaining the ideal temperature for your kegerator.
Key Takeaways:
- Proper sensor placement is crucial for accurate temperature control and optimal kegerator performance. Whether inside or outside the unit, avoid common mistakes to ensure precise temperature readings and maintain beer quality.
- Placing the sensor on the beer keg, in the air, or in a bottle of water inside the kegerator, or taping it to the side of the unit, using a thermowell, or in a cooling chamber outside the kegerator are recommended locations. Avoiding common mistakes such as proximity to heat sources and overcrowding the sensor location is essential for accurate temperature control.
Understanding the STC 1000 Kegerator
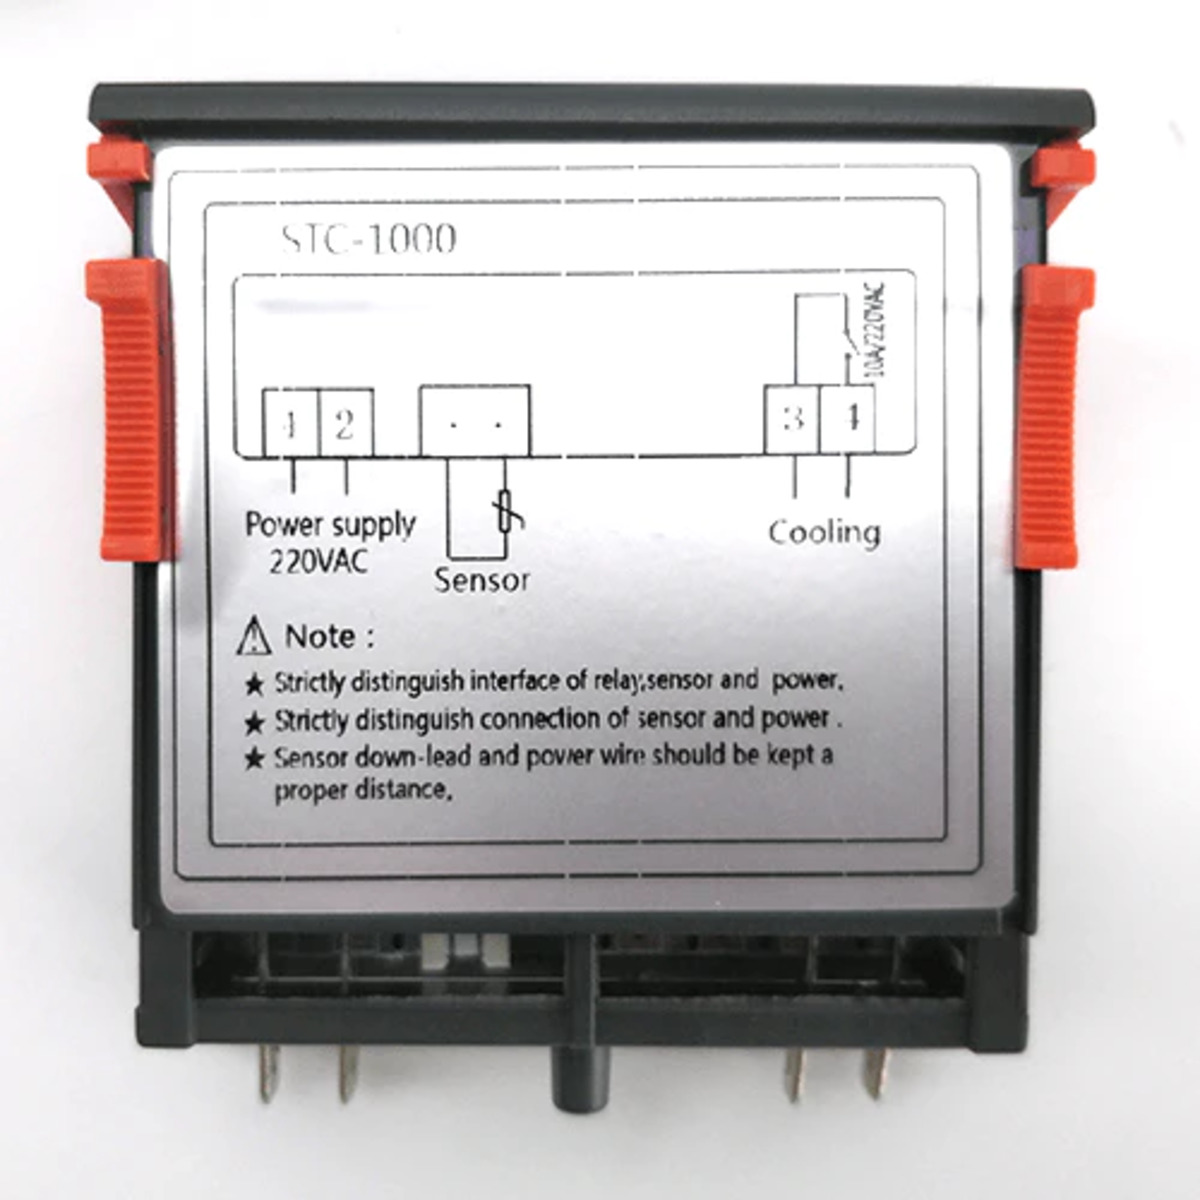
The STC 1000 temperature controller is a popular choice among homebrewers and kegerator enthusiasts for its reliability and affordability. It is a digital thermostat that allows you to set and control the temperature of your kegerator with precision. The controller features a dual relay output, which means it can control both heating and cooling devices simultaneously.
With the STC 1000, you can easily program temperature ranges and set cooling and heating triggers. When connected to a refrigerator or a heating source, it automatically switches on or off to maintain your desired temperature. This level of control is essential for preserving the quality and flavor of your beer.
One key component of the STC 1000 is the temperature sensor or probe. This is the part of the controller that measures the temperature inside the kegerator and sends that information to the controller. The accuracy of the temperature readings relies heavily on the placement of the sensor.
Now that we have an understanding of the STC 1000 kegerator and its temperature controlling capabilities, let’s take a closer look at the importance of sensor placement.
Importance of Sensor Placement
The placement of the sensor for the STC 1000 temperature controller is crucial for achieving accurate temperature readings and ensuring optimal performance of your kegerator. Proper sensor placement directly affects the controller’s ability to regulate the temperature effectively.
Firstly, accurate temperature readings are essential for maintaining the quality and flavor of your beer. Different beer styles have specific temperature requirements, and slight variations can impact the taste and aroma. If the sensor is not placed correctly, it may result in inaccurate temperature readings, leading to beers that are too warm or too cold.
Secondly, placing the sensor in the wrong location can cause temperature fluctuations within the kegerator. For example, if the sensor is placed near the cooling unit or close to the beer keg, it may lead to rapid temperature changes whenever the cooling unit cycles on and off. This can cause inconsistencies in temperature and result in fluctuations that affect the quality of the beer.
Furthermore, improper sensor placement can affect the life and efficiency of your kegerator’s compressor. If the sensor is located too close to the cooling unit, it may cause the compressor to run more frequently, leading to increased energy consumption and potential strain on the compressor.
Therefore, understanding where to place the sensor is vital to ensure accurate temperature control, maintain beer quality, and optimize the performance of your kegerator.
In the next section, we will provide recommendations on the best locations to place the sensor for optimal temperature control and beer enjoyment.
Recommended Sensor Locations
When it comes to sensor placement for the STC 1000 kegerator, there are two main options: inside the kegerator and outside the kegerator. Let’s explore the recommended locations for each.
Inside the Kegerator
Placing the sensor inside the kegerator is a popular choice for many kegerator owners. Here are some recommended locations within the kegerator:
- On the beer keg: Attaching the sensor to the side of the beer keg using an adhesive strip or a zip tie can provide accurate readings as it directly measures the temperature of the beer.
- Hanging in the air: Positioning the sensor in the air inside the kegerator, away from the cooling unit and the beer keg, can give a good overall temperature reading.
- In a bottle of water: Placing the sensor in a water-filled bottle can provide more stability and prevent rapid temperature fluctuations. This method is especially useful if you have limited space inside your kegerator.
Read more: What Is A Kegerator?
Outside the Kegerator
While placing the sensor inside the kegerator is common, some kegerator owners prefer to keep the sensor outside. Here are a few recommended locations outside the kegerator:
- Taped to the side of the kegerator: Securing the sensor to the side of the kegerator using tape or adhesive can provide a reliable reading of the ambient temperature surrounding the kegerator.
- In a thermowell: Using a thermowell, a tube made of metal or other heat-conductive material, to house the sensor can provide precise temperature readings without directly exposing it to the environment.
- In a cooling chamber: If you have a separate temperature-controlled cooling chamber for your kegerator, placing the sensor inside the chamber can ensure accurate readings and temperature control.
Remember, regardless of the chosen location, it is crucial to avoid placing the sensor near the cooling unit or any heat sources. This could lead to inaccurate readings and affect the performance of the temperature controller.
Now that we have covered the recommended sensor locations, it’s important to be aware of some common mistakes to avoid. Let’s discuss those in the next section.
Inside the Kegerator
Placing the sensor inside the kegerator is a popular choice for many kegerator owners as it allows for direct temperature measurement of the beer. Here are some recommended locations within the kegerator:
On the beer keg
Attaching the sensor to the side of the beer keg using an adhesive strip or a zip tie is a common method. This positioning provides accurate readings as it directly measures the temperature of the beer itself. The sensor should be attached towards the top of the keg, ensuring that it is submerged in the beer and not exposed to the air. This placement allows you to monitor and control the temperature of the beer, which is crucial for serving it at the optimal temperature for maximum enjoyment.
Hanging in the air
Another option is to position the sensor in the air inside the kegerator, away from the cooling unit and the beer keg. This method provides a more general temperature reading of the internal environment. It is recommended to hang the sensor using a string or a clip to keep it away from any direct contact with the cooling unit or the keg. This location gives you an overall indication of the temperature inside the kegerator, ensuring it remains within the desired range for beer storage and dispensing.
Read more: What Is The Best Outdoor Motion Sensor Light
In a bottle of water
If you have limited space inside your kegerator or prefer a more stable temperature reading, placing the sensor in a bottle of water can be a practical solution. Fill a small bottle with water and submerge the sensor into it. This method provides thermal stability as the water acts as a buffer against rapid fluctuations in temperature. Ensure that the bottle is placed in a central location inside the kegerator, away from any direct contact with the cooling unit. This placement will allow the sensor to accurately measure the temperature of the water, giving you a reliable reading of the internal temperature.
Remember, regardless of the chosen location, avoid placing the sensor near the cooling unit or any heat sources. Doing so can compromise the accuracy of the temperature readings and affect the overall performance of the STC 1000 kegerator.
In the next section, we will explore the recommended sensor locations outside the kegerator.
Outside the Kegerator
While placing the sensor inside the kegerator is common, some kegerator owners prefer to keep the sensor outside. There are a few recommended locations to consider:
Taped to the side of the kegerator
Securing the sensor to the side of the kegerator using tape or adhesive can provide a reliable reading of the ambient temperature surrounding the kegerator. This placement allows you to monitor the external temperature, which can be helpful if you want to gauge the temperature in the room where the kegerator is located. Ensure that the sensor is not directly exposed to any heat sources or in direct sunlight. Additionally, make sure the sensor is placed at a height that reflects the average room temperature, away from any significant temperature variations that may occur near the floor or ceiling.
In a thermowell
Using a thermowell is another option for placing the sensor outside the kegerator. A thermowell is a tube made of metal or other heat-conductive material that houses the sensor. This method allows for precise temperature readings without directly exposing the sensor to the environment. The thermowell can be fitted into a pre-drilled hole in the kegerator or attached externally. This type of installation provides insulation for the sensor and protects it from external influences that may affect temperature readings.
Read more: What Is The Best Kegerator For Home Use
In a cooling chamber
If you have a separate temperature-controlled cooling chamber for your kegerator, placing the sensor inside the chamber can ensure accurate readings and temperature control. This setup is commonly found in larger kegerators or commercial setups where the kegerator component is separate from the cooling system. The sensor can be placed inside the chamber, allowing it to monitor and regulate the temperature in the enclosed space accurately.
Regardless of the chosen location, remember to avoid placing the sensor near any heat sources that might affect the temperature readings. Additionally, be mindful of any potential obstructions that may impede the sensor’s ability to accurately measure the temperature.
Now that we have covered the recommended sensor locations outside the kegerator, let’s move on to the next section, where we discuss common mistakes to avoid when placing the sensor.
Avoiding Common Mistakes
When it comes to sensor placement for your STC 1000 kegerator, it’s important to avoid some common mistakes that can compromise temperature control and accuracy. Here are some key mistakes to avoid:
Placing the sensor too close to the cooling unit
Avoid placing the sensor in direct contact with the cooling unit of the kegerator. The cooling unit generates cold air, and if the sensor is too close, it may give inaccurate readings. The cold air from the cooling unit can cause the sensor to register lower temperatures than the actual temperature of the kegerator. This can lead to overcooling and potentially freezing of the beer.
Positioning the sensor near heat sources
Avoid placing the sensor near sources of heat, such as heating elements or direct sunlight. Heat sources can artificially raise the temperature reading, leading to inaccurate temperature control. Ensure that the sensor is positioned away from any heat-emitting components or direct exposure to sunlight.
Overcrowding the sensor location
Avoid overcrowding the sensor location within the kegerator or when placed externally. Ensure that the sensor has sufficient space around it for accurate temperature measurement. Overcrowding can lead to inaccurate readings as it may cause the sensor’s temperature probe to touch objects that have different temperatures, resulting in erroneous readings. Providing ample space around the sensor promotes better air circulation and thermodynamic equilibrium.
Neglecting temperature differentials
Take into account temperature differentials between the internal and external environment when determining the placement of the sensor. Placing the sensor too far away from the beer or outside the kegerator might result in temperature differentials impacting the accuracy of the temperature control. Consider the temperature differentials that might occur and adjust the sensor placement accordingly to ensure accurate readings.
By avoiding these common mistakes, you can ensure that your sensor is placed in an optimal location for accurate temperature control and efficient performance of your kegerator.
Before we conclude, let’s summarize the key points we have discussed throughout the article.
Conclusion
Proper sensor placement is essential for maximizing the performance and accuracy of your STC 1000 kegerator. By ensuring that the sensor is positioned correctly, you can maintain the ideal temperature for your beer, preserving its quality and enhancing your overall drinking experience.
Inside the kegerator, you have the option of placing the sensor on the beer keg, hanging it in the air, or submerging it in a bottle of water. Each placement offers its own benefits, allowing you to measure the temperature of the beer directly or obtain a general reading of the internal environment.
If you choose to place the sensor outside the kegerator, consider taping it to the side of the unit, using a thermowell, or placing it in a cooling chamber. These locations provide accurate temperature readings of the ambient surroundings or within a controlled temperature chamber.
However, it’s crucial to avoid common mistakes such as placing the sensor too close to the cooling unit, near heat sources, overcrowding the sensor location, or neglecting temperature differentials. By avoiding these errors, you can ensure precise temperature control and maintain the integrity of your kegerator system.
Remember, achieving the perfect serving temperature for your beer enhances its flavor, aroma, and overall enjoyment. By following the recommendations and being mindful of sensor placement, you can optimize the performance of your STC 1000 kegerator and indulge in refreshing, perfectly chilled beer with every pour.
So, whether you choose to place the sensor inside or outside the kegerator, make sure to keep these guidelines in mind for accurate and reliable temperature control. Cheers to a perfectly chilled beer!
Frequently Asked Questions about What Is The Best Sensor Placement For A STC 1000 Kegerator
Was this page helpful?
At Storables.com, we guarantee accurate and reliable information. Our content, validated by Expert Board Contributors, is crafted following stringent Editorial Policies. We're committed to providing you with well-researched, expert-backed insights for all your informational needs.








0 thoughts on “What Is The Best Sensor Placement For A STC 1000 Kegerator”