Home>Furniture>Outdoor Furniture>How To Hang A Stuffed Animal Hammock
Outdoor Furniture
How To Hang A Stuffed Animal Hammock
Modified: March 16, 2024
Discover how to hang a stuffed animal hammock and declutter your outdoor space with this step-by-step guide. Create a neat and organized area for your kids' toys and enjoy more space for your outdoor furniture.
(Many of the links in this article redirect to a specific reviewed product. Your purchase of these products through affiliate links helps to generate commission for Storables.com, at no extra cost. Learn more)
Introduction
Welcome to the ultimate guide on how to hang a stuffed animal hammock! If you’re tired of your child’s bedroom being overrun with stuffed animals, then a stuffed animal hammock is the perfect solution. Not only does it provide functional storage for all those cuddly creatures, but it also adds a playful and decorative element to any room.
In this comprehensive guide, we will walk you through the step-by-step process of hanging a stuffed animal hammock. We’ll discuss the materials you’ll need, how to choose the perfect location, and provide detailed instructions on installing the hooks and attaching the hammock. By the end, you’ll have a neat and organized space for your child’s beloved stuffed animals.
So let’s dive in and transform your child’s room into a clutter-free haven!
Key Takeaways:
- Transform your child’s cluttered room into a playful haven by hanging a stuffed animal hammock. Follow the steps to create a neat and whimsical storage solution that reflects your child’s personality and interests.
- Choose the perfect location, securely install hooks, and arrange the stuffed animals for a functional and decorative display. Keep the room tidy and make it easy for your child to access their favorite toys.
Read more: How To Organize Stuffed Animals
Materials Needed
Before we start hanging the stuffed animal hammock, make sure you have the following materials handy:
- Hammock: Choose a hammock made of durable and breathable material, preferably mesh or netting, to ensure proper air circulation for the stuffed animals. Make sure the hammock is large enough to accommodate all the toys.
- Hooks: Purchase sturdy hooks that can support the weight of the stuffed animals. The type of hooks you’ll need will depend on the structure of the room. If you’re attaching the hammock to a stud or ceiling joist, use screw hooks. If you’re attaching it to a wall, use wall hooks or adhesive hooks designed for heavy loads.
- Measuring Tape: Measure and mark the location for the hammock accurately using a measuring tape. This will help ensure the hammock is hung at the desired height and distance from walls or furniture.
- Mounting Hardware: If you’re using screw hooks, you’ll need appropriate mounting hardware such as wall anchors, screws, and a drill. Make sure to choose the right size of anchors and screws based on your wall type.
- Level: To ensure the hammock is hung straight and level, have a level tool handy. This will help you maintain a balanced and aesthetically pleasing look.
Once you have gathered these essential materials, you’re ready to move on to the next steps of the installation process.
Step 1: Choosing the Location
Choosing the right location for your stuffed animal hammock is essential. Here are a few factors to consider when determining the ideal spot:
- Wall or Ceiling: Decide whether you want to attach the hammock to a wall or ceiling. The choice will depend on the layout of the room and your personal preference.
- Accessibility: Select a location where your child can easily access the stuffed animals. Consider placing the hammock at a height that allows your child to reach and retrieve their favorite toys without any difficulty.
- Visibility: Opt for a spot that allows you to display the stuffed animals prominently. This could be a corner of the room, above a bed or play area, or along a wall with enough space to showcase the collection.
- Support: Ensure the chosen location provides sufficient support for the weight of the hammock and the stuffed animals. If you’re attaching the hammock to a wall, make sure it is secured to studs or wall anchors for added stability.
- Aesthetics: Consider the overall aesthetic of the room and how the hammock will complement the existing decor. You can choose a hammock color that matches the room or adds a fun pop of color.
Take some time to evaluate different areas of the room and visualize how the stuffed animal hammock will look in each location. Once you’ve selected the perfect spot, it’s time to move on to the next step: measuring and marking.
Step 2: Measuring and Marking
Once you have chosen the location for your stuffed animal hammock, it’s time to measure and mark the area to ensure precise installation. Follow these steps:
- Measure the Space: Use a measuring tape to determine the length and width of the hammock. This will help you visualize how it will fit in the chosen location and ensure that it doesn’t take up too much space or interfere with other furniture or fixtures.
- Mark the Height: Determine the desired height at which you want to hang the hammock. Consider the accessibility for your child and the overall aesthetics of the room. Use a pencil to mark the height measurement on the wall or ceiling.
- Measure the Distance: Measure the distance from the marked height to the nearest walls or furniture. This will help you determine the ideal placement of the hooks and ensure that the hammock hangs symmetrically in the designated area.
- Mark the Hook Placement: Using the measurements and distance, mark the points where the hooks will be installed. Make sure the marks are centered and level.
By taking the time to measure and mark the area, you’ll achieve a balanced and visually pleasing installation. It will also make the process of installing the hooks much easier in the next step.
Now that you have the measurements and marks in place, it’s time to move on to step 3 and install the hooks securely.
Step 3: Installing the Hooks
Now that you have measured and marked the area for your stuffed animal hammock, it’s time to install the hooks. Follow these steps for a secure installation:
- Preparation: If you’re using screw hooks, start by using a drill and appropriate drill bit to create pilot holes at the marked points. This will make it easier to screw in the hooks later. If you’re using adhesive hooks, ensure that the surface is clean and dry before attaching them.
- Screw Hooks: If using screw hooks, align the hook with the pilot hole and begin twisting clockwise. Apply firm and steady pressure until the hook is fully screwed in, making sure it is straight and secure. Repeat the process for all marked points.
- Adhesive Hooks: If using adhesive hooks, remove the backing from the adhesive strip and align the hook with the marked point. Apply firm pressure for a few seconds to ensure proper adhesion. Follow the manufacturer’s instructions for weight capacity and drying time.
- Check Stability: Once all the hooks are installed, give them a gentle tug to ensure they are secure. If any hooks feel loose, reinforce them by either tightening the screw or reapplying adhesive. It’s crucial to have stable hooks that can bear the weight of the hammock and stuffed animals.
By following these steps, you’ll have a solid foundation for hanging your stuffed animal hammock. Now, let’s move on to the exciting part: attaching the hammock!
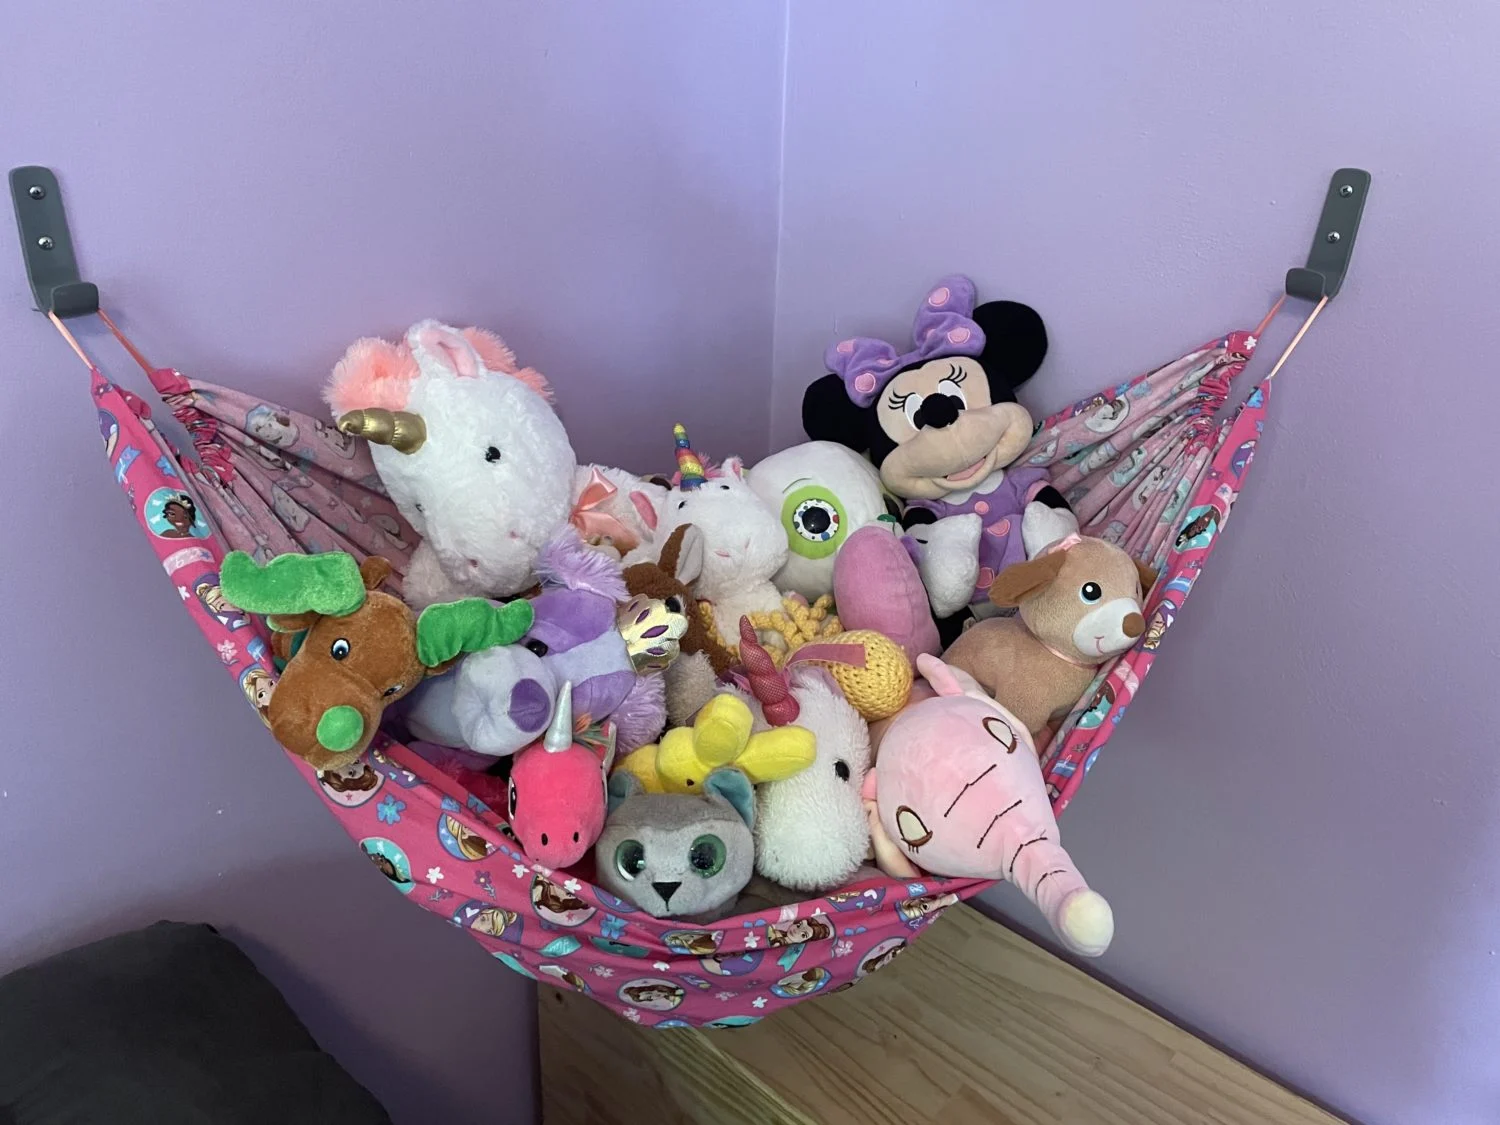
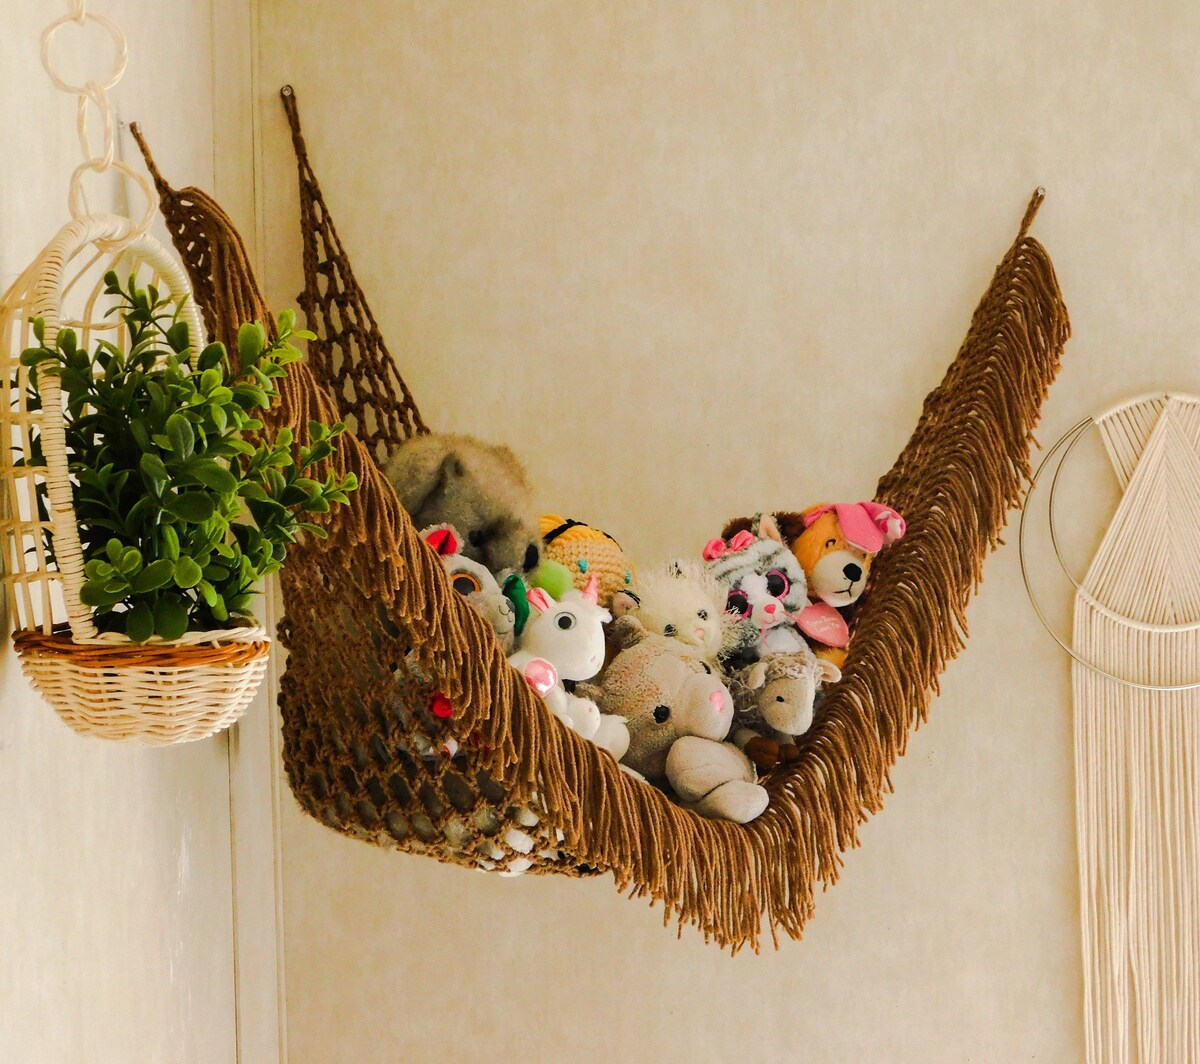
When hanging a stuffed animal hammock, make sure to find a sturdy wall or corner to mount it on. Use anchors or screws to securely attach the hammock to the wall, and distribute the weight of the stuffed animals evenly to prevent it from sagging.
Step 4: Attaching the Hammock
With the hooks securely in place, it’s time to attach the stuffed animal hammock. Follow these steps to ensure a proper installation:
- Attach the Hooks: Carefully loop each end of the hammock onto the hooks you installed. Make sure the hammock is evenly supported and centered between the hooks.
- Adjust the Height: If needed, adjust the height of the hammock by either raising or lowering the loops on the hooks. Check that the height is suitable for your child to reach and place their stuffed animals comfortably.
- Ensure Proper Tension: Ensure that the hammock is pulled taut and there is enough tension to support the weight of the toys. Avoid sagging or loose areas, as this may cause the stuffed animals to fall out.
- Test the Stability: Give the hammock a gentle shake to verify its stability. If it feels secure and doesn’t sway excessively, it’s ready for the next step. If not, check the hooks to ensure they are properly tightened and reinforced.
Once the hammock is properly attached and secured, take a moment to admire your handiwork. It’s amazing how a simple hammock can transform a room and provide a fun storage solution for all those beloved stuffed animals!
Now, let’s move on to step 5 and test the strength of the hammock before arranging the stuffed animals.
Step 5: Testing the Strength
Before filling the stuffed animal hammock with your child’s beloved toys, it’s essential to test its strength. Follow these steps to ensure the hammock can securely hold the weight of the stuffed animals:
- Gradually Add Weight: Start by placing a few lightweight stuffed animals into the hammock. Slowly add more toys, increasing the weight gradually. This will allow you to assess the hammock’s ability to support the load.
- Observe Stability: Keep an eye on the hammock as you add weight. Ensure that it remains stable, without any signs of sagging, straining, or pulling at the hooks. If you notice any instability, stop adding weight and check the hooks and hammock attachments.
- Verify Safety: Shake the hammock gently to check if the stuffed animals stay secure and don’t fall out. If they do, readjust the tension or consider reducing the weight load.
- Avoid Overloading: Be mindful not to overload the hammock beyond its recommended weight capacity. Excessive weight can strain the hooks and potentially lead to accidents or damage.
By testing the strength and stability of the stuffed animal hammock, you can ensure a safe and functional storage solution for your child’s toys. Once you’re confident in its strength, move on to the final step: arranging the stuffed animals.
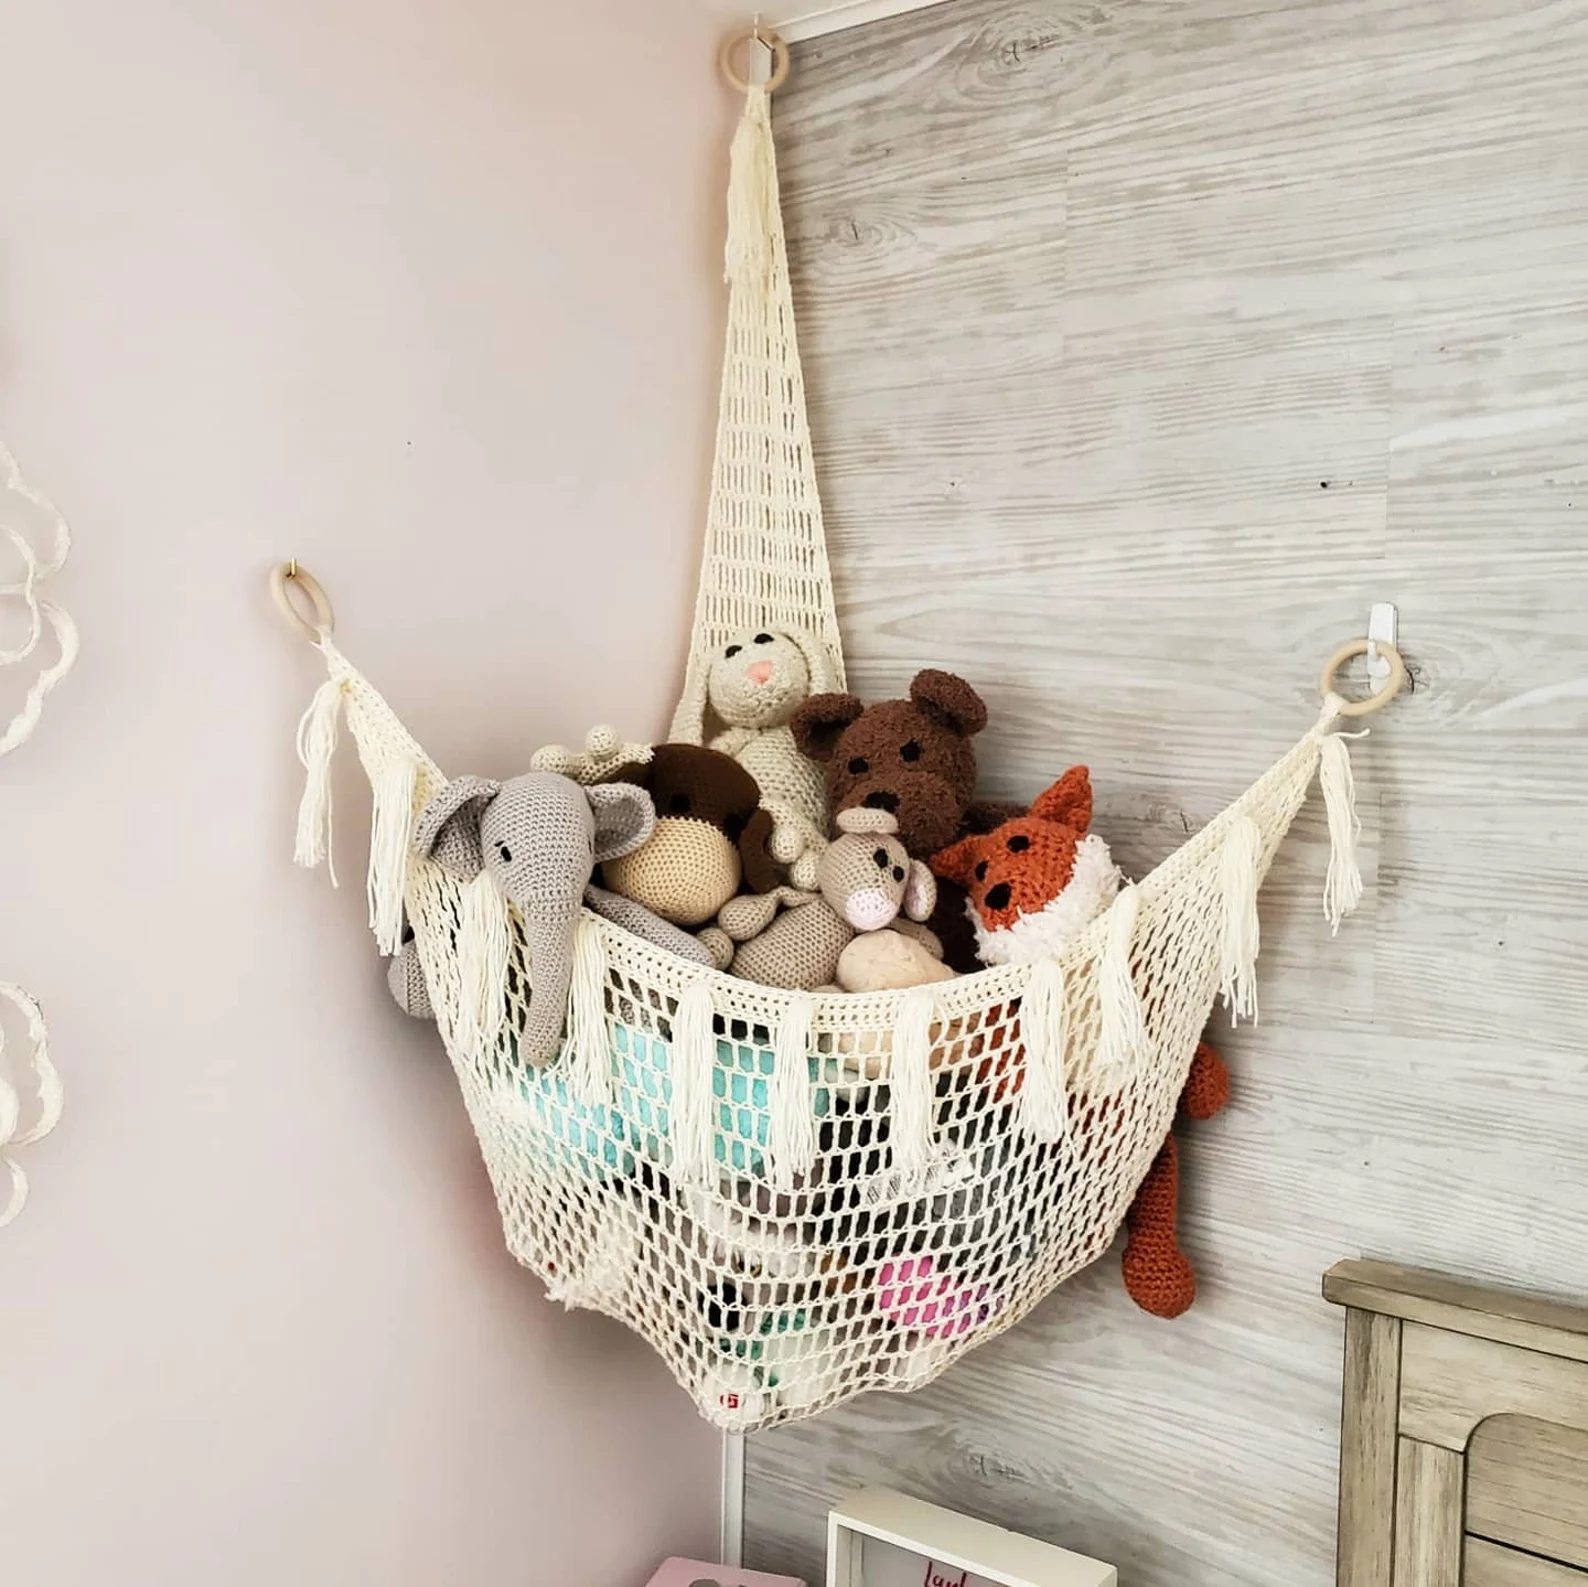
Step 6: Arranging the Stuffed Animals
Now that your stuffed animal hammock is securely installed and tested for strength, it’s time to have some fun and arrange the toys! Follow these steps to create an organized and visually appealing display:
- Group Similar Toys: Start by grouping the stuffed animals based on type, size, or theme. This will make it easier to organize and create cohesion within the hammock.
- Consider Weight Distribution: Distribute the toys evenly across the hammock to maintain balance. Place heavier toys towards the center and lighter ones towards the edges.
- Vary Heights: To create visual interest, vary the heights of the toys. Hang some toys higher and others closer to the bottom of the hammock. This adds depth and dimension to the display.
- Utilize the Sides: Make use of the sides of the hammock by securing smaller toys or accessories such as doll clothes or tiny stuffed animals. This maximizes the storage space and adds charm to the overall arrangement.
- Regularly Rotate: Encourage your child to rotate and switch out the stuffed animals on display. This keeps the arrangement fresh and allows them to showcase their favorite toys periodically.
Remember, the goal is to create an organized and visually appealing display that your child will love. Take the time to arrange the stuffed animals in a way that reflects their personality and preferences. By doing so, the stuffed animal hammock becomes more than just a storage solution – it becomes a playful and decorative element in the room.
Congratulations! You have successfully learned how to hang a stuffed animal hammock and create a delightful and functional space for your child’s toys. Enjoy the newfound organization and whimsy in their bedroom!
If you need additional assistance or inspiration, feel free to explore different decorating ideas or consult with your child for their input. Happy arranging!
Conclusion
Congratulations on successfully hanging a stuffed animal hammock! By following the steps outlined in this guide, you have transformed your child’s room into a clutter-free and playful space. Here’s a quick recap of what you’ve accomplished:
- You chose the perfect location for the hammock, considering accessibility, visibility, support, and aesthetics.
- You measured and marked the area accurately to ensure a precise installation.
- You installed the hooks securely, either using screw hooks or adhesive hooks.
- You attached the hammock, adjusting the height and ensuring proper tension for stability.
- You tested the strength of the hammock by gradually adding weight and observing its stability.
- You arranged the stuffed animals in an organized and visually appealing manner, adding charm to the room.
By incorporating these steps into your process, you have not only created a functional storage solution but also added a decorative element that reflects your child’s personality and interests. The stuffed animal hammock will keep the room tidy and make it easier for your child to access their favorite toys.
Remember to periodically rotate and switch out the stuffed animals to keep the display fresh and exciting. This allows your child to showcase different toys and maintain their interest in the arrangement.
Thank you for following this comprehensive guide on how to hang a stuffed animal hammock. We hope it has been informative and helpful in your journey to create an organized and delightful space for your child. Enjoy the newfound tidiness and charm in your child’s room!
Frequently Asked Questions about How To Hang A Stuffed Animal Hammock
Was this page helpful?
At Storables.com, we guarantee accurate and reliable information. Our content, validated by Expert Board Contributors, is crafted following stringent Editorial Policies. We're committed to providing you with well-researched, expert-backed insights for all your informational needs.


0 thoughts on “How To Hang A Stuffed Animal Hammock”