Home>Garden Essentials>How To Adjust Infill On Dremel
Garden Essentials
How To Adjust Infill On Dremel
Modified: August 17, 2024
Learn how to adjust the infill on your Dremel for your garden projects with our step-by-step guide. Enhance your gardening skills with ease!
(Many of the links in this article redirect to a specific reviewed product. Your purchase of these products through affiliate links helps to generate commission for Storables.com, at no extra cost. Learn more)
Introduction
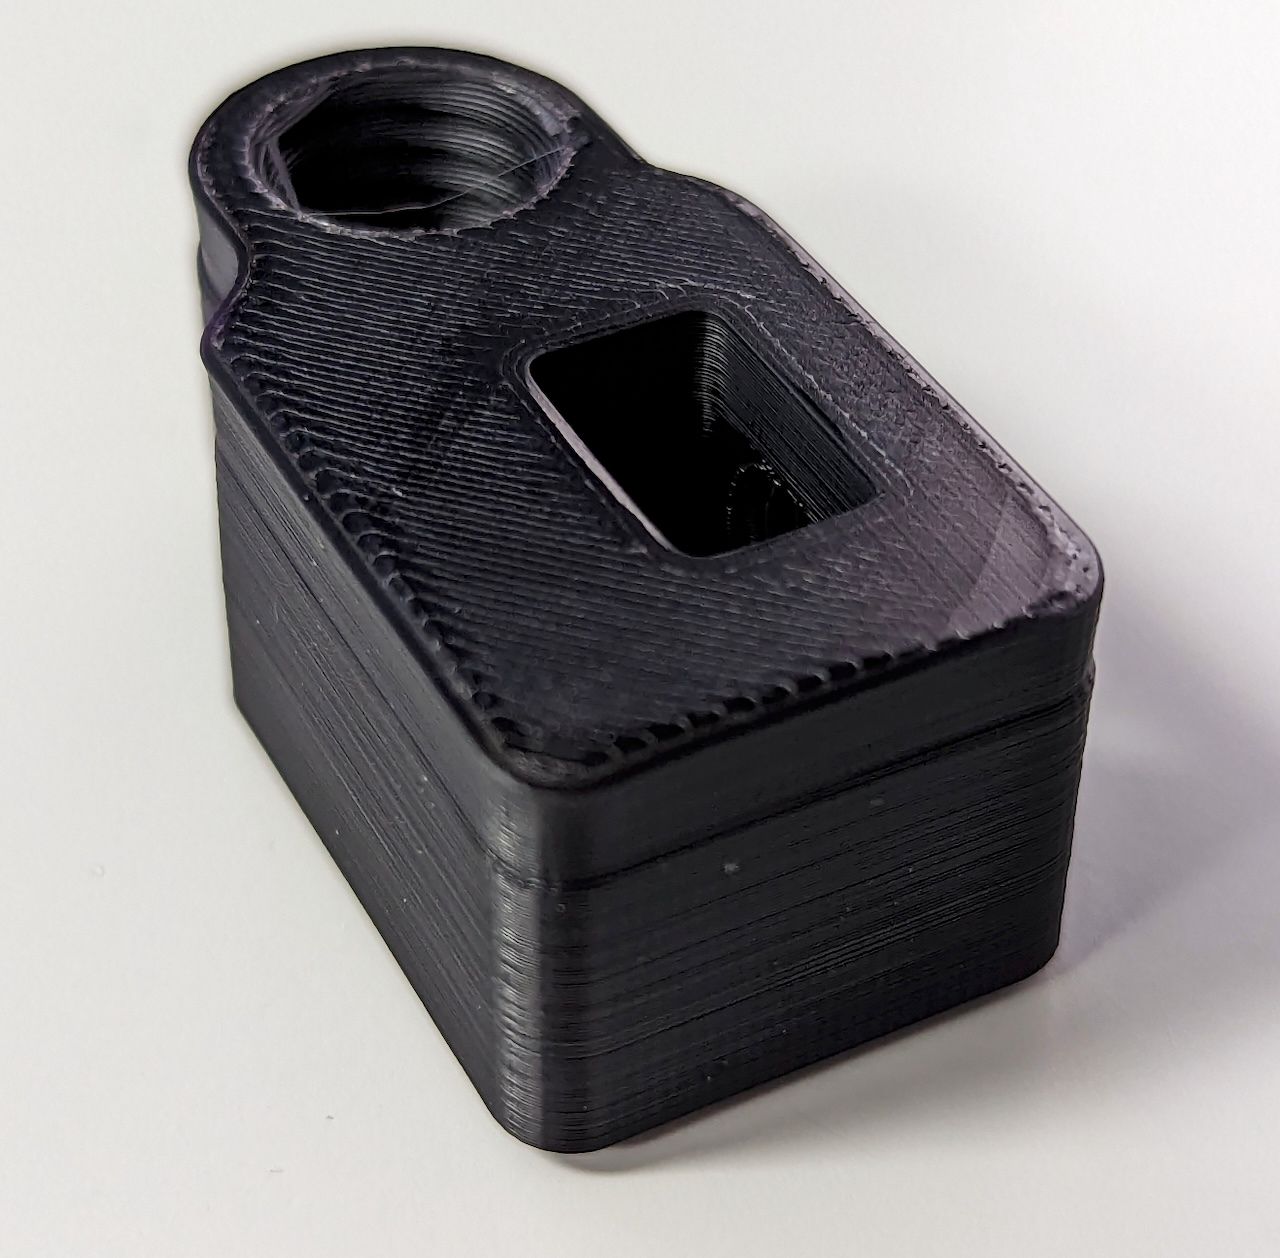
When it comes to 3D printing, achieving the perfect balance between strength and material usage is crucial. That’s where infill comes in. Infill refers to the internal structure of a 3D printed object, filling the empty spaces between the outer layers. By adjusting the infill percentage, you can control the density and strength of your printed objects.
If you’re using a Dremel 3D printer, understanding how to adjust the infill settings can greatly enhance your printing experience. Whether you’re looking for a lightweight prototype or a robust final product, being able to manipulate the infill percentage will help you achieve the desired results.
In this article, we will delve into the world of infill and guide you through the process of adjusting infill on a Dremel 3D printer. You’ll learn why infill adjustment is important, the tools you’ll need, and a step-by-step guide to get you started. So let’s dive in!
Key Takeaways:
- Adjusting infill on a Dremel 3D printer allows you to control the strength, weight, and material usage of your prints, giving you the power to create objects tailored to your specific needs.
- Experimenting with different infill patterns and settings, while considering the purpose of your print, can help you achieve the perfect balance between strength and material usage for your 3D printed objects.
Read more: How To Spread Infill Without Infill Machine
Understanding Infill in 3D Printing
Before we dive into adjusting infill on a Dremel 3D printer, it’s important to have a solid understanding of what infill is and how it affects your prints.
Infill refers to the internal structure of a 3D printed object. When you design a 3D model, the slicer software divides it into layers and calculates the toolpath for each layer. Infill is the pattern that fills the empty space between the outer layers, providing structural support to the object.
The infill percentage determines how much of the internal space is filled. A higher infill percentage means a denser, stronger print but uses more material and takes longer to print. On the other hand, a lower infill percentage will result in a more lightweight object, but with reduced structural integrity.
There are different types of infill patterns available, such as honeycomb, grid, rectilinear, and more. Each pattern has its own advantages and is suitable for different applications. The choice of infill pattern often depends on the intended use of the printed object and the desired balance between strength and material usage.
Let’s take an example to illustrate the importance of infill. Suppose you are 3D printing a stool. If you use a low infill percentage, the stool may feel flimsy and unable to support weight. However, by increasing the infill percentage, you can make the stool more robust and capable of handling heavy loads.
Understanding the concept of infill gives you control over the properties of your printed objects. It allows you to optimize the balance between strength, weight, and material usage to achieve the desired functionality.
Why Adjust Infill?
Adjusting the infill on your Dremel 3D printer can have a significant impact on the quality and functionality of your printed objects. Here are a few reasons why you might want to adjust the infill:
- Strength and Stability: By increasing the infill percentage, you can enhance the strength and stability of your 3D printed objects. This is particularly important for functional parts that need to withstand external forces or weight.
- Material Usage: Increasing the infill percentage means using more material. If you want to conserve material or reduce printing costs, you can adjust the infill to a lower percentage. This is especially useful when printing prototypes or non-structural objects.
- Print Time: Higher infill percentages typically result in longer print times. On the other hand, reducing the infill percentage can significantly reduce the printing time. This can be beneficial when you have time constraints or need to increase your print throughput.
- Weight Reduction: Lowering the infill percentage can help reduce the overall weight of your printed objects. This is advantageous for applications where weight plays a crucial role, such as aerospace or automotive parts.
- Aesthetic Considerations: In some cases, adjusting the infill percentage can have an impact on the appearance of your prints. For example, if you are printing a vase or decorative object, a lower infill percentage can create a more transparent or hollow effect.
By adjusting the infill on your Dremel 3D printer, you have the flexibility to optimize your prints for various factors, including strength, material usage, print time, weight, and aesthetics. It allows you to fine-tune the performance and characteristics of your 3D printed objects to meet your specific requirements.
Tools Needed for Adjusting Infill on Dremel
Adjusting the infill on your Dremel 3D printer is a straightforward process that requires a few essential tools. Here’s a list of the tools you’ll need:
- Dremel 3D Printer: Of course, you’ll need a Dremel 3D printer to adjust the infill settings. Make sure your printer is in good working condition and connected to your computer.
- Slicer Software: To adjust the infill settings, you’ll need slicer software that is compatible with your Dremel 3D printer. Dremel provides its own slicing software called Dremel DigiLab 3D Slicer. Install and set up the software on your computer.
- Computer: You’ll need a computer to access the slicer software and connect it to your Dremel 3D printer. Ensure that your computer meets the system requirements for the slicer software.
- USB Cable or SD Card: Depending on your Dremel 3D printer model, you’ll need a USB cable or an SD card to transfer the sliced files from your computer to the printer. Check the documentation or user manual of your specific Dremel printer to determine the appropriate method.
- Calipers or Ruler: To accurately measure the infill percentage, you may need a pair of calipers or a ruler. This will help you ensure that the desired infill percentage is reflected in your prints.
- Patience and Perseverance: Adjusting the infill can be an iterative process, and it may take some trial and error to achieve the desired results. Having patience and being willing to experiment and fine-tune your settings will help you achieve optimal infill adjustments on your Dremel 3D printer.
With these tools in hand, you’re ready to start adjusting the infill on your Dremel 3D printer. Remember to always follow the manufacturer’s guidelines and recommendations when making any changes to your printer settings.
To adjust infill on a Dremel, change the infill percentage in your slicing software. Higher percentage means more solid infill, lower means more hollow.
Step-by-Step Guide to Adjust Infill on Dremel
Now that you have all the necessary tools, let’s walk through the step-by-step process of adjusting the infill on your Dremel 3D printer:
- Prepare Your Model: Start by designing or selecting the 3D model you want to print. Ensure that it is compatible with your Dremel 3D printer and save it in a suitable file format supported by your slicer software.
- Open the Slicer Software: Launch the Dremel DigiLab 3D Slicer software on your computer. If you haven’t installed it yet, download and install it from the Dremel website.
- Import the 3D Model: Use the software’s file import function to open the 3D model you want to print. The software should display a preview of your model on the interface.
- Adjust the Slice Settings: Look for the option to adjust the slice settings or print settings in the software. Locate the infill percentage setting, which may be labeled as “Infill Density” or similar, and adjust it according to your requirements. Higher percentages result in denser prints, while lower percentages create more lightweight objects.
- Preview the Sliced Model: Once you’ve adjusted the infill percentage, preview the sliced model within the software. This will give you an idea of how the infill pattern will look and how it will affect the overall structure of the print. Take note of any other settings that may impact the print quality or functionality.
- Generate and Save the G-Code: Once you’re satisfied with the infill and other settings, generate the G-code. This code contains the instructions for your Dremel 3D printer on how to print the model. Save the G-code to your computer, USB drive, or SD card, depending on the connection method for your Dremel printer.
- Transfer the G-Code to the Printer: Connect your Dremel 3D printer to your computer using a USB cable or insert the SD card into the printer, depending on your printer model. Transfer the saved G-code file to the printer, following the instructions provided by Dremel for your specific printer.
- Start the Print: Once the G-code is transferred, start the print process on your Dremel 3D printer. Monitor the progress of the print and ensure that the infill percentage is reflected in the printed object.
- Inspect and Fine-Tune: After the print is complete, carefully examine the printed object. Assess whether the infill adjustment meets your expectations in terms of strength, weight, and overall quality. If necessary, iterate the process by making further adjustments to the infill percentage to achieve your desired results.
Remember that the adjustment of infill is an iterative process, and it may take some trial and error to find the optimal settings for your specific print. Pay attention to the interaction between the infill, print speed, layer height, and other factors to achieve the desired balance in your prints.
By following this step-by-step guide, you’ll be able to adjust the infill on your Dremel 3D printer with confidence, resulting in 3D printed objects that meet your expectations in terms of strength, weight, and overall functionality.
Read also: 13 Best Dremel Masonry For 2025
Tips for Optimal Infill Adjustment
Adjusting the infill on your Dremel 3D printer can be a nuanced process. To help you achieve the best results, here are some tips for optimal infill adjustment:
- Consider the Purpose: Think about the intended use and functionality of your printed object. If it needs to be strong and durable, a higher infill percentage is recommended. For lightweight or decorative objects, a lower infill percentage may be suitable.
- Experiment with Infill Patterns: Don’t limit yourself to a single infill pattern. Different patterns can offer variations in strength, print time, and material usage. Experiment with different infill patterns to find the one that suits your needs best.
- Balance Strength and Material Usage: Finding the right balance between strength and material usage is crucial. Increasing the infill percentage will improve strength but use more material, so consider the trade-off based on your specific requirements.
- Test Small Sections: If you’re unsure about the impact of the infill adjustment on a larger print, try testing it on a small section first. This way, you can observe how the infill affects the strength and overall quality of the print before committing to a full-scale print.
- Optimize Layer Height: Layer height and infill percentage often go hand in hand. Pay attention to the interaction between the two settings, as a higher layer height may require a higher infill percentage to maintain structural integrity.
- Consider Print Speed: Adjusting the infill can impact print speed. Higher infill percentages may require slower print speeds to ensure accurate and reliable prints. Keep an eye on the print speed settings to achieve optimal results.
- Document Your Settings: Keep a record of the infill percentages and settings that work well for different types of prints. This documentation will serve as a reference for future projects and save you time and effort in the long run.
- Learn from Others: Join online forums and communities dedicated to 3D printing. Engage with other users and learn from their experiences and insights. They can offer valuable tips and recommendations for adjusting infill on your Dremel 3D printer.
Remember that adjusting the infill is a process of experimentation and iteration. What works for one print may not work for another, so be patient and willing to make adjustments to achieve the desired results.
By following these tips and taking the time to fine-tune your infill settings, you’ll be able to optimize the strength, weight, and material usage of your 3D printed objects, ensuring they meet your precise requirements.
Conclusion
Adjusting the infill on your Dremel 3D printer opens up a world of possibilities for creating 3D printed objects that are tailored to your specific needs. By manipulating the infill percentage, you can balance strength, weight, and material usage to achieve optimal results.
Understanding the concept of infill and its impact on your prints is the first step toward successful infill adjustment. By increasing the infill percentage, you can enhance the strength and stability of your objects, while decreasing the infill percentage reduces weight and material usage.
Throughout the adjustment process, remember to consider the purpose of your printed object, experiment with different infill patterns, and find a balance between strength and material usage. Testing small sections and optimizing settings like layer height and print speed will help you fine-tune your prints.
It’s important to document your settings and learn from the experiences of others in the 3D printing community. By sharing knowledge and listening to different perspectives, you can continue to improve your infill adjustment techniques.
Remember, adjusting infill is an iterative process. Take the time to experiment, make adjustments, and fine-tune your settings to achieve the desired results. Whether you’re creating functional parts, prototypes, or decorative objects, infill adjustment on your Dremel 3D printer allows you to unleash your creativity and take your prints to the next level.
So, go ahead and start exploring the possibilities of adjusting infill on your Dremel 3D printer. With practice and dedication, you’ll be able to create 3D printed objects that perfectly balance strength, weight, and material usage, bringing your designs to life in a whole new way.
Frequently Asked Questions about How To Adjust Infill On Dremel
Was this page helpful?
At Storables.com, we guarantee accurate and reliable information. Our content, validated by Expert Board Contributors, is crafted following stringent Editorial Policies. We're committed to providing you with well-researched, expert-backed insights for all your informational needs.


0 thoughts on “How To Adjust Infill On Dremel”