Home>Garden Essentials>How To Best Fill Urns With Greenery
Garden Essentials
How To Best Fill Urns With Greenery
Modified: October 20, 2024
Learn how to beautifully fill your urns with lush greenery in your garden for a stunning and vibrant display. Discover expert tips and techniques to create the perfect botanical arrangement.
(Many of the links in this article redirect to a specific reviewed product. Your purchase of these products through affiliate links helps to generate commission for Storables.com, at no extra cost. Learn more)
Introduction
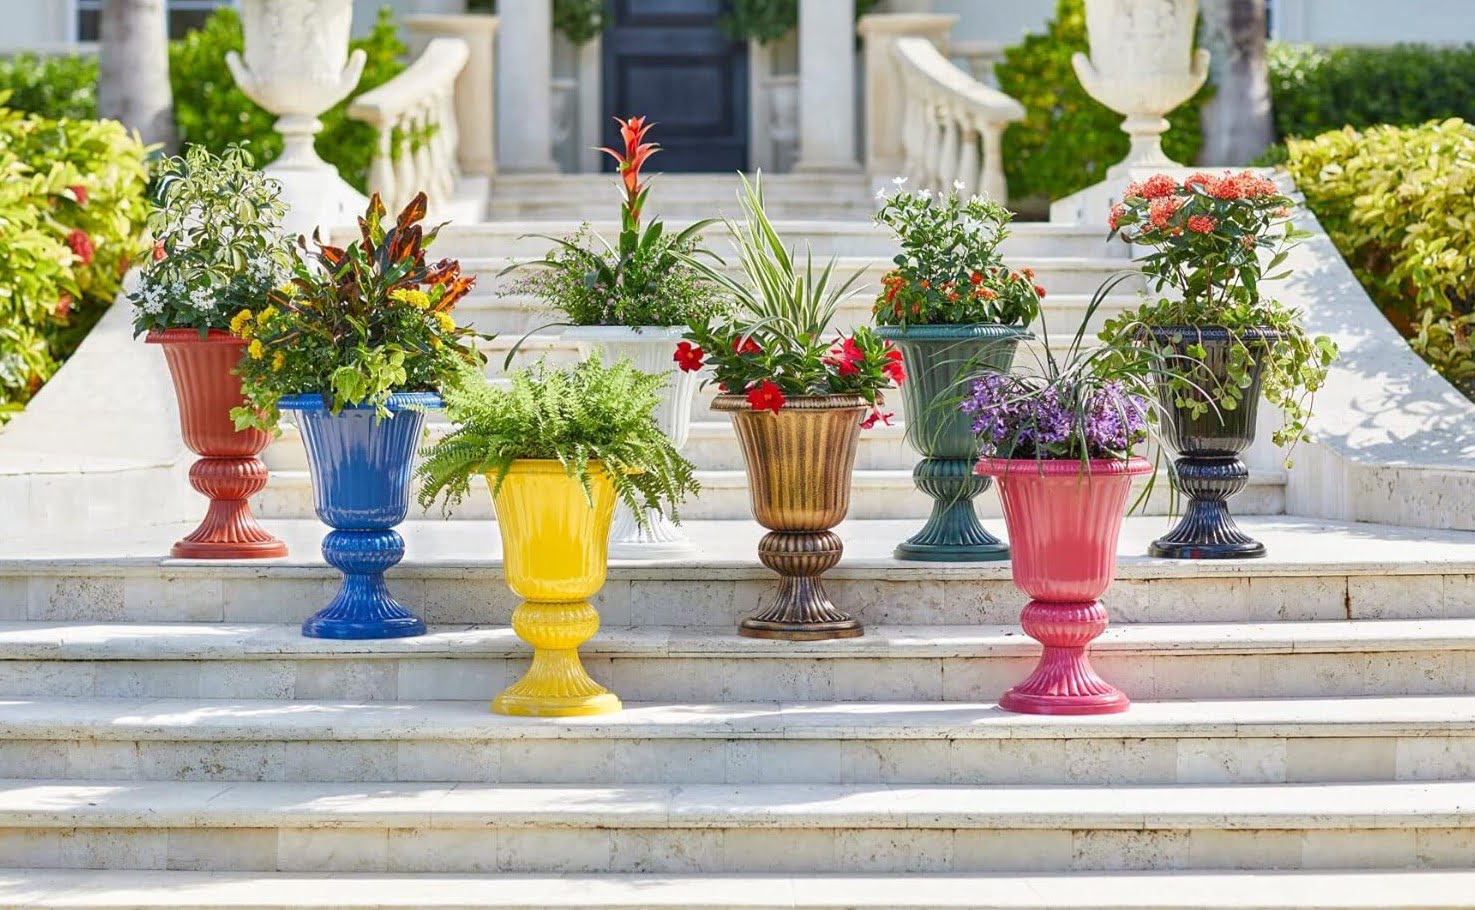
Adding greenery to your outdoor space can instantly bring life and beauty to any area. One way to showcase your green thumb is by filling urns with a variety of lush plants and foliage. Whether you have a large garden or a small patio, urns filled with greenery can create a stunning and welcoming display.
In this article, we will guide you through the process of filling urns with greenery, from choosing the right plants to arranging them in an eye-catching design. We will also provide tips on caring for the greenery to ensure it stays healthy and vibrant. Whether you’re a seasoned gardener or just starting with your green endeavors, this article will help you create beautiful urn displays that will make your outdoor space the envy of the neighborhood.
As you read on, you will learn about the different types of greenery that work well in urns, how to prepare the urns for planting, and the steps to design and fill the urns with greenery. Additionally, we will discuss the importance of adding decorative elements to enhance the overall look of the arrangement. Finally, we will offer useful tips on how to care for the greenery so that your urns continue to look their best throughout the seasons.
So, let’s dive in and discover how to fill urns with greenery to create stunning displays that will transform your outdoor space into a garden oasis.
Key Takeaways:
- Choose greenery based on light, climate, size, color, and plant combinations. Prepare urns with drainage, quality soil, and proper moisture. Design with thriller, filler, spiller plants for a balanced, visually appealing arrangement.
- Fill urns with greenery, add decorative elements, and care for plants with watering, fertilizing, pruning, and pest control. Experiment, have fun, and enjoy the beauty of nature in your outdoor space.
Read more: What Are Urns
Choosing the Right Greenery
When it comes to selecting the greenery for your urns, it’s important to consider the specific requirements of the plants as well as the overall aesthetic you want to achieve. Here are some factors to keep in mind while choosing the right greenery:
- Light Requirements: Assess the lighting conditions in the area where the urns will be placed. Some plants thrive in full sun, while others prefer partial shade. Choose plants that are suitable for the amount of sunlight they will receive.
- Climate Adaptability: Consider the climate in your region and choose plants that are well-suited for the temperature, humidity, and rainfall experienced in your area. This will ensure that the greenery thrives and remains healthy.
- Size and Growth Habit: Take into account the size of the urns and the space available for the plants to grow. Select greenery that will complement the size of the urns and not overwhelm the space. Consider the growth habit of the plants – spreading or upright – to create a harmonious arrangement.
- Color and Texture: Think about the color palette and visual texture you want to achieve. Choose greenery with varying shades of green and different leaf shapes and textures to create visual interest and depth in the arrangement.
- Complementary Plant Combinations: Consider pairing plants with contrasting foliage colors or textures to create a striking display. Mixing plants with different heights and growth habits can also add dimension to the arrangement.
In terms of specific plant options, popular choices for urns include evergreen shrubs, ornamental grasses, trailing vines, and flowering plants. Some suitable evergreen shrubs include boxwood, yew, and juniper. Ornamental grasses like fountain grass and mondo grass can add movement and texture. For trailing vines, consider ivy or sweet potato vine. And for pops of color, flowers such as petunias, geraniums, or pansies can be added.
It’s essential to research and select greenery that will thrive in your specific growing conditions. Consult with local garden centers or seek advice from experienced gardeners to ensure you choose the right plants for your urns.
Now that you have a good understanding of the factors to consider when selecting greenery, let’s move on to preparing the urns for planting.
Preparing the Urns
Before you start filling your urns with greenery, it’s important to ensure they are properly prepared. Follow these steps to ensure your urns provide a healthy and stable environment for your plants:
- Clean the Urns: If your urns have been used before or have collected dirt or debris, give them a thorough cleaning. Use a brush or sponge and mild soap to remove any grime. Rinse the urns well and allow them to dry completely before proceeding.
- Add Drainage Holes (If Needed): Check if your urns have drainage holes at the bottom. If not, consider drilling a few holes to prevent water from pooling and causing root rot. Ensure the holes are of sufficient size to allow excess water to drain effectively.
- Line the Urns (Optional): To conserve moisture and protect the inner walls of the urns, you can opt to line them with burlap or a porous fabric. This lining will allow water to drain while keeping the soil contained.
- Fill the Bottom with Drainage Material: Place a layer of small rocks or gravel at the bottom of the urns. This helps improve drainage and prevents the soil from becoming overly saturated.
- Use High-Quality Potting Mix: Choose a well-draining potting mix specifically formulated for container gardening. Avoid using regular garden soil, as it may become compacted and hinder root growth. Fill the urns with the potting mix, leaving enough space for the roots of the plants.
- Moisten the Soil: Before planting, lightly moisten the potting mix to ensure it is evenly damp. This will help the plants establish quickly and minimize transplant shock.
By taking the time to properly prepare your urns, you are creating an optimal environment for your greenery to thrive. Now that your urns are ready, it’s time to move on to designing the arrangement.
Designing the Arrangement
Designing the arrangement of greenery in your urns is where your creativity comes into play. Considering the size, shape, and aesthetic appeal of the urns, follow these tips to create an eye-catching arrangement:
- Thriller, Filler, Spiller: Follow the “thriller, filler, spiller” rule of thumb for a well-balanced arrangement. Choose a tall, dramatic plant as the thriller, such as a spiky grass or a vertical-growing flower. Use smaller, bushy plants as fillers, providing fullness and texture. Finally, select trailing plants that cascade over the edges of the urns as spillers, creating a beautiful cascading effect.
- Consider Proportions: Take into account the size and shape of the urns when choosing the size of the plants. A large urn can accommodate bigger, more statement-making plants, while a smaller urn may require more delicate and compact greenery. Make sure the proportions of the plants complement the urns and create a visually appealing balance.
- Think About Color Palette: Decide on a color scheme for your arrangement. Opt for colors that complement each other and your outdoor space. You can choose a monochromatic scheme, such as various shades of green, for a soothing and elegant look. Alternatively, mix contrasting colors for a vibrant and bold display.
- Create Height and Depth: Use a combination of taller plants and trailing ones to add vertical interest and depth to the arrangement. Place the taller plants toward the center or back of the urns, and position trailing plants around the edges to create a cascading effect and soften the look.
- Group Plants Strategically: Consider grouping plants with similar growth habits together to create visual harmony. Place low-growing plants together, taller plants together, and cascading plants together. This will ensure that each plant has enough space to grow and that the overall arrangement looks well organized.
- Experiment and Have Fun: Don’t be afraid to experiment with different plant combinations and arrangements. Play around with different heights, textures, and colors until you achieve the desired look. Remember, gardening is a creative process, so let your imagination guide you.
Keep in mind that designing the arrangement of greenery is a personal expression of your style and preferences. So, trust your intuition and have fun with it! Now that you have designed the arrangement, it’s time to fill the urns with greenery.
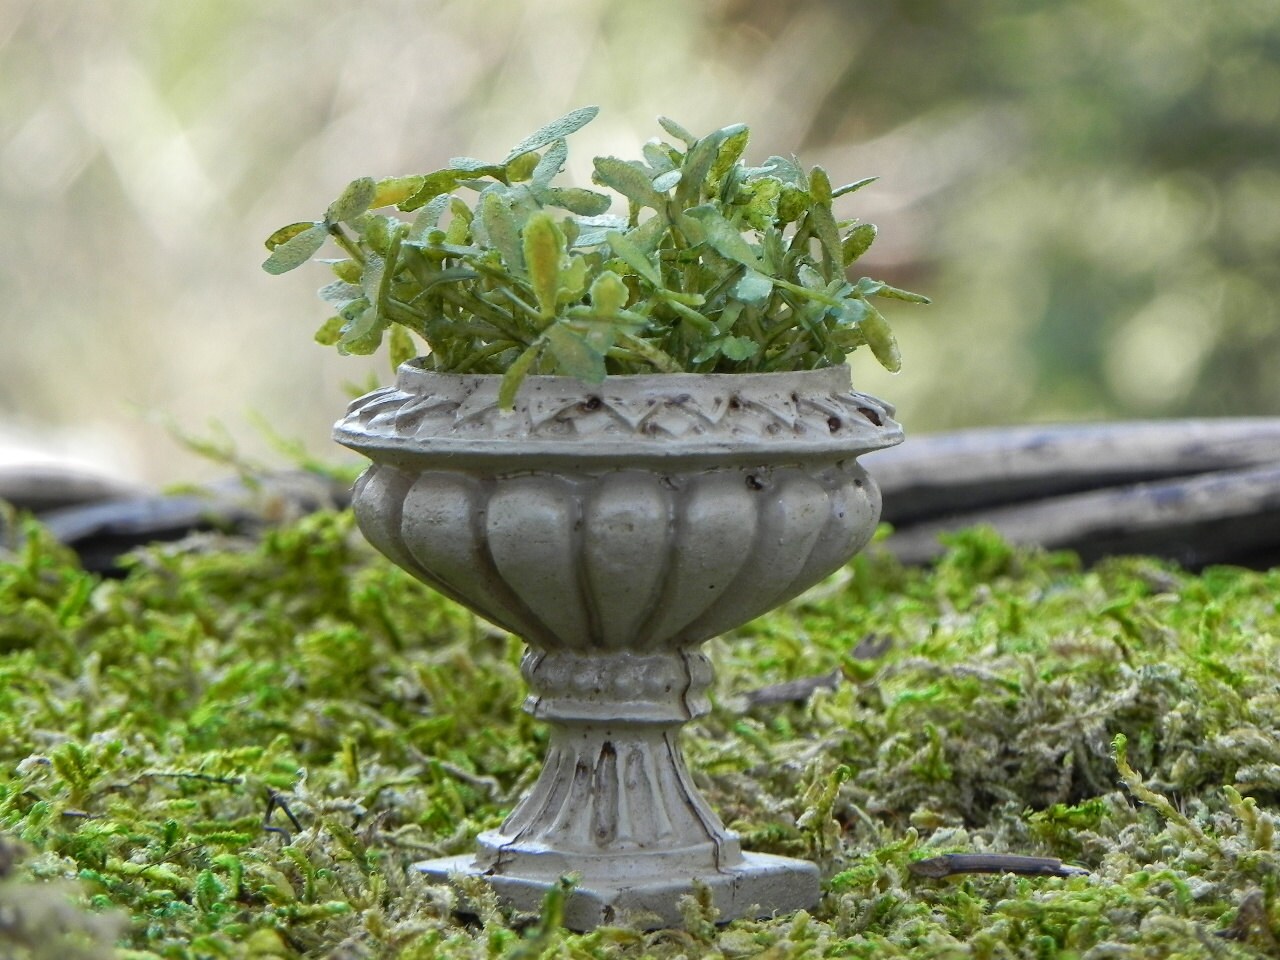
When filling urns with greenery, start with a base of larger, sturdier foliage and then layer in smaller, more delicate greenery for a balanced and full look. This will create a visually appealing arrangement that is both structured and natural.
Filling the Urns with Greenery
Now that you have designed the arrangement, it’s time to bring it to life by filling the urns with your chosen greenery. Follow these steps to ensure a successful planting process:
- Start with the Thriller Plant: Begin by placing the tallest and most eye-catching plant, the “thriller,” in the center or toward the back of the urn. Insert it into the potting mix, pressing it gently but firmly to secure it in place. Ensure that the top of the root ball is level with the rim of the urn.
- Add the Filler Plants: Surround the thriller plant with the “filler” plants, which provide fullness and texture to the arrangement. Place them evenly around the thriller, spacing them out to allow room for growth. Gently press the plants into the potting mix, making sure they are secure in the urn.
- Place the Spiller Plants: Finally, add the “spiller” plants that will cascade over the edges of the urn. Position them strategically around the perimeter of the urn, allowing them to drape down and create a cascading effect. Adjust the position of the spiller plants as needed to achieve the desired look.
- Fill in Gaps: After placing all the plants, check for any gaps or bare spots in the arrangement. If needed, fill in the gaps with additional filler plants or small accents like colorful foliage or flowering plants. This will ensure that the arrangement looks lush and cohesive.
- Water Thoroughly: Once all the plants are in place, give the urns a thorough watering. This will help settle the potting mix and ensure that the plants are well hydrated. Allow any excess water to drain out of the bottom of the urns.
After filling the urns with greenery, step back and assess the overall arrangement. Make any final adjustments to the position of the plants if needed. Admire your handiwork and envision the beauty your urns filled with greenery will add to your outdoor space.
With the greenery now in place, you can take it to the next level by adding decorative elements to enhance the overall look of the arrangement.
Read also: 8 Best Silver Urns For 2025
Adding Decorative Elements
While greenery alone can create a beautiful display in your urns, adding decorative elements can take it to the next level and elevate the overall aesthetic. Here are some ideas to enhance your urn arrangements:
- Ornaments and Sculptures: Consider placing decorative ornaments or sculptures in the urns to add visual interest and personality. Choose items that complement the style of your outdoor space, such as ceramic animals, garden gnomes, or geometric sculptures.
- Colored Stones or Glass Pebbles: Sprinkle colored stones or glass pebbles around the base of the plants to add a touch of sparkle and texture. This can also help to weigh down the plants and keep them stable in the urns.
- Fairy Lights or String Lights: Create a magical ambiance by incorporating fairy lights or string lights in and around the greenery. These lights can add a warm, inviting glow to your urns, especially in the evening or during special occasions.
- Ribbon or Fabric Bows: Wrap ribbon or fabric bows around the urns to provide a decorative touch. Choose ribbons in colors that complement the greenery or select patterns that match the overall theme of your outdoor space.
- Seasonal Accents: Change up the decorative elements throughout the year to reflect the changing seasons. You can add small seasonal accents like miniature pumpkins for fall, red bows for the holidays, or pastel-colored eggs for spring.
- Plant Labels or Signs: Use plant labels or signs to identify and showcase the names of the plants in your urns. This not only adds a decorative element but also serves as an educational tool for visitors who may be interested in learning about the different plants you have chosen.
The key is to choose decorative elements that complement and enhance the overall design of your urn arrangements. Don’t be afraid to get creative and experiment with different combinations until you achieve the desired look.
Now that your urns are filled with greenery and adorned with decorative elements, it’s time to move on to learning how to care for and maintain the health and beauty of your greenery.
Caring for the Greenery
To ensure your urns filled with greenery continue to look vibrant and healthy, it’s important to provide proper care and maintenance. Follow these tips to keep your greenery thriving:
- Watering: Regularly check the moisture level of the soil in your urns and water as needed. Different plants have different water requirements, so it’s important to understand the specific needs of the plants you have chosen. Avoid overwatering, as it can lead to root rot, while underwatering can cause stress and wilting.
- Fertilizing: Feed your greenery with a slow-release or liquid fertilizer to provide essential nutrients for healthy growth. Follow the instructions on the fertilizer packaging and apply it as recommended. Be mindful not to over-fertilize, as this can cause damage to the plants.
- Pruning: Regularly remove any dead or yellowing leaves from your plants to maintain their overall appearance. Prune back any overgrown or leggy growth to encourage bushier and healthier plants. Use clean and sharp pruning shears to avoid damaging the plants.
- Monitoring Pests and Diseases: Keep an eye out for any signs of pests or diseases on your greenery. Common pests include aphids, mealybugs, and spider mites. If you notice any infestations or plant diseases, take action immediately to prevent them from spreading. Use appropriate organic or chemical control methods as recommended.
- Protection from Extreme Weather: During extreme weather conditions, such as heatwaves or frost, provide protection to your urns and greenery. Move the urns to a more sheltered area during strong winds, provide shade during scorching summers, and cover the plants during frost to avoid damage.
- Regular Cleaning: Keep your urns and greenery looking their best by periodically cleaning them. Wipe down the urns to remove any dirt or debris and remove any fallen leaves or flowers from the arrangements. This will help maintain the overall aesthetics of your urn displays.
By providing proper care and attention to your greenery, you can ensure that your urns continue to be a stunning focal point in your outdoor space. Remember to adapt your care routine based on your specific plants’ needs and the seasonal changes in your region.
Now that you are equipped with the knowledge to care for your greenery, let’s conclude our journey of filling urns with greenery.
Conclusion
Filling urns with greenery is a wonderful way to add beauty, life, and personality to your outdoor space. By carefully selecting the right greenery, preparing the urns, designing an eye-catching arrangement, and adding decorative elements, you can create stunning displays that will become the focal point of your garden or patio.
When choosing the greenery, consider factors such as light requirements, climate adaptability, size, and color palette to ensure a harmonious arrangement. Take the time to properly prepare the urns by cleaning them, adding drainage holes if necessary, and using high-quality potting mix.
Designing the arrangement requires creativity and a balance of thriller, filler, and spiller plants. Consider proportions, height, depth, and color palette to create a visually appealing display. Don’t be afraid to experiment and let your personal style shine through.
After filling the urns with greenery, adding decorative elements such as ornaments, colored stones, fairy lights, and ribbon can enhance the overall look and create a unique touch. Remember, seasonal accents can be incorporated throughout the year to reflect the changing seasons.
Caring for the greenery is essential to keep it healthy and vibrant. This includes proper watering, fertilizing, pruning, monitoring for pests and diseases, protecting from extreme weather conditions, and regular cleaning. By providing the necessary care, your urns filled with greenery will continue to thrive and enhance your outdoor space.
Now it’s time to let your creativity bloom and bring life to your urns with greenery. Experiment with different plant combinations, design arrangements that reflect your personal style, and enjoy the beauty that nature brings to your outdoor space. With proper care and attention, your urns will be a source of pride and joy for years to come.
Frequently Asked Questions about How To Best Fill Urns With Greenery
Was this page helpful?
At Storables.com, we guarantee accurate and reliable information. Our content, validated by Expert Board Contributors, is crafted following stringent Editorial Policies. We're committed to providing you with well-researched, expert-backed insights for all your informational needs.


0 thoughts on “How To Best Fill Urns With Greenery”