Home>Garden Essentials>How To Make Greenery Tomte With Greenery

Garden Essentials
How To Make Greenery Tomte With Greenery
Modified: March 7, 2024
Learn how to create a charming garden-themed Greenery Tomte with this step-by-step tutorial. Perfect for adding a touch of nature to your decor.
(Many of the links in this article redirect to a specific reviewed product. Your purchase of these products through affiliate links helps to generate commission for Storables.com, at no extra cost. Learn more)
Introduction
Gardens are often seen as a place of relaxation and beauty, where we can connect with nature and find solace amidst the hustle and bustle of everyday life. But why limit the garden experience to just the outdoors? With a little creativity, you can bring the beauty of nature into your home and create stunning botanical displays that are sure to be conversation starters.
In this article, we will explore a unique and creative way to incorporate greenery into your home décor – by making a Greenery Tomte. Tomte, also known as a Nisse or a Scandinavian gnome, is a mythical creature from Nordic folklore believed to bring good luck and protect households. By crafting a Greenery Tomte, you can add a touch of whimsy and nature’s beauty to your indoor spaces.
To create your own Greenery Tomte, you’ll need some basic materials and a little bit of time and creativity. So, let’s gather our supplies and get started on this fun and rewarding DIY project!
Key Takeaways:
- Create your own Greenery Tomte by gathering greenery, crafting a base, and adding personal touches. This whimsical DIY project brings nature and folklore into your home decor.
- Crafting a Greenery Tomte is a fun and creative way to bring the beauty of nature indoors. Gather greenery, decorate, and enjoy the magic of this enchanting DIY project.
Read more: How To Make A Greenery Corsage
Materials Needed
Before we dive into the process of creating a Greenery Tomte, let’s gather all the necessary materials. Here’s what you’ll need:
- A small terracotta pot or any other container of your choice
- Floral foam or oasis foam
- Assorted greenery such as eucalyptus, ferns, moss, or any other foliage of your preference
- Wire cutters or scissors
- Hot glue gun
- Small decorations like pinecones, berries, or any other embellishments
- A wooden or felt cone shape for the gnome’s body
- Colored felt or fabric for the gnome’s hat and clothing
- Craft glue or fabric glue
- Paint and brushes (optional for personalizing the pot or gnome’s clothing)
Once you have gathered these materials, you’re ready to embark on the creative journey of making your own Greenery Tomte!
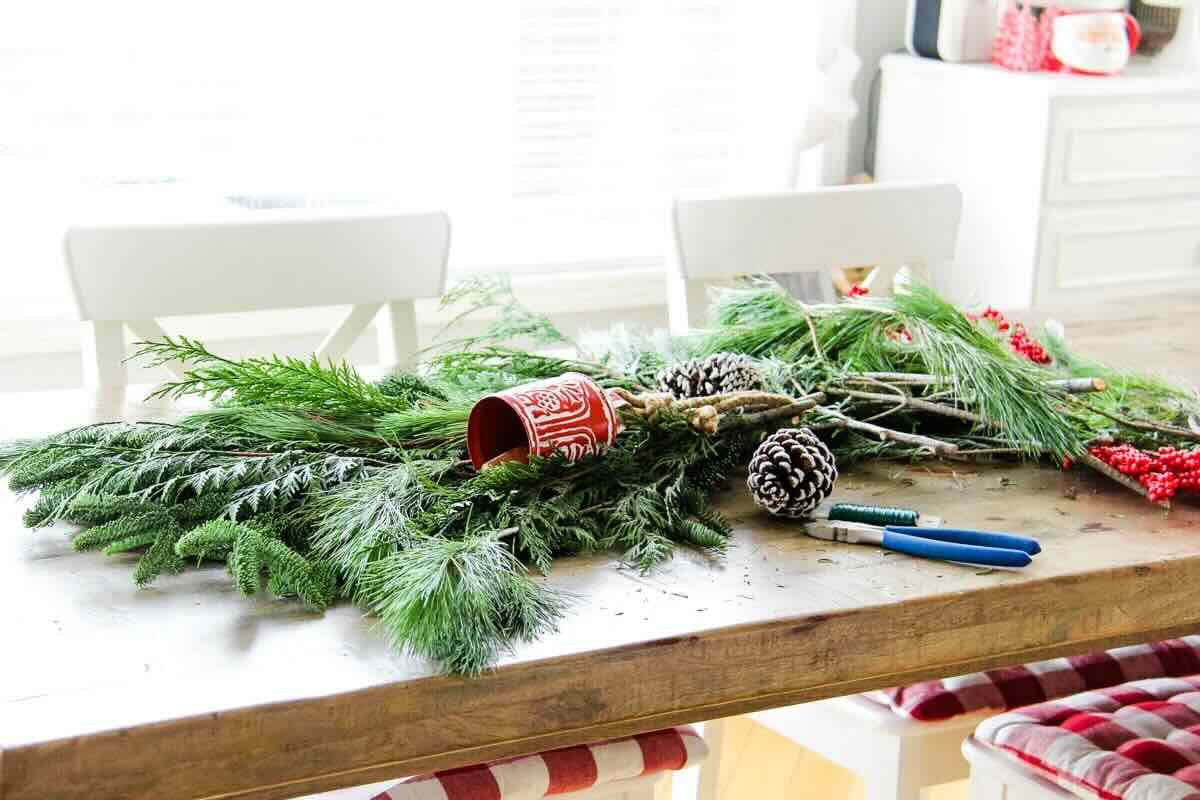
Step 1: Gathering Greenery
The first step in creating a Greenery Tomte is to gather the greenery that you’ll use to adorn your gnome. Look for a variety of foliage such as eucalyptus, ferns, moss, or any other leafy greens that catch your eye. Consider the texture, color, and shape of the greenery to add visual interest to your creation.
You have a few options when it comes to sourcing the greenery. If you have a garden, you can venture outside and cut some branches and foliage that you find appealing. Take care not to damage the plants and ensure you have permission if they are not on your property. Alternatively, you can visit a local florist or garden center and purchase pre-cut greens for your project.
When gathering the greenery, it’s a good idea to collect more than you think you’ll need. This will give you the flexibility to experiment and choose the best pieces to use. Plus, having extra greenery allows you to refresh and replace any wilted or dried out pieces as needed over time.
It’s important to handle the greenery with care and keep it hydrated while you work on your Greenery Tomte. Place the cut stems in water or mist them with a spray bottle to keep them fresh and prevent wilting. This will ensure that your creation looks vibrant and stays beautiful for longer.
Once you have gathered your greenery and prepared it for use, it’s time to move on to the next step – creating the tomte base.
Step 2: Creating the Tomte Base
Now that you have your greenery gathered and prepared, it’s time to create the base for your Greenery Tomte. The base will serve as the foundation for your gnome and provide stability.
Start by selecting a small terracotta pot or any other container that you wish to use for the base. If you want to add a personal touch, you can even paint or decorate the pot to match your desired aesthetic. Allow the paint to dry completely before moving on to the next step.
Next, take the floral foam or oasis foam and cut it to fit inside the pot. This foam will act as a support for the greenery and help keep it in place. Ensure that the foam is tightly fitted in the pot and secured in place.
Once the foam is secure, take the wooden or felt cone shape that you have prepared for the gnome’s body. Place it on top of the foam, making sure it fits snugly. Use a hot glue gun to attach the cone to the foam for added stability.
Now that you have your tomte base set up, it’s time to move on to the next step – attaching the greenery to the tomte base. This is where the creative fun begins!
When making a greenery tomte, use a variety of greenery such as pine, cedar, and eucalyptus to create a textured and visually interesting look. Be sure to secure the greenery tightly to the base to prevent it from falling off.
Step 3: Attaching Greenery to the Tomte
With your tomte base ready, it’s time to bring your Greenery Tomte to life by attaching the greenery. This step allows you to unleash your creativity and give your gnome its unique personality.
Start by selecting a variety of greenery pieces that you gathered earlier. Trim the stems to the desired length using wire cutters or scissors, ensuring that they are long enough to be inserted into the floral foam. Consider the height and proportions you want for your Greenery Tomte as you make your choices.
Begin inserting the trimmed stems of the greenery into the floral foam, starting from the bottom of the gnome’s body and working your way up. Mix and match different types of foliage to create texture and depth. Play around with the arrangement until you achieve the desired look.
As you attach the greenery, make sure to vary the direction and angle of the stems to create a natural and organic appearance. Allow some pieces to cascade downwards, while others can stick out horizontally or angle upward. This will give your Greenery Tomte a whimsical and lively demeanor.
Take your time during this step, adjusting and rearranging the greenery as needed. Step back and evaluate the overall composition to ensure a balanced and visually appealing effect. You can always add more greenery or remove any pieces that don’t seem to fit properly.
Once you are satisfied with the placement of the greenery, it’s time to move on to the next step – decorating your Greenery Tomte to add those charming finishing touches.
Read more: How To Make A Greenery Wreath
Step 4: Decorating the Greenery Tomte
Now that your Greenery Tomte is adorned with lush foliage, it’s time to add some decorative elements to give it personality and charm.
Start by selecting small decorations such as pinecones, berries, miniature ornaments, or any other embellishments that resonate with your desired aesthetic. These decorative items will add an extra layer of visual interest and can reflect the theme or season you want to convey.
Using a hot glue gun or craft glue, attach the decorations strategically throughout the greenery. Consider adding them to the gnome’s hat, around its body, or at the base of the greenery to create a cohesive and visually pleasing arrangement. Be mindful of the size and weight of the decorations to ensure they are secure and won’t cause the greenery to droop or become imbalanced.
In addition to the decorations, you can also personalize your Greenery Tomte further by painting or embellishing the gnome’s hat and clothing. Use colored felt or fabric to create a hat for your gnome, and add details like a belt or buttons using fabric glue or stitching. Get creative and let your imagination guide you in bringing your Greenery Tomte to life.
Remember, this is your unique creation, so feel free to experiment and add your personal touch. You can customize your Greenery Tomte to fit any style, whether it’s rustic, whimsical, or modern.
Once you have finished decorating, take a step back and admire your masterpiece. Your Greenery Tomte is now ready to bring a touch of nature and magic into your home decor.
But before we conclude, let’s add the final touches to ensure your Greenery Tomte is perfect.
Step 5: Adding Final Touches
You’re almost there! It’s time to add those final touches to elevate your Greenery Tomte and make it truly shine.
First, take a moment to assess your creation and make any necessary adjustments. Check if any greenery needs to be repositioned or if any decorations need to be secured further. This step ensures that your Greenery Tomte looks polished and well-crafted.
Next, consider the overall presentation and placement of your Greenery Tomte. You can choose to display it as a standalone decorative piece or incorporate it into a larger nature-inspired display. Consider placing it on a mantel, shelf, or centerpiece to showcase its beauty.
If desired, you can also enhance the visual appeal of your Greenery Tomte by adding additional elements such as fairy lights or small twinkle lights. These can be delicately woven into the greenery to create a warm and whimsical atmosphere.
Lastly, don’t forget to give your Greenery Tomte a little love and care to ensure its longevity. Mist the greenery with water occasionally to keep it hydrated and vibrant. Remove any wilted or dried-out pieces and replace them with fresh greenery as needed. Regularly dust the gnome and its surroundings to keep it looking clean and fresh.
Congratulations! You have successfully created your very own Greenery Tomte. This unique and whimsical decoration will not only bring a touch of nature indoors but also serve as a conversation starter and a symbol of creativity.
Enjoy the beauty and charm your Greenery Tomte brings to your home and take pride in your DIY accomplishment. Feel free to personalize and modify the design to make it truly your own. Let your creativity flourish and continue exploring the wonderful world of garden-inspired decor.
Thank you for joining us on this creative journey, and we hope your Greenery Tomte brings you joy and inspiration for years to come!
Conclusion
Creating a Greenery Tomte is a delightful way to bring the beauty of nature and the whimsy of Scandinavian folklore into your home. By following these simple steps and unleashing your creativity, you can craft a unique and enchanting decoration that will be sure to impress.
Throughout the process, we learned the importance of gathering an assortment of greenery, selecting a suitable base, attaching the foliage, and adding personalized touches through decorations and embellishments. Each step allowed us to infuse our own style and preferences into our Greenery Tomte, resulting in a one-of-a-kind creation.
Remember, the magic lies in the details. Don’t be afraid to experiment, mix and match different foliage, and add your personal flair to your Greenery Tomte. Let your imagination run wild as you embellish your creation with small ornaments, paint, or fabric.
Not only does the Greenery Tomte serve as a beautiful decoration, but it also brings a sense of connection to nature and folklore. It serves as a reminder of the importance of incorporating greenery and natural elements into our indoor spaces, creating a serene and soothing environment.
As you display your Greenery Tomte in your home, take a moment to appreciate the craftsmanship and effort you put into creating this unique piece. Share the story behind your Greenery Tomte with friends and family, and let it become a cherished symbol of your creativity and love for nature.
So, gather your materials, let your imagination soar, and embark on the journey of creating your very own Greenery Tomte. Enjoy the process, and may this whimsical gnome bring joy, beauty, and a touch of magic to your home.
Frequently Asked Questions about How To Make Greenery Tomte With Greenery
Was this page helpful?
At Storables.com, we guarantee accurate and reliable information. Our content, validated by Expert Board Contributors, is crafted following stringent Editorial Policies. We're committed to providing you with well-researched, expert-backed insights for all your informational needs.


0 thoughts on “How To Make Greenery Tomte With Greenery”