Home>Garden Essentials>What Infill Should I Use For A Benchy
Garden Essentials
What Infill Should I Use For A Benchy
Modified: August 20, 2024
Discover the best garden bench infill for your Benchy project. Get expert recommendations and tips for a stunning garden addition.
(Many of the links in this article redirect to a specific reviewed product. Your purchase of these products through affiliate links helps to generate commission for Storables.com, at no extra cost. Learn more)
Introduction
Welcome to the world of 3D printing, where creativity knows no bounds! If you’re new to 3D printing or looking to improve your printing skills, you might be wondering what type of infill to use for a Benchy print.
The Benchy is a popular benchmark test object that helps evaluate the capabilities of a 3D printer. It consists of various complex features, such as overhangs, curves, and small details. When printing a Benchy, it’s important to find the right balance between structural integrity and material usage.
Choosing the perfect infill for your Benchy print can make a significant difference in terms of strength, print time, and material consumption. In this article, we’ll delve into the importance of infill, explore different types of infill materials, discuss their pros and cons, and provide recommendations for achieving the best infill settings for your Benchy prints.
So, let’s dive in and discover the secrets to optimizing the infill for your Benchy prints!
Key Takeaways:
- Choose infill wisely for your Benchy print to balance strength, material usage, and print time. Consider factors like material type, printer capability, and surface finish for optimal results.
- Experiment with infill materials and settings to enhance the quality and appearance of your Benchy prints. Adjust infill density, pattern, and angle, and don’t forget to evaluate and optimize your prints for the best results.
Read more: What Infill Density Should I Use
Understanding the Importance of Infill
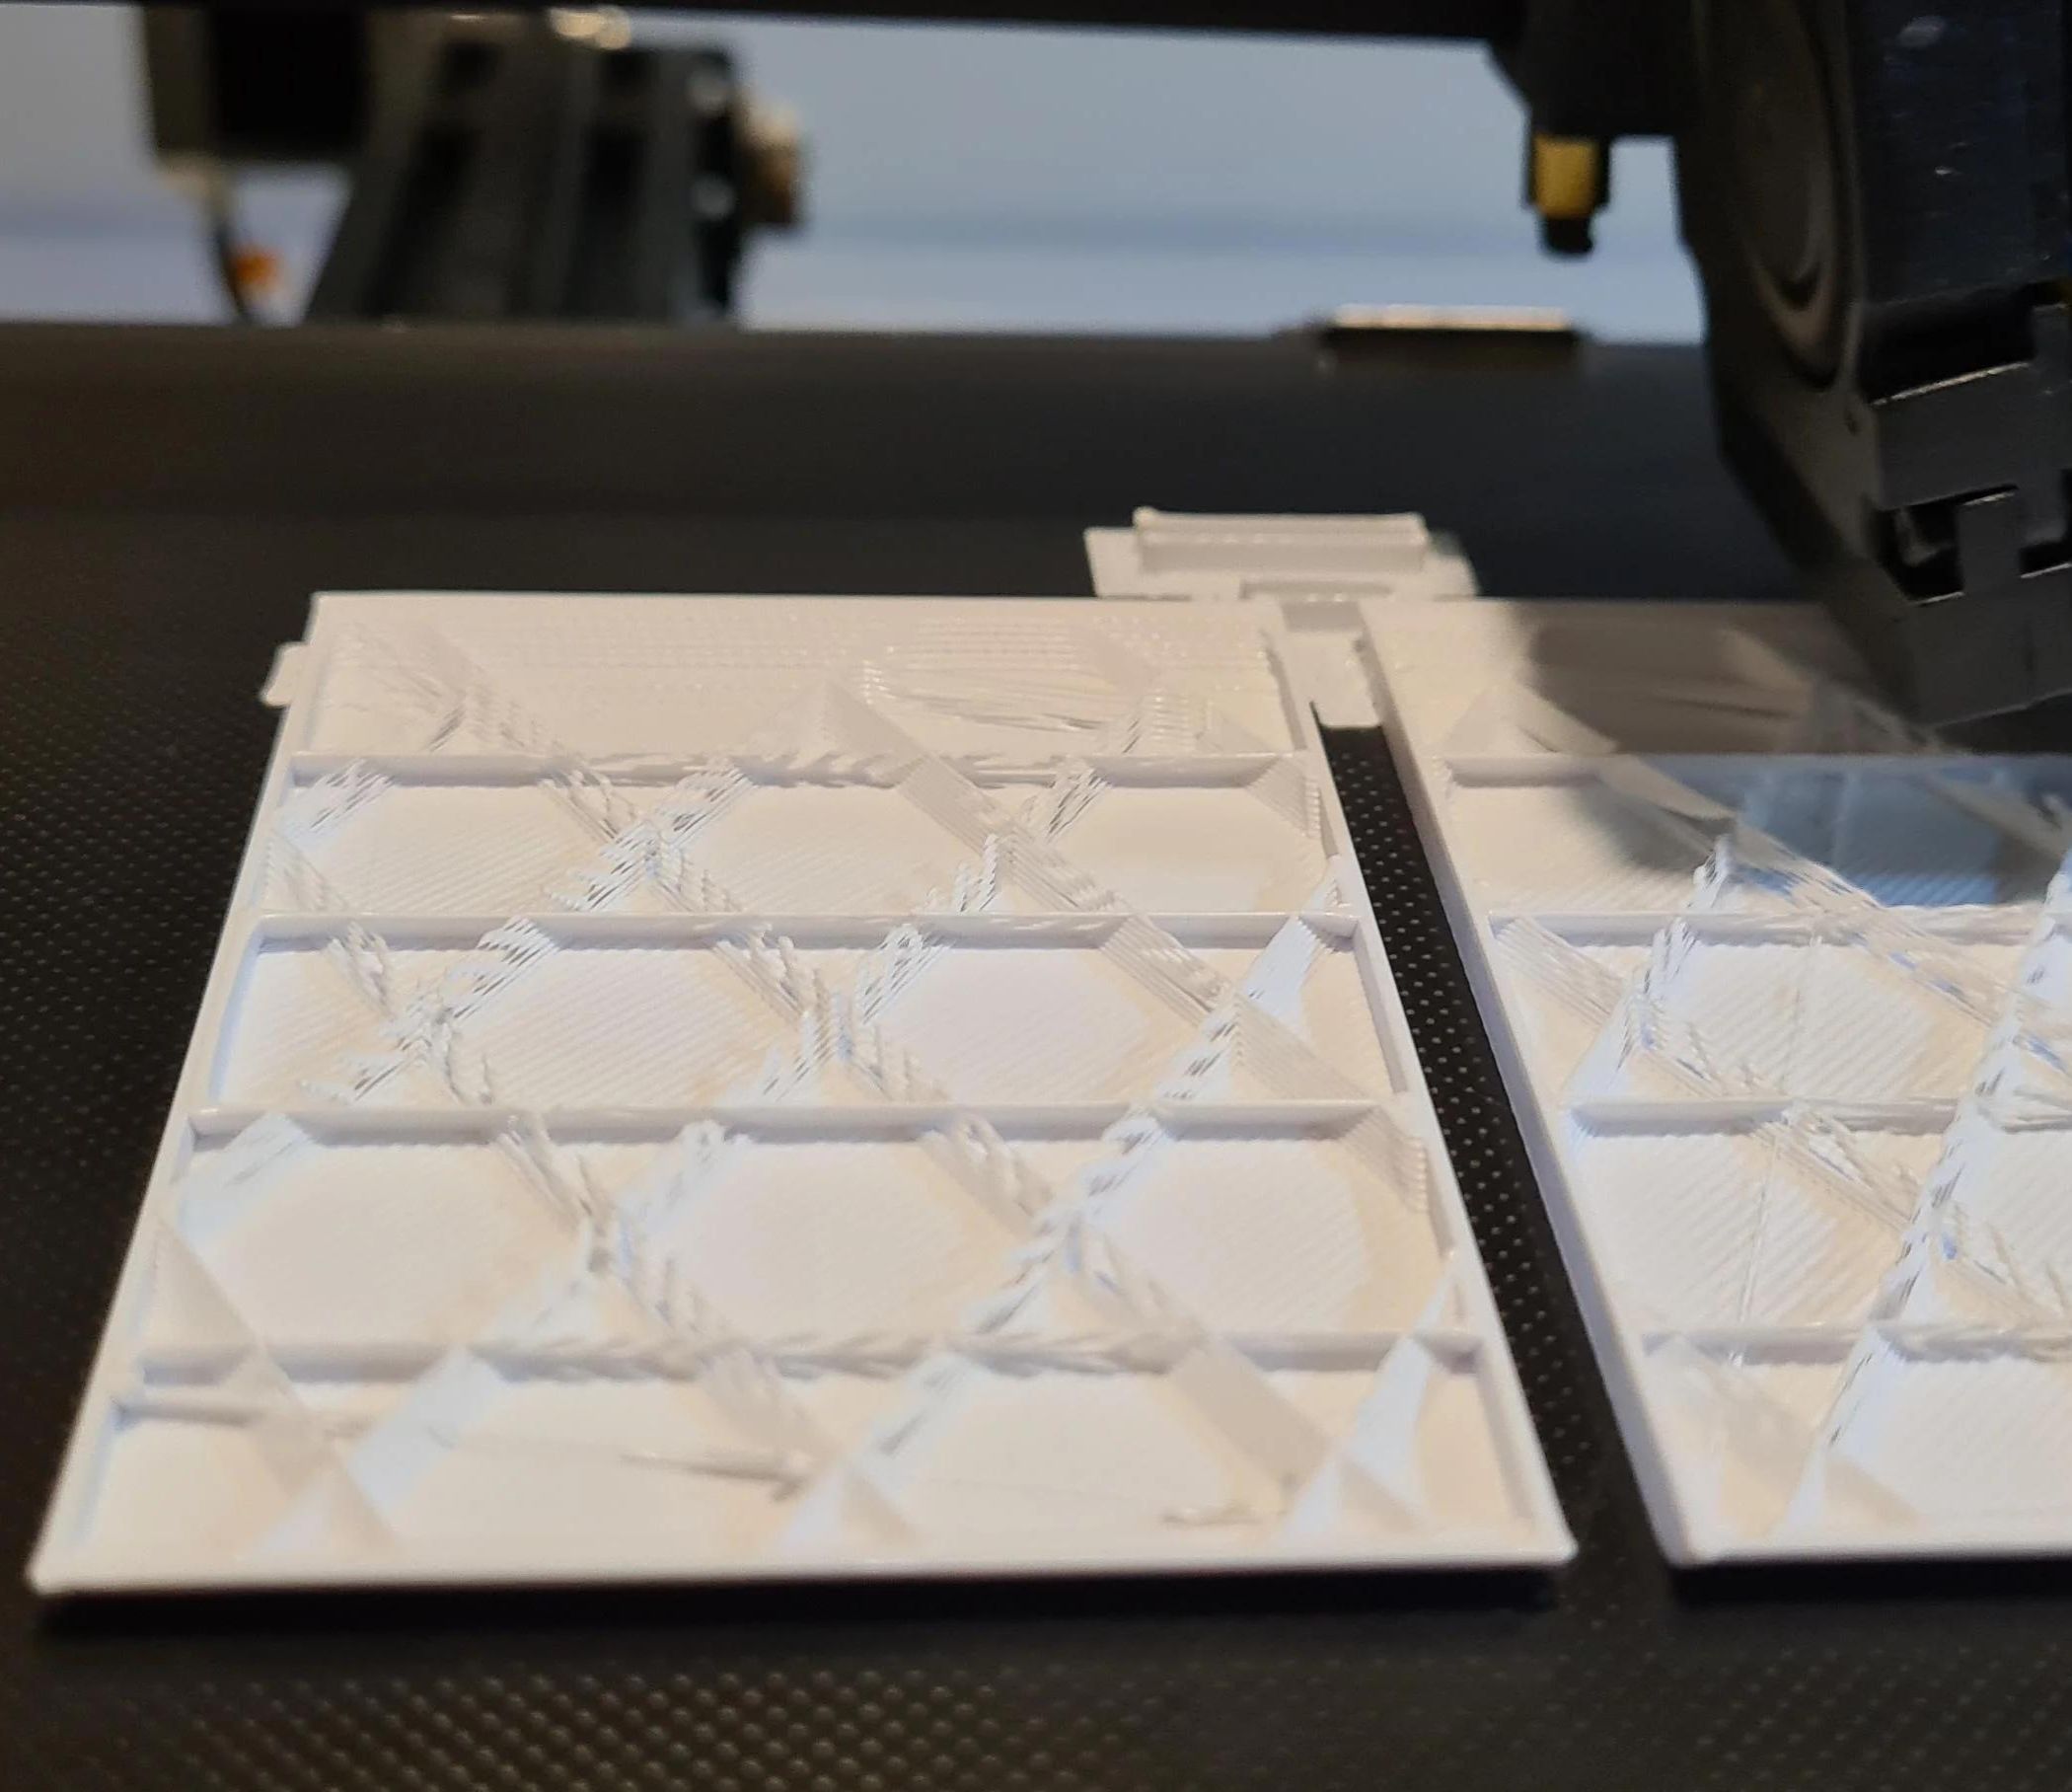
Infill is the internal lattice-like structure that fills the empty space inside a 3D printed object. It provides necessary support and gives strength to the printed model. Understanding the importance of infill is crucial in achieving a successful Benchy print.
The primary purpose of infill is to provide structural integrity to the 3D printed object. Without infill, a Benchy print would be hollow and lack the strength required to retain its shape. The infill acts as a support system, preventing the walls of the object from collapsing or warping.
Infill also plays a vital role in optimizing material usage. By adjusting the infill percentage, you can control the amount of material consumed during the printing process. Lower infill percentages result in less material usage, reducing the overall cost of the print.
Furthermore, infill affects the print time. Higher infill percentages require more time to print, as the printer has to fill a larger volume of space. On the other hand, lower infill percentages decrease print time but may compromise the strength and durability of the Benchy print.
It’s important to strike a balance between these factors when selecting the infill for your Benchy print. By understanding the significance of infill, you can make informed decisions to achieve the desired print quality without wasting excess material or time.
Now that we’ve established the importance of infill let’s dive into the factors to consider when choosing infill for a Benchy print.
Factors to Consider when Choosing Infill for a Benchy
Choosing the right infill for your Benchy print involves considering several factors. These factors will help you determine the appropriate infill pattern, infill density, and infill material for your specific needs. Here are some key factors to consider:
- Structural Integrity: The infill should provide enough support to ensure the Benchy print retains its shape without collapsing or warping. Consider the complexity of the Benchy object and the desired level of strength when selecting the infill.
- Material Consumption: Optimizing material usage is important to minimize costs and reduce waste. Higher infill densities consume more material, while lower densities result in less material usage. Consider the balance between structural integrity and material conservation when choosing the infill density.
- Print Time: The time required to print a Benchy object is affected by the infill density. Higher densities require more time to fill the inner spaces, resulting in longer print times. Consider the urgency of your print and the trade-off between print time and strength when selecting the infill density.
- Printer Capability: Every 3D printer has its own limitations and capabilities. Consider the maximum infill density your printer can handle without sacrificing print quality. Some printers may struggle with high-density infills, resulting in poor print quality or even failures.
- Surface Finish: The infill pattern can affect the surface finish of your Benchy print. Certain patterns, such as rectilinear or grid, can leave visible lines on the surface. However, patterns like gyroid or honeycomb provide smoother finishes. Consider the desired aesthetic and choose an infill pattern that complements it.
- Print Speed: The speed at which your printer can produce Benchy prints can vary. Higher infill densities require more time to print, but reducing the infill density can speed up the process. Consider your printer’s capabilities and the trade-off between speed and strength when selecting the infill density.
By carefully considering these factors, you can make an informed decision when choosing the infill for your Benchy print. In the next section, we’ll explore the different types of infill materials you can use.
Different Types of Infill Materials
When it comes to selecting the right infill material for your Benchy print, you have several options to choose from. Each infill material has its own unique properties and characteristics. Here are some common types of infill materials:
- PLA (Polylactic Acid): PLA is one of the most popular infill materials for Benchy prints. It is bio-based, easy to print with, and offers good strength and stiffness. PLA is also environmentally friendly and comes in a variety of colors, making it versatile for different Benchy projects.
- ABS (Acrylonitrile Butadiene Styrene): ABS is another commonly used infill material for Benchy prints. It offers good strength, durability, and resistance to heat. ABS can be more challenging to print with than PLA due to its higher printing temperature requirement and tendency to warp during cooling.
- PETG (Polyethylene Terephthalate Glycol): PETG is known for its combination of strength, flexibility, and ease of printing. It is more impact-resistant than PLA or ABS and exhibits good layer adhesion. PETG also has a high resistance to chemicals and is suitable for Benchy prints that require moderate to high strength.
- Nylon: Nylon is a strong and durable infill material with high flexibility and impact resistance. It has excellent layer adhesion and is suitable for Benchy prints that require maximum strength. Nylon can be more challenging to print with due to its higher printing temperature and higher moisture absorption rate.
- TPU (Thermoplastic Polyurethane): TPU is a flexible and elastic infill material suitable for Benchy prints that need to be soft and bendable. It offers excellent shock absorption and can withstand repeated bending and stretching without tearing or deforming.
- Composite Materials: Composite materials, such as carbon fiber-infused filaments, offer enhanced strength and stiffness. These materials are ideal for Benchy prints that require extra structural integrity while maintaining a lightweight design.
These are just a few examples of the infill materials available for Benchy prints. Each material has its own unique set of properties, so it’s important to consider the specific needs of your Benchy project when choosing the infill material.
Now that we have explored the different types of infill materials, let’s discuss the pros and cons of each material in the next section.
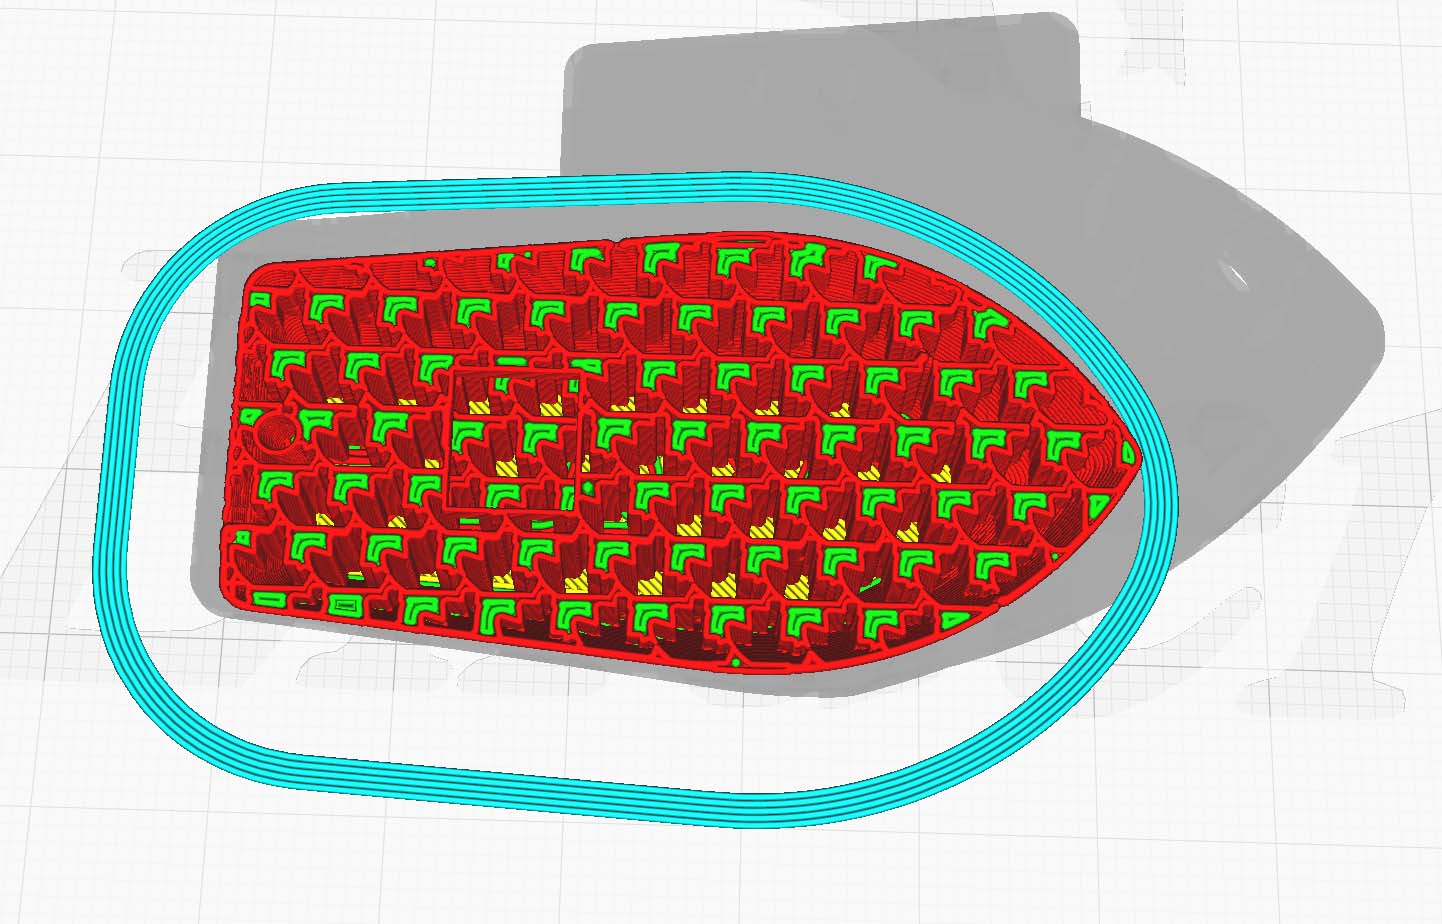
For a Benchy, use a higher infill percentage (around 20-30%) to ensure the structural integrity of the model, especially for the hull and chimney. This will help prevent warping and improve overall print quality.
Pros and Cons of Common Infill Materials
Each infill material used in Benchy prints has its own set of advantages and disadvantages. Understanding these pros and cons can help you make an informed decision when choosing the right infill material for your Benchy project. Let’s explore the pros and cons of some common infill materials:
- PLA (Polylactic Acid):
- Pros: PLA is easy to print with, bio-based, and eco-friendly. It offers good strength and stiffness, making it suitable for a wide range of Benchy prints. PLA also comes in a variety of colors and is less prone to warping during printing.
- Cons: PLA has a lower heat resistance compared to other materials, limiting its use in applications that require high temperatures. It may also be more brittle and prone to snapping under stress compared to other infill materials.
- ABS (Acrylonitrile Butadiene Styrene):
- Pros: ABS offers good strength, durability, and resistance to heat. It can withstand higher temperatures than PLA, making it suitable for Benchy prints that need to withstand higher temperature environments.
- Cons: ABS can be more challenging to print with due to its higher printing temperature and tendency to warp during cooling. It also emits fumes during printing, so proper ventilation is necessary.
- PETG (Polyethylene Terephthalate Glycol):
- Pros: PETG combines the strength and durability of ABS with the ease of printing of PLA. It offers good layer adhesion, impact resistance, and resistance to chemicals. PETG is also less prone to warping compared to ABS.
- Cons: PETG may not offer the same level of stiffness as ABS and PLA. It can be slightly more challenging to print with due to its higher printing temperature and increased stringing.
- Nylon:
- Pros: Nylon is known for its strength, durability, and flexibility. It offers excellent layer adhesion and can withstand high loads and impact. Nylon is also resistant to chemicals, making it suitable for Benchy prints with demanding applications.
- Cons: Nylon can be more challenging to print with due to its higher printing temperature and higher moisture absorption rate. It may require drying before printing to prevent issues like popping, bubbling, or poor adhesion.
- TPU (Thermoplastic Polyurethane):
- Pros: TPU is a flexible and elastic infill material, making it suitable for Benchy prints that need to be soft and bendable. It offers excellent shock absorption and can withstand repeated bending and stretching without tearing or deforming.
- Cons: TPU can be more challenging to print with due to its flexibility, as it may cause issues like stringing or poor layer adhesion. It may also require adjusting print settings to achieve the desired flexibility.
- Composite Materials:
- Pros: Composite materials, such as carbon fiber-infused filaments, offer enhanced strength and stiffness. They are lightweight and excel in applications that require extra structural integrity.
- Cons: Composite materials may come at a higher cost compared to traditional infill materials. They may also be more abrasive, which can wear down the printer’s nozzle faster. Additionally, they require specific printer settings for optimal results.
It’s important to consider these pros and cons alongside your specific Benchy project requirements when selecting the infill material. Now that we have explored the different infill materials and their pros and cons, let’s move on to discussing recommended infill settings for a Benchy print.
Recommended Infill Settings for a Benchy Print
When it comes to achieving the best infill for your Benchy print, several recommended settings can help you strike the right balance between strength, print time, and material usage. Here are some guidelines for selecting infill settings:
- Infill Density: A recommended starting point for infill density is around 20-25%. This provides a good balance between strength and material usage. You can adjust the density higher for prints that require extra strength or lower for prints where strength is not a priority.
- Infill Pattern: For most Benchy prints, a rectilinear or grid infill pattern works well. These patterns offer good structural integrity and can be printed quickly. However, you can experiment with other patterns like honeycomb or gyroid for a smoother surface finish, if desired.
- Infill Angle: Infill angle refers to the orientation of the infill pattern. A 45-degree angle is commonly recommended as it provides good support while minimizing the risk of overhangs. However, you can adjust the angle based on the specific requirements of your Benchy print.
- Top and Bottom Layers: To ensure a solid top and bottom surface, it’s recommended to have at least 3-4 top and bottom layers. This helps in achieving a smooth finish and adds strength to the Benchy print.
- Layer Adhesion: To enhance layer adhesion and overall print quality, optimizing the temperature and print speed is important. Experiment with the recommended temperature range for your specific infill material and adjust the print speed accordingly.
- Infill Overlap: The infill overlap determines how much the infill overlaps with the walls of the Benchy print. A recommended overlap of 10-15% helps ensure good bonding between the infill and walls, enhancing the overall strength of the print.
It’s important to note that these settings can vary depending on the specific 3D printer and slicer software you’re using. It’s always recommended to consult the user manual or online resources for your printer model to ensure compatibility and obtain the best infill settings.
Now that you have a good understanding of the recommended infill settings for a Benchy print, let’s move on to the next section to discuss some tips for achieving the best infill for your Benchy prints.
Tips for Achieving the Best Infill for Benchy Prints
Achieving the best infill for your Benchy prints requires attention to detail and a few handy tips. By following these tips, you can enhance the strength, surface finish, and overall quality of your Benchy prints:
- Layer Height: Using a smaller layer height can improve the overall print quality and detail of your Benchy print. Consider reducing the layer height to produce finer infill lines and enhance the overall appearance of the printed object.
- Infill Tweaking: If you’re not satisfied with the default infill settings, don’t hesitate to experiment and tweak them. Adjusting the infill density, pattern, or angle can provide different effects and properties. Use your printer’s test mode or small-scale prints to evaluate the changes before committing to a full Benchy print.
- Post-Processing: After the Benchy print is complete, consider post-processing techniques to enhance the finish. Sanding, painting, or applying a surface finish can smooth out any imperfections caused by infill patterns and give your Benchy print a professional look.
- Optimize Printer Settings: Ensure your printer is properly calibrated by following manufacturer-recommended maintenance procedures. Properly leveled build plate, correct filament diameter settings, and accurate extruder calibration are crucial to achieving the best infill for Benchy prints.
- Infill Material Compatibility: Some infill materials may have specific requirements or characteristics that your printer may not be compatible with. Ensure that your printer can handle the chosen infill material, including temperature requirements, nozzle size compatibility, and any specific printing conditions.
- Experiment with Infill Materials: Don’t hesitate to experiment with different infill materials to achieve the desired characteristics for your Benchy print. Each material has unique properties, and testing different materials can help you discover new possibilities and find the perfect infill material for your specific project.
- Print Orientation: The orientation of your Benchy print can affect the appearance and strength of the infill. Consider printing the Benchy object with the infill pattern running diagonally or parallel to the longest axis to distribute the load evenly and enhance the stability of the print.
- Evaluate Prints: Regularly evaluate your Benchy prints to assess the quality and performance of different infill settings. Take note of any issues or improvements observed and adjust the infill settings accordingly for future prints.
By incorporating these tips into your printing process, you can achieve the best infill for your Benchy prints and create impressive, high-quality objects. Remember to experiment, learn from each print, and enjoy the journey of mastering the art of infill optimization.
Now, let’s conclude our discussion on achieving the best infill for Benchy prints.
Conclusion
Choosing the right infill for your Benchy print is essential to ensure structural integrity, optimize material usage, and achieve the desired print quality. By considering factors such as structural integrity, material consumption, print time, printer capability, surface finish, and print speed, you can make informed decisions when selecting the infill for your Benchy print.
Understanding the different infill materials available, including PLA, ABS, PETG, Nylon, TPU, and composite materials, allows you to choose the material that best suits your Benchy project’s requirements. Each material has its own pros and cons, and it’s crucial to find the perfect balance between strength, flexibility, and ease of printing.
Recommended infill settings, such as infill density, pattern, angle, top and bottom layers, layer adhesion, and infill overlap, provide a solid foundation for achieving the best infill for your Benchy prints. However, it’s important to customize these settings based on your specific printer’s capabilities and the desired outcome of your print.
Implementing tips such as adjusting layer height, experimenting with infill settings, post-processing techniques, optimizing printer settings, and evaluating prints can further enhance the quality and appearance of your Benchy prints.
In conclusion, by understanding the importance of infill, considering the factors involved in choosing the right infill, exploring different infill materials, selecting recommended infill settings, and implementing practical tips, you can achieve the best infill for your Benchy prints. So, dive into the world of 3D printing, unleash your creativity, and let your Benchy prints shine!
Frequently Asked Questions about What Infill Should I Use For A Benchy
Was this page helpful?
At Storables.com, we guarantee accurate and reliable information. Our content, validated by Expert Board Contributors, is crafted following stringent Editorial Policies. We're committed to providing you with well-researched, expert-backed insights for all your informational needs.


0 thoughts on “What Infill Should I Use For A Benchy”