Home>Garden Essentials>How To Grow Gerbera Daisy From Seed
Garden Essentials
How To Grow Gerbera Daisy From Seed
Modified: March 21, 2024
Learn how to grow beautiful Gerbera daisies from seeds in your garden. Discover essential tips and techniques for a successful germination process.
(Many of the links in this article redirect to a specific reviewed product. Your purchase of these products through affiliate links helps to generate commission for Storables.com, at no extra cost. Learn more)
Introduction
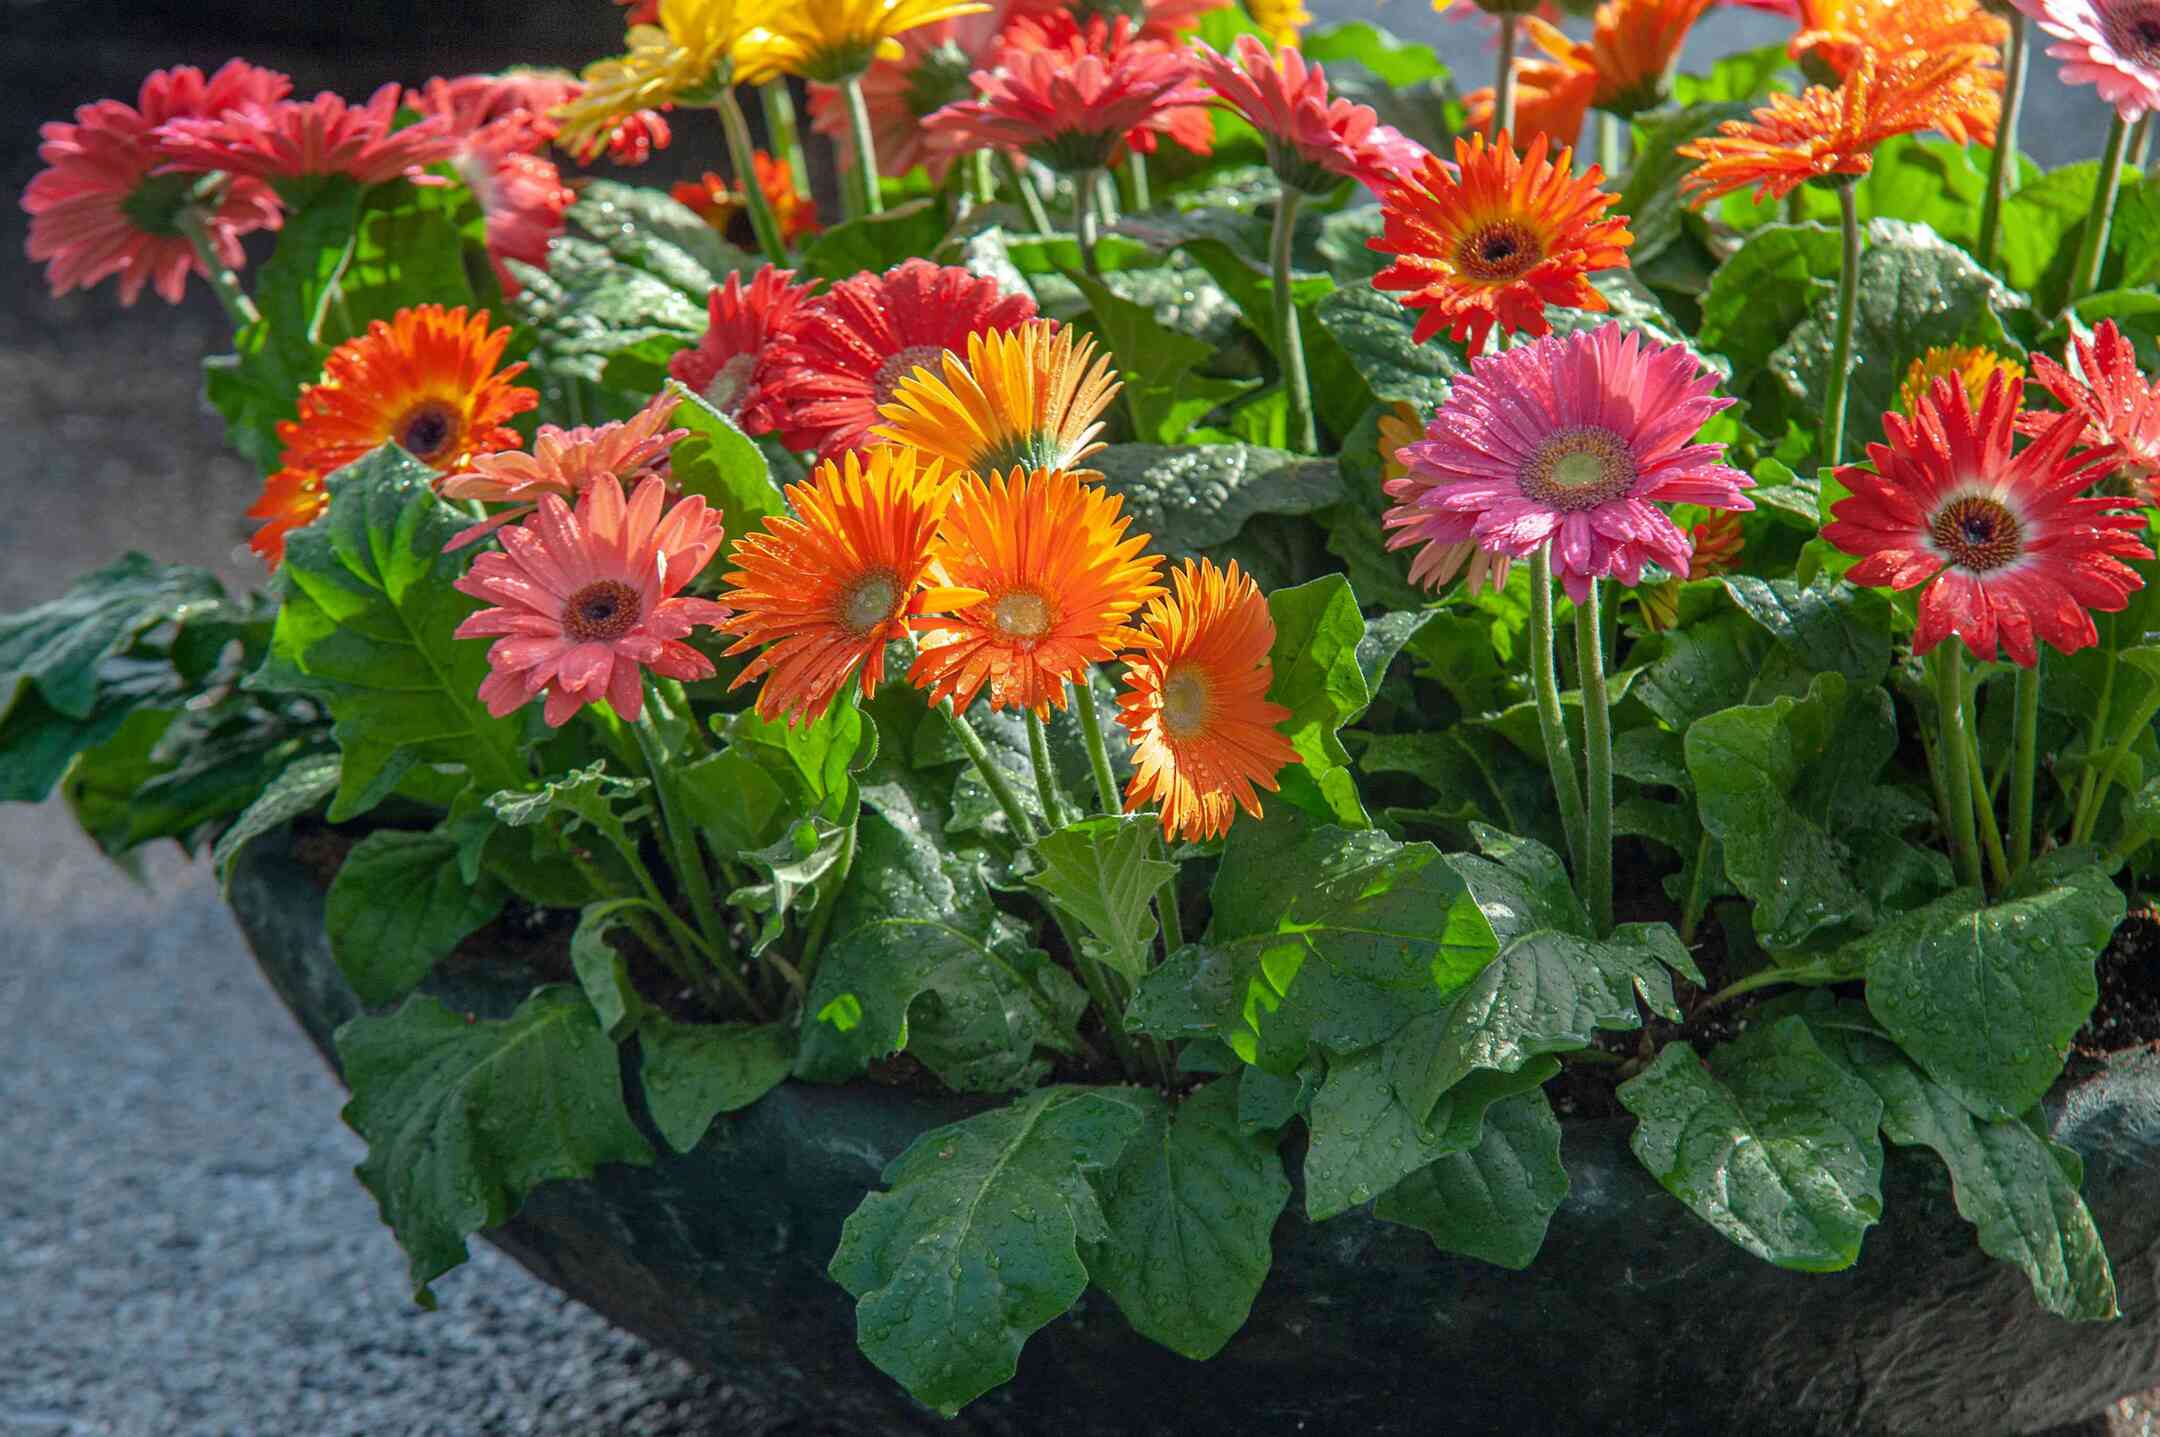
Welcome to this comprehensive guide on how to grow Gerbera Daisy from seed. Gerbera Daisies, also known as Transvaal Daisies or African Daisies, are stunning flowers that add vibrant colors to any garden or floral arrangement. These beautiful and versatile flowers are easy to grow from seed, making them a popular choice among gardening enthusiasts.
Gerbera Daisies come in a wide range of colors, including red, pink, yellow, orange, and white, making them a perfect addition to any garden design. With their large, daisy-like blooms and long stems, Gerbera Daisies make eye-catching cut flowers that can brighten up your home.
In this article, we will take you through the step-by-step process of growing Gerbera Daisy from seed. We will discuss the materials you’ll need, how to prepare the seeds, the proper techniques for sowing and caring for the seedlings, as well as tips for maintaining and growing mature Gerbera Daisy plants. By following these guidelines, you’ll be well on your way to enjoying a beautiful garden filled with these stunning flowers.
So let’s dive in and learn how to grow Gerbera Daisy from seed!
Key Takeaways:
- Growing Gerbera Daisies from seed is an exciting and rewarding process. By following the steps to prepare, sow, and care for the seeds, you can enjoy the vibrant blooms of these stunning flowers in your garden or home.
- Providing the right conditions, such as warmth, light, and proper care, is essential for the successful growth of Gerbera Daisy seedlings. With patience and attention, you can watch these beautiful flowers thrive and bring joy to your surroundings.
Read more: When To Plant Gerbera Daisy Seeds
Step 1: Gathering Materials
Before you begin the process of growing Gerbera Daisy from seed, it’s important to gather all the necessary materials. Here’s a list of items you’ll need:
- Gerbera Daisy seeds: You can purchase Gerbera Daisy seeds from a local nursery or online. Make sure to choose a reputable supplier to ensure the quality and viability of the seeds.
- Seed tray or pots: You’ll need containers to sow the Gerbera Daisy seeds. A seed tray with individual cells or small pots with drainage holes will work well.
- Seed starting mix: Opt for a well-draining and sterilized seed starting mix or a blend of peat moss and perlite to provide the ideal growing environment for the seeds.
- Watering can or spray bottle: To water the seeds and seedlings gently without causing damage.
- Plastic wrap or a clear plastic dome: To create a mini greenhouse effect and maintain humidity during the germination process.
- Grow lights or a sunny location: Gerbera Daisies require bright light to thrive. If you don’t have access to natural sunlight, consider using fluorescent or LED grow lights.
- Plant labels: It’s essential to label your seed trays or pots to keep track of the varieties you’re growing.
- Optional: Heat mat or heating pad: Gerbera Daisy seeds germinate best when kept warm. If you’re growing them in cooler temperatures, a heat mat or heating pad can provide the necessary warmth.
By gathering all these materials in advance, you’ll be well-prepared to embark on your journey of growing Gerbera Daisy from seed. Once you have everything ready, it’s time to move on to the next step: preparing the Gerbera Daisy seeds.
Step 2: Preparing the Gerbera Daisy Seeds
Preparing the Gerbera Daisy seeds is an essential step to ensure successful germination. Follow these steps to properly prepare the seeds:
- Check the seed viability: Before you start, it’s a good idea to check the viability of the Gerbera Daisy seeds. Place a few seeds between two damp paper towels and seal them in a plastic bag. Keep the bag in a warm and dark place for a few days. If the majority of the seeds germinate, they are viable and ready for planting. If not, you may need to consider purchasing new seeds.
- Soak the seeds (optional): Some gardeners recommend soaking Gerbera Daisy seeds in warm water for a few hours before planting. This can help soften the seed coat and promote better germination. However, it’s not necessary and can be skipped if desired.
- Scarify the seeds (optional): Scarification is a technique that involves scratching or nicking the hard outer shell of the seeds to improve germination. If you choose to scarify the Gerbera Daisy seeds, gently rub them against a fine-grit sandpaper or use a nail file to create small scratches on the surface. This process allows water to penetrate the seed coat and speed up germination.
- Stratify the seeds: Gerbera Daisy seeds benefit from a period of cold stratification to simulate winter conditions. Place the scarified or unscarified seeds in a plastic bag with a slightly moistened paper towel or vermiculite. Seal the bag and place it in the refrigerator for 2 to 4 weeks. This cold stratification process helps break seed dormancy and improves germination rates.
- Remove from stratification: After the cold stratification period is over, remove the Gerbera Daisy seeds from the refrigerator and allow them to come to room temperature for a day or two.
- Inspect for mold or damage: Before sowing the seeds, inspect them carefully for any signs of mold, pests, or physical damage. Discard any seeds that appear unhealthy or damaged.
By following these steps, you’ll ensure that your Gerbera Daisy seeds are properly prepared for successful germination. Now that the seeds are ready, it’s time to move on to the next step: sowing the Gerbera Daisy seeds.
Step 3: Sowing the Gerbera Daisy Seeds
Now that your Gerbera Daisy seeds are prepared and ready, it’s time to sow them. Follow these steps to sow your seeds and give them the best start:
- Fill the seed trays or pots: Fill your seed trays or pots with a well-draining seed starting mix or a mixture of peat moss and perlite. Ensure that the containers have drainage holes at the bottom to prevent waterlogging.
- Moisten the soil: Before sowing the seeds, lightly moisten the soil to provide a good environment for germination. Avoid saturating the soil as this can lead to rotting of the seeds.
- Sow the seeds: Place the Gerbera Daisy seeds on the surface of the soil, spacing them a few inches apart. Gently press them into the soil to ensure good seed-to-soil contact, but do not bury them too deep.
- Cover the seeds: Sprinkle a thin layer of the seed starting mix or vermiculite over the seeds to cover them. This will help retain moisture without smothering the seeds. Alternatively, you can use a clear plastic dome or plastic wrap to create a mini greenhouse effect over the seed trays.
- Provide warmth and moisture: Gerbera Daisy seeds require warmth and moisture for germination. Place the seed trays in a warm location or on a seedling heat mat. Maintain a consistent temperature between 70°F and 75°F (21°C to 24°C) for optimal germination. Mist the soil gently with water or use a spray bottle to keep it moist throughout the germination process.
- Place in a bright location: Once the Gerbera Daisy seeds germinate and the seedlings emerge, move them to a bright location that receives at least 6 to 8 hours of direct sunlight per day. If you’re using grow lights, position them a few inches above the seedlings to provide adequate light.
- Thin out the seedlings: As the Gerbera Daisy seedlings grow, they may become overcrowded. Thin them out by removing weaker or overcrowded seedlings, leaving only the healthiest and strongest ones. This will allow the remaining seedlings to have enough space and resources to grow well.
By following these steps, you’ll ensure proper sowing and germination of your Gerbera Daisy seeds. Once the seedlings have grown a bit, it’s time to move on to the next step: providing the ideal growing conditions for your Gerbera Daisy seedlings.
Step 4: Providing the Ideal Growing Conditions
Now that your Gerbera Daisy seedlings have emerged, it’s crucial to provide them with the ideal growing conditions to ensure healthy growth. Follow these steps to create the optimal environment for your Gerbera Daisies:
- Temperature: Gerbera Daisies prefer temperatures between 65°F and 75°F (18°C to 24°C) during the day and slightly cooler temperatures of 60°F to 65°F (15°C to 18°C) at night. Maintain a consistent temperature to avoid stress on the seedlings.
- Light: Gerbera Daisies require bright light to develop strong and healthy plants. Place your seedlings in a location that receives 6 to 8 hours of direct sunlight per day. If growing indoors, position them near a south-facing window or use fluorescent or LED grow lights to supplement the natural light.
- Air circulation: Good air circulation is essential to prevent fungal diseases and encourage sturdy growth. Avoid overcrowding the seedlings and provide space between them for air to circulate freely.
- Watering: Gerbera Daisies prefer consistently moist soil, but they are susceptible to root rot if overwatered. Water the seedlings when the top inch of soil feels dry. Use a watering can or spray bottle to water gently at the base of the plants, avoiding wetting the foliage to prevent disease. Ensure the containers have proper drainage to avoid waterlogging.
- Fertilization: Once the Gerbera Daisy seedlings have developed their second set of true leaves, you can begin fertilizing them. Use a balanced liquid fertilizer diluted to half strength and apply every two weeks. This will provide the necessary nutrients for healthy growth.
- Humidity: Gerbera Daisies prefer moderate humidity levels. If the air in your home or greenhouse is dry, you can increase humidity by placing a tray filled with water near the plants or using a room humidifier. Avoid misting the plants directly as it can lead to fungal diseases.
- Support: As the Gerbera Daisy plants grow taller, they may require support to prevent their tall stems from bending or breaking. Use bamboo stakes or plant supports to gently secure the stems and keep them upright.
By providing the ideal growing conditions, you’ll encourage healthy and vigorous growth in your Gerbera Daisy seedlings. As they mature, it’s time to move on to the next step: caring for your Gerbera Daisy seedlings.
To grow gerbera daisies from seed, start by sowing the seeds in well-draining soil, keeping them moist and warm. Once the seedlings have grown a few inches tall, transplant them into larger pots or your garden. Keep the soil consistently moist and provide them with plenty of sunlight.
Read more: How To Plant Gerbera Daisies Seeds
Step 5: Caring for Gerbera Daisy Seedlings
Once your Gerbera Daisy seedlings have established and started to grow, it’s important to provide them with proper care to ensure their continued health and development. Follow these steps to care for your Gerbera Daisy seedlings:
- Watering: Gerbera Daisies prefer consistently moist soil, so continue to water them as needed. Check the moisture level of the soil regularly and water when the top inch feels dry. Be careful not to overwater, as this can lead to root rot. Water at the base of the plants to avoid wetting the foliage.
- Thinning: If the seedlings are crowded, it’s important to continue thinning them out as they grow. Remove any weak or overcrowded seedlings to provide more space and resources for the remaining plants to thrive.
- Pest control: Monitor your Gerbera Daisy seedlings closely for any signs of pests, such as aphids or spider mites. If you notice any infestation, treat the affected plants with organic insecticidal soap or neem oil following the product instructions. Remove any severely affected or diseased plants to prevent the spread of pests or diseases.
- Support: As your Gerbera Daisy seedlings continue to grow, they may require additional support. Use stakes or plant supports to gently secure the stems and prevent them from bending or breaking. This is especially important if your Gerbera Daisies are growing tall or if you live in a windy area.
- Pinching: To encourage bushier growth and more flower production, you can pinch back the tips of your Gerbera Daisy seedlings once they have developed a few sets of leaves. This will stimulate the growth of side shoots and result in a fuller and more compact plant.
- Continued fertilization: Continue fertilizing your Gerbera Daisy seedlings every two weeks with a balanced liquid fertilizer diluted to half strength. This will provide them with the necessary nutrients for healthy growth and abundant blooms.
- Monitor for diseases: Keep an eye out for any signs of diseases, such as powdery mildew or fungal infections. If you notice any issues, remove affected leaves or plants promptly to prevent the spread of disease. Avoid overhead watering and ensure good air circulation to minimize the risk of fungal infections.
By providing proper care to your Gerbera Daisy seedlings, you’ll ensure their health and prepare them for the next step: transplanting them into their permanent location. However, before that, let’s cover how to successfully transplant Gerbera Daisy seedlings.
Step 6: Transplanting Gerbera Daisy Seedlings
Transplanting Gerbera Daisy seedlings is an important step in their growth journey, as it allows them to establish themselves in their permanent location. Follow these steps for successful transplanting:
- Choose the right time: Transplant your Gerbera Daisy seedlings when they have developed at least 3 to 4 sets of true leaves and are about 4 to 6 inches tall. This usually occurs a few weeks after germination.
- Prepare the planting area: Make sure the planting area is well-drained and receives full or partial sunlight. Prepare the soil by removing any weeds or debris and loosening it with a garden fork or tiller. Incorporate organic matter, such as compost or well-rotted manure, to improve soil fertility and drainage.
- Dig the planting holes: Dig holes in the prepared soil that are slightly larger than the root ball of each seedling. Space the holes about 12 to 18 inches apart to allow the Gerbera Daisies ample room to grow.
- Carefully remove the seedlings from their containers: Gently loosen the soil around each seedling and carefully lift them out of their containers. Be cautious not to damage the delicate roots.
- Place the seedlings in the planting holes: Set each Gerbera Daisy seedling into its respective planting hole, making sure the top of the root ball is level with the surrounding soil surface. Backfill the hole with soil, gently firming it around the base of the seedling to eliminate any air pockets.
- Water thoroughly: After transplanting, give the Gerbera Daisy seedlings a thorough watering to help them settle into their new environment. Ensure the soil is evenly moist, but avoid waterlogged conditions.
- Mulch: Apply a layer of organic mulch, such as straw or wood chips, around the base of the seedlings to help conserve soil moisture and suppress weed growth. Keep the mulch a few inches away from the stems to prevent rotting.
- Provide post-transplant care: In the initial weeks after transplanting, monitor your Gerbera Daisies closely and provide extra care. Water them regularly, especially during dry periods, and protect them from extreme weather conditions such as strong winds or heavy rain.
By following these steps, your Gerbera Daisy seedlings will have a smooth transition into their new growing space. Now, it’s time to move on to the final step: maintaining and growing mature Gerbera Daisy plants.
Step 7: Maintaining and Growing Mature Gerbera Daisy Plants
Now that your Gerbera Daisy plants are established in their permanent location, it’s important to provide proper maintenance and care to ensure their continued growth and blooming. Follow these steps to maintain and grow mature Gerbera Daisy plants:
- Watering: Gerbera Daisies prefer consistently moist soil, so water them regularly, especially during dry periods. Allow the top inch of soil to dry out slightly between waterings to prevent overwatering. Water at the base of the plants to avoid wetting the foliage, which can lead to fungal diseases.
- Fertilization: Apply a balanced slow-release fertilizer formulated for flowering plants every 6 to 8 weeks during the growing season. Follow the package instructions for proper application rates. Alternatively, you can use a liquid flower fertilizer diluted to half strength every 2 to 4 weeks.
- Deadheading: Regularly remove faded or spent flowers by gently pinching or cutting them off. This process, known as deadheading, encourages the Gerbera Daisy plants to produce more blooms and prolongs their blooming period.
- Support: As the Gerbera Daisy stems grow taller, provide support with stakes or plant supports to prevent them from bending or breaking. Secure the stems gently to the support structure using twist ties or soft twine.
- Protecting from pests: Monitor your Gerbera Daisy plants for any signs of pests, such as aphids or slugs. Use organic pest control methods, such as insecticidal soap or beer traps for slugs, to keep them at bay. Regularly inspect the plants and take action at the first sign of an infestation.
- Overwintering: Gerbera Daisies are generally not frost-tolerant. If you live in an area with harsh winters, consider growing them as annuals or move potted Gerbera Daisies indoors during the colder months. Provide a cool and bright location, and reduce watering during the dormant period.
- Dividing: Every few years, Gerbera Daisy plants may become overcrowded and benefit from division. When the plants are dormant, typically in early spring, carefully lift and separate the clumps into smaller sections, ensuring each division has a good portion of roots and leaves. Replant the divisions in well-prepared soil and provide proper care.
By following these maintenance practices, you’ll ensure healthy growth and abundant blooms from your mature Gerbera Daisy plants. Enjoy the beauty and vibrancy these stunning flowers bring to your garden or home.
With this comprehensive guide, you now have the knowledge and tips to successfully grow Gerbera Daisy from seed. Remember to adapt the instructions to your specific gardening conditions and enjoy the process of watching the seeds transform into beautiful, colorful flowers. Happy gardening!
Conclusion
Congratulations! You have reached the end of this comprehensive guide on how to grow Gerbera Daisy from seed. By following the step-by-step instructions and implementing the necessary care, you’ll be able to successfully cultivate these beautiful flowers in your garden or home.
Starting with gathering the materials, preparing the seeds, and sowing them, you have laid the foundation for healthy germination and growth. As your Gerbera Daisy seedlings develop, providing the ideal growing conditions such as temperature, light, and air circulation will ensure their continuous progress.
With proper care, such as watering, fertilizing, and pest control, your Gerbera Daisy seedlings will thrive and eventually mature into robust, blooming plants. Remember to deadhead the spent flowers, provide support, and protect them from pests to extend their flowering period and maintain their overall health.
Transplanting Gerbera Daisy seedlings into their permanent location is an important step to establish them in ideal soil and environmental conditions. Once they are mature and successfully growing, continue providing the necessary maintenance, including regular watering, fertilization, and protection from pests.
With their vibrant colors and stunning blooms, Gerbera Daisies will bring joy and beauty to your garden or home. Whether you choose to grow them as annuals or perennials, adapting to your local climate, the reward of witnessing their growth and enjoying their flowers will be well worth the effort.
Remember, gardening is a continuous learning process, and each experience will contribute to your gardening knowledge and expertise. Don’t be afraid to experiment, try new techniques, and make adjustments based on your specific conditions and preferences.
So, grab your materials, sow those Gerbera Daisy seeds, and watch as they transform into radiant flowers that brighten up your surroundings. Happy gardening!
Frequently Asked Questions about How To Grow Gerbera Daisy From Seed
Was this page helpful?
At Storables.com, we guarantee accurate and reliable information. Our content, validated by Expert Board Contributors, is crafted following stringent Editorial Policies. We're committed to providing you with well-researched, expert-backed insights for all your informational needs.


0 thoughts on “How To Grow Gerbera Daisy From Seed”