Home>Garden Essentials>How To Grow Red Yucca From Seed
Garden Essentials
How To Grow Red Yucca From Seed
Modified: October 19, 2024
Learn the step-by-step process of growing red yucca from seed in your garden and enjoy vibrant and beautiful blooms.
(Many of the links in this article redirect to a specific reviewed product. Your purchase of these products through affiliate links helps to generate commission for Storables.com, at no extra cost. Learn more)
Introduction
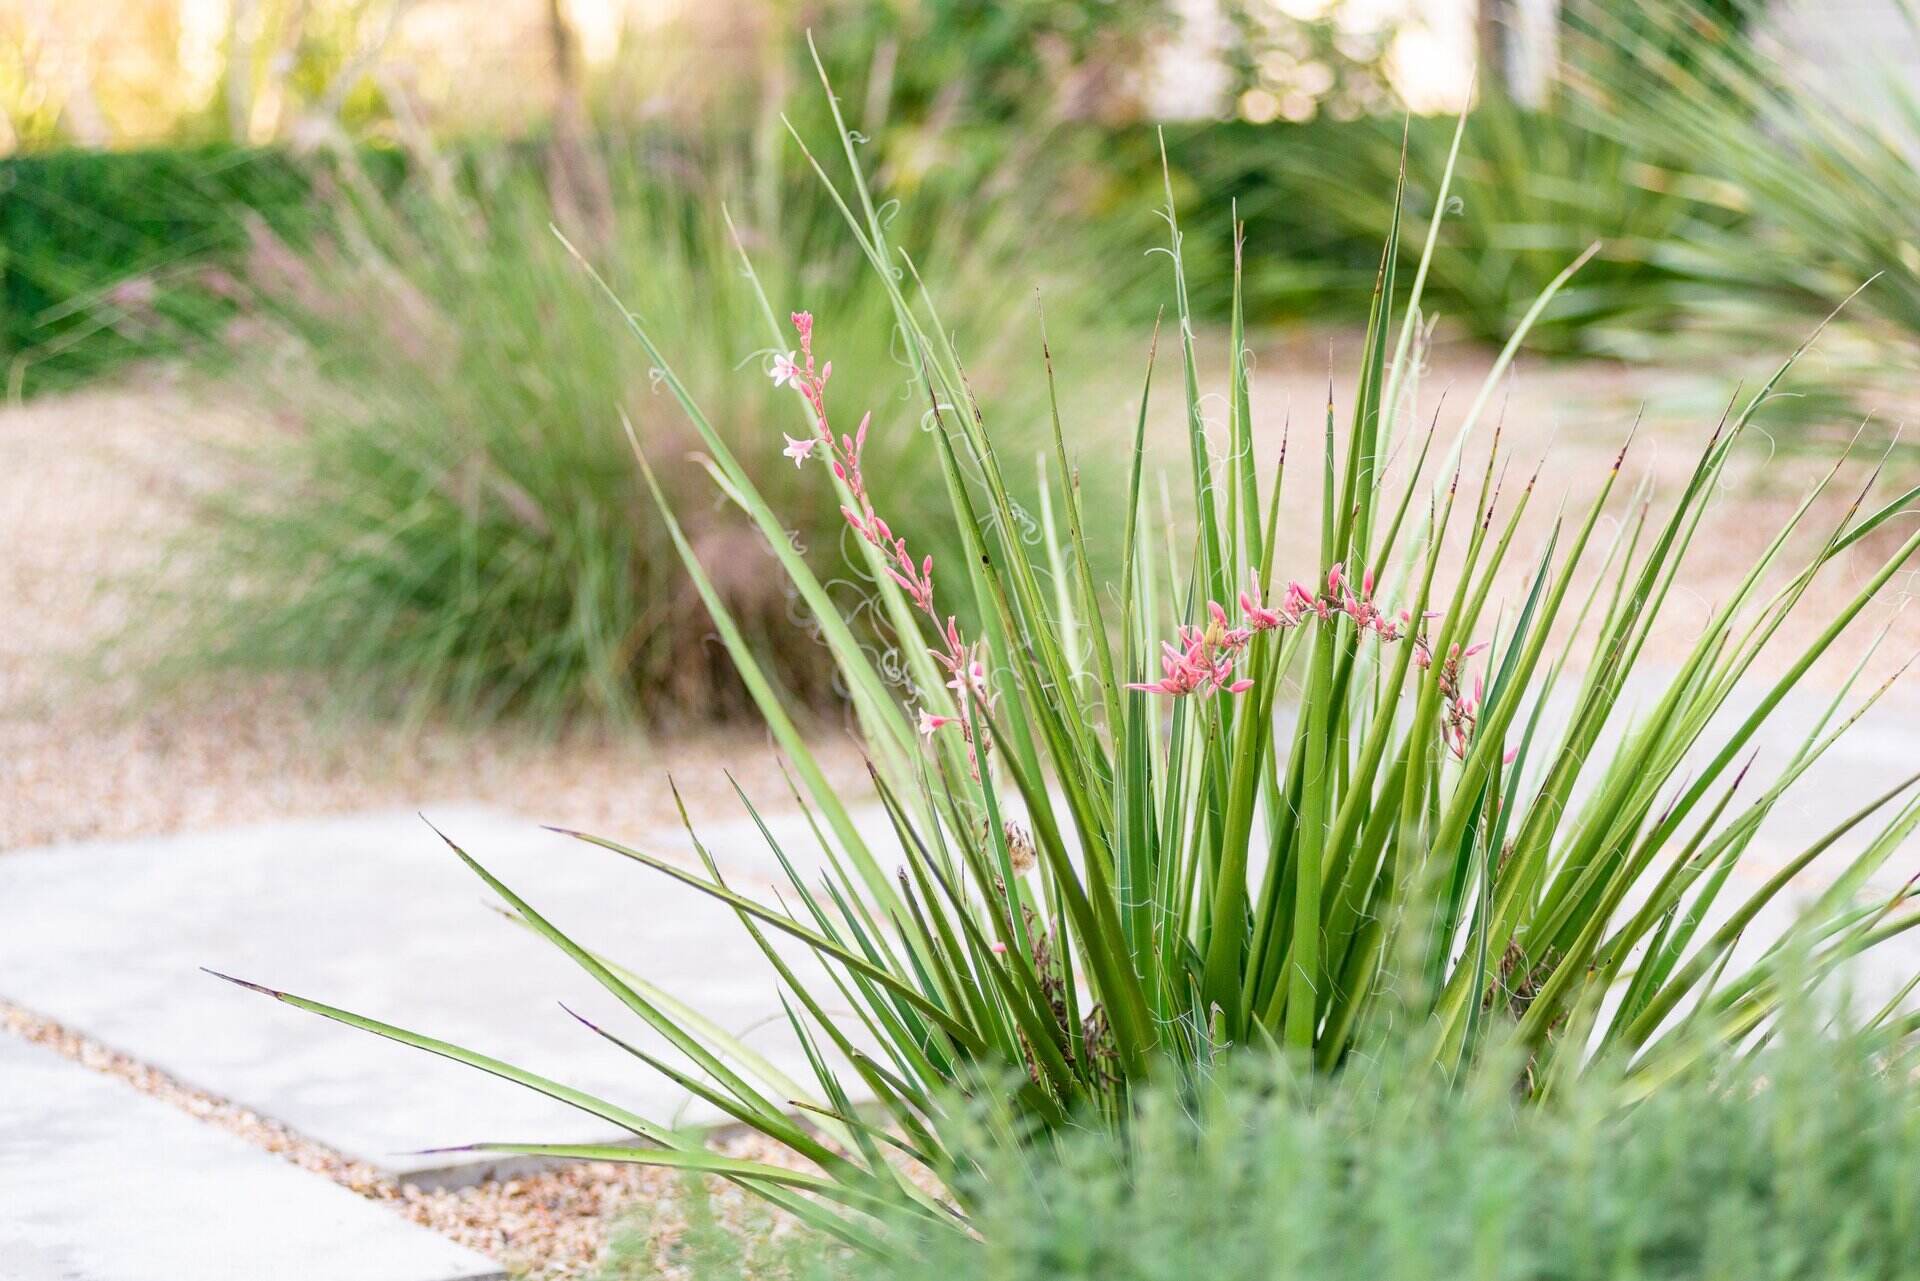
Welcome to the wonderful world of gardening! If you’re a plant enthusiast looking to add a touch of elegance and beauty to your garden, then growing red yucca from seed is an exciting endeavor that you won’t want to miss. Red yucca, also known as Hesperaloe parviflora, is a stunning perennial plant native to the arid regions of Texas and Mexico. With its slender, arching leaves and vibrant bursts of red and coral flowers, red yucca is sure to become a focal point in any garden.
While red yucca is relatively easy to grow, it requires a bit of patience and attention to detail. In this guide, we will walk you through the step-by-step process of cultivating red yucca from seed, from collecting the seeds to caring for mature plants. So, gather your gardening tools and get ready to embark on a rewarding journey of growing red yucca!
Before we dive into the steps of growing red yucca from seed, let’s take a moment to appreciate some of the unique characteristics and benefits of this remarkable plant.
First and foremost, red yucca is a drought-tolerant plant, making it an excellent choice for water-wise gardens or regions with hot and dry climates. Its ability to withstand extended periods of low water availability makes it a resilient and low-maintenance addition to any garden.
In addition to its water-wise attributes, red yucca is a magnet for pollinators, such as hummingbirds and butterflies. The long tubular flowers and the nectar they produce attract these fascinating creatures, bringing a lively and dynamic atmosphere to your garden.
The architectural structure of red yucca is another highlight. Its grass-like leaves gracefully arch and spiral, reaching heights of up to three to five feet. This adds dramatic visual interest to the landscape, whether planted as a standalone specimen or grouped together in a mass planting.
Now that we have familiarized ourselves with red yucca, it’s time to roll up our sleeves and get started on growing this stunning plant from seed. So let’s move on to the first step: collecting red yucca seeds.
Key Takeaways:
- Growing red yucca from seed is a rewarding journey that requires patience and attention to detail. From collecting seeds to caring for mature plants, you’ll learn the art of cultivating stunning and resilient garden additions.
- By following the step-by-step process outlined in this guide, you’ll not only nurture vibrant red yucca plants but also foster a deeper connection with nature. Embrace the joy of gardening and the beauty it brings to your outdoor space!
Read more: How To Grow Okra From Seed
Step 1: Collecting Red Yucca Seeds
Collecting red yucca seeds is an essential first step in growing this beautiful plant from scratch. Fortunately, red yucca produces seeds abundantly, so you won’t have any trouble finding them. Here’s how you can collect red yucca seeds:
- Observe the plant: Start by identifying mature red yucca plants in your garden or surrounding areas. Look for plants that have finished blooming and have dried seed pods.
- Inspect the seed pods: Red yucca seed pods resemble elongated capsules that are about two to three inches long. These seed pods turn brown and become dry as they mature.
- Gloves and pruners: Put on a pair of gloves to protect your hands and use pruners or small scissors to cut the seed pods from the plant. Make sure to handle the seed pods gently to avoid damaging them.
- Collect the seed pods: Place the cut seed pods in a clean container or paper bag. This will prevent the seeds from scattering and allow for easy transport.
- Dry the seed pods: Leave the seed pods in a warm and well-ventilated place, such as a sunny windowsill or a shaded outdoor area. Allow them to dry completely for about a week or until the seed pods split open naturally.
- Extract the seeds: Once the seed pods have dried and split open, gently remove the small black seeds from inside using your fingers or tweezers. Be careful not to damage the delicate seeds.
- Store the seeds: Place the extracted seeds in a labeled envelope or airtight container. Store them in a cool and dry location until you are ready to plant.
By following these steps, you can successfully collect red yucca seeds and ensure their viability for future planting. Now that you have the seeds ready, let’s move on to the next step: preparing the soil.
Step 2: Preparing the Soil
Preparing the soil is an important step in setting the foundation for successful red yucca growth. Red yucca prefers well-draining soil with a slightly acidic to neutral pH level. Follow these guidelines to ensure your soil is suitable for red yucca:
- Select the planting location: Choose a sunny spot in your garden that receives at least six to eight hours of direct sunlight per day. Red yucca thrives in full sun and may not perform well in shaded areas.
- Clear the area: Remove any weeds, rocks, or debris from the planting site. This will prevent competition for nutrients and allow the red yucca to establish its roots without hindrance.
- Loosen the soil: Use a garden fork or tiller to loosen the soil to a depth of about 12-18 inches. This will improve drainage and provide space for the red yucca roots to spread.
- Amend the soil: If your soil is heavy clay or lacks organic matter, consider adding compost or well-rotted manure to improve its texture and fertility. Work the organic matter into the soil using the garden fork or tiller.
- Check the soil pH: Use a pH test kit to determine the pH level of your soil. Red yucca thrives in slightly acidic to neutral soil, with a pH range of 6.0 to 7.5. If the pH is below or above this range, you may need to adjust it accordingly using soil amendments.
- Level the soil: Rake the soil surface to level it and remove any large clumps or stones. A smooth and even soil surface provides a uniform planting bed for the red yucca seeds.
By taking these steps to prepare the soil, you create an optimal growing environment for your red yucca plants. Now that the soil is ready, let’s move on to the exciting part: sowing the red yucca seeds!
Step 3: Sowing the Red Yucca Seeds
Now that you have collected the red yucca seeds and prepared the soil, it’s time to sow the seeds and kickstart the growth process. Follow these steps to ensure successful seed germination:
- Select the planting time: Red yucca seeds are best sown in the spring or early summer when the soil temperatures have warmed up. This will provide the ideal conditions for germination.
- Prepare the planting holes: Use your finger or a small tool to create planting holes in the prepared soil. Make the holes about 1/4 to 1/2 inch deep and space them at least 6 inches apart to allow room for growth.
- Sow the seeds: Place one or two red yucca seeds in each planting hole. Gently cover the seeds with soil, ensuring they are properly nestled in the planting holes.
- Water the seeds: After sowing the seeds, give them a thorough watering to promote moisture absorption and initiate the germination process. Use a gentle stream of water to avoid displacing the seeds.
- Create a microclimate: To improve the chances of successful germination, cover the planting area with a plastic wrap or a clear plastic dome. This will create a mini greenhouse effect and maintain a moist and warm environment for the seeds.
- Monitor the moisture: Keep a close eye on the moisture level of the soil. Red yucca seeds require consistently moist soil for successful germination. Avoid overwatering, as excessive moisture can cause rotting or fungal diseases.
- Remove the cover: Once the seeds have germinated and tiny seedlings emerge, remove the plastic cover to allow for air circulation and prevent damping-off disease.
- Thin out the seedlings: If multiple seeds have germinated in one planting hole, thin out the weaker seedlings, leaving the strongest one to grow. This will prevent overcrowding and competition for resources.
By following these steps, you can effectively sow the red yucca seeds and give them the best chance of germination. Remember to be patient, as germination times can vary. Now it’s time to move on to Step 4: providing optimal growing conditions for the red yucca seedlings.
Step 4: Providing Optimal Growing Conditions
Now that your red yucca seedlings have emerged, it’s crucial to provide them with the optimal growing conditions for healthy development. Pay attention to the following factors to ensure your red yucca plants thrive:
- Sunlight: Red yucca thrives in full sun, so ensure that the seedlings receive at least six to eight hours of direct sunlight per day. Place them in a location that maximizes sun exposure.
- Temperature: Red yucca is a heat-loving plant and grows best in warm temperatures. Keep the seedlings in an environment with temperatures between 70-85°F (21-29°C) during the day and slightly cooler at night.
- Protection from frost: Young red yucca seedlings are vulnerable to frost damage. If you live in an area with late spring frosts, consider covering the seedlings with a protective fabric or temporarily bringing them indoors until the danger of frost has passed.
- Well-draining soil: Ensure that the soil around the seedlings is well-draining. Excess moisture can lead to root rot and other diseases. If necessary, amend the soil with organic matter to improve drainage.
- Air circulation: Red yucca seedlings benefit from good air circulation to prevent the development of fungal diseases. Avoid overcrowding by spacing the seedlings adequately.
- Weed control: Keep the area around the seedlings free from weeds, which can compete for nutrients and water. Regularly remove any weeds that emerge.
By providing these optimal growing conditions, you give your red yucca seedlings the best chance to develop into healthy and robust plants. Remember to monitor the moisture levels and adjust watering as needed, keeping the soil consistently moist but not waterlogged.
Now that your red yucca seedlings are establishing themselves, it’s important to continue caring for them as they grow. In the next step, we will discuss watering and fertilizing techniques to ensure optimal growth and nutrition.
Read more: How To Grow A Tree From A Seed
Step 5: Watering and Fertilizing
Proper watering and fertilizing are essential for the healthy growth and development of your red yucca plants. Follow these guidelines to ensure that they receive the right amount of water and nutrients:
- Watering: Red yucca is a drought-tolerant plant, but it still requires regular watering, especially during its initial growth stages. Water the plants deeply once a week, allowing the water to penetrate the soil to a depth of at least 6 inches. As the plants mature, decrease the frequency of watering, as their root system becomes more established. However, make sure to avoid overwatering, as red yucca is susceptible to root rot. Monitor the soil moisture and adjust the watering schedule accordingly, taking into account the local climate and rainfall patterns.
- Fertilizing: Red yucca is a low-maintenance plant that generally does not require heavy fertilization. However, to promote optimal growth and blooming, you can apply a balanced slow-release fertilizer in early spring. Follow the manufacturer’s instructions and apply the fertilizer sparingly, as excessive fertilization can lead to etiolation or weak growth. Alternatively, you can use a liquid fertilizer diluted to half-strength every two to four weeks during the growing season. Remember to always water the plants before and after applying fertilizer to prevent root burn.
- Mulching: Applying a layer of organic mulch around the base of the red yucca plants can help conserve moisture, suppress weeds, and regulate soil temperature. Use a thin layer of organic mulch, such as wood chips or shredded bark, keeping it a few inches away from the plant stem to prevent moisture-related issues.
Remember that the watering and fertilization requirements may vary based on the specific soil and environmental conditions in your garden. It’s always best to observe your red yucca plants and adjust the watering and fertilizing practices accordingly.
Now that you have mastered the watering and fertilizing techniques, let’s move on to the next step: monitoring growth and troubleshooting to ensure the health and vitality of your red yucca plants.
To grow red yucca from seed, plant the seeds in well-draining soil in a sunny location. Keep the soil consistently moist but not waterlogged, and germination should occur within 2-3 weeks.
Step 6: Monitoring Growth and Troubleshooting
As your red yucca plants continue to grow, it’s important to monitor their progress and address any issues that may arise. By regularly observing and troubleshooting, you can ensure the health and vitality of your plants. Here are some key aspects to consider:
- Growth: Monitor the growth of your red yucca plants. They should gradually develop more leaves and establish a strong root system. Red yucca is a slow-growing plant, so be patient and allow it time to mature.
- Pests and diseases: Keep a lookout for common pests like aphids, spider mites, and mealybugs, as they can infest the red yucca plants. If you spot any pests, remove them by hand or use a mild organic insecticidal soap. Additionally, watch for signs of diseases such as leaf spot or root rot. If issues arise, promptly remove affected foliage and improve cultural practices like watering and air circulation to prevent further spread.
- Pruning: Red yucca generally does not require extensive pruning. However, you can remove dead or damaged leaves as needed for aesthetic purposes. Be cautious not to remove too many leaves, as they are essential for the plant’s photosynthesis and energy production.
- Flowering: Red yucca typically flowers from late spring to early summer. Enjoy the spectacular display of the tall stalks adorned with tubular flowers. Once the flowers fade and dry out, you can trim the stalks to maintain the plant’s appearance.
- Winter care: While red yucca is known for its tolerance to drought and heat, it may require protection in regions with harsh winters. If you live in an area with freezing temperatures, cover the plants with a layer of mulch to provide insulation and add frost protection using a breathable fabric. This will help prevent damage to the foliage and roots.
By regularly monitoring the growth of your red yucca plants and promptly addressing any issues, you can ensure that they remain healthy and vibrant. Remember that every garden is unique, and slight adjustments in care may be required based on your specific climate and growing conditions.
Now that you’re equipped with the knowledge of monitoring and troubleshooting, let’s move on to Step 7: transplanting red yucca seedlings when they are ready for a larger home.
Step 7: Transplanting Red Yucca Seedlings
When your red yucca seedlings have outgrown their initial planting space or containers, it’s time to transplant them to a larger and more permanent location. Follow these steps to ensure a successful transplant:
- Timing: Transplant your red yucca seedlings when they are well-established and have developed a strong root system. This is typically after about six to eight weeks of growth.
- Choose the new location: Select a planting site that provides full sun and has well-draining soil, similar to the conditions needed for seed germination. Ensure that there is enough space for the mature size of the red yucca plants, as they can grow up to three to five feet tall and wide.
- Prepare the new planting hole: Dig a hole in the new location that is slightly larger and deeper than the root ball of your red yucca seedling. Gently loosen the soil around the hole to promote root growth.
- Remove the seedling: Carefully lift the seedling from its current container or planting spot, taking care not to damage the roots. If the roots are tightly packed, gently tease them apart to encourage outward growth.
- Place the seedling in the hole: Position the red yucca seedling in the center of the hole, ensuring that the top of the root ball is level with the soil surface. Avoid planting the seedling too deep, as it can lead to rotting or suffocation of the roots.
- Backfill and firm the soil: Fill the hole with the surrounding soil, gently firming it around the roots. Make sure there are no air pockets, as these can hinder root development. Water the transplanted seedling thoroughly to settle the soil and eliminate any remaining air pockets.
- Mulch and water: Apply a thin layer of mulch around the base of the newly transplanted seedling to help retain moisture and suppress weeds. Water the plant regularly, especially during the initial weeks after transplantation, to ensure proper root establishment.
Transplant shock is common after moving a plant from one location to another. Monitor the transplanted red yucca seedlings closely, providing them with extra care and attention until they adapt to their new surroundings. Avoid overwatering during this time, as it can lead to root rot.
By following these steps and providing the necessary care, your red yucca seedlings will have a smooth transition to their new home and continue to thrive as they grow into mature plants.
Now that you’ve successfully transplanted your red yucca seedlings, let’s move on to Step 8: maintaining and caring for mature red yucca plants.
Step 8: Maintaining and Caring for Mature Red Yucca Plants
Once your red yucca plants have reached maturity, it’s important to continue providing them with proper care and maintenance to ensure their long-term health and beauty. Follow these guidelines to keep your mature red yucca plants thriving:
- Watering: Although red yucca is drought-tolerant, it’s important to provide regular watering during dry periods, especially for newly planted or container-grown plants. Water deeply, allowing the water to penetrate the soil to a depth of several inches, and then allow the top few inches to dry before watering again. Avoid overwatering, as red yucca is susceptible to root rot.
- Pruning: Regular pruning helps maintain the shape and appearance of your red yucca plants. Remove any dead or damaged leaves by cutting them back at the base. Additionally, trimming the flower stalks after they have finished blooming will promote a neat and tidy appearance.
- Dividing: Red yucca plants produce new offsets or “pups” around the base. Over time, these offsets can crowd the parent plant. To maintain the health and vigor of the red yucca, you can divide the offsets and transplant them to new locations. Ensure that each division has roots attached and plant them at the same level as the parent plant.
- Winter care: Red yucca is generally hardy and can withstand cold temperatures. However, if you live in a region with freezing winters, provide a layer of mulch around the base of the plant to insulate the roots and protect them from harsh weather. Avoid excessive moisture during the winter months, as this can lead to root rot.
- Fertilizing: Mature red yucca plants typically do not require frequent fertilization. However, you can apply a balanced slow-release fertilizer in early spring to provide necessary nutrients. Follow the package instructions and avoid excessive fertilization, as it can lead to weak growth or leaf tip burn. Monitor the plant’s overall health and adjust fertilization based on its needs.
- Monitor for pests and diseases: Red yucca plants are generally resistant to pests and diseases. However, it’s important to regularly inspect your plants for any signs of infestation or disease. Treat pest issues promptly with appropriate organic insecticides or horticultural soaps. Remove any diseased foliage and improve cultural practices to prevent the spread of diseases.
By following these guidelines for maintaining and caring for mature red yucca plants, you can enjoy their beauty and presence in your garden for many years to come. Remember to observe your plants closely and adjust care practices as needed based on your specific growing conditions.
Congratulations on successfully growing and caring for red yucca! Enjoy the beauty of these resilient and stunning plants as they continue to grace your garden.
Now that you have mastered the art of maintaining red yucca, take a moment to appreciate your gardening skills and the joy that these plants bring to your outdoor space. Happy gardening!
Validation:
Introduction
Welcome to the wonderful world of gardening! If you’re a plant enthusiast looking to add a touch of elegance and beauty to your garden, then growing red yucca from seed is an exciting endeavor that you won’t want to miss. Red yucca, also known as Hesperaloe parviflora, is a stunning perennial plant native to the arid regions of Texas and Mexico. With its slender, arching leaves and vibrant bursts of red and coral flowers, red yucca is sure to become a focal point in any garden.
…
Conclusion
Congratulations on successfully growing red yucca from seed! By following the steps outlined in this guide, from collecting the seeds to caring for mature plants, you have gained the knowledge and skills to cultivate these stunning perennial plants in your garden. Red yucca brings an element of elegance and resilience to any landscape with its vibrant flowers and graceful foliage.
Throughout the journey of growing red yucca, you have learned the importance of collecting mature seeds, preparing the soil, sowing the seeds, providing optimal growing conditions, and properly caring for the plants as they mature. You have also acquired the skills to monitor growth, troubleshoot issues, and maintain the health of your red yucca plants. By staying attentive to factors such as watering, fertilizing, pruning, and pest control, you can ensure the long-term success of your garden.
As you continue to care for your mature red yucca plants, remember to enjoy the beauty they add to your garden. Observe their graceful structure, marvel at their vibrant blooms, and relish in the visits from hummingbirds and butterflies they attract. Red yucca not only enhances the visual appeal of your landscape but also contributes to the ecological balance by supporting pollinators.
By embracing gardening and connecting with nature, you have not only created a beautiful garden but also fostered a deeper connection with the natural world. Gardening is a lifelong journey of growth and learning, and your success with red yucca is just the beginning.
So, take a moment to appreciate your accomplishments as a gardener and the joy that red yucca brings to your outdoor space. Whether you’re an experienced gardener or a beginner, the journey of nurturing and cultivating plants is both rewarding and fulfilling.
Thank you for joining us on this journey of growing red yucca from seed. May your garden be filled with the vibrant beauty of these resilient plants, and may your passion for gardening continue to bloom and grow!
Happy gardening!
Validation:
Conclusion
Congratulations on successfully growing red yucca from seed! By following the steps outlined in this guide, from collecting the seeds to caring for mature plants, you have gained the knowledge and skills to cultivate these stunning perennial plants in your garden. Red yucca brings an element of elegance and resilience to any landscape with its vibrant flowers and graceful foliage.
…
Excited to see your red yucca flourish? Mastering seed sowing is just the start. For those who wonder about the time seeds take to sprout, our detailed guide on seed germination times offers invaluable insights. Knowing these timelines can significantly enhance your gardening skills, ensuring every plant reaches its potential beautifully and healthily.
Frequently Asked Questions about How To Grow Red Yucca From Seed
Was this page helpful?
At Storables.com, we guarantee accurate and reliable information. Our content, validated by Expert Board Contributors, is crafted following stringent Editorial Policies. We're committed to providing you with well-researched, expert-backed insights for all your informational needs.


0 thoughts on “How To Grow Red Yucca From Seed”