Home>Garden Essentials>How To Paint Watercolor Greenery
Garden Essentials
How To Paint Watercolor Greenery
Modified: March 7, 2024
Learn how to paint vibrant greenery using watercolors in this step-by-step guide. Create stunning garden-themed artwork with expert tips and techniques.
(Many of the links in this article redirect to a specific reviewed product. Your purchase of these products through affiliate links helps to generate commission for Storables.com, at no extra cost. Learn more)
Introduction
Welcome to the wonderful world of watercolor painting where you can bring the beauty of greenery to life on your canvas. Painting greenery in watercolor can be a rewarding and fulfilling experience, as you capture the natural essence of leaves, foliage, and plants.
Whether you are a beginner or an experienced artist, this guide will provide you with the knowledge and techniques to paint realistic and vibrant greenery. Along the way, we will explore various aspects such as choosing the right supplies, understanding color theory, and implementing basic watercolor techniques.
With the right tools and a dash of creativity, you will be able to create stunning artwork featuring lush landscapes, serene gardens, or even a single leaf. So, let’s dive in and discover the secrets of painting watercolor greenery!
Key Takeaways:
- Dive into the world of watercolor greenery painting with the right supplies, color theory, and techniques. Experiment, practice, and embrace mistakes to create stunning and realistic artwork.
- Capture the beauty of leaves and foliage by observing, sketching, and painting with depth and dimension. Explore textures, colors, and techniques to bring your greenery to life on canvas.
Choosing the Right Supplies
Before you start painting greenery in watercolor, it’s important to have the right supplies on hand. Here are some key items to consider:
- Watercolor Paints: Invest in a good quality set of watercolor paints. Look for paints that are labeled as “lightfast,” meaning they won’t fade over time. Having a range of green tones, from bright greens to muted olive shades, will give you more versatility in your artwork.
- Watercolor Brushes: Choose brushes with soft bristles that hold water well. A variety of brush sizes, such as flat brushes for larger areas and round brushes for detail work, will come in handy when painting different types of greenery.
- Watercolor Paper: Opt for heavyweight watercolor paper that can withstand the wetness of watercolor paints. Look for paper specifically designed for watercolor painting, such as cold-pressed or rough-textured paper, which will add interesting textures to your greenery.
- Palette: A palette with wells or mixing areas will allow you to mix and blend your watercolor paints effectively. Consider using a porcelain or plastic palette that is easy to clean and won’t absorb the paint.
- Masking Fluid: Masking fluid can be handy when you want to preserve areas of white paper or create intricate details. It acts as a barrier, preventing paint from seeping into certain areas of your artwork.
- Water Container and Paper Towels: Have a clean container for water to rinse your brushes and a stack of paper towels nearby to blot excess water and paint from your brushes.
Having the right supplies will give you the control and versatility needed to create beautiful and realistic greenery in watercolor. Experiment with different brands and tools to find what works best for you.
Understanding Color Theory
Color theory is the foundation of any successful painting, and when it comes to painting watercolor greenery, a solid understanding of color is essential. Here are the key concepts you need to know:
Primary Colors: The primary colors in the color wheel are red, blue, and yellow. These colors cannot be created by mixing other colors and are used as a basis for creating all other colors.
Secondary Colors: Secondary colors are created by mixing two primary colors together. In the case of green, it is a secondary color created by mixing blue and yellow. Understanding how to mix secondary colors will help you achieve a wide range of green shades in your greenery.
Color Temperature: Colors can be classified as warm or cool. Warm colors, such as yellows and oranges, evoke a sense of warmth and vibrancy. Cool colors, such as blues and greens, create a sense of calm and serenity. In portraying greenery, incorporating a mix of warm and cool shades can add depth and visual interest to your artwork.
Color Value: Value refers to how light or dark a color appears. Mixing black or white with a color will alter its value. When painting greenery, varying the value of green can help create dimension and depth. Lighter greens may represent highlights, while darker greens may suggest shadows.
Color Harmony: Color harmony refers to the combination of colors that work well together to create a pleasing composition. Complementary colors, such as red and green, create a strong contrast and can be used to draw attention to specific elements in your greenery painting. Analogous colors, on the other hand, are colors that are adjacent to each other on the color wheel, such as yellow-green, green, and blue-green. Using analogous colors can create a harmonious and unified look in your artwork.
Understanding color theory will guide you in selecting the right colors and creating a visually appealing and realistic representation of greenery. Experiment with different color combinations and observe how they interact with each other on your watercolor palette and canvas.
Basic Watercolor Techniques
Mastering basic watercolor techniques is crucial for painting realistic and vibrant greenery. Here are some fundamental techniques to get you started:
Wet-on-Wet: This technique involves applying wet paint onto a wet surface. Wet your paper with clean water using a large brush or a spray bottle. Then, while the paper is still damp, apply diluted paint to create soft, blurred edges and blends. This technique works well for creating a soft and natural look for foliage and background washes.
Wet-on-Dry: In contrast to wet-on-wet, wet-on-dry involves applying paint onto a dry surface. Start by wetting your brush and then load it with paint. Apply the paint onto dry paper, allowing for more control and crisp edges. This technique is ideal for adding details and definition to leaves, stems, and intricate foliage.
Dry Brush: Dry brushing is achieved by using a brush with minimal water and lots of pigment. Use quick, light strokes to create texture and details, such as the veins on a leaf or the rough texture of bark. This technique can add depth and interest to your greenery painting.
Layering: Layering is the process of building up multiple layers of paint to create depth and dimension. Start with lighter, more transparent colors as a base layer and gradually add darker, more opaque colors on top. This technique is particularly effective in portraying the layers of leaves and foliage found in greenery.
Lifting: Watercolor paint can be lifted from the paper using a clean, damp brush or a paper towel. This technique allows you to correct mistakes or create highlights by gently lifting off layers of paint. Be mindful not to scrub the paper too aggressively, as it can damage the surface.
As you explore and practice these basic techniques, you will develop your own style and refine your watercolor skills. Remember to experiment, be patient, and embrace the unpredictable nature of watercolor painting. With time and practice, you will become more comfortable and confident in painting greenery in watercolor.
Sketching Greenery
Before putting watercolor to paper, it’s important to sketch out your composition and plan the placement of greenery elements. Here are some steps to help you sketch greenery effectively:
Observe and Study: Start by observing and studying different types of greenery. Whether it’s leaves, flowers, or plants, take time to study their shapes, sizes, and structures. Notice how they cluster together and the patterns they form. Pay attention to the smaller details such as veins, textures, and the overall flow of the foliage.
Thumbnail Sketches: Begin with small thumbnail sketches to quickly capture the basic shapes and composition of your greenery. These rough sketches can help you experiment with different arrangements, sizes, and angles. Don’t worry about getting the details perfect at this stage; focus on capturing the overall form and movement.
Use Basic Shapes: Break down the complex forms of greenery into simple shapes. For example, leaves can be represented by ovals or triangles, while flowers can be depicted as circles or rectangles. Using basic shapes as a starting point will help you establish proportions and maintain the overall structure of your greenery.
Add Depth and Perspective: Consider the depth and perspective of your greenery. Use lighter or thinner lines for objects in the background and darker or thicker lines for objects in the foreground. This will create a sense of depth and make your greenery appear more three-dimensional.
Refine Your Sketch: Once you have a rough sketch, take the time to refine it. Add more details and intricacies to the shapes, such as the jagged edges of leaves or the curves of flower petals. Pay attention to the negative spaces between leaves and branches, as they can be just as important as the objects themselves.
Guidelines for Placement: Use light pencil lines or guidelines to help you position your greenery elements. These guidelines can help you establish the overall shape and structure of your composition.
Remember, sketching is a flexible and creative process. Don’t be afraid to make changes and adjustments as you go along. Consider sketching multiple variations of your composition to explore different options before settling on a final design. Once you have a solid sketch, you can confidently move on to adding watercolor to bring your greenery to life.
Read more: How To Store Watercolor Paintings
Mixing Green Colors
When it comes to painting greenery in watercolor, knowing how to mix various shades of green is crucial. Here are some tips to help you achieve the perfect green colors:
Start with the Basics: Begin by mixing the primary colors, blue and yellow, to create your base green. Experiment with different ratios of blue and yellow to achieve a range of greens, from bright lime greens to darker olive tones. Remember that adding more blue will result in cooler greens, while adding more yellow will create warmer greens.
Expand Your Palette: By adding additional colors to your green mixtures, you can create more depth and complexity in your greens. For example, adding a touch of red or brown to your greens will result in muted, earthy tones. Adding a bit of white can create lighter, pastel greens, while adding black will result in darker, more saturated greens.
Mixing Greens from Secondary Colors: Instead of starting with blue and yellow, you can also mix greens from secondary colors. For example, mixing blue and yellow-green or blue and olive green can produce unique shades. These secondary greens can add variety and interest to your greenery.
Try Complementary Contrasts: Experiment with complementary contrasts to create vibrant and dynamic greens. Complementary colors are opposite each other on the color wheel. For example, using a touch of red or purple next to your green will create a striking contrast and make your greens appear more vibrant.
Observation and Practice: Look closely at nature and observe how different shades of green appear. Study the variations in color, intensity, and temperature in various greenery. Take note of the greens you see in different lighting conditions and atmospheric perspectives. Practice mixing and blending greens on your palette to refine your understanding and capture the nuances of natural greenery.
Keep a Color Mixing Log: Consider keeping a color mixing log or a swatch book, where you keep track of various greens you have mixed. This will serve as a reference guide for future paintings and help you recreate specific shades.
Remember, mixing colors is a skill that develops with practice. Don’t be afraid to experiment and explore different combinations to find the greens that work best for your desired outcome. With time and experience, you will develop a strong sense of color and be able to create beautifully nuanced greens for your watercolor greenery.
When painting watercolor greenery, start with a light wash of yellow or blue to create the base color. Then, add layers of darker greens to build depth and texture. Remember to vary the shapes and sizes of the leaves for a more natural look.
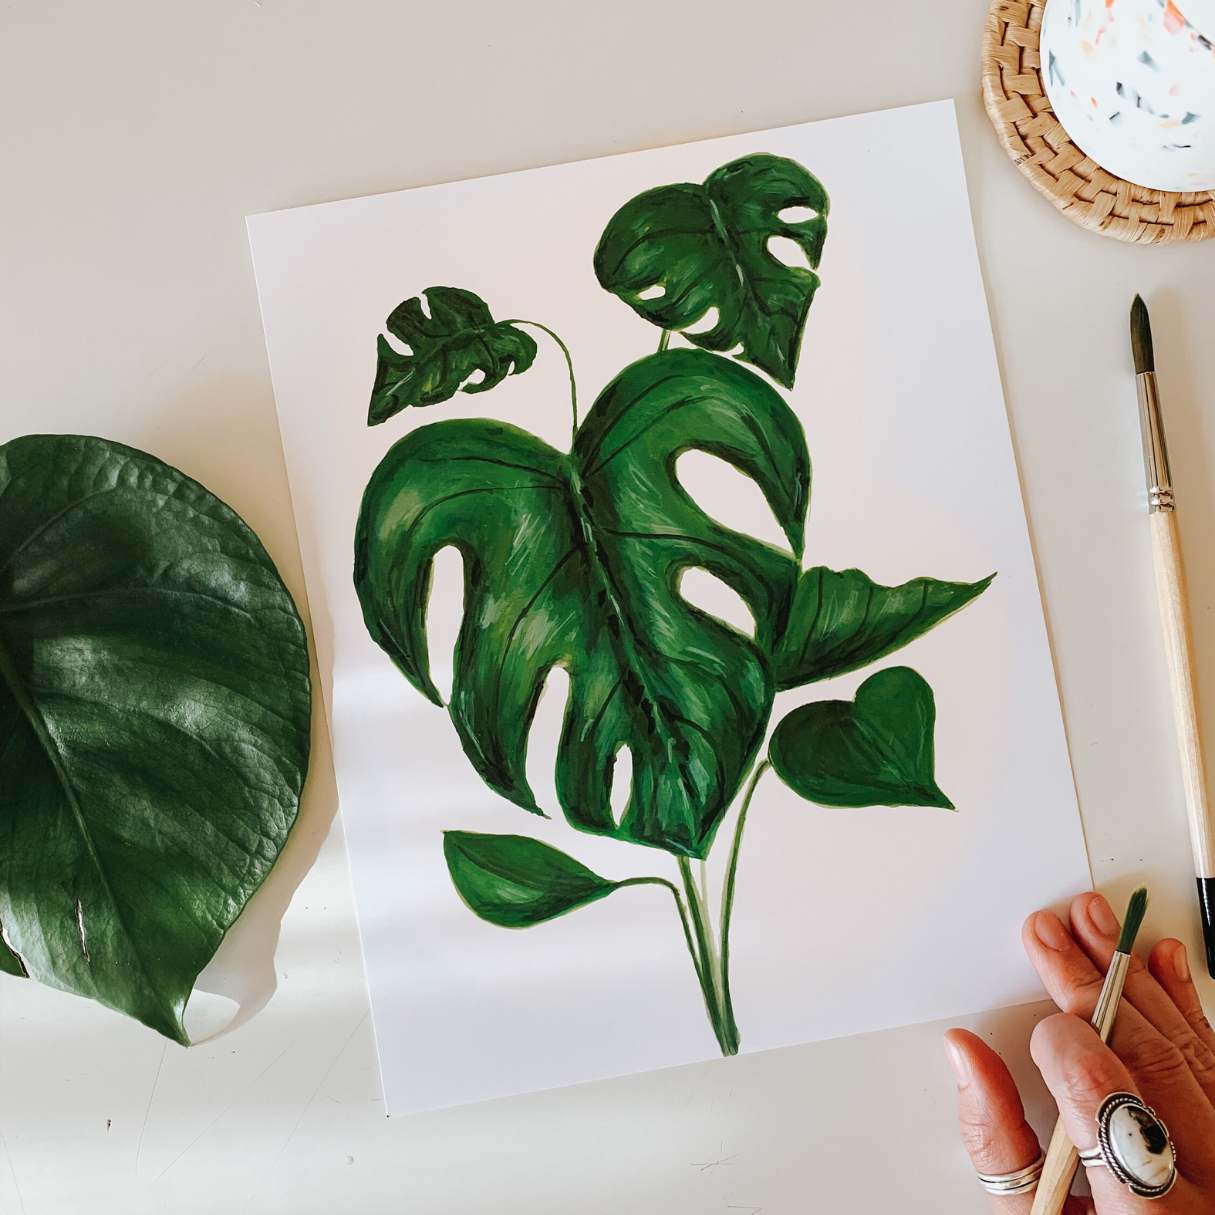
Painting Leaves
Leaves are a key element in painting greenery, and capturing their unique shapes, textures, and colors is essential for a realistic representation. Here are some steps to help you paint leaves with watercolor:
Observe and Analyze: Take a close look at the leaves you wish to paint. Pay attention to their overall shape, whether they are elongated, oval, or heart-shaped. Note the veins and patterns on the leaves, as well as any variegation or color variations.
Choose the Right Brush: Select a brush that suits the size and shape of the leaves you want to paint. A pointed round brush works well for small, detailed leaves, while a flat brush or a filbert brush is great for larger, more substantial leaves.
Wet-on-Dry Technique: Begin by lightly sketching the shape of the leaf using a pencil or a light wash of paint. Then, using the wet-on-dry technique, gradually build layers of paint. Start with light washes and gradually add darker tones to create depth and dimension. Pay attention to the transitions between light and shadow areas of the leaf.
Color Variation: Leaves come in a variety of shades, so experiment with different combinations of paint to achieve realistic colors. Start with a base color and gradually add subtle variations by introducing lighter and darker shades. Use the tip of your brush to create veins and add details.
Dry Brush Technique: To capture the texture of leaves, you can use the dry brush technique. Load your brush with a small amount of paint and remove excess water by blotting it on a paper towel. Then, lightly drag the brush across the paper to create the jagged edges and textures of leaves.
Highlight and Detail: Once you have established the base colors and shapes of the leaves, add highlights and details to bring them to life. Use a lighter shade of your base color to create highlights on the prominent edges of the leaves. Add smaller, finer details like veins and serrated edges using a thin, pointed brush.
Layering and Overlapping: Leaves often overlap each other in a natural arrangement. To convey this in your painting, layer the leaves, painting the ones in the foreground first and gradually adding the leaves in the background. Allow some leaves to partially cover others, adding depth and realism to your composition.
Remember to practice and experiment with different techniques to develop your own style and create realistic leaves. Study different types of leaves, from broad leaves to delicate ferns, to expand your understanding of their structures and variations. With patience and practice, you’ll be able to paint leaves that breathe life into your watercolor greenery.
Painting Foliage
Painting foliage is a crucial aspect of capturing the lushness and complexity of greenery in watercolor. Foliage encompasses the mass of leaves, branches, and vegetation that creates the overall texture and form. Here are some steps to help you paint foliage:
Observe and Analyze: Take a moment to closely observe the foliage you wish to recreate. Pay attention to the different shapes, sizes, and clustering patterns of leaves within the foliage. Notice how light filters through the foliage, creating areas of highlights and shadows.
Choose the Right Brushes: Depending on the size and detail of the foliage, select a combination of brushes that will allow you to achieve the desired effects. Round brushes in various sizes work well for painting individual leaves, while flat brushes can be useful for creating broader strokes and filling in larger areas of foliage.
Wet-on-Wet Technique: Begin by wetting the area where you plan to paint the foliage with clean water. This technique allows the paint to spread and blend more easily on the damp surface. Apply diluted paint in various shades of green, starting with lighter tones and gradually building up to darker ones. Use a combination of brush strokes such as short flicks, dabs, and small circles to imitate the texture of foliage.
Layering and Overlapping: Foliage often consists of layers of leaves and branches, so layering is key to creating depth and dimension. Start by painting the background foliage first and then progressively add layers of leaves in the foreground. Overlap leaves and branches to create a sense of depth and realism.
Color Variation: Foliage comes in a wide range of green shades, so experiment with different combinations to achieve a realistic look. Incorporate variations of green by adding warmer or cooler tones, or introduce subtle hints of other colors such as yellow, brown, or even purple to mimic the natural variations found in foliage.
Negative Painting: Negative painting is a technique that involves painting around an object to create its form. Use this technique to define the shape of foliage by painting around the areas where the leaves or branches intersect. This creates an interesting and intricate silhouette, adding depth and definition.
Details and Highlights: Once you have established the main structure of the foliage, add details and highlights to bring it to life. Use a thin brush to paint delicate veins on selected leaves, or add touches of lighter green to create highlights where light hits the foliage.
Step Back and Assess: Throughout the painting process, step back and assess your work. Take breaks and return with fresh eyes to evaluate the overall composition. This will help you make adjustments and refine areas that need more detail or balance.
Remember, each foliage type may require different techniques and approaches. Study and practice painting various types of foliage, from dense bushy branches to wispy ferns, to enrich your understanding and ability to capture the unique characteristics of each. With patience and experimentation, you will create beautiful and realistic foliage in your watercolor greenery paintings.
Adding Details and Textures
Adding details and textures is the final touch that brings depth, realism, and visual interest to your watercolor greenery painting. Here are some techniques to help you enhance your artwork:
Details in Leaves and Foliage: Use a fine brush to add intricate details to individual leaves. Paint veins, serrated edges, and any unique characteristics specific to the foliage you are portraying. Pay attention to the various shapes, sizes, and patterns of leaves, as these details contribute to the authenticity of your painting.
Texture in Bark and Branches: Create the illusion of texture on tree trunks, branches, and twigs. Use a mix of dry brush strokes, light feathery strokes, and even dabbing techniques to mimic the rough or smooth texture of the bark. Vary your brushstrokes to capture the unique characteristics of different tree species.
Textured Backgrounds: Consider adding texture to the background of your greenery painting. You can achieve this by using techniques such as splattering, sponging, or salt effects. Splattering involves flicking or tapping your brush loaded with paint or diluted ink to create small random splatters. Using a natural sponge or even crumpled tissue can create interesting textures when dipped in paint and pressed onto the paper. Salt effects can be achieved by sprinkling salt on wet paint, creating unique patterns and texture as the salt absorbs the moisture.
Adding Depth: Create depth by utilizing overlapping layers of foliage. Paint the foreground leaves with darker and more vibrant colors, allowing them to stand out. As you move towards the background, gradually lighten the hues and reduce the level of detail. This technique simulates the natural depth perception we encounter in real-life greenery.
Highlighting: Use lighter and brighter shades of green or even a touch of white to add highlights to your leaves and foliage. This adds a sense of light hitting the greenery and enhances the three-dimensional effect. Be mindful of where the light source is coming from and apply highlights accordingly.
Exploring Mixed Media: Don’t limit yourself to solely using watercolors. Consider incorporating other mediums to add texture and dimension. Collage pieces of textured paper or fabric onto your painting, or use colored pencils or pastels to add extra details or highlight specific areas.
Remember, adding details and textures is an opportunity to showcase your creativity and personal style. Experiment with different techniques and observe the greenery around you. By paying attention to the small intricacies and incorporating various textures, you can elevate your watercolor greenery paintings to captivating works of art.
Read also: 10 Best Watercolor Paint For 2024
Creating Depth and Dimension
Creating depth and dimension in your watercolor greenery painting is essential to make your artwork visually engaging and realistic. Here are some techniques to help you achieve this:
Foreground, Middle Ground, Background: Divide your composition into distinct areas of foreground, middle ground, and background. Paint the objects or elements in the foreground with more detail, vibrant colors, and crisp edges. As you move towards the middle ground and background, reduce the level of detail, lighten the colors, and soften the edges. This manipulation of focus guides the viewer’s eye and creates a sense of depth.
Overlap and Perspective: Overlapping objects is a fundamental technique for creating depth. Allow leaves, branches, or other elements of your greenery to intersect and overlap each other. This technique adds a sense of depth as the objects appear closer or farther away from the viewer. Additionally, employing linear and aerial perspective techniques, where objects become smaller and less detailed as they recede into the distance, adds further dimension to your painting.
Value Contrast: Use contrasting values of light and dark to create depth and dimension. Darken the shadows in the recesses of your greenery, such as between leaves or beneath branches. Lighten the areas that catch direct light or are closer to the viewer. This contrast in value adds depth and helps to distinguish between different planes in your composition.
Use Atmospheric Perspective: Emulate the natural atmospheric effects that occur in real-life landscapes. As objects recede into the distance, they start to appear less sharp, lighter in value, and less saturated in color due to factors such as humidity and air particles. Incorporate these elements in your painting to give the illusion of depth and distance.
Limit Detail in Background: Minimize the level of detail in the background of your painting. Soften edges and use simpler brushwork to suggest foliage or distant greenery. This approach helps create a sense of depth by differentiating the focus on the main subject in the foreground.
Utilize Shading and Shadows: Shadows are vital in creating depth and dimension. Observe the direction and intensity of light sources in your scene, and paint shadows accordingly. Consider the cast shadows created by tree canopies or surrounding objects. By accurately portraying shadows, you enhance the three-dimensional feel of your greenery.
Add Depth with Contrast: Contrast in color, value, and texture can add depth and dimension to your painting. Incorporate opposites on the color wheel, such as complementary colors, to create vibrant and dynamic contrasts. Contrast in value, with dark shadows against light highlights, also adds depth and visual interest. Experiment with different textures to create variations in the surface of your greenery, further enhancing its dimension.
By applying these techniques and practicing observation of real-life greenery, you can enhance the depth and dimension of your watercolor greenery paintings. Remember to experiment, be patient, and allow yourself to embrace and learn from any unexpected outcomes. With time and practice, your artwork will come alive with a sense of depth and realism.
Final Thoughts and Tips
As you embark on your journey of painting watercolor greenery, here are some final thoughts and tips to keep in mind:
Practice and Patience: Like any skill, watercolor painting takes practice and patience to master. Don’t be discouraged by initial challenges or mistakes. Embrace the learning process and keep practicing to enhance your skills and refine your techniques.
Observe and Study: Take the time to observe and study greenery in real life. Pay attention to the details, colors, and textures. Notice how different types of greenery grow and interact with each other. This observation will inform your artwork and help you create more realistic and compelling paintings.
Experiment and Explore: Don’t be afraid to experiment with different techniques, brushstrokes, and color combinations. Allow your creativity to guide you and explore new possibilities. Watercolor painting offers a world of possibilities, so embrace the freedom to play and discover your unique style.
Embrace Mistakes: Mistakes are a natural part of the artistic process. Don’t be afraid to make them or try new things. Sometimes, unexpected results can lead to wonderful discoveries. Learn from your mistakes and use them as opportunities for growth and experimentation.
Work in Layers: Building layers in your painting can add depth and complexity to your greenery. Start with lighter colors and gradually layer darker tones on top. This technique allows you to create rich and vibrant greens while maintaining a sense of transparency.
Be Mindful of Water Control: Water control is key in watercolor painting. Pay attention to the amount of water on your brush and on the paper. Too much water can cause colors to bleed and blend too much, while too little water can create harsh and dry brushstrokes. Finding the right balance is crucial for achieving the desired effects.
Take Breaks: Watercolor painting can be time-consuming and mentally demanding. Take regular breaks to rest your eyes and clear your mind. Step away from your painting and come back with fresh eyes to assess your progress and make adjustments.
Seek Inspiration: Explore the work of other watercolor artists who specialize in painting greenery. Gather inspiration from their techniques, use of color, and composition. Visit art galleries, attend workshops, and join art communities to connect with other artists and continue learning.
Remember, the beauty of watercolor painting lies in its fluidity, transparency, and ability to capture the delicate nature of greenery. Enjoy the process of bringing greenery to life on your canvas and allow your passion for the subject to shine through in your artwork. Happy painting!
Frequently Asked Questions about How To Paint Watercolor Greenery
Was this page helpful?
At Storables.com, we guarantee accurate and reliable information. Our content, validated by Expert Board Contributors, is crafted following stringent Editorial Policies. We're committed to providing you with well-researched, expert-backed insights for all your informational needs.


0 thoughts on “How To Paint Watercolor Greenery”