Home>Garden Essentials>How To Retrace Your Play Area In Windows Mixed Reality
Garden Essentials
How To Retrace Your Play Area In Windows Mixed Reality
Modified: March 7, 2024
Learn how to retrace your garden play area in Windows Mixed Reality with this step-by-step guide. Create an immersive virtual gardening experience easily and accurately!
(Many of the links in this article redirect to a specific reviewed product. Your purchase of these products through affiliate links helps to generate commission for Storables.com, at no extra cost. Learn more)
Introduction
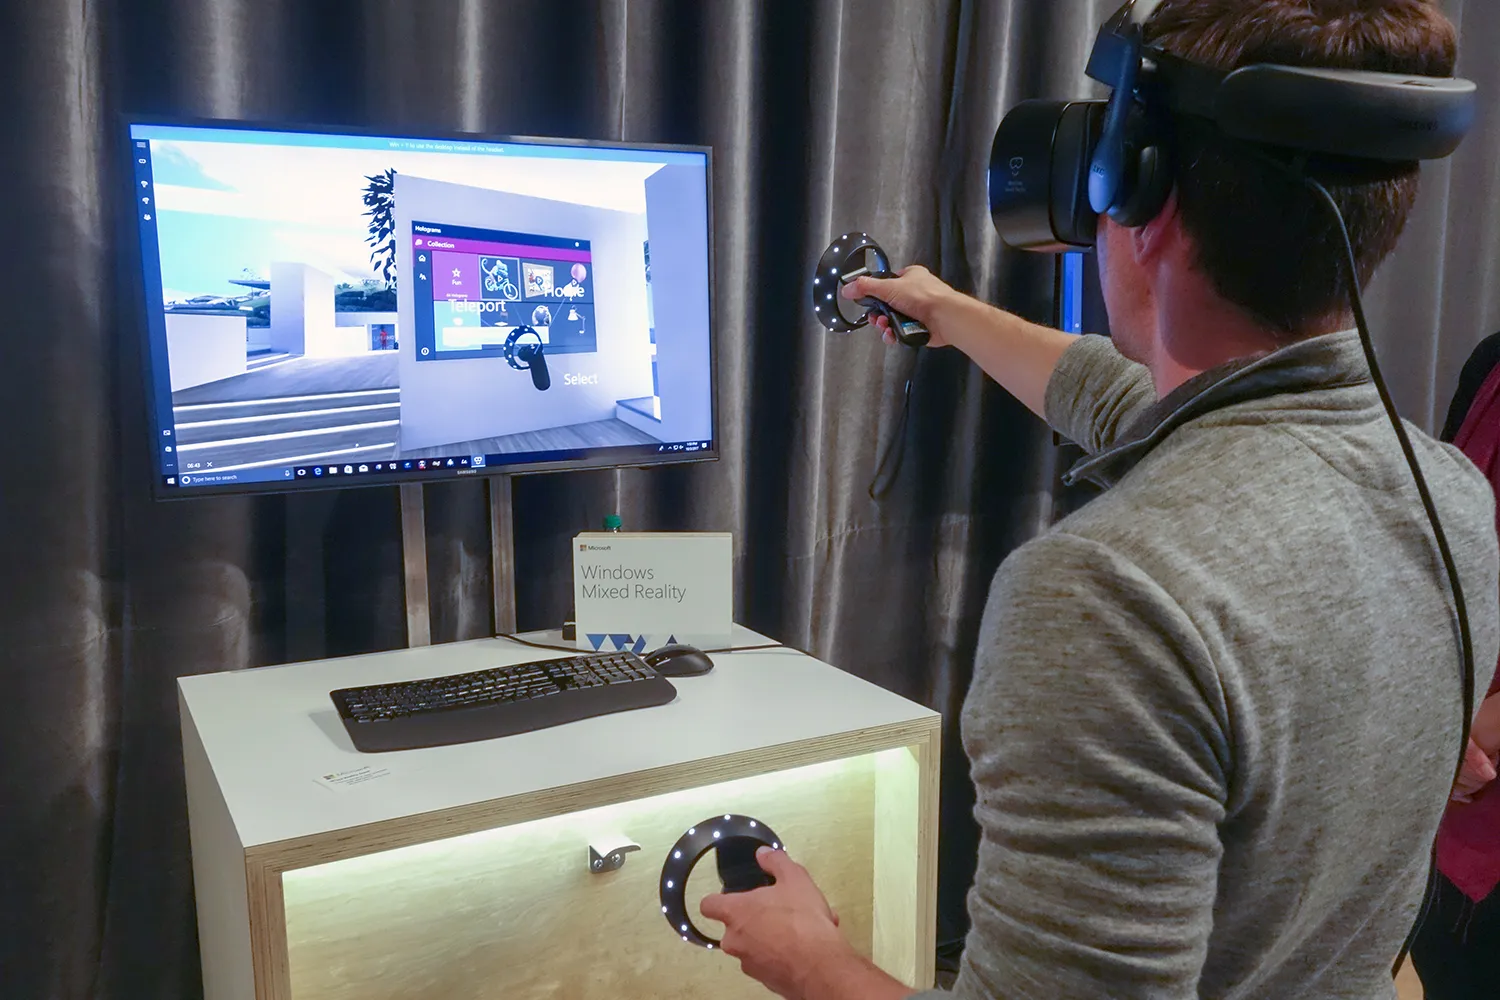
Welcome to the world of Windows Mixed Reality! If you’re an avid gamer or a virtual reality enthusiast, you know that creating an accurate and defined play area is essential for an immersive and enjoyable experience. In this article, we will guide you through the process of retracing your play area in Windows Mixed Reality, ensuring that you have a clear understanding of the boundaries within which you can navigate and interact with virtual content.
Windows Mixed Reality offers a wide range of virtual reality experiences, from games to productivity tools, all designed to transport you to a whole new realm of possibilities. But to fully embrace this virtual world, you need to establish a play area that allows you to move around, interact, and explore while ensuring your safety.
By retracing your play area in Windows Mixed Reality, you will define the boundaries of your physical space, enabling the system to create a virtual representation of it. This virtual boundary will serve as your guide, letting you know when you’re approaching the limits of your play area and helping you stay centered within it.
Whether you’re a seasoned Windows Mixed Reality user or just getting started, re-establishing your play area is a crucial step to ensure a seamless and immersive virtual experience. So, let’s dive in and learn how to retrace your play area in Windows Mixed Reality!
Key Takeaways:
- Retracing your play area in Windows Mixed Reality ensures a safe and immersive virtual experience by defining the boundaries of your physical space, allowing you to navigate and interact with confidence.
- By following simple steps in the Windows Mixed Reality Portal, you can walk around your play area to create a virtual representation of your physical space, unlocking endless possibilities for virtual adventures.
Read more: How To Build Your Own Natural Play Area
Step 1: Open the Windows Mixed Reality Portal
To begin the process of retracing your play area in Windows Mixed Reality, you first need to open the Windows Mixed Reality Portal. This is the central hub where you can access all your virtual reality content and settings.
To open the Windows Mixed Reality Portal, follow these steps:
- Make sure your Windows Mixed Reality headset is connected to your computer and turned on.
- On your computer, go to the Start menu and search for “Mixed Reality Portal”.
- Click on the “Mixed Reality Portal” app to launch it.
Once the Windows Mixed Reality Portal is launched, you will see a virtual environment displayed inside your headset. This is where you’ll perform the next steps to retrace your play area.
Note: If you don’t have the Windows Mixed Reality Portal installed on your computer, you can download it from the Microsoft Store. Make sure your system meets the minimum requirements for running Windows Mixed Reality before proceeding.
Now that you’ve opened the Windows Mixed Reality Portal, you’re ready to move on to the next step: accessing the boundary settings.
Step 2: Access the Boundary Settings
Once you have the Windows Mixed Reality Portal open, the next step is to access the boundary settings. These settings allow you to customize and retrace your play area to ensure it aligns with your physical space.
To access the boundary settings, follow these instructions:
- Ensure that you are wearing your Windows Mixed Reality headset and that it’s properly connected to your computer.
- Look around in the virtual environment until you spot the Start menu button located at the bottom of your field of view. It will appear as a small circular button with the Windows logo.
- Focus your gaze on the Start menu button and select it by pressing the corresponding controller button or using the air tap gesture.
- Once the Start menu opens, navigate to the “Settings” option. You can do this by moving your gaze and selecting the “Settings” tile on the menu.
- In the Settings menu, locate and select the “Mixed Reality” option. This will open the Mixed Reality settings page.
- Look for the “Boundary” option in the Mixed Reality settings and select it. This will take you to the boundary configuration page.
By following these steps, you will now be in the boundary settings section, where you can modify and retrace your play area to better fit your physical space.
Now that you’ve accessed the boundary settings, it’s time to move on to the next step: starting the room setup process.
Step 3: Start the Room Setup Process
Now that you have accessed the boundary settings in the Windows Mixed Reality Portal, it’s time to start the room setup process. This process will guide you through the necessary steps to establish and retrace your play area accurately.
Follow these instructions to begin the room setup process:
- In the boundary settings section, look for the “Room set up” option and select it.
- The room setup process will begin by showing you a brief introduction. Read through the information provided to familiarize yourself with the steps and purpose of the process.
- Once you’re ready to proceed, select the “Next” button to move forward.
- The room setup process will now prompt you to clear your play area from any obstacles or hazards. Make sure you have enough space to freely move around without any obstructions.
- After verifying that your play area is clear, select the “Next” button to continue.
- The next step is to ensure that your Windows Mixed Reality headset is properly connected and calibrated. Follow the on-screen instructions to adjust the headset for the best fit and comfort.
- Once the headset is calibrated, select the “Next” button to proceed.
- The room setup process will now guide you through the process of retracing your play area by walking around the designated area.
By following these steps, you will be well on your way to retracing your play area in Windows Mixed Reality. The room setup process will ensure that your virtual environment aligns accurately with your physical space, providing a seamless virtual reality experience.
Now that you’ve started the room setup process, it’s time to move on to the next step: choosing the “Retrace Your Play Area” option.
To retrace your play area in Windows Mixed Reality, open the Mixed Reality Portal, go to Settings, select “Headset display” and then “Room adjustment.” Follow the on-screen instructions to retrace your play area.
Step 4: Choose the “Retrace Your Play Area” Option
After starting the room setup process in the Windows Mixed Reality Portal, you will reach a point where you need to choose the “Retrace Your Play Area” option to define the boundaries of your physical space accurately. This step is crucial to ensure that your virtual reality experience is safe and immersive.
Follow these instructions to choose the “Retrace Your Play Area” option:
- During the room setup process, you’ll be presented with different options for defining your play area. Look for the option that says “Retrace Your Play Area” and select it.
- Upon selecting this option, you will be prompted to put on your Windows Mixed Reality headset and hold the controllers in your hands.
- Make sure the headset is securely in place and the controllers are powered on and connected to your computer.
- Once you’re ready, select the “Next” button to begin retracing your play area.
- A virtual boundary will appear in your headset, highlighting the current limits of your play area based on your previous setup or default settings.
Choosing the “Retrace Your Play Area” option allows you to redefine and refine your virtual boundaries based on your physical space. This step ensures that you have a clear understanding of where you can safely move and interact within the virtual environment.
Now that you’ve chosen the “Retrace Your Play Area” option, it’s time to move on to the next step: walking around the play area to retrace it.
Step 5: Walk Around the Play Area to Retrace It
Now that you have selected the “Retrace Your Play Area” option in the Windows Mixed Reality Portal, it’s time to physically walk around your play area to create an accurate virtual representation of it. This step allows the system to understand the boundaries of your physical space and ensures that your virtual reality experience is properly aligned.
Follow these instructions to walk around the play area and retrace it:
- Once the “Retrace Your Play Area” option is selected, the virtual boundary will be visible in your headset.
- Start by identifying a corner of your play area, marked by a small marker or boundary indicator.
- Walk towards that corner and make sure to stay within the boundaries as indicated by the virtual wall.
- Slowly move around the perimeter of your play area, making sure to cover as much ground as possible while staying within the virtual boundary.
- As you move, the system will track your position and adjust the virtual representation of your play area accordingly.
- Continue walking until you have retraced the entire play area, ensuring that you have covered all corners and sides.
While retracing your play area, it’s important to maintain a steady pace and follow the guidance provided by the virtual boundaries. This will help the system accurately map out your play area and create a seamless virtual environment.
Now that you have walked around the play area to retrace it, it’s time to move on to the final step: confirming and saving the new play area.
Step 6: Confirm and Save the New Play Area
After walking around the play area to retrace it in the Windows Mixed Reality Portal, the final step is to confirm and save the new play area boundaries. This step ensures that the system has an accurate representation of your physical space, allowing for a seamless and immersive virtual reality experience.
Follow these instructions to confirm and save the new play area:
- Once you have completed retracing your play area, the Windows Mixed Reality Portal will prompt you to review the newly defined boundaries.
- Take a moment to examine the virtual boundary and ensure that it aligns with your physical space.
- If you’re satisfied with the new boundaries, select the “Next” or “Confirm” button to proceed.
- The system will save the new play area boundaries, and you’ll receive confirmation that the process is complete.
- At this point, you can remove your headset and prepare to enjoy your virtual reality experience within the defined play area.
It’s important to remember that once you have saved the new play area boundaries, it’s recommended to avoid moving outside of this designated space during your virtual reality sessions. Doing so may cause the system to lose tracking and disrupt your experience.
By following these steps and confirming the newly defined play area boundaries, you have successfully retraced your play area in Windows Mixed Reality. Now you’re ready to embark on exciting virtual adventures while staying within the safe and defined boundaries of your physical space.
Congratulations on completing the process of retracing your play area. Enjoy your immersive virtual reality experience!
Conclusion
Retracing your play area in Windows Mixed Reality is a crucial step in creating an immersive, safe, and enjoyable virtual reality experience. By following the steps outlined in this guide, you can accurately define the boundaries of your physical space and ensure that your virtual environment aligns seamlessly with it.
The process begins by opening the Windows Mixed Reality Portal and accessing the boundary settings. From there, you can start the room setup process and choose the “Retrace Your Play Area” option. Walking around your play area allows the system to map out the boundaries and create a virtual representation of your physical space. Lastly, you confirm and save the new play area, ensuring that it aligns accurately with your surroundings.
By retracing your play area, you can navigate, interact, and explore the virtual world with confidence, knowing that you are within the defined boundaries of your physical space. This not only enhances the immersive experience but also promotes safety as it helps prevent collisions with real-world objects.
Whether you’re an avid gamer, a creative professional, or simply someone seeking new forms of entertainment, having a well-defined play area in Windows Mixed Reality is essential. It allows you to fully engage with virtual content, dive into new experiences, and unlock the full potential of this exciting technology.
So, take the time to retrace your play area in Windows Mixed Reality and enjoy a world filled with endless possibilities. Immerse yourself in captivating virtual environments, play interactive games, explore new worlds, or collaborate with others in innovative ways. The choice is yours, and with a properly retraced play area, you can make the most of your Windows Mixed Reality experience.
Embrace the future of virtual reality, and let Windows Mixed Reality transport you to a whole new dimension of entertainment, productivity, and creativity. Get started today and redefine the way you interact with technology.
Frequently Asked Questions about How To Retrace Your Play Area In Windows Mixed Reality
Was this page helpful?
At Storables.com, we guarantee accurate and reliable information. Our content, validated by Expert Board Contributors, is crafted following stringent Editorial Policies. We're committed to providing you with well-researched, expert-backed insights for all your informational needs.


0 thoughts on “How To Retrace Your Play Area In Windows Mixed Reality”