Home>Garden Essentials>How To Build Your Own Natural Play Area
Garden Essentials
How To Build Your Own Natural Play Area
Modified: October 20, 2024
Learn how to create your own beautiful garden play area that is both fun and eco-friendly. Design a natural playground right in your backyard with our step-by-step guide!
(Many of the links in this article redirect to a specific reviewed product. Your purchase of these products through affiliate links helps to generate commission for Storables.com, at no extra cost. Learn more)
Introduction
Welcome to the world of natural play areas! Gone are the days of sterile plastic playgrounds. Instead, imagine a lush, green space where children can connect with nature through play. Building your own natural play area is not only a rewarding project, but it also provides countless benefits for children. From helping them develop physical skills to fostering their creativity and imagination, a natural play area can become a haven for kids of all ages.
In this article, we will guide you through the process of building your own natural play area step by step. From choosing the perfect location to incorporating nature-inspired play features, we will cover everything you need to know to create an engaging and sustainable play space for your children.
But before we dive into the details, let’s take a moment to understand the importance of natural play areas. In today’s digital age, where children are often glued to screens, it is crucial to provide them with opportunities to experience the wonders of the outdoors. Natural play areas offer a chance to reconnect with nature, stimulating their senses and encouraging exploration and discovery.
Moreover, studies have shown that spending time in nature has numerous benefits for children’s physical and mental well-being. It promotes active play, develops gross motor skills, and boosts cognitive development. Natural play areas also provide opportunities for social interaction, problem-solving, and imaginative play. By building your own natural play area, you are creating an environment where children can thrive and grow.
Now that we understand the importance of natural play areas, let’s move on to the first step: choosing the perfect location.
Key Takeaways:
- Building a natural play area provides children with a space to connect with nature, fostering creativity, physical skills, and cognitive development while promoting active play and social interaction.
- Creating a natural play area involves choosing a safe location, planning the design, incorporating natural materials, and ensuring safety considerations to provide a secure and enjoyable environment for children.
Step 1: Choose the Perfect Location
When it comes to building a natural play area, the location is of utmost importance. You want to find a spot that provides a balance between safety, accessibility, and the natural elements you wish to incorporate. Here are some factors to consider when choosing the perfect location:
- Safety: Ensure that the area you choose is free from potential hazards such as sharp objects, steep slopes, or poisonous plants. Also, consider proximity to any bodies of water or busy roads. Safety should always be the top priority.
- Accessibility: The play area should be easily accessible for children and caregivers. It is best to choose a location that is close to your home or easily reachable from the main living area. This will encourage frequent use and supervision.
- Natural Elements: Look for a location that already has some natural elements like trees, shrubs, or rocks. These elements will provide a good foundation for your natural play area and will enhance the overall experience for children.
- Sunlight: Consider the amount of sunlight the location receives throughout the day. For optimal play experiences, a balance of sun and shade is ideal. Areas with partial shade or adjacent to existing shade structures can be beneficial.
- Privacy: If possible, choose a location that offers some privacy from neighboring properties. This will create a more intimate and immersive play environment for children.
Once you have considered these factors, take some time to explore the potential locations. Observe the space at different times of the day to gauge sunlight and shade patterns. Consider the views and natural surroundings of each location. This will help you make an informed decision that aligns with your vision for the natural play area.
Remember that the location will set the tone for the entire project, so choose wisely. Once you have chosen the perfect location, it’s time to move on to the next step: planning the design of your natural play area.
Step 2: Plan the Design
Now that you have chosen the location for your natural play area, it’s time to start planning the design. This step is crucial as it will determine the layout, features, and overall feel of the play space. Here are some key considerations when planning the design:
- Age and Interests: Take into account the age and interests of the children who will be using the play area. Younger children may benefit from low-to-the-ground features, while older children may enjoy more challenging elements like climbing structures or balance beams.
- Natural Elements: Incorporate natural elements such as logs, boulders, or fallen branches into the design. These elements not only add to the aesthetics but also provide opportunities for imaginative play and exploration.
- Zoning: Divide the play area into different zones or areas to cater to different activities. For example, you can have an area for active play, a quiet reading nook, or a sensory garden. This zoning will create a well-rounded play experience.
- Accessibility: Ensure that the play area is accessible to children of all abilities. Consider including pathways wide enough for wheelchairs or strollers, and provide seating areas where children and caregivers can rest.
- Sustainability: Aim for sustainability in your design by using eco-friendly materials, incorporating native plants, and implementing water-saving strategies. This will not only benefit the environment but also teach children about the importance of taking care of our planet.
- Budget: Determine your budget for the project and plan the design accordingly. Keep in mind that natural play areas don’t have to be extravagant. Simple and well-thought-out design elements can create an engaging and enriching play experience.
Once you have considered these factors, it’s time to sketch out the design on paper or using design software. Create a layout that reflects your vision for the play area, taking into account the available space and any existing natural features. You can also seek inspiration from other natural play areas or consult with landscape designers or experts in the field for guidance.
Remember, the design should prioritize the overall experience and well-being of the children who will be using the play area. Once you have finalized the design, you can move on to the next step: preparing the ground.
Step 3: Prepare the Ground
Now that you have a clear design plan for your natural play area, it’s time to prepare the ground. Proper ground preparation is essential to ensure a safe and stable foundation for the play features. Here are some steps to follow:
- Clear the Area: Remove any vegetation, debris, or obstructions from the play area. This will provide a clean slate for your project and help you create a level surface.
- Level the Ground: Use a rake or shovel to level the ground as much as possible. Remove any bumps or uneven areas to create a smooth surface. This will prevent tripping hazards and ensure a safe play environment.
- Add Drainage: If your play area is prone to puddling or water accumulation, consider adding drainage elements. This can be as simple as creating small trenches or installing a French drain system. Adequate drainage will help prevent the play area from becoming muddy and slippery.
- Install Weed Barrier: To minimize weed growth, lay a weed barrier fabric over the prepared ground. This will help keep the play area clean and reduce maintenance tasks in the future.
- Provide a Soft Surface: Consider adding a soft surface material to cushion falls and provide additional safety. Options include wood chips, rubber mulch, sand, or synthetic turf. Choose a material that aligns with your design aesthetic and budget.
- Secure the Border: Install a sturdy edge or border around the play area to define the boundaries and contain the surfacing material. This can be done using landscape timbers, stones, or a rubber curb. A secure border will help keep the play area intact and prevent the surfacing material from spreading.
It’s important to note that the ground preparation may vary depending on the specific requirements and features of your design. Always refer back to your design plan to ensure that the ground preparation aligns with your vision.
Once the ground is prepared, you’re ready to move on to the exciting part: selecting and incorporating natural materials into your play area. Stay tuned for step 4!
Step 4: Select Natural Materials
In step 4 of building your natural play area, it’s time to select the natural materials that will bring your vision to life. Incorporating natural elements not only adds aesthetic value but also enhances the sensory experience for children. Here are some ideas for natural materials to consider:
- Logs and Tree Stumps: Logs and tree stumps can serve multiple purposes in a natural play area. They can be used as seating, stepping stones, or climbing structures. Look for logs and stumps that are sturdy and free from rot or insect infestation.
- Rock and Boulder Features: Rocks and boulders can create a sense of adventure and challenge for children. They can be used for climbing, balancing, or creating a natural boundary. Make sure the rocks are securely placed and do not pose any safety hazards.
- Sand and Gravel: Sand and gravel provide opportunities for sensory play and building. Consider adding a designated sandbox area or incorporating sand and gravel into pathways or play features. Ensure that the sand is clean and free from any harmful contaminants.
- Natural Loose Parts: Collect natural loose parts such as pinecones, shells, acorns, or leaves. These can be used for imaginative play, construction activities, or sensory exploration. Encourage children to use their creativity to incorporate these natural loose parts into their play.
- Plants and Foliage: Introduce native plants and foliage into the play area to enhance the natural feel. Choose plants that are safe for children and require minimal maintenance. Consider including sensory plants like lavender, mint, or lemon balm to stimulate the senses.
- Water Elements: If possible, incorporate water elements into your natural play area. This can be as simple as a small water table, a hand pump, or a natural streambed. Water play provides endless opportunities for exploration and sensory experiences.
When selecting natural materials, ensure that they are safe, non-toxic, and appropriate for the age group using the play area. It’s also important to regularly inspect and maintain the materials to ensure their longevity and safety.
Remember, the selection and arrangement of natural materials should align with your overall design plan and promote open-ended play. By incorporating these natural elements, you will create a play area that fosters connection with the natural world and encourages children’s curiosity and imagination.
Now that you have selected your natural materials, it’s time to move on to step 5: creating play features in your natural play area.
Read more: How To Build A Play Area For Ferret
Step 5: Create Play Features
Creating play features is where the magic of your natural play area truly comes to life. In this step, you will incorporate the selected natural materials into engaging structures and elements that promote active and imaginative play. Here are some ideas for creating play features:
- Climbing Structures: Use sturdy logs, boulders, or tree stumps to create climbing structures of varying heights and difficulty levels. Incorporate ropes or nets for added challenge and excitement. Make sure the climbing structures are securely installed and provide proper handholds and footholds.
- Balance Beams: Utilize logs or cut slices of tree trunks to create balance beams. Place them at different heights and widths to cater to children of different ages and abilities. Balance beams enhance coordination and motor skills.
- Nature Play Stations: Set up different play stations that encourage sensory exploration and imaginative play. This could include a mud kitchen, a digging area, a puppet theater, or a nature art table. Rotate the materials and activities regularly to keep the play area fresh and engaging.
- Nature-inspired Seating: Arrange tree stumps, log benches, or picnic tables to provide seating areas within the play area. These seating options can also double as platforms for play or gathering spaces for children and caregivers.
- Secret Hideaways: Create cozy nooks and hideaways within the play area using plants or trellises. These hidden spaces can spark children’s creativity and provide a sense of adventure and privacy.
- Musical Features: Incorporate natural materials that make sounds, such as bamboo wind chimes or wooden xylophones. These musical features add a sensory element to the play area and encourage exploration of different sounds and rhythms.
When creating play features, keep in mind the age range and abilities of the children using the play area. Ensure that the structures are safe, sturdy, and free from sharp edges or protruding nails. Regularly inspect and maintain the play features to ensure their safety and longevity.
Remember, the goal is to provide a variety of play experiences that stimulate the senses, promote physical activity, and inspire imaginative play. By creating play features with natural materials, you’re providing children with opportunities to connect with nature and develop a sense of wonder and curiosity.
Now that your play features are in place, let’s move on to step 6: incorporating water elements into your natural play area.
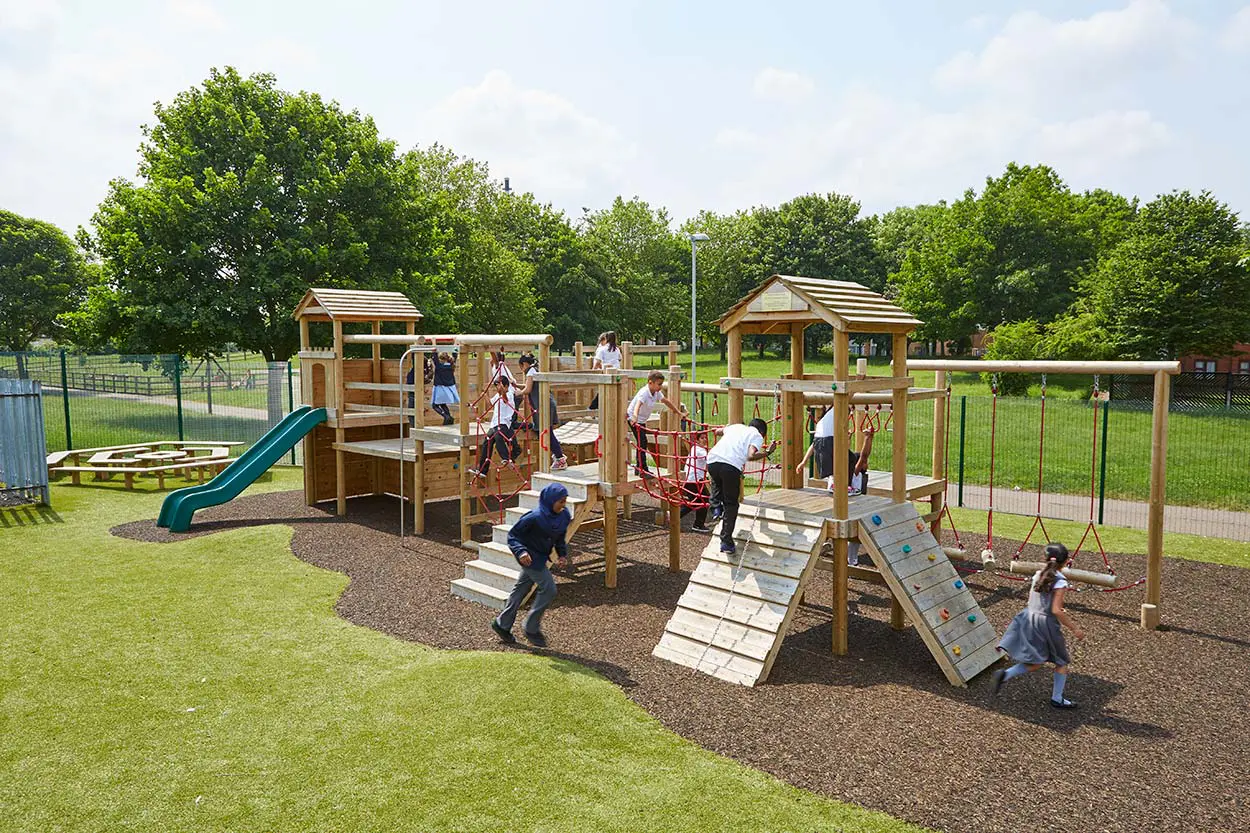
Consider incorporating natural elements such as logs, rocks, and plants into your play area to encourage imaginative and active play while connecting children with the natural world.
Step 6: Incorporate Water Elements
Water elements add an exciting and dynamic aspect to your natural play area. The sound, texture, and movement of water stimulate the senses and provide children with endless opportunities for exploration and sensory play. Here are some ideas for incorporating water elements:
- Water Table or Sensory Bin: Include a water table or sensory bin where children can engage in hands-on water play. Fill it with toys, cups, and containers for pouring, scooping, and experimenting. This provides a contained area for water play, minimizing mess and ensuring safety.
- Nature-inspired Water Feature: Design a natural water feature, such as a small stream or waterfall, using a recirculating pump. You can create a shallow basin with rocks, allow water to flow gently over them, and create a mini oasis for children to explore and interact with.
- Splash Pad: If you have the space and resources, consider installing a splash pad. This is a larger water feature that children can run through and play in while staying cool on hot days. Splash pads typically have built-in jets or sprayers that shoot water for added fun.
- Water Wall: Create a water wall using recycled materials such as pipes, gutters, and funnels. Allow children to interact with the water as it flows down the wall, providing a sensory and educational experience.
- Natural Water Play Area: If your natural play area is near a natural water source like a pond or stream, incorporate that into the design. Create a safe and supervised area for children to interact with the water, such as a shallow creek bed or a designated water play spot.
When incorporating water elements, safety is paramount. Ensure that the water sources are clean and free from any potential hazards. If using standing water, take appropriate measures to prevent stagnation and discourage mosquitoes. Supervise children closely when they are playing with water to ensure their safety.
Incorporating water elements into your natural play area not only adds a fun and refreshing aspect but also allows children to engage in sensory exploration and learn about the properties of water. It provides a unique and enriching play experience that connects them with nature.
Now that water elements are included in your play area, let’s move on to step 7: adding seating and shade for comfort and relaxation.
Step 7: Add Seating and Shade
To create a comfortable and inviting atmosphere in your natural play area, it’s important to incorporate seating and shade. This allows children and caregivers to rest, observe, and interact within the play space. Here are some ideas for adding seating and shade:
- Natural Seating: Arrange tree stumps, logs, or wooden benches throughout the play area to provide seating options. These natural seating elements blend seamlessly with the surroundings and add a rustic and organic touch.
- Picnic Areas: Designate a picnic area with a sturdy picnic table or blanket where families can enjoy snacks or meals. This provides a space for socializing, bonding, and taking a break from play.
- Shade Structures: Install shade structures such as pergolas, canopies, or umbrellas to provide relief from the sun and create comfortable shady spots. This is particularly important during hot summer months or in regions with intense sun exposure.
- Trellises and Arbor: Incorporate trellises or arbors covered with climbing vines or shade-producing plants. These vertical structures not only provide shade but also add visual interest and a sense of privacy within the play area.
- Natural Canopy: If your play area is surrounded by trees, take advantage of the natural canopy they provide. Enhance the shade by strategically placing seating areas beneath the shade of trees, making use of the natural foliage to create a cool and relaxing environment.
When adding seating and shade, consider the layout and flow of the play area. Place seating in strategic locations where caregivers can have a clear view of the play space while still being able to rest and engage with their children.
Creating areas for relaxation and respite not only improves the overall experience for children and caregivers but also encourages longer play sessions and fosters social interactions. It provides a space for children to recharge and refuel before rejoining the play activities.
With seating and shade incorporated into your natural play area, you’re almost done! The next step is to consider safety considerations to ensure a secure and enjoyable play environment. Let’s move on to step 8.
Step 8: Safety Considerations
When creating a natural play area, ensuring the safety of children is of utmost importance. Here are some key safety considerations to keep in mind:
- Surfacing Material: Ensure that the surfacing material beneath play equipment is impact-absorbing and provides cushioning in case of falls. This is particularly important for climbing structures and areas where children may engage in more dynamic play. Wood chips, rubber mulch, or sand are popular choices for safe surfacing.
- Inspect and Maintain: Regularly inspect the play area and play features for any signs of wear, damage, or potential hazards. Check for loose bolts, splintered wood, or sharp edges. Maintain and repair the play area promptly to keep it in safe and working condition.
- Avoid Toxic Plants: Be mindful of any toxic plants in or around the play area. Avoid planting poisonous plants or remove any existing ones. Educate children about the importance of not touching or eating unknown plants.
- Supervision: Ensure that children are supervised while playing in the natural play area, especially younger children. Encourage caregivers to actively engage in their children’s play, ensuring their safety and guiding their interactions with the environment.
- Clear Sightlines: Maintain clear sightlines within the play area to easily monitor children’s activities and minimize potential risks. Trimming branches, removing obstacles, and avoiding blind spots will enhance supervision and ensure a safe play environment.
- Water Safety: If incorporating water elements, always supervise children closely during water play. Ensure the water is clean, shallow, and safe for children to interact with. Educate children about water safety rules and the importance of not going near water bodies without supervision.
- Age-appropriate Design: Design play features and structures according to the age range of the children using the play area. Younger children may require lower and less challenging structures, while older children may enjoy more adventurous and physically demanding features.
It’s important to regularly review and update safety guidelines as new information and best practices emerge. Stay informed about relevant safety standards and guidelines for play equipment and surfacing material.
By prioritizing safety in your natural play area, you create a secure and enjoyable environment for children to explore, learn, and have fun.
With the safety considerations addressed, we’re approaching the final steps of building your natural play area. Let’s move on to step 9: maintenance and care.
Read more: How Much To Build A Soft Play Area
Step 9: Maintenance and Care
Now that your natural play area is complete, it’s important to establish a maintenance routine to keep it in optimal condition for continued enjoyment. Here are some key maintenance and care tips:
- Clean and Inspect: Regularly clean the play area to remove debris, fallen leaves, and any other materials that may accumulate. Inspect the play features, seating, and surfacing material for any signs of wear or damage. Address any issues promptly to prevent accidents and ensure a safe play environment.
- Repair and Replace: As natural materials age and weather, they may require occasional repair or replacement. Periodically check for loose parts, worn-out surfaces, or damaged elements. Repair or replace them as needed to maintain safety and functionality.
- Replenish Surfacing Material: Check the surfacing material under play equipment to ensure an adequate depth for impact absorption. Replenish wood chips, rubber mulch, or sand as needed to maintain the recommended safety standards. Ensure that the surfacing remains even and consistently distributed.
- Seasonal Maintenance: Adjust your maintenance routine based on the changing seasons. During spring and summer, you may need to address weed growth, water management, and plant care. In colder months, focus on protecting and preserving the play area from snow, ice, and freezing temperatures.
- Prune and Trim: Regularly prune trees and shrubs around the play area to prevent overgrowth. Trim branches that may pose a hazard or obstruct sightlines. This will ensure clear access to play features and maintain a safe environment.
- Pest Management: Implement pest management strategies to minimize issues with insects or critters that may interfere with the play area. This can include using natural repellents, sealing entry points, or seeking professional assistance if necessary.
- Community Involvement: Engage the community in the maintenance and care of the play area. Organize occasional clean-up days or involve local volunteers to ensure the longevity and ongoing enjoyment of the space.
Maintaining your natural play area is an ongoing process. Regular observation, care, and periodic adjustments will help preserve the integrity of the play space and ensure a safe and inviting environment for children.
Congratulations on completing the essential steps to build your own natural play area! By following these guidelines, you have created a haven where children can connect with nature, explore, and engage in imaginative play. Enjoy the remarkable benefits that a natural play area brings to children’s physical, mental, and emotional well-being.
Remember to continually assess and adapt your natural play area to meet the evolving needs and interests of the children using it. Regularly seek feedback from children, caregivers, and the community to ensure that your natural play area remains a beloved and cherished space throughout the years.
Happy playing!
Conclusion
Congratulations! You have successfully learned how to build your own natural play area. By following the steps outlined in this guide, you have created a space where children can connect with nature, engage in imaginative play, and reap the many benefits that come with spending time outdoors.
A natural play area offers numerous advantages for children’s physical, mental, and emotional development. It fosters creativity, promotes active play, and provides opportunities for sensory exploration. The use of natural materials and elements stimulates the senses, encourages problem-solving, and nurtures a love for the environment.
Throughout the process, you have learned how to choose the perfect location, plan the design, prepare the ground, select natural materials, create engaging play features, incorporate water elements, provide seating and shade, address safety considerations, and establish a maintenance routine.
Remember, safety should always be a priority. Regularly inspect and maintain the play area to ensure that it remains safe and free from hazards. Keep in mind the ages and abilities of the children using the play area and design accordingly.
A natural play area is a dynamic and evolving space. As children grow and their interests change, be open to making modifications and improvements to accommodate their needs. Engage the community in the maintenance and care of the play area, fostering a sense of ownership and pride.
Most importantly, relish in the joy and wonder that the natural play area brings to children’s lives. Watch as their curiosity is sparked, their creativity flourishes, and their love for the outdoors deepens. Allow this space to be a sanctuary where imaginations run wild and memories are made.
Thank you for joining us on this journey to build your own natural play area. Embrace the beauty of nature, the thrill of play, and the infinite possibilities that await in this enchanting haven.
Now, it’s time to let the children explore, play, and embark on countless adventures in their very own natural play area. Enjoy!
Frequently Asked Questions about How To Build Your Own Natural Play Area
Was this page helpful?
At Storables.com, we guarantee accurate and reliable information. Our content, validated by Expert Board Contributors, is crafted following stringent Editorial Policies. We're committed to providing you with well-researched, expert-backed insights for all your informational needs.


0 thoughts on “How To Build Your Own Natural Play Area”