Home>Garden Essentials>When To Plant Pea Seeds
Garden Essentials
When To Plant Pea Seeds
Modified: March 15, 2024
Learn when to plant pea seeds in your garden for a successful harvest. Discover the ideal timing and techniques for optimal growth in just a few simple steps.
(Many of the links in this article redirect to a specific reviewed product. Your purchase of these products through affiliate links helps to generate commission for Storables.com, at no extra cost. Learn more)
Introduction
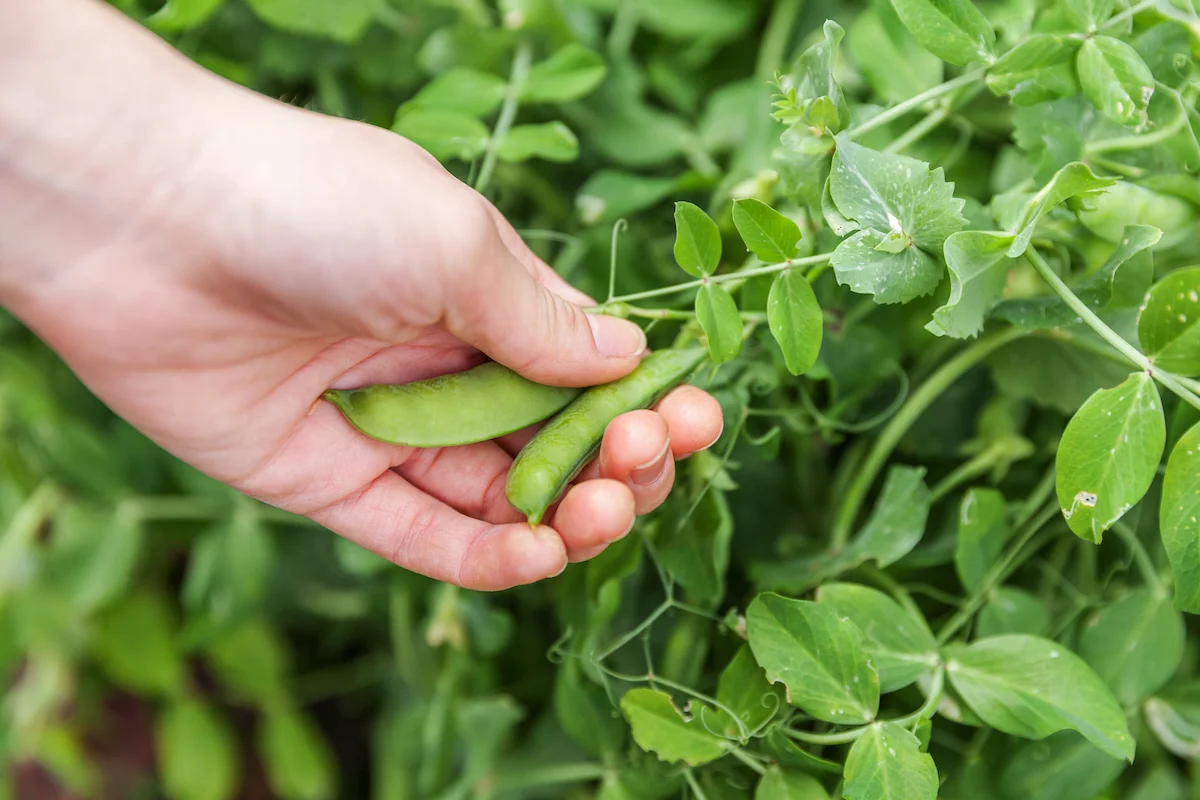
Welcome to the wonderful world of gardening! If you’re looking to add delicious and nutritious peas to your garden, you’re in for a treat. Peas are not only a versatile vegetable but also a delight to grow. Whether you’re a seasoned gardener or a newbie, planting pea seeds can be a rewarding experience that results in a bountiful harvest.
In this article, we will guide you on when to plant pea seeds, considering various factors like climate, soil conditions, timing, and different planting methods. By the end, you’ll have all the information you need to successfully grow peas in your garden.
Before we dive into the details, it’s important to understand the factors that influence the growth and development of pea plants. By considering these factors, you can ensure optimal conditions for your pea seeds to germinate and thrive.
Key Takeaways:
- Plant peas in cool weather, well-draining soil, and with 6 hours of sunlight. Choose direct seeding or transplanting methods for a bountiful harvest.
- Care for pea plants with proper watering, fertilization, and pest control. Harvest plump pods at the right time for delicious homegrown peas.
Read more: When To Plant Sweet Pea Seeds
Factors to Consider
When it comes to planting pea seeds, there are several factors that you need to take into consideration. These factors include:
- Climate and Temperature Requirements: Peas are cool-weather crops that prefer temperatures between 55°F and 75°F (13°C to 24°C). They thrive in spring and fall seasons when the temperature is not excessively hot or cold.
- Soil Conditions: Peas grow best in well-draining soil with a pH level of 6.0 to 7.5. The soil should be rich in organic matter and loose, allowing for proper root development.
- Timing and Season: Timing is crucial when planting pea seeds. Depending on your location, you may need to plant peas in early spring for a spring harvest or in late summer for a fall harvest. Consult your local agricultural extension office or gardening resources for specific planting dates in your area.
- Methods of Planting Pea Seeds: There are two main methods of planting pea seeds: direct seeding and transplanting seedlings. Direct seeding involves sowing the seeds directly into the garden bed, while transplanting involves starting the seeds indoors and later transplanting the seedlings into the garden.
By understanding and considering these factors, you can ensure that your pea plants have the best possible chance of success. Now, let’s delve into the specifics of each factor to help you plan your pea planting journey.
Climate and Temperature Requirements
Peas are cool-weather crops that thrive in moderate temperatures. They prefer temperatures between 55°F and 75°F (13°C to 24°C). These legumes love the spring and fall seasons when the weather is not excessively hot or cold.
It’s important to note that peas do not tolerate high temperatures well. If the temperature consistently exceeds 75°F (24°C), the plants may experience heat stress, resulting in poor growth and reduced yields.
When considering the climate for planting pea seeds, it is essential to take into account your location and the seasonal variations in temperature. In cooler regions, peas can be planted early in spring, as soon as the soil is workable. However, in warmer regions, it may be better to wait until the temperatures cool down in the fall for optimal pea growth.
In addition to temperature, peas require a certain amount of sunlight to grow and produce a good harvest. They need at least 6 hours of direct sunlight each day. If you live in a region with shorter daylight hours, make sure to choose a sunny spot in your garden to maximize sunlight exposure for your pea plants.
By considering the climate and temperature requirements, you can choose the most suitable time of year to plant your pea seeds and ensure that they have the right conditions to thrive.
Soil Conditions
The right soil conditions are crucial for the successful growth of pea plants. Peas prefer well-draining soil that is rich in organic matter and has a pH level between 6.0 and 7.5.
Before planting your pea seeds, prepare the soil by removing any weeds, rocks, or debris. Loosen the soil using a garden fork or tiller, breaking up any large clumps. This will provide a loose and friable soil structure, allowing the roots to penetrate easily and ensuring proper drainage.
Adding organic matter, such as compost or well-rotted manure, to the soil is beneficial for pea plants. Organic matter improves soil fertility, enhances water retention, and promotes beneficial microbial activity in the soil. Spread a layer of compost or manure over the garden bed and incorporate it into the top few inches of soil.
It’s important to avoid over-watering the soil, as excessive moisture can lead to root rot and other problems. Peas prefer soil that is evenly moist but not waterlogged. Monitor the soil moisture regularly and water the plants when the top inch of soil feels dry.
It’s also important to ensure proper drainage to prevent waterlogging. If you have heavy clay soil, consider adding some coarse sand or perlite to improve the drainage. This will help prevent water from pooling around the roots and causing damage.
By providing your pea plants with well-draining soil rich in organic matter, you create an ideal environment for their root development and overall growth. This will contribute to healthy and productive pea plants in your garden.
Timing and Season
The timing and season of planting pea seeds play a crucial role in their growth and development. The specific planting dates will vary depending on your location and climate.
In general, peas are cool-season crops that prefer to be planted in early spring or late summer/early fall. They thrive in temperatures between 55°F and 75°F (13°C to 24°C) and can tolerate cooler temperatures.
For an early spring planting, you can sow pea seeds as soon as the soil is workable. This is typically around 4 to 6 weeks before the last expected frost date. Planting early allows the peas to establish and produce a harvest before the arrival of hot summer temperatures.
If you miss the opportunity for an early spring planting, you can also plant peas in late summer for a fall harvest. This is especially beneficial in regions with hot summers, as fall-planted peas can avoid the scorching heat.
Before planting, make sure the soil is at the right temperature for optimal germination. Peas prefer soil temperatures between 45°F and 65°F (7°C to 18°C). If the soil is too cold, the seeds may rot before germinating. Use a soil thermometer to gauge the temperature and ensure it falls within the suitable range.
It’s important to keep in mind that peas have a limited growing season. They are typically ready for harvest within 55 to 70 days after planting, depending on the variety. Consider the length of your growing season when planning the timing of your pea planting to ensure you have adequate time for the plants to mature and produce a harvest.
Consult resources specific to your region, such as agricultural extension offices or local gardening guides, to determine the ideal planting dates for peas in your area. These resources consider local climate data and historical frost dates to provide accurate planting recommendations.
By planting peas at the appropriate time and season, you give them the best chance to thrive and produce a flavorful and abundant harvest.
Read more: When To Plant Sweet Peas Seeds
Methods of Planting Pea Seeds
There are two main methods of planting pea seeds: direct seeding and transplanting seedlings. Each method has its advantages and considerations, so you can choose the one that works best for your gardening needs.
Direct Seeding
Direct seeding is the most common and straightforward method for planting pea seeds. It involves sowing the seeds directly into your garden bed or container where they will grow.
Here’s how to plant peas using the direct seeding method:
- Prepare the soil by removing weeds and loosening it with a garden fork or tiller.
- Make trenches or furrows in the soil, about 1 to 2 inches (2.5 to 5 cm) deep and 2 to 3 inches (5 to 7.5 cm) apart.
- Place the pea seeds in the trench, spacing them about 2 inches (5 cm) apart.
- Cover the seeds with soil, gently pressing it down to ensure good seed-to-soil contact.
- Water the soil thoroughly but gently, keeping it evenly moist throughout the germination and growing process.
Direct seeding is a popular choice because it eliminates the need for transplanting and allows the pea seeds to develop their roots directly in their final growing location.
Transplanting Seedlings
Transplanting pea seedlings is an alternative method suitable for gardeners who want an early start or have limited space. It involves starting the pea seeds indoors in seed trays or pots and later transplanting the seedlings into the garden once they have grown.
Here’s how to transplant pea seedlings:
- Start the pea seeds indoors 4 to 6 weeks before the last expected frost date. Plant them in seed trays or pots filled with seed-starting or potting mix.
- Keep the seedlings in a warm and well-lit location, ensuring they receive at least 6 hours of direct sunlight or supplemental grow lights.
- Once the seedlings have developed a few sets of true leaves and the danger of frost has passed, it’s time to transplant them into the garden.
- Prepare the garden bed by loosening the soil and incorporating organic matter.
- Dig a hole large enough to accommodate the root ball of each seedling. Space the holes according to the recommended spacing for the variety you are growing.
- Carefully remove the seedlings from their containers, gently loosen the roots, and place them in the prepared holes.
- Backfill the holes with soil, firming it gently around the base of the plants.
- Water the newly transplanted seedlings thoroughly to help them establish in their new environment.
Transplanting seedlings allows for an early start to the growing season and can help protect young seedlings from pests and adverse weather conditions. However, it requires extra care and attention to ensure successful transplantation and establishment in the garden.
Both direct seeding and transplanting are effective methods for planting pea seeds. Choose the one that suits your gardening style and resources best, and enjoy the process of watching your pea plants grow and flourish.
Direct Seeding
Direct seeding is a common and straightforward method for planting pea seeds. It involves sowing the seeds directly into your garden bed or container where they will grow and develop. This method eliminates the need for transplanting seedlings and allows the pea seeds to establish their roots directly in their final growing location.
Follow these steps to successfully direct seed your pea seeds:
- Prepare the soil: Begin by preparing the soil in your garden bed or container. Remove any weeds and loosen the soil using a garden fork or tiller. This will create a loose and friable soil structure, allowing for proper root development and drainage.
- Create furrows or trenches: Use a garden hoe or your fingers to create furrows or trenches in the soil. The furrows should be about 1 to 2 inches (2.5 to 5 cm) deep and spaced 2 to 3 inches (5 to 7.5 cm) apart. These furrows will serve as the planting rows for your pea seeds.
- Sow the seeds: Drop the pea seeds into the furrows, spacing them approximately 2 inches (5 cm) apart. You can adjust the spacing depending on the specific variety of peas you are planting. It’s always better to slightly overestimate the spacing to allow room for the plants to grow and spread.
- Cover the seeds: Once the seeds are in place, cover them with soil, gently pressing it down to ensure good seed-to-soil contact. This will help with successful germination and root development.
- Water thoroughly: After planting, water the soil thoroughly but gently. This will help settle the soil and provide the moisture needed for germination. Keep the soil consistently moist (but not waterlogged) throughout the germination and growing period.
Direct seeding is a popular method for planting peas because it is simple and requires minimal effort. It allows the seeds to be sown directly in their final growing location, reducing the risk of transplant shock and providing an optimal environment for root establishment.
One key advantage of direct seeding is that it allows the peas to develop their roots in the same environment where they will eventually grow, helping them adapt better to the surrounding soil conditions and microclimate.
Keep in mind that peas are susceptible to certain pests, such as birds and rodents, who might be tempted to sample the newly sown seeds. To protect your seeds from being eaten, cover the planting area with a lightweight floating row cover or use other preventive measures if necessary.
With direct seeding, you can observe the entire lifecycle of your pea plants, from seed to harvest, without the need for transplanting. Enjoy the process and watch as your pea seeds transform into healthy and fruitful plants.
Read more: When To Plant Butterfly Pea Seeds
Transplanting Seedlings
Transplanting seedlings is an alternative method for planting pea seeds that allows for an early start to the growing season or when space is limited. This method involves starting the pea seeds indoors in seed trays or pots and later transplanting the seedlings into the garden once they have grown.
Here’s a step-by-step guide on how to successfully transplant pea seedlings:
- Start seeds indoors: Begin by starting your pea seeds indoors, typically 4 to 6 weeks before the last expected frost date. Fill seed trays or pots with seed-starting or potting mix, and plant one or two seeds per container, about 1 inch (2.5 cm) deep.
- Create optimal growing conditions: Place the seed trays or pots in a warm and well-lit location, such as near a sunny window or under grow lights. Peas require at least 6 hours of direct sunlight each day to grow strong and healthy seedlings.
- Maintain proper care: Keep an eye on the moisture level of the soil and ensure it remains evenly moist. Avoid overwatering, as excessive moisture can lead to damping-off disease. It is also important to provide adequate air circulation to prevent fungal growth.
- Harden off the seedlings: About a week before transplanting, start hardening off the seedlings. This involves gradually exposing them to outdoor conditions, such as placing them outside for a few hours each day. Gradually increase the duration and intensity of exposure to acclimate the seedlings to the outdoor environment.
- Prepare the garden bed: Before transplanting, prepare the garden bed by loosening the soil and incorporating organic matter. This will improve soil fertility and provide a conducive environment for the young seedlings to establish.
- Transplant the seedlings: Dig holes in the garden bed that are large enough to accommodate the root ball of each seedling. Space the holes according to the recommended spacing for the specific variety of peas you are growing. Carefully remove the seedlings from their containers, gently loosen the roots, and place the seedlings in the prepared holes.
- Backfill and water: Backfill the holes with soil, ensuring that the seedlings are at the same depth they were in the containers. Gently firm the soil around the base of the plants. Water the newly transplanted seedlings thoroughly to help settle the soil and encourage root establishment.
Transplanting seedlings allows for an earlier start to the growing season, providing a head start compared to direct seeding. It also gives you more control over the growing conditions, allowing you to protect the seedlings from adverse weather or pest damage.
It is important to note that pea seedlings can be sensitive to transplant shock, so it’s crucial to handle them with care during the transplantation process. Avoid disturbing the roots as much as possible and ensure they are well-watered before and after transplantation to minimize stress.
By following these steps for transplanting pea seedlings, you can cultivate strong and vigorous plants that will continue to grow and flourish in your garden, eventually rewarding you with a plentiful pea harvest.
Care and Maintenance
Proper care and maintenance are essential for the healthy growth and productivity of your pea plants. By providing them with the necessary attention, you can maximize their potential and ensure a successful harvest. Here are some important factors to consider:
Watering:
Peas require consistent moisture to thrive, especially during the flowering and pod development stages. Keep the soil evenly moist but avoid overwatering, as waterlogged soil can lead to root rot. Monitor the soil moisture regularly and water deeply when the top inch of soil feels dry. Applying mulch around the base of the plants can help retain moisture and suppress weed growth.
Fertilization:
Peas are generally light feeders and often do not require heavy fertilization. However, incorporating well-decomposed compost or organic matter into the soil before planting provides a good nutritional base. If your soil is lacking in nutrients, you can apply a balanced organic fertilizer during planting or in mid-season. Avoid using excessive nitrogen-rich fertilizers, as this can result in lush foliage but low pod production.
Read more: How To Plant Sweet Peas From Seeds
Weed Control:
Keep the garden bed free from weeds, as they compete for nutrients and water with your pea plants. Regularly inspect the area and remove any weeds by hand or using appropriate tools. Be careful not to disturb the pea plant roots while weeding.
Support:
Pea plants are climbers and require support to keep them upright and prevent the vines from trailing on the ground. Install trellises, stakes, or a pea netting system in the garden bed to provide support. As the vines grow, gently guide and secure them along the support structure. This helps increase airflow, reduces the risk of disease, and makes it easier to harvest the pods.
Pest and Disease Control:
Monitor your pea plants regularly for any signs of pests or diseases. Common pests that may affect peas include aphids, caterpillars, and pea weevils. Consider using natural pest control methods such as handpicking, beneficial insects, or organic insecticides if necessary. Diseases like powdery mildew and root rot can occur in moist conditions. To minimize the risk, ensure proper air circulation and avoid overhead watering.
Harvesting:
Harvesting time varies depending on the variety of peas you’re growing. Generally, peas are ready to be harvested when the pods are plump and the peas inside have reached their desired size. Use your fingers to gently snap off the pods from the plant. Harvest regularly to encourage continuous pod production, as leaving mature pods on the plant can signal to the plant that it’s time to stop producing.
By providing ongoing care and addressing any issues promptly, you can help your pea plants stay healthy and productive throughout the growing season. Enjoy the process of nurturing your plants and be rewarded with a bountiful harvest of delicious and nutritious peas.
Read more: How Long To Soak Pea Seeds Before Planting
Watering
Proper watering is essential for the health and productivity of your pea plants. Peas require consistent moisture throughout their growing period, especially during flowering and pod development. By providing adequate water, you can help your pea plants grow vigorously and produce a bountiful harvest. Consider the following guidelines for watering your peas:
Monitor Soil Moisture:
Regularly monitor the moisture level of the soil to ensure that it remains evenly moist. Stick your finger into the soil up to the second knuckle to check the moisture level. If it feels dry at that depth, it’s time to water. Avoid letting the soil dry out completely, as this can lead to stress and negatively impact growth and pod production.
Frequency of Watering:
Watering frequency will depend on various factors like weather conditions, soil type, and stage of plant growth. In general, peas require about 1 inch (2.5 cm) of water per week. However, adjust the watering schedule based on the specific needs of your plants. During hot and dry periods, you may need to water more frequently to prevent wilting and maintain moisture levels.
Deep and Infrequent Watering:
When you water, provide deep and thorough irrigation to encourage healthy root development. Apply water directly to the soil around the base of the plants rather than overhead, as wet foliage can promote disease. Water deeply, allowing the water to penetrate the soil to a depth of at least 6 inches (15 cm). This encourages the roots to grow deeper and become more resilient to drought conditions.
Read more: When To Plant Daisy Seeds
Morning Watering:
Water your peas in the morning if possible. Morning watering allows the foliage to dry out during the day, reducing the risk of fungal diseases. Watering in the late afternoon or evening can lead to prolonged moisture on the leaves overnight, creating a favorable environment for diseases to develop.
Mulching:
Applying a layer of organic mulch around the base of the plants can help conserve moisture and regulate soil temperature. Mulch helps prevent evaporation of water from the soil, reduces weed growth, and maintains a more consistent level of moisture. Use materials such as straw, wood chips, or compost as mulch, ensuring not to pile it directly against the plant stems.
Adjust for Rainfall:
Take into account natural rainfall when determining the amount of supplemental watering needed. If there has been significant rainfall, you may need to reduce the frequency and duration of watering. On the other hand, during dry periods, you may need to provide additional irrigation to make up for the lack of rain.
Remember that overwatering can be just as harmful as underwatering. Peas prefer moist but not waterlogged soil. Excessive moisture can lead to root rot, fungal diseases, and poor plant growth. It’s important to strike a balance and provide the right amount of water for your pea plants.
By monitoring soil moisture, adjusting watering frequency based on plant needs, and providing deep and thorough irrigation, you can ensure that your peas have the optimal conditions for growth. Proper watering will contribute to healthy plants, abundant pods, and a successful pea harvest.
Fertilization
Proper fertilization is crucial for the healthy growth and productivity of your pea plants. While peas are generally light feeders, providing the right nutrients can help them thrive and produce a bountiful harvest. Here are some guidelines to consider when it comes to fertilizing your pea plants:
Read more: When To Plant Gaillardia Seeds
Soil Testing:
Before fertilizing, it’s a good idea to test your soil to determine its nutrient levels and pH. A soil test will provide valuable information about the specific needs of your plants and help you adjust your fertilization approach accordingly. Contact your local agricultural extension office or a reputable soil testing laboratory for assistance.
Organic Matter:
Incorporating organic matter into the soil before planting peas provides a good nutritional foundation. Well-decomposed compost, aged manure, or other organic amendments are excellent choices. Organic matter improves soil structure, enhances water retention, and gradually releases nutrients to the roots of the plants.
Balanced Fertilizer:
If your soil test indicates nutrient deficiencies or you are growing peas in containers or nutrient-poor soil, applying a balanced fertilizer can be beneficial. Look for a fertilizer labeled NPK, which denotes the three primary macronutrients: nitrogen (N), phosphorus (P), and potassium (K). Opt for a balanced ratio, such as 10-10-10 or 14-14-14.
Timing of Fertilization:
Peas have modest fertilizer requirements compared to other plants. The best time to apply fertilizer is before planting or during the early stages of growth. Avoid applying excessive amounts of fertilizer later in the season, as this can result in lush foliage growth but minimal pod production. Overfertilization with nitrogen can lead to vigorous vegetative growth at the expense of flower and pod development.
Read more: When To Plant Seeds For Garden
Application Method:
When applying fertilizer, follow the instructions on the package and apply it evenly around the base of the plants. Avoid directly placing fertilizer in contact with the stems or leaves, as this can burn the plants. After application, water the area thoroughly to help the nutrients penetrate the soil and reach the plant roots.
Organic Alternatives:
If you prefer organic gardening methods, there are several natural fertilizers you can use to nourish your pea plants. Examples include compost tea, fish emulsion, bone meal, or seaweed extract. These organic alternatives provide a slow release of nutrients and contribute to overall soil health.
Mulching with Organic Matter:
Using organic mulch, such as straw, around the base of the plants can help retain moisture, regulate soil temperature, and gradually release nutrients as it breaks down. Mulching also suppresses weed growth, reducing competition for nutrients and water.
Remember, it’s essential to strike a balance when fertilizing your pea plants. Applying too much fertilizer can lead to excessive foliage growth or nutrient imbalances, while too little can result in stunted growth and nutrient deficiencies. Regularly monitor your plants for signs of nutrient deficiencies or excesses and adjust your fertilization practices accordingly.
By providing the right nutrients through organic matter incorporation, balanced fertilizers, or organic alternatives, you can support the healthy and vigorous growth of your pea plants and enjoy a successful harvest of delicious peas.
Pest and Disease Control
Pests and diseases can pose a threat to the health and productivity of your pea plants. Implementing pest and disease control measures is important to prevent damage and ensure a successful harvest. Here are some helpful guidelines for managing pests and diseases in your pea garden:
Read more: When To Plant Yarrow Seeds
Pest Prevention:
Prevention is the first line of defense against pests. Start by practicing good garden hygiene and keeping the area clean. Remove plant debris, fallen leaves, and weeds regularly, as they can harbor pests that feed on pea plants.
Monitoring:
Regularly inspect your pea plants for signs of pests or damage. Check the leaves, stems, and pods for any evidence of chewing, holes, discoloration, or wilting. Early detection allows for prompt action and better pest control.
Handpicking:
If you notice pests such as aphids, caterpillars, or pea weevils on your plants, manually remove them by handpicking. Wearing gloves, pick off the pests and drop them into a bucket of soapy water or use a vacuum cleaner to suck them up. This can help reduce pest populations without the need for chemical intervention.
Beneficial Insects:
Attracting beneficial insects to your garden can help control pest populations naturally. Ladybugs, lacewings, and parasitic wasps are examples of beneficial insects that prey on pests like aphids and caterpillars. Planting flowers such as marigolds, alyssum, and dill can help attract these beneficial insects.
Read more: When To Plant Elderberry Seeds
Organic Pest Control:
If pest populations become problematic, consider using organic pest control methods. These can include insecticidal soaps or oils that target specific pests, such as aphids or caterpillars. Ensure the chosen organic pesticide is safe for use on edible crops and follow the instructions carefully.
Fungal Disease Prevention:
To prevent fungal diseases, provide adequate air circulation around your pea plants. Avoid overcrowding and ensure proper spacing between plants. This allows for better airflow, reducing the likelihood of fungal spores settling on the foliage.
Water Management:
Avoid overhead watering, as wet foliage can create a favorable environment for fungal diseases such as powdery mildew. Water the soil directly at the base of the plants, aiming to keep the foliage as dry as possible. Watering in the morning or early afternoon allows time for the foliage to dry before cooler evening temperatures.
Sanitation:
Practice good garden sanitation by removing any infected plant material promptly. This includes removing and disposing of any plants showing signs of disease, as well as fallen leaves or debris that may harbor pathogens. Disinfect your gardening tools and containers regularly to prevent the spread of diseases.
Read more: When To Plant Bermuda Seeds
Cultural Practices:
Adopting healthy cultural practices can help prevent diseases. Choose disease-resistant pea varieties suited to your region. Rotate your crops each year to minimize the risk of soilborne diseases. Improving soil drainage, using proper irrigation techniques, and avoiding excess nitrogen fertilization contribute to stronger plant health.
By implementing these pest and disease control strategies, you can minimize pest damage and keep your pea plants healthy throughout the growing season. Prompt action and ongoing vigilance can help ensure a successful and enjoyable pea harvest.
Harvesting Pea Pods
Harvesting your pea pods at the right time is essential to enjoy the best flavor and texture of your freshly grown peas. Peas are typically ready for harvest when the pods are plump, filled with mature peas inside. Here are some guidelines to help you determine when and how to harvest your pea pods:
Pod Appearance:
Monitor your pea pods regularly as they start to mature. Look for pods that have reached their full size and are well-filled with peas. The pods should be firm to the touch and have a vibrant green color. Avoid harvesting pods that are discolored, yellowing, or shriveled, as those are likely past their prime.
Timing:
Timing is crucial when it comes to harvesting peas. Most peas are ready for harvest between 55 to 70 days after planting, but this can vary depending on the variety. Refer to the seed packet or the specific instructions for the pea variety you are growing. Keep in mind that sugar snap and snow peas are usually harvested at a younger stage, while shelling peas are left to mature longer.
Read more: When To Plant Celosia Seeds
Testing the Pods:
To determine if the peas inside the pods are mature and ready for harvest, gently squeeze the pods between your fingers. If they feel plump and the peas inside are round and firm, they are likely ready to be picked. If the peas inside the pod feel very soft, they may have started to shrivel or overmatured.
Harvesting Method:
To harvest pea pods, hold the stem of the plant with one hand and use the other hand to snap or cut the pods off. Snap off the pods individually or use garden shears or scissors for a cleaner cut. Avoid pulling or yanking on the pods, as this can damage the plant or pull it out of the ground.
Continual Harvest:
Pea plants produce pods over a certain period, so harvesting should be done regularly to encourage continuous pod production. Harvest every few days as the pods reach maturity to ensure that you pick them at their peak. Leaving mature pods on the plant for too long can signal to the plant that it’s time to stop producing new pods.
Storage and Use:
Freshly harvested peas are best consumed immediately for maximum flavor and sweetness. If you have more peas than you can use right away, store them in the refrigerator in a breathable plastic bag or container. Properly stored peas can stay fresh for several days. For long-term storage, consider blanching and freezing the peas to preserve their quality.
Read more: When To Plant Datura Seeds
Enjoy the Fruits of Your Labor:
Harvesting your own pea pods is a rewarding experience. The flavor and sweetness of freshly picked peas are unbeatable. Enjoy them as a snack, add them to salads, stir-fries, or pasta dishes, or steam and serve them as a delicious side dish. Get creative and savor the taste of your homegrown peas!
By harvesting your pea pods at the right time and handling them with care, you can enjoy the full flavor and tenderness of these delightful garden treasures.
Conclusion
Growing peas in your garden can be a rewarding and delicious experience. By considering factors such as climate, soil conditions, timing, and different planting methods, you can optimize the conditions for your pea seeds to germinate and thrive. Whether you choose to directly sow the seeds or transplant seedlings, each method has its benefits and considerations.
Care and maintenance are crucial for the health and productivity of your pea plants. Proper watering, fertilization, and pest and disease control measures are essential to ensure optimal growth. Regular monitoring and taking timely action will help you address any issues that may arise during the growing season.
Harvesting your pea pods at the right time is key to enjoying the best flavor and texture. Monitoring pod appearance, testing for maturity, and using proper harvesting methods will ensure that you savor the taste of freshly picked peas straight from your garden.
Remember to continuously care for your pea plants and enjoy the fruits of your labor. Freshly grown peas are a delightful addition to meals and can be enjoyed in a variety of dishes. Whether you eat them raw, add them to salads, stir-fries, or steam them as a side dish, the possibilities are endless.
So go ahead and embark on your pea-growing journey! With the guidance provided in this article, you have the knowledge and tools to successfully plant, grow, and harvest your peas. Experience the joy of gardening and the satisfaction of enjoying the delicious rewards of your efforts.
Frequently Asked Questions about When To Plant Pea Seeds
Was this page helpful?
At Storables.com, we guarantee accurate and reliable information. Our content, validated by Expert Board Contributors, is crafted following stringent Editorial Policies. We're committed to providing you with well-researched, expert-backed insights for all your informational needs.


0 thoughts on “When To Plant Pea Seeds”