Home>Gardening & Outdoor>Landscaping Ideas>How To Tear Up Grass
Landscaping Ideas
How To Tear Up Grass
Modified: August 27, 2024
Learn effective landscaping ideas and techniques for tearing up grass. Discover step-by-step guides and expert tips for your lawn renovation project.
(Many of the links in this article redirect to a specific reviewed product. Your purchase of these products through affiliate links helps to generate commission for Storables.com, at no extra cost. Learn more)
Introduction
Are you looking to revamp your outdoor space and give it a fresh new look? One of the first steps in transforming your landscape may involve tearing up existing grass to make way for a new design. Whether you're planning to install a vibrant garden, create a spacious patio, or lay down a lush lawn, knowing how to properly remove grass is essential.
Tearing up grass can be a physically demanding task, but with the right techniques and tools, you can make the process more manageable and efficient. In this comprehensive guide, we'll explore the step-by-step process of tearing up grass, from preparing the area to disposing of the removed turf. By the end, you'll have the knowledge and confidence to tackle this project and set the stage for your landscaping vision.
So, roll up your sleeves, put on your gardening gloves, and let's delve into the art of tearing up grass to pave the way for your outdoor oasis.
Key Takeaways:
- Properly preparing the area and using the right tools, like a sod cutter and shovel, are essential for efficiently tearing up grass and setting the stage for your landscaping vision.
- After removing the grass, consider composting, green waste collection, or reusing it in garden beds for responsible and environmentally friendly disposal, contributing to sustainable waste management.
Tools and Materials Needed
Before embarking on the task of tearing up grass, it’s essential to gather the necessary tools and materials. Having the right equipment at your disposal can streamline the process and ensure that the job is carried out effectively. Here’s a comprehensive list of the tools and materials you’ll need:
- Sod Cutter: A sod cutter is a powerful tool designed to slice through the grass and roots, making it easier to lift and remove sections of turf.
- Shovel: A sturdy shovel is indispensable for digging and lifting the grass, particularly in areas where the sod cutter may not reach.
- Wheelbarrow: A wheelbarrow will come in handy for transporting the removed grass and soil to a designated disposal area.
- Work Gloves: Protect your hands with a reliable pair of work gloves to shield them from blisters, cuts, and abrasions.
- Protective Eyewear: Safety goggles or glasses are essential for safeguarding your eyes from debris and dirt during the grass removal process.
- Watering Can or Hose: Before tearing up the grass, thoroughly water the area to soften the soil and make it easier to cut and remove the turf.
- Marking Flags or Spray Paint: Use marking flags or spray paint to outline the areas where the grass will be removed, providing a clear guide for the task at hand.
- Compost or Disposal Bags: Depending on your plans for the removed grass, you may need compost bins or heavy-duty disposal bags for proper disposal or recycling.
By ensuring that you have these tools and materials at your disposal, you’ll be well-prepared to commence the process of tearing up the grass with confidence and efficiency.
Preparing the Area
Before diving into the task of removing the grass, it’s crucial to prepare the area to facilitate a smooth and effective process. Proper preparation can minimize potential obstacles and ensure that the grass removal is carried out with precision. Here are the essential steps to prepare the area for tearing up the grass:
- Mark the Boundaries: Use marking flags or spray paint to clearly outline the boundaries of the area where the grass will be removed. This will provide a visual guide and prevent unintentional removal of grass from adjacent areas.
- Water the Soil: Thoroughly water the targeted area a day or two before the scheduled grass removal. Moist soil is easier to work with and can make the grass and roots more pliable for removal.
- Clear Debris: Remove any debris, rocks, or large obstacles from the area to create a clear workspace. This will prevent potential damage to equipment and ensure a safer working environment.
- Inspect for Utilities: Before digging or using any machinery, it’s crucial to identify and mark the locations of underground utilities such as irrigation lines, electrical cables, or drainage systems. This step is essential for safety and to avoid any accidental damage.
- Check Soil Conditions: Assess the soil conditions to determine its composition and any potential obstacles such as compacted soil or rocks. Understanding the soil will help in planning the approach for grass removal.
By meticulously preparing the area before tearing up the grass, you’ll set the stage for a more efficient and organized process. Taking the time to complete these preparatory steps can contribute to a successful grass removal endeavor and pave the way for the next phase of your landscaping project.
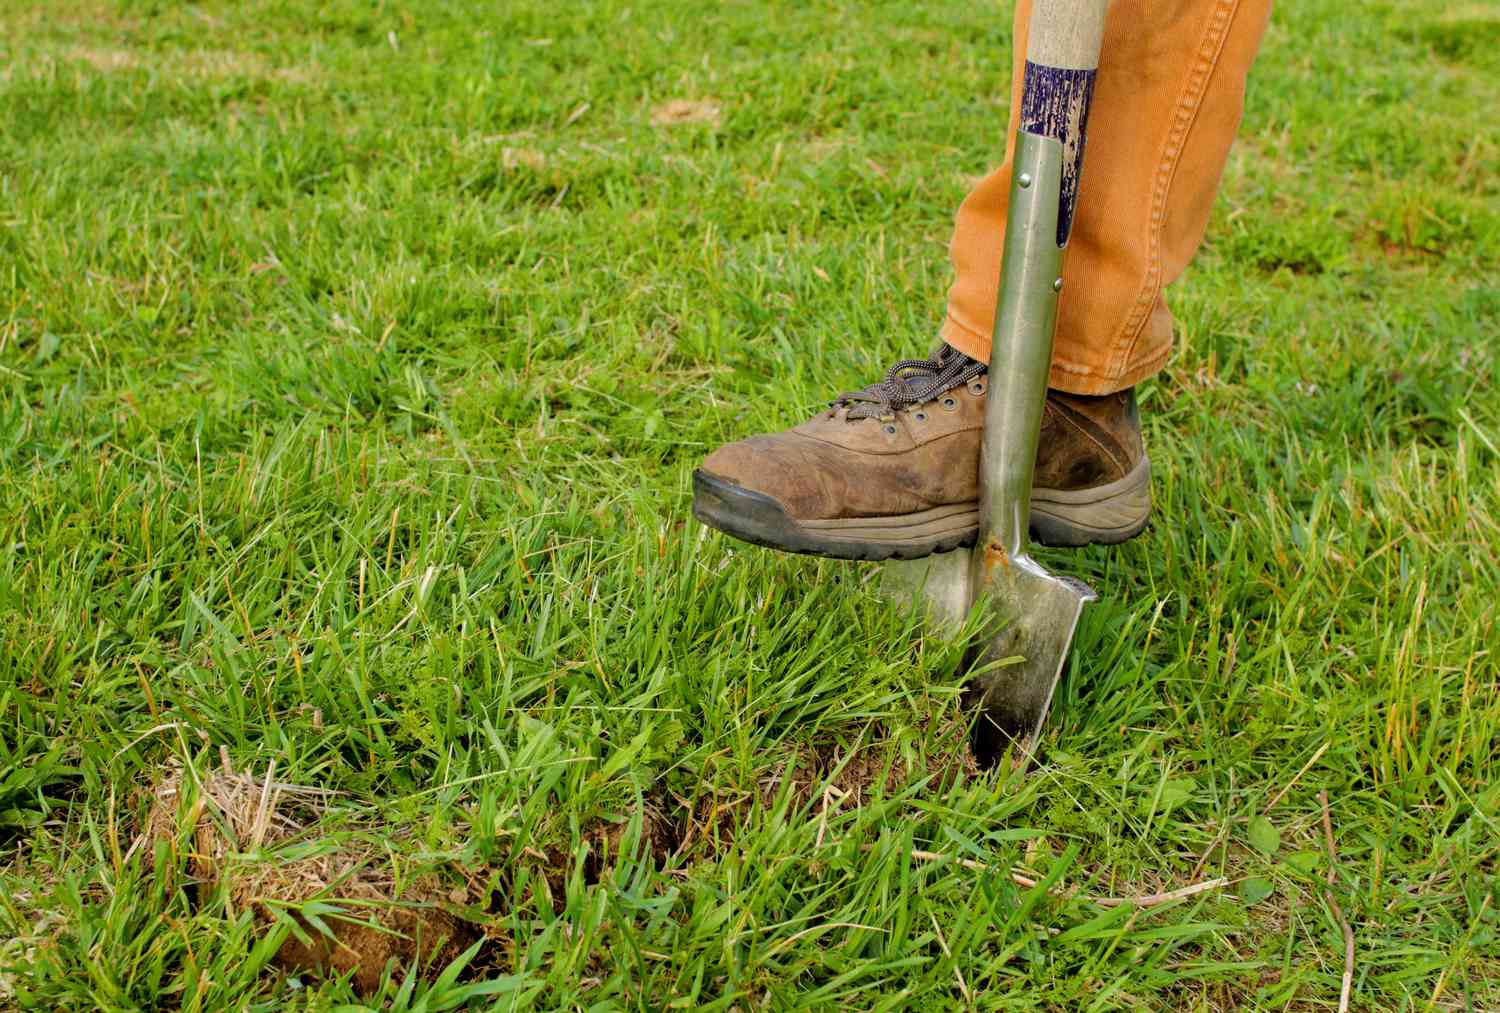
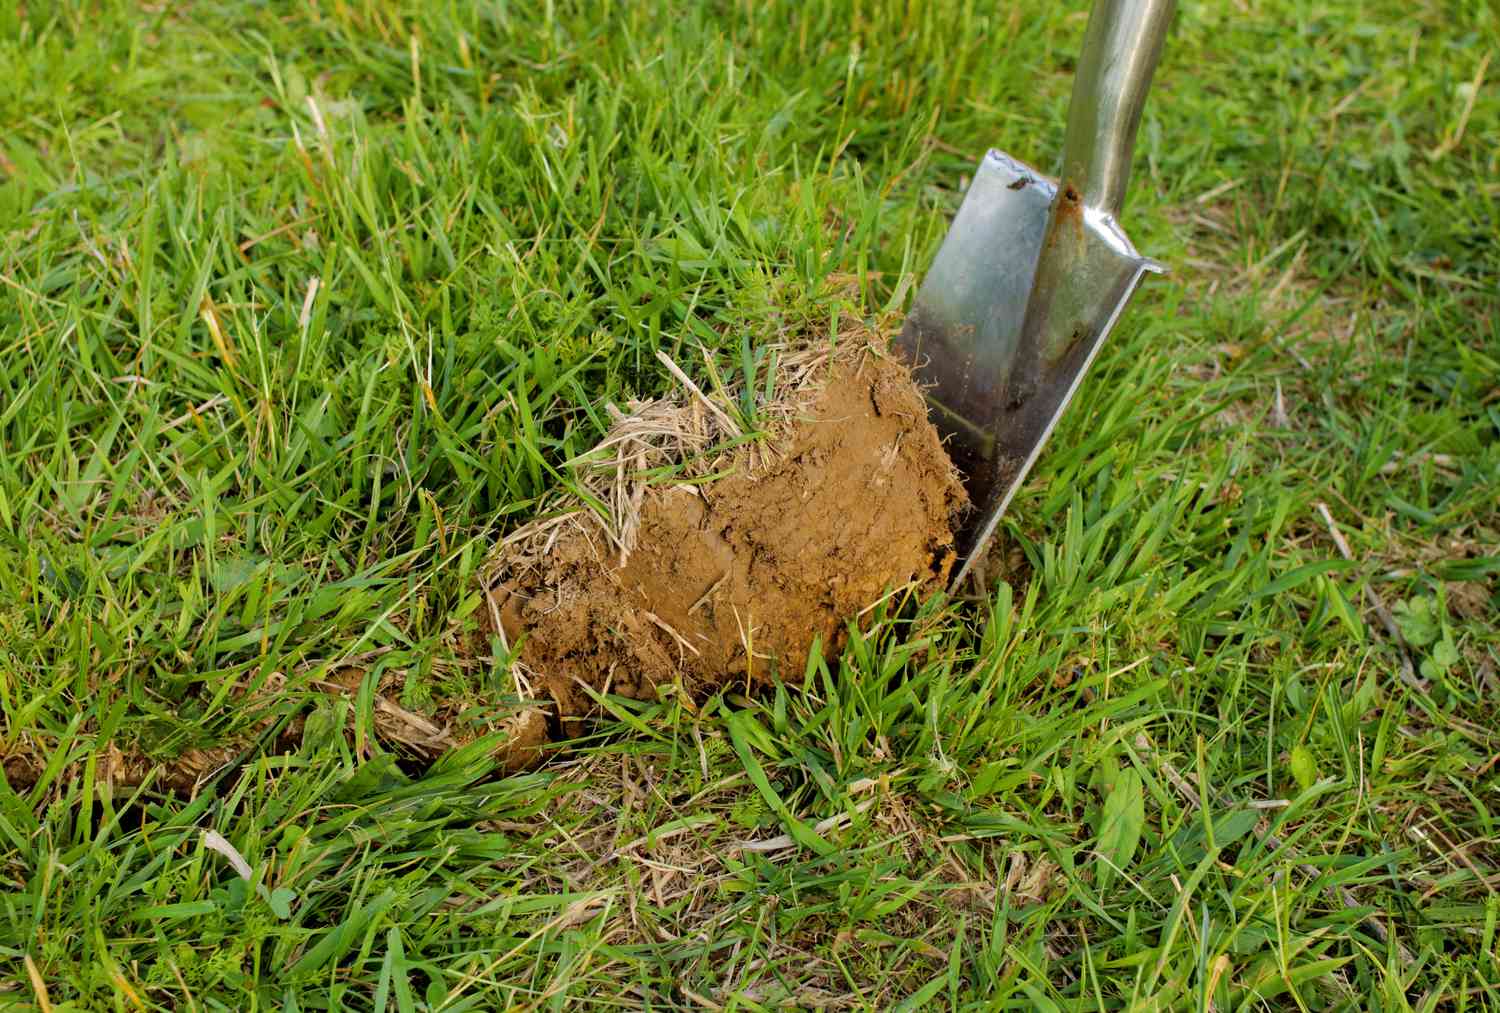
When tearing up grass, use a shovel or a garden fork to loosen the soil around the grass. Then, grab the grass clumps and pull them up, making sure to remove as much of the roots as possible to prevent regrowth.
Removing the Grass
With the area prepared and the necessary tools at the ready, it’s time to embark on the process of removing the grass. This step requires a combination of precision, physical effort, and attention to detail to ensure that the grass is lifted and cleared effectively. Here’s a step-by-step guide on how to remove the grass:
- Using a Sod Cutter: Start by operating the sod cutter along the marked boundaries of the area where the grass is to be removed. The sod cutter will slice through the grass and roots, creating manageable sections for lifting.
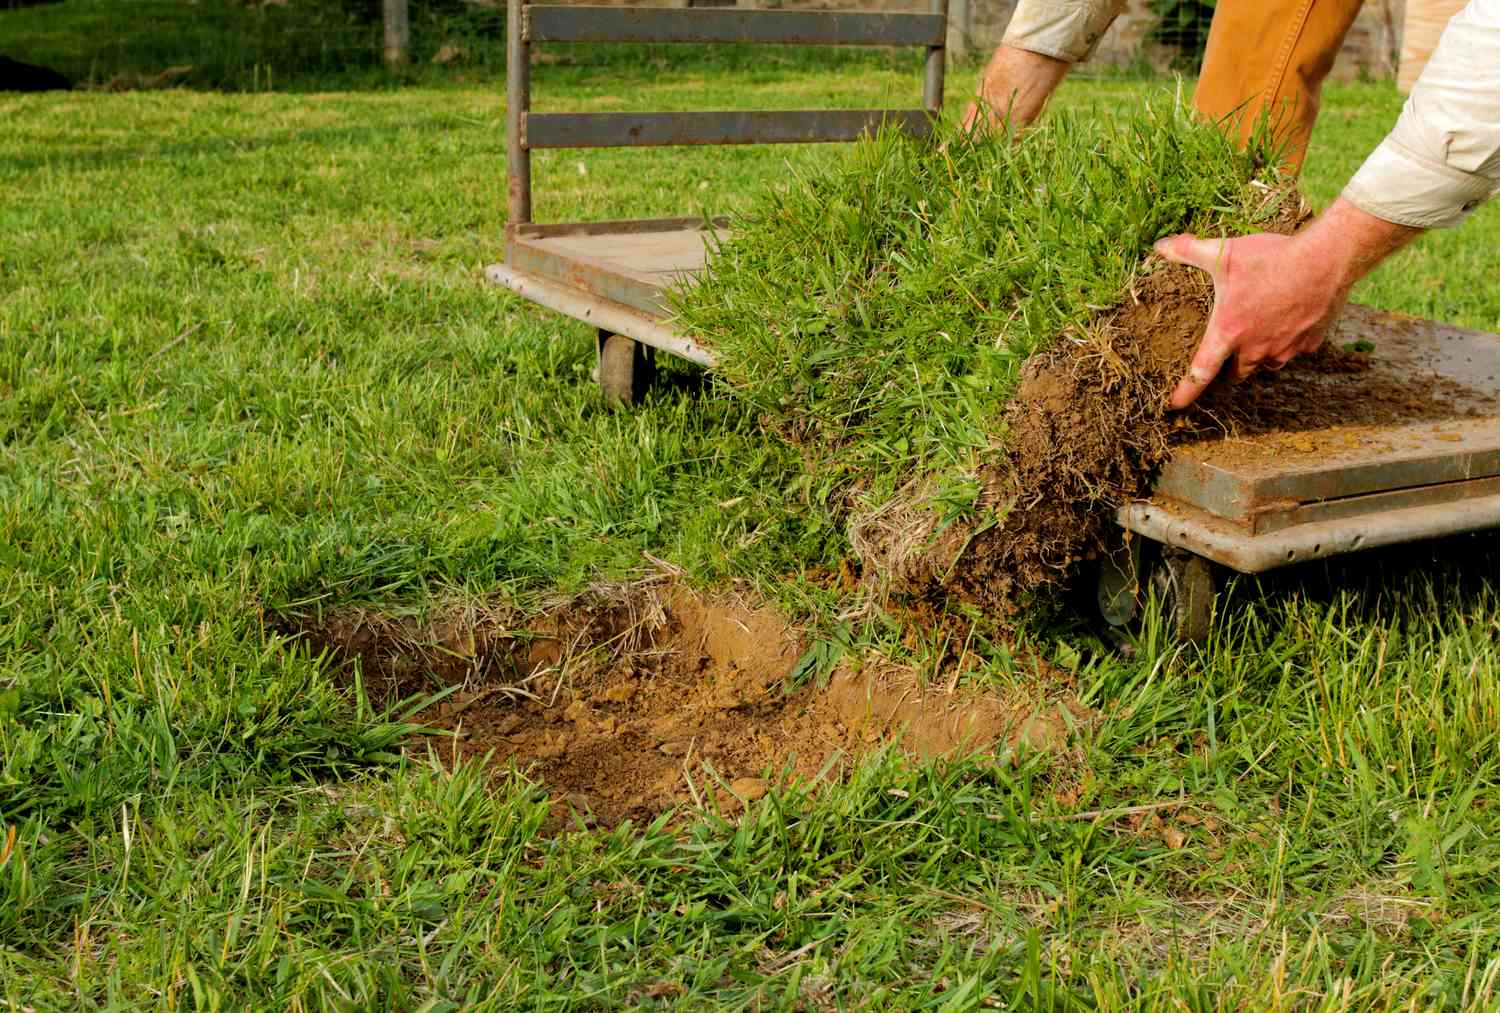
- Lifting the Turf: Once the sod cutter has delineated the sections, use a shovel to lift and separate the grass and soil. Work methodically across the designated area, lifting manageable portions of turf for removal.
- Inspecting and Clearing Roots: After lifting the grass, inspect the underlying soil for any remaining roots. Use a shovel or handheld root saw to clear any persistent roots and ensure a clean removal of the grass.
- Transporting the Removed Grass: Place the lifted grass and soil into a wheelbarrow, ensuring not to overload it for ease of transport. Move the wheelbarrow to the designated disposal area, compost bin, or collection point.
- Repeating the Process: Continue the process of using the sod cutter, lifting the turf, and clearing roots until the entire designated area has been cleared of grass.
It’s important to approach the task with patience and care, especially when using the sod cutter and lifting the grass, to ensure that the removal is thorough and the area is left in optimal condition for the next phase of your landscaping project.
Disposal of Grass
Once the grass has been successfully removed, the next crucial step is the proper disposal of the extracted turf. Whether you’re aiming to recycle the grass, create compost, or dispose of it responsibly, handling the removed grass with care and environmental consciousness is essential. Here’s a guide to the disposal of grass following its removal:
- Composting: If you’re environmentally inclined and have the capacity, consider composting the removed grass. Grass clippings can be an excellent addition to a compost pile, contributing valuable nutrients to the composting process.
- Green Waste Collection: Many municipalities offer green waste collection services, allowing you to dispose of the removed grass responsibly. Check with local waste management authorities for guidelines on green waste disposal and collection schedules.
- Landfill Disposal: In cases where composting or green waste collection is not feasible, landfill disposal may be the only option. Ensure that the removed grass is packaged securely in heavy-duty disposal bags and adhere to any local regulations for landfill disposal.
- Reuse in Garden Beds: If the removed grass is free from pesticides and herbicides, consider repurposing it as a natural mulch in garden beds. This can help retain soil moisture and suppress weed growth in your garden or landscape.
- Consulting Local Guidelines: Before disposing of the grass, be sure to consult local guidelines and regulations regarding green waste, composting, and landfill disposal. Adhering to these guidelines ensures responsible and environmentally friendly disposal practices.
By conscientiously considering the disposal options and selecting the most suitable method for the removed grass, you can contribute to sustainable waste management and environmental stewardship in your landscaping endeavors.
Read more: How To Get Rid Of Baby Tears Ground Cover
Conclusion
Congratulations on successfully completing the process of tearing up grass in preparation for your landscaping project! Tackling this task requires dedication, the right tools, and a methodical approach, and your efforts have set the stage for the transformation of your outdoor space.
By following the steps outlined in this guide, you’ve not only learned how to remove grass effectively but also gained valuable insights into the importance of proper preparation and responsible disposal. As you look ahead to the next phases of your landscaping endeavor, consider the possibilities that now lie before you. Whether you envision a vibrant garden, a serene patio, or a lush new lawn, the cleared space is ready to accommodate your creative vision.
Remember, the journey of landscaping is a blend of hard work, creativity, and a deep appreciation for the natural world. As you embark on the next stages of your project, infuse your personal touch and creativity, and take pride in the transformative process that you’ve undertaken. Your outdoor oasis awaits, and with each step, you’re one closer to bringing your vision to life.
So, take a moment to admire the cleared space, breathe in the fresh air, and envision the possibilities that await. Your landscaping journey is a reflection of your unique style and connection to nature, and the process of tearing up grass is just the beginning of an exciting and fulfilling adventure in outdoor beautification.
Embrace the journey, stay inspired, and revel in the progress you’ve made. Your outdoor sanctuary is on the horizon, and each step, including the meticulous task of tearing up grass, brings you closer to the landscape of your dreams.
Frequently Asked Questions about How To Tear Up Grass
Was this page helpful?
At Storables.com, we guarantee accurate and reliable information. Our content, validated by Expert Board Contributors, is crafted following stringent Editorial Policies. We're committed to providing you with well-researched, expert-backed insights for all your informational needs.


0 thoughts on “How To Tear Up Grass”