Home>Furniture>Outdoor Furniture>How To Light Up An Outdoor Patio
Outdoor Furniture
How To Light Up An Outdoor Patio
Modified: August 28, 2024
Discover the best ways to light up your outdoor patio with our helpful guide. Create an inviting atmosphere with outdoor furniture that enhances your evenings under the stars.
(Many of the links in this article redirect to a specific reviewed product. Your purchase of these products through affiliate links helps to generate commission for Storables.com, at no extra cost. Learn more)
Introduction
Welcome to the world of outdoor living! A well-designed outdoor patio can be a haven where you can relax, entertain guests, and enjoy beautiful weather. One crucial element that can completely transform the ambiance of your outdoor space is lighting. Proper lighting not only creates a welcoming and comfortable atmosphere but also enhances the functionality and safety of your patio.
In this article, we will guide you through the process of lighting up your outdoor patio, step by step. Whether you want to create a cozy retreat for intimate gatherings or a lively space for entertaining, we have got you covered.
Before we jump into the specifics of choosing the right lighting fixtures and installation, let’s take a moment to assess your outdoor patio. Consider the size, layout, and purpose of your patio. Is it a small, intimate space or a large area that accommodates a dining set, lounge chairs, and other outdoor furniture?
Understanding the unique characteristics of your patio space will help you determine proper lighting placement and choose the right type of lights. Additionally, consider the overall style and theme of your outdoor area. Are you aiming for a modern, sleek look or a more rustic and natural vibe?
Once you have assessed your outdoor patio, you can move on to selecting the lighting fixtures that best suit your needs and style. The right lighting fixtures will not only illuminate your outdoor space but also add a touch of elegance and sophistication.
Preparing your patio for lighting installation is an essential step to ensure a smooth and hassle-free process. This involves checking the electrical infrastructure, preparing any necessary wiring, and cleaning the space to provide a clear and safe working environment.
Next, we will dive into the installation process, starting with overhead lighting. Overhead lighting serves as the primary source of illumination and sets the overall mood for your patio. From pendant lights to string lights, we will discuss various options and provide guidance on installation techniques.
In addition to overhead lighting, decorative lighting can add a touch of charm and personality to your patio. We will explore different types of decorative lights, such as wall sconces, pathway lights, and accent lights, and discuss their placement and installation.
To enhance the ambiance and create a cozy atmosphere, we will also show you how to incorporate candles or lanterns into your patio lighting setup. These versatile additions can provide a warm and intimate glow, perfect for relaxed evenings or romantic gatherings.
Lastly, we will guide you through the essential step of testing and adjusting the lighting setup. It is crucial to ensure that the lights are functioning properly and positioned correctly for optimal lighting effect.
By the end of this article, you will have the knowledge and confidence to create a stunning and well-lit outdoor patio that will impress your guests and enhance your outdoor living experience. So, let’s get started on turning your patio into a captivating and inviting oasis!
Key Takeaways:
- Transform your outdoor patio into a captivating oasis by strategically choosing lighting fixtures that match your style and create the desired ambiance for relaxation or entertaining.
- Ensure a smooth and safe lighting installation process by assessing your patio’s unique characteristics, preparing the space, and testing and adjusting the lighting setup for optimal functionality and aesthetics.
Read more: How To Light Up An Outdoor Patio
Step 1: Assessing the Outdoor Patio
Before you embark on the journey of lighting up your outdoor patio, it is crucial to assess the space to determine the best lighting approach. This step will help you understand the size, layout, and purpose of your patio, which will guide you in making informed decisions about lighting placement and fixture selection.
Start by measuring the dimensions of your patio. Consider both the length and width, as well as any unique features such as pillars, columns, or architectural elements that could impact lighting installation. This information will help you determine how many lighting fixtures you will need and where they should be placed.
Next, consider the layout and function of your patio. Is it primarily used for dining, lounging, or hosting gatherings? Understanding how you plan to use the space will influence the type of lighting you choose. For example, if you have a dining area, you may want to focus on installing overhead lights directly above the table to provide ample illumination during meals.
Additionally, think about the atmosphere you want to create in your patio. Are you aiming for a vibrant and lively ambiance or a serene and calming space? This will help you determine the intensity and color temperature of the lighting fixtures you select.
Take note of any architectural or landscaping features that you want to highlight. For example, if you have a beautiful garden or a striking sculpture, consider incorporating accent lights to draw attention to these focal points. Properly placed lighting can elevate the overall aesthetics of your outdoor space.
Consider the power source and electrical infrastructure available in your patio area. Determine if there are existing electrical outlets or if you need to plan for wiring installation. Consulting with a professional electrician can help you determine the feasibility and safety of your lighting plans.
Last but not least, embrace your personal style and preferences. Your outdoor patio is an extension of your home, and the lighting should reflect your taste. Consider whether you prefer modern, minimalist fixtures or rustic, vintage-inspired designs. By aligning the lighting style with your personal aesthetic, you will create a cohesive and harmonious outdoor environment.
Once you have completed the assessment of your outdoor patio, you will have a clear understanding of its size, layout, purpose, and unique features. Armed with this knowledge, you can confidently move forward with choosing the right lighting fixtures and planning their placement.
Step 2: Choosing the Right Lighting Fixtures
Now that you have assessed your outdoor patio and determined its unique characteristics, it’s time to choose the lighting fixtures that will bring your space to life. The right lighting fixtures can enhance the ambiance, highlight key features, and create a warm and inviting atmosphere on your patio.
Consider the different types of lighting fixtures available and how they can suit your patio’s specific needs and style. Here are some popular options to consider:
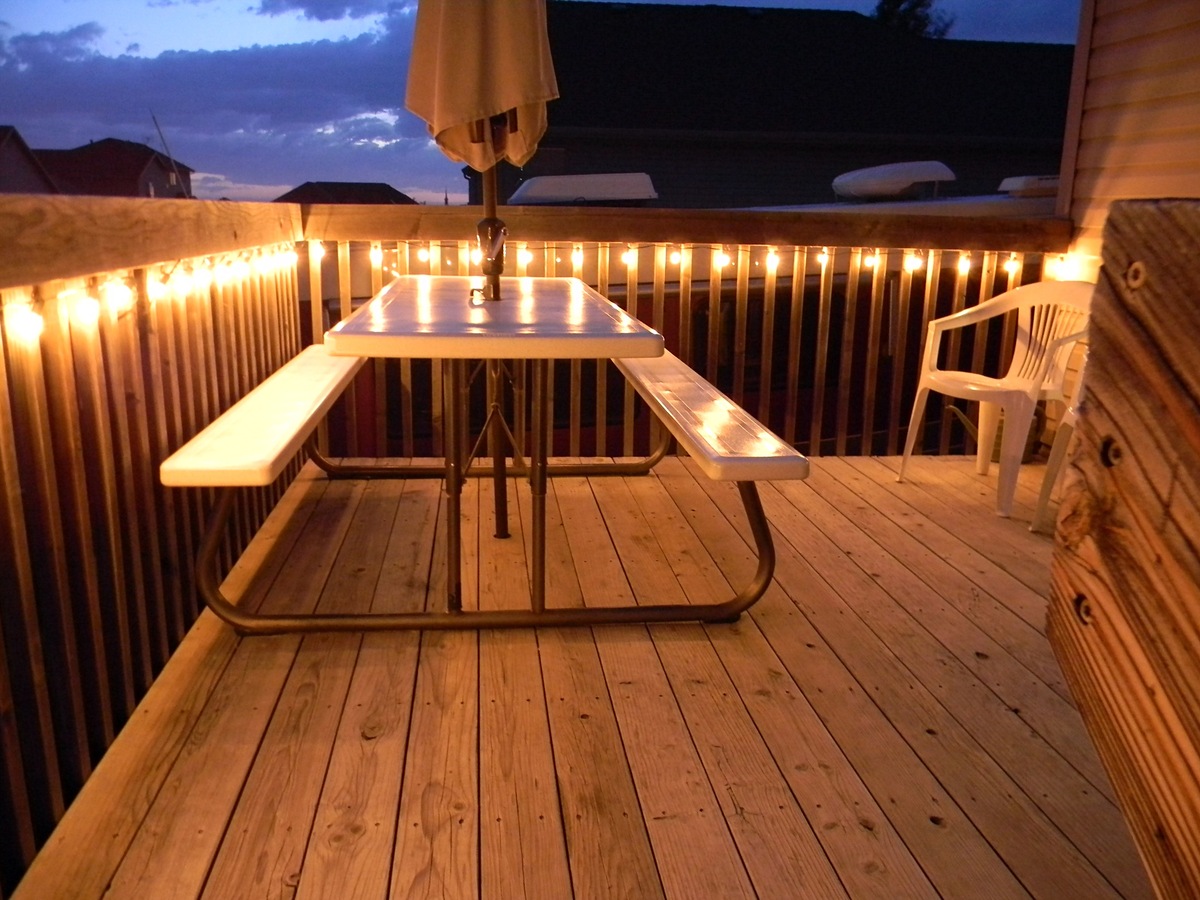
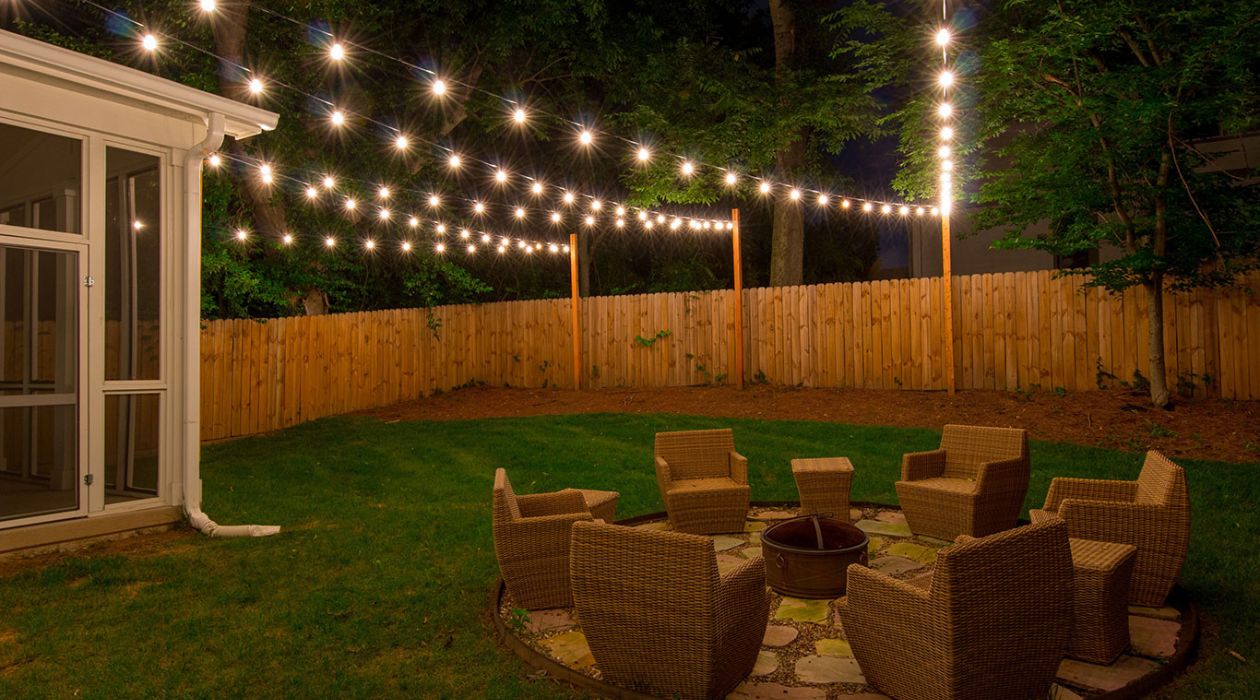
1. Overhead Lights: Overhead lights provide general illumination for your outdoor patio. They are typically installed on a ceiling, pergola, or tree branches. Popular choices include pendant lights, chandeliers, and string lights. Pendant lights and chandeliers can add a touch of elegance and sophistication, while string lights create a whimsical and romantic atmosphere.
2. Wall Sconces: Wall sconces are mounted on the walls of your patio and provide both functional and decorative lighting. They can be placed strategically to illuminate pathways, seating areas, or architectural details. Choose wall sconces that complement your patio’s style, whether it’s modern, traditional, or rustic.
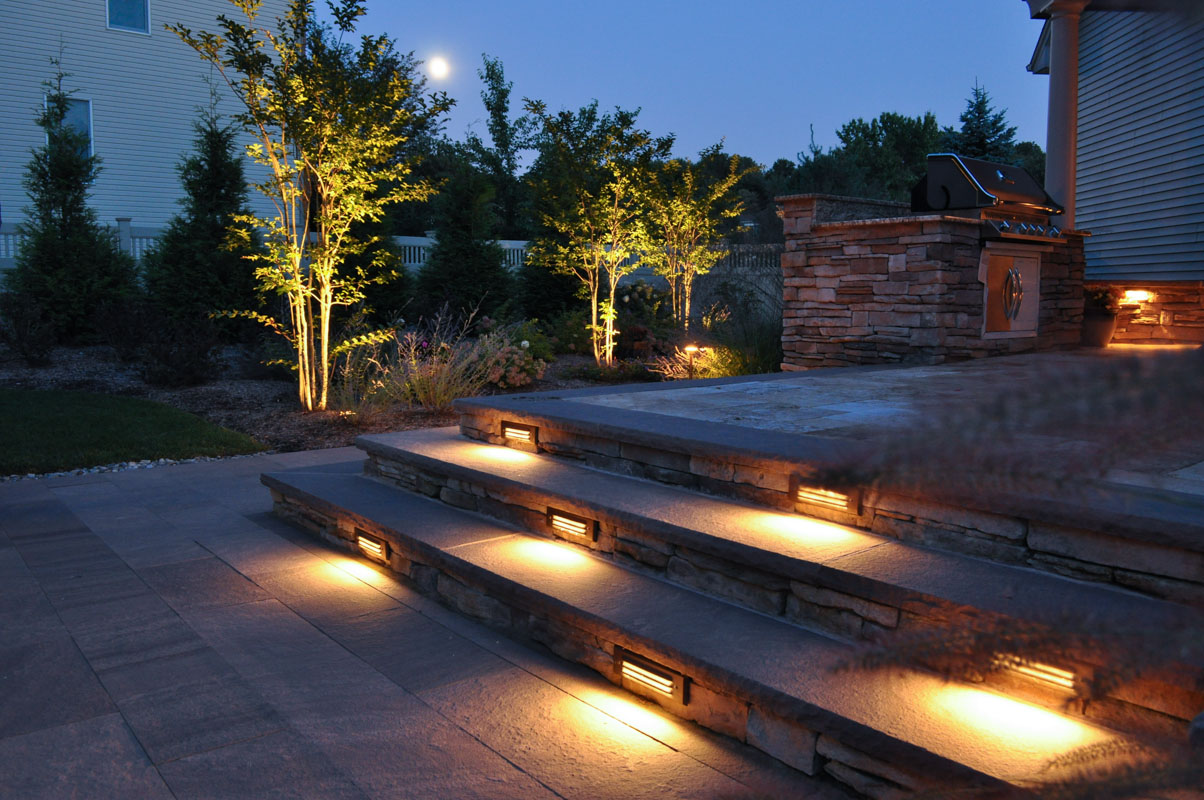
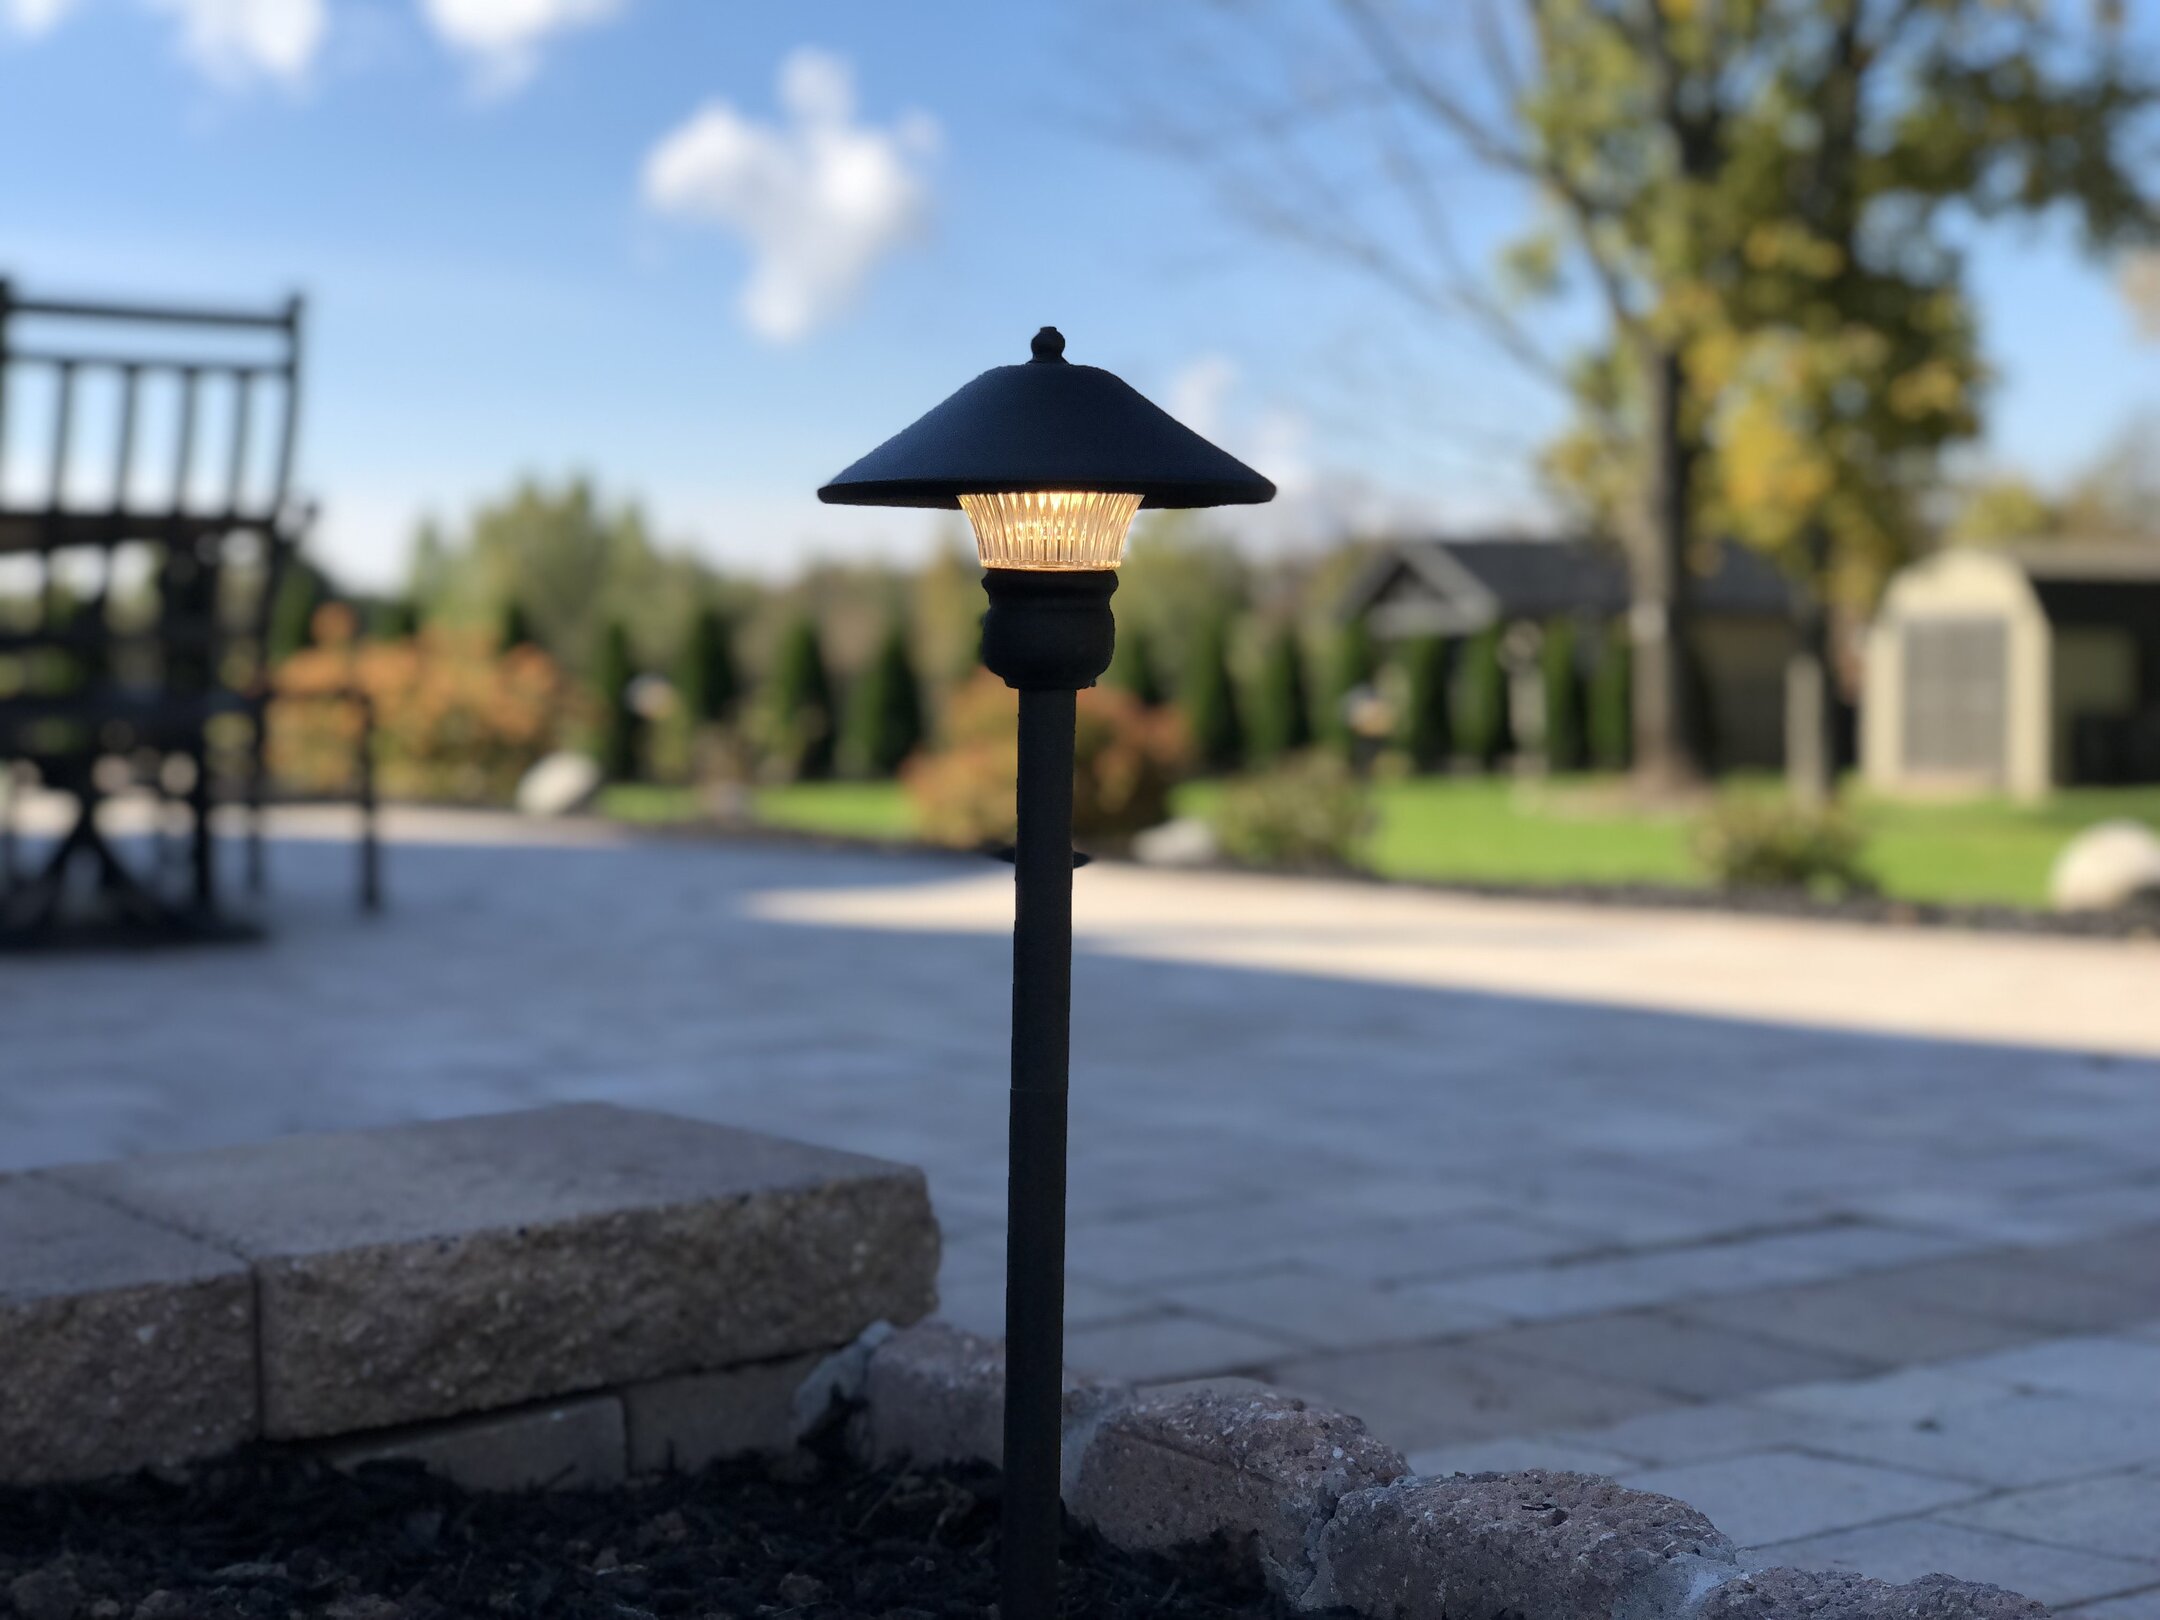
3. Landscape Lights: Landscape lights are ideal for highlighting landscaping elements, such as trees, shrubs, or flowerbeds. They come in various forms, including spotlights, up-lights, and path lights. These lights not only enhance the visual appeal of your patio but also improve safety and visibility during nighttime.
4. Accent Lights: Accent lights are versatile fixtures that draw attention to specific areas or features of your patio. They can be used to illuminate artwork, statues, or architectural elements. Popular choices for accent lighting include LED tape lights, strip lights, or up-lights.
5. Rope Lights: Rope lights are flexible strands of LED lights encased in a protective tube. They can be easily attached to railings, fences, or pergolas, creating a soft and ambient glow. Rope lights are energy-efficient and come in various colors, allowing you to create different moods and themes on your patio.
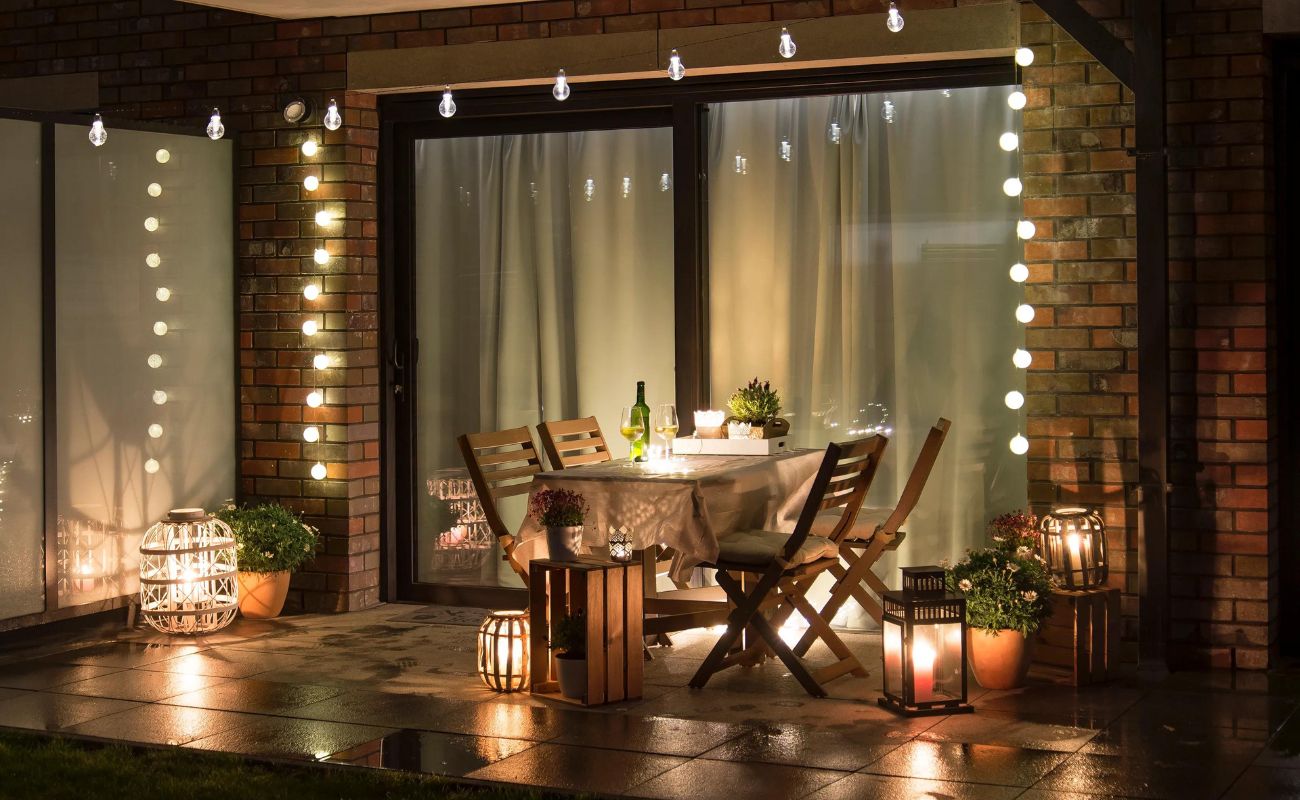
6. Lanterns and Candle Holders: For a more intimate and cozy ambiance, consider incorporating lanterns and candle holders into your patio lighting design. These portable fixtures can be placed on tables, hung from hooks, or scattered around the patio. They add a warm and flickering glow, perfect for romantic evenings or gatherings with friends.
When choosing lighting fixtures, consider the quality and durability. Outdoor lighting should be weather-resistant and able to withstand exposure to the elements. Look for fixtures with an IP (Ingress Protection) rating to ensure they are suitable for outdoor use.
Additionally, consider the type of bulbs used in the fixtures. LED bulbs are highly recommended for outdoor settings due to their energy efficiency, long lifespan, and versatility. They come in different color temperatures, ranging from cool white to warm white, allowing you to create the desired ambiance on your patio.
Ultimately, the right lighting fixtures for your outdoor patio will depend on your personal style, the size and layout of the space, and the mood you want to create. By choosing thoughtfully, you can transform your patio into a captivating and illuminated retreat.
Step 3: Preparing the Patio for Lighting Installation
Before diving into the installation process, it’s essential to prepare your outdoor patio to ensure a smooth and safe lighting installation. Taking the time to properly prepare the space will help avoid complications and potential hazards.
Here are some key steps to follow when preparing your patio for lighting installation:
1. Check the Electrical Infrastructure: Start by assessing the existing electrical infrastructure in your patio area. Determine if there are enough electrical outlets available or if additional wiring needs to be installed. Consult with a professional electrician to ensure that the electrical setup can handle the load of the lighting fixtures you plan to install.
2. Plan the Wiring Layout: If you need to install additional wiring, carefully plan the layout to ensure seamless integration with your patio design. Determine the best routes for the wiring to avoid any obstructions while maintaining a clean and organized appearance. Concealing the wiring can be accomplished by using conduit or hiding it behind structures such as walls or plants.
3. Clean and Clear the Space: Before performing any installation work, thoroughly clean and clear the patio area. Remove any debris, leaves, or obstacles that may obstruct the installation process. Keeping the area clean will provide a safe and efficient working environment for the installation process.
4. Gather Tools and Equipment: Gather all the necessary tools and equipment needed for the installation process. This may include a ladder, drill, screws, wire cutters, and various other tools depending on the specific lighting fixtures you have chosen. Having everything readily available will streamline the installation process and prevent unnecessary delays.
5. Test the Power Source: Ensure that the power source for your outdoor patio is functioning properly. Test the outlets or electrical connections to ensure they are supplying the correct voltage and are in good working condition. Safety is paramount, so if you are unsure, it is best to consult with a professional electrician.
6. Consider Weatherproofing: Since your patio lighting fixtures will be exposed to the elements, it is essential to weatherproof them to prevent damage. Choose lighting fixtures that have a high IP (Ingress Protection) rating to ensure they are resistant to water, dust, and other environmental factors. Additionally, use waterproof connectors and ensure that all wiring and connections are protected to prevent short circuits and electrocution risks.
7. Securely Mount Fixtures: During the installation process, ensure that all lighting fixtures are securely mounted to the appropriate surfaces. This will prevent them from becoming dislodged or falling, reducing the risk of accidents. Follow the manufacturer’s instructions and use appropriate mounting hardware to ensure a sturdy and safe installation.
By carefully preparing your patio for lighting installation, you will create a solid foundation for a successful and safe lighting project. Taking the time to assess the electrical infrastructure, plan the wiring layout, clean the space, gather the necessary tools, test the power source, weatherproof the fixtures, and securely mount them will contribute to a seamless installation process and a stunning, well-lit patio.
Step 4: Installing Overhead Lighting
Installing overhead lighting is a crucial step in illuminating your outdoor patio. Overhead lights provide general illumination and set the overall mood and ambiance of the space. From pendant lights to string lights, there are various options to choose from, depending on your patio design and personal preference.
Here is a step-by-step guide on installing overhead lighting for your outdoor patio:
1. Determine the Lighting Placement: Start by determining the ideal placement for your overhead lights. Consider the layout and size of your patio, along with the specific areas or features you want to highlight. For dining areas, you may want to center the lights directly above the table for even illumination during meals. In larger patios, you can create a captivating effect by installing multiple lights staggered or in a pattern to cover the entire space.
2. Measure and Mark the Mounting Points: Once you have determined the lighting placement, measure and mark the mounting points on the ceiling, pergola, or tree branches. Use a measuring tape and a pencil to ensure accurate placement. If drilling is required, ensure that you are aware of any existing wiring or infrastructure in the area to avoid accidents.
3. Install Mounting Hardware: Depending on the type of lighting fixture chosen, follow the manufacturer’s instructions to install the necessary mounting hardware. This may include hooks, brackets, or screws. Ensure that the hardware is securely fastened, providing a stable foundation for the lights.
4. Wire and Connect the Lights: If your overhead lights require wiring, carefully follow the manufacturer’s instructions to connect the lights to the power source. If you are unsure of the wiring process, it is recommended to hire a professional electrician to ensure safety and proper installation.
5. Hang the Lights: Once the mounting hardware is installed and the lights are wired and connected, it’s time to hang them in their designated positions. Carefully attach the lights to the mounting points, ensuring they are securely fastened. Adjust the height and position of the lights as needed to achieve the desired lighting effect.
6. Test the Lights: After the lights are hung, test them to ensure they are functioning correctly. Turn on the power source and verify that each light is working as expected. If any issues arise, double-check the connections and consult the manufacturer’s troubleshooting guide.
7. Consider Lighting Controls: To enhance convenience and flexibility, consider incorporating lighting controls for your overhead lights. This can include dimmer switches, timers, or smart home integration. These controls allow you to adjust the lighting intensity and create different moods on your patio.
Remember, safety is of utmost importance when working with electrical components. If you are unsure about any aspect of installing overhead lighting, it is always recommended to consult a professional electrician to ensure a safe and proper installation.
By following these steps and carefully installing overhead lighting, you will add a striking and functional element to your outdoor patio. The right choice of lighting fixtures and placement will create a warm and inviting atmosphere for you to enjoy and entertain guests for years to come.
Consider using string lights or LED lanterns to create a warm and inviting atmosphere on your outdoor patio. These options are energy-efficient and can be easily hung from trees, pergolas, or along the edges of the patio.
Read more: How To String Up Patio Lights
Step 5: Installing Decorative Lighting
Installing decorative lighting is a wonderful way to add charm and personality to your outdoor patio. These lighting elements not only enhance the visual appeal of the space but also create a warm and inviting ambiance. From wall sconces to pathway lights, there are various options to choose from, allowing you to customize the look and feel of your patio.
Here is a step-by-step guide on installing decorative lighting for your outdoor patio:
1. Determine the Lighting Placement: Start by determining the areas or features on your patio that you want to highlight with decorative lighting. Consider the architectural details, pathways, and landscaping elements that would benefit from illuminated accents. These can include walls, pillars, steps, and garden beds. Visualize how the lighting will enhance these features and create a captivating effect.
2. Measure and Mark the Mounting Points: Once you have determined the lighting placement, measure and mark the mounting points for the decorative lights. Use a tape measure and a pencil to ensure precise positioning. Take into account any existing structures or wires in the area to avoid damage or accidents during installation.
3. Install Mounting Hardware: Depending on the type of decorative lighting chosen, follow the manufacturer’s instructions to install the appropriate mounting hardware. This may include brackets, screws, or stakes. Ensure that the hardware is securely fastened, providing stability for the lights.
4. Wire and Connect the Lights: If your decorative lights require wiring, carefully follow the manufacturer’s instructions to connect them to the power source. If you are not confident in your wiring skills, it is recommended to hire a professional electrician to ensure safe and proper installation.
5. Mount and Position the Lights: Once the mounting hardware is installed and the lights are wired and connected, it’s time to mount and position them according to your planned design. Securely attach the lights to the designated mounting points, ensuring they are placed in the desired positions to bring out the best features of your patio.
6. Test the Lights: After installing the decorative lights, it’s important to test them to ensure they are functioning properly. Turn on the power source and verify that each light is working as expected. Check for any flickering or issues with the connections. If necessary, make adjustments or consult the manufacturer’s troubleshooting guide.
7. Consider Lighting Controls: To enhance convenience and flexibility, you may want to consider incorporating lighting controls for your decorative lights. This can include timers, motion sensors, or remote control options. These controls allow you to easily adjust the lighting settings and create the desired ambiance on your patio.
Remember, safety should always be a priority when working with electrical components. If you are unsure about any aspect of installing decorative lighting, it is always recommended to consult a professional electrician to ensure a safe and proper installation.
By following these steps and carefully installing decorative lighting, you will add a touch of charm and sophistication to your outdoor patio. The right choice of lighting fixtures and strategic placement will transform your patio into a captivating space that you can enjoy day or night.
Step 6: Enhancing the Ambiance with Candles or Lanterns
To create a warm and intimate ambiance on your outdoor patio, consider incorporating candles or lanterns into your lighting design. These versatile additions can add a soft and flickering glow, perfect for relaxed evenings or special gatherings. Whether placed on tables, hung from hooks, or scattered throughout the patio, candles and lanterns can enhance the overall charm and coziness of the space.
Here is a step-by-step guide on enhancing the ambiance with candles or lanterns:
1. Determine Placement: Start by determining where you want to place the candles or lanterns on your patio. Consider areas where you want to create a cozy atmosphere or highlight specific features. Popular spots include dining tables, side tables, pathways, and seating areas. Visualize the desired effect and ensure that the placement complements the overall design and flow of your patio space.
2. Choose the Right Candles or Lanterns: Consider the style, size, and type of candles or lanterns that would best suit your patio. You can opt for traditional wax candles, LED candles, or even flameless candles for added safety. Lanterns come in various materials and designs, ranging from metal to glass, and can add an additional layer of style to your outdoor decor. Choose options that align with your personal taste and the ambiance you want to create.
3. Select the Lighting Products: If you choose to use traditional wax candles, select high-quality candles made from materials that are suitable for outdoor use. Look for candles that are designed to withstand wind or are enclosed in glass containers for added safety. If you prefer the convenience and peace of mind of LED or flameless candles, select ones that emit a warm and realistic glow.
4. Arrange the Candles or Lanterns: Once you have chosen the candles or lanterns, arrange them in the desired locations on your patio. Place them strategically to create a romantic and inviting atmosphere. Consider using a mix of different-sized candles or lanterns to add depth and visual interest. Cluster them together in groups or spread them out across the patio depending on the effect you want to achieve.
5. Ensure Safety and Stability: Safety is paramount when using candles or lanterns on your patio. Ensure that all candles and lanterns are placed on stable surfaces to prevent tipping over. For open-flame candles, employ appropriate safety measures such as candle holders or glass enclosures to prevent accidents. Always follow the manufacturer’s instructions regarding candle use and keep an eye on open flames to prevent fire hazards.
6. Consider Mosquito-Repellent Candles: To enhance the comfort of your outdoor space, consider incorporating mosquito-repellent candles into your candle or lantern arrangements. These candles are specifically formulated to repel mosquitoes and other insects, allowing you and your guests to relax without being bothered by pesky bugs.
7. Experiment and Enjoy: Once everything is in place, light the candles or turn on the LED or flameless candles to create a warm and inviting glow. Step back and take in the ambiance you have created. Experiment with different arrangements and adjust as needed to find the perfect balance of lighting and atmosphere for your patio.
By following these steps and incorporating candles or lanterns into your outdoor patio lighting design, you can create a cozy and enchanting atmosphere. The soft and flickering glow of candles or the subtle illumination of lanterns will enhance the overall aesthetic and encourage a peaceful and relaxing outdoor experience.
Step 7: Testing and Adjusting the Lighting Setup
After installing all the lighting fixtures on your outdoor patio, it’s important to take the final step of testing and adjusting the lighting setup. This step ensures that the lights are functioning properly, positioned correctly, and creating the desired ambiance in your outdoor space.
Here is a step-by-step guide on testing and adjusting your outdoor patio lighting setup:
1. Turn on Each Light: Start by turning on each lighting fixture, one at a time, to ensure they are all working properly. Check for any flickering, dimming, or inconsistencies in the light output. If any issues arise, double-check the connections, bulb installation, and power source to identify and resolve the problem.
2. Assess the Overall Lighting Level: Step back and evaluate the overall lighting level on your patio. Is it adequately bright, or is it too dim? Adjust the positioning and intensity of the lights accordingly. Make sure the patio is well-lit, especially in areas where you plan to spend more time, such as dining or seating areas.
3. Evaluate the Lighting Direction: Assess the direction in which the light is cast from each fixture. Ensure that the lighting is illuminating the intended areas and not causing unwanted glare or shadows. Adjust the angle or direction of the fixtures if necessary to achieve a balanced and even lighting distribution.
4. Consider Lighting Zones: Divide your outdoor patio into different lighting zones based on the specific activities or areas you want to highlight. This can include dining areas, lounging spaces, pathways, and focal points. Adjust the lighting levels and positioning within each zone to create the desired ambiance and functionality for that particular area.
5. Add or Adjust Dimmers: If you have installed dimmable lighting fixtures, consider adding or adjusting dimmers to create more control over the lighting intensity. Dimmers allow you to customize the mood and ambiance of your patio based on the time of day or the specific occasion. Experiment with different dimmer settings to find the perfect balance of light for different situations.
6. Consider Lighting Control Systems: If you want even more convenience and flexibility in adjusting your patio lighting, consider investing in a lighting control system. These systems allow you to control the entire lighting setup from a central point, whether through a mobile app or a control panel. With a lighting control system, you can easily adjust the lighting levels, create preset scenes, and even set timers or schedules for automated lighting changes.
7. Fine-tune and Enjoy: Take the time to fine-tune your patio lighting setup based on your personal preferences and the feedback from others. Experiment with different settings, positions, and configurations until you achieve the desired ambiance and functionality. Once you’re satisfied, sit back, relax, and enjoy your beautifully illuminated outdoor patio.
Regularly revisit and assess your lighting setup as seasons change or your patio usage evolves. Make any necessary adjustments to accommodate new furniture arrangements or to accommodate special events or occasions.
By thoroughly testing and adjusting your outdoor patio lighting setup, you will ensure that your space is beautifully illuminated, safe, and functional. The properly positioned and well-functioning lights will make your patio a welcoming and delightful place to spend time with family and friends, day or night.
Conclusion
Creating a well-lit and inviting outdoor patio is a transformative process that can significantly enhance your outdoor living experience. Whether you want to create a cozy retreat for relaxation, a vibrant space for entertaining, or a combination of both, strategic lighting plays a crucial role in setting the mood and amplifying the beauty of your outdoor area.
Throughout this guide, we have walked you through the essential steps of lighting up your outdoor patio. From assessing your patio’s unique characteristics to choosing the right fixtures, preparing the space, installing overhead and decorative lighting, enhancing the ambiance with candles or lanterns, and testing and adjusting the lighting setup, you now have the knowledge and tools to create a stunningly illuminated patio.
Remember to pay attention to the size and layout of your patio, its intended purpose, and your personal style when selecting lighting fixtures. Consider the different lighting options available, such as overhead lights, wall sconces, landscape lights, accent lights, rope lights, lanterns, and candles, to create a layered and versatile lighting design. Keep in mind safety measures and weatherproofing for all outdoor lighting installations.
As you install your chosen lighting fixtures, take the time to properly prepare the patio space, check the electrical infrastructure, and clean the area for a smooth installation process. Testing and adjusting the lighting setup will ensure that the lights are functioning correctly, positioned appropriately, and creating the desired ambiance for your patio.
Throughout the process, remember that your outdoor patio is an extension of your home and a reflection of your personal taste. Let your creativity shine through, and don’t be afraid to experiment with different lighting configurations and styles to create a unique and enchanting outdoor space.
So, whether you want to host memorable gatherings, enjoy intimate evenings under the stars, or simply relax in the fresh air, a well-lit outdoor patio will provide the perfect backdrop. Embrace the power of lighting and let it transform your patio into a captivating oasis that you can enjoy throughout the year.
Frequently Asked Questions about How To Light Up An Outdoor Patio
Was this page helpful?
At Storables.com, we guarantee accurate and reliable information. Our content, validated by Expert Board Contributors, is crafted following stringent Editorial Policies. We're committed to providing you with well-researched, expert-backed insights for all your informational needs.


0 thoughts on “How To Light Up An Outdoor Patio”