Home>Interior Design>How Many Coats Of Primer Do You Need? Pro Painters Explain
Interior Design
How Many Coats Of Primer Do You Need? Pro Painters Explain
Modified: January 19, 2024
Expert painters explain how many coats of primer you need for optimal interior design results. Discover the perfect primer application for your project.
(Many of the links in this article redirect to a specific reviewed product. Your purchase of these products through affiliate links helps to generate commission for Storables.com, at no extra cost. Learn more)
Introduction
Welcome to the world of interior design! Whether you are a homeowner looking to revamp your living space or a professional designer working on a client’s project, one thing is certain – the power of a well-executed interior design cannot be underestimated. From choosing the right color palette to selecting furniture and accessories, every element plays a crucial role in creating a harmonious and inviting space.
Amongst the many considerations in interior design, the importance of primer often goes unnoticed. However, the role of primer should not be underestimated, as it forms the foundation for a successful paint job. Applying primer before the final coat of paint can significantly improve the overall finish and durability of your walls.
In this article, we will delve into the intricacies of primer and discuss the factors that influence the number of coats required for the best results. Whether you are a seasoned DIY enthusiast or a professional painter, this information will help you achieve a flawless finish every time.
So, let’s grab our paintbrushes and dive into the wonderful world of primers!
Key Takeaways:
- Don’t underestimate the power of primer! It’s crucial for enhanced adhesion, improved durability, and even paint coverage. Invest in high-quality primer and follow expert recommendations for a flawless finish.
- Consider the type of material, surface condition, primer quality, and coverage when determining the number of primer coats needed. Follow expert tips, assess the surface, and consult professionals for optimal results.
Read more: How Many Coats Of Primer On Exterior Walls
Importance of Primer
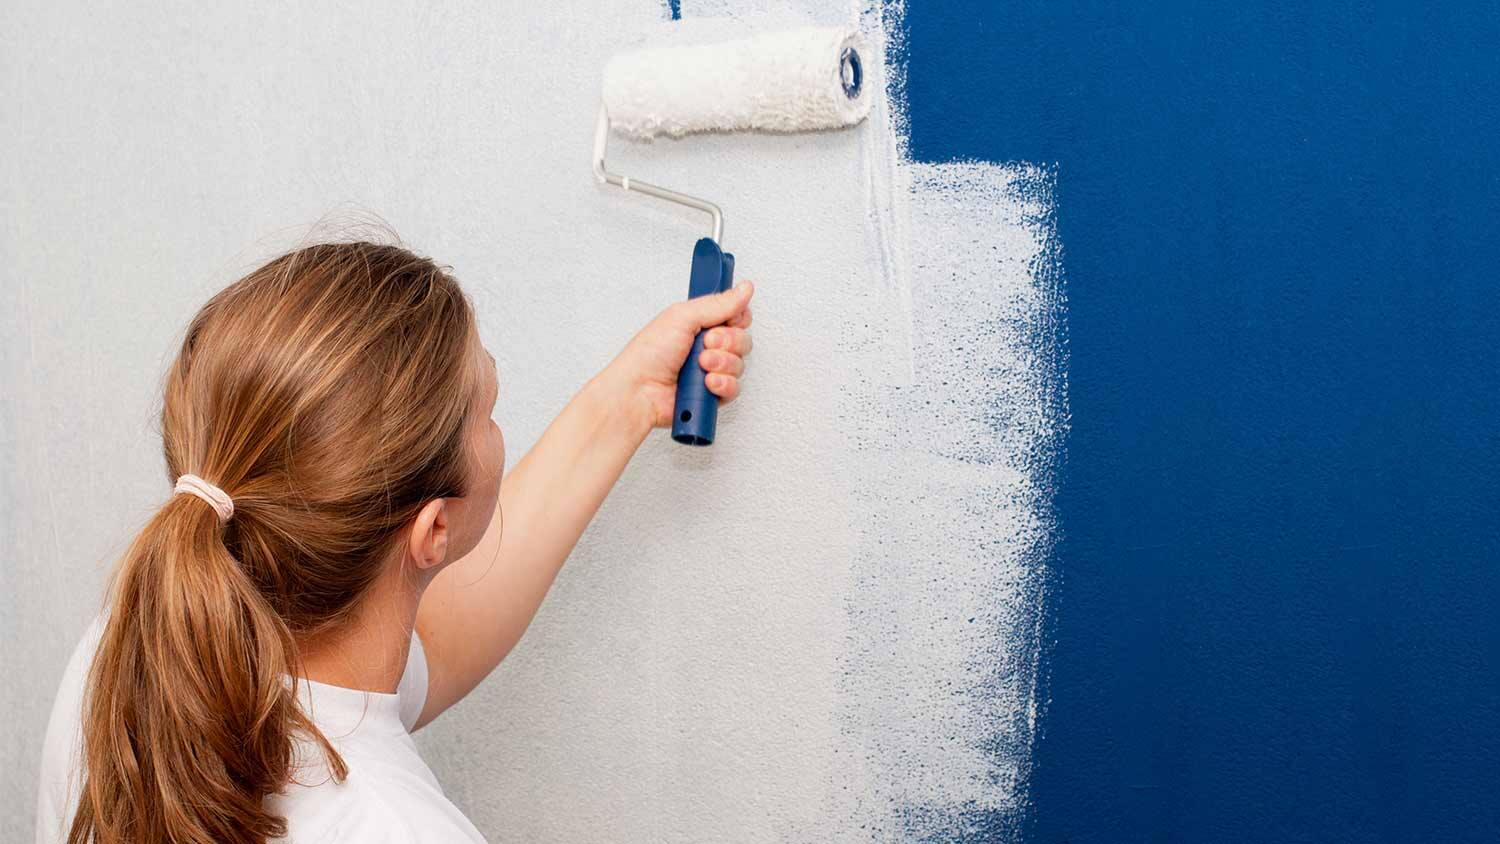
Primer is a preparatory coating that is applied to surfaces before the final coat of paint. Its primary function is to create a smooth and uniform surface for paint adhesion. It acts as a bonding agent, ensuring that the paint adheres well to the surface and doesn’t peel or chip over time.
There are several reasons why using primer is essential in any painting project:
- Enhanced Adhesion: Primer creates a strong bond between the surface and the paint, preventing it from easily scratching or peeling off. It improves paint adhesion on a variety of materials, including drywall, wood, metal, and concrete.
- Improved Durability: When paint is applied directly to a surface without primer, it may not adhere properly. This can lead to premature paint failure, such as cracking, flaking, or peeling. Primer creates a durable foundation that helps the paint withstand wear and tear, ensuring a longer-lasting finish.
- Even Paint Coverage: Applying primer evens out the porosity of the surface, allowing the paint to be applied more uniformly. It helps to prevent the paint from being absorbed into the surface and creating uneven patches or blotches.
- Stain Blocking: Primer is particularly useful when covering stains, such as watermarks, smoke damage, or tannin bleed. It acts as a barrier, preventing the stains from bleeding through the paint and reappearing on the surface.
- Surface Sealing: In addition to improving paint adhesion, primer also helps to seal the surface, preventing moisture penetration, which can cause paint to bubble or peel. It creates a barrier that keeps the surface dry and protects it from damage.
- Cost and Time Efficiency: Applying primer can save both time and money in the long run. By providing a solid foundation for the paint, it reduces the number of coats required for proper coverage, ultimately reducing the amount of paint needed.
As you can see, primer plays a crucial role in achieving a professional and long-lasting paint job. It is a step that should never be skipped, regardless of the surface or project at hand. Now that we understand the importance of primer, let’s explore the factors that influence the number of coats required for optimal results.
Factors Affecting the Number of Coats
The number of coats of primer required for a painting project depends on several factors. Understanding these factors will help you determine the appropriate number of coats needed for optimal results:
- Type of Material: Different materials have varying levels of absorption and surface smoothness. Porous materials like bare wood or drywall may require more coats of primer to achieve proper coverage and adhesion compared to less porous materials like previously painted surfaces.
- Surface Condition: The condition of the surface being painted also plays a role in determining the number of primer coats required. Surfaces that are damaged, uneven, or have existing paint that is in poor condition may require additional coats of primer to create a smooth and uniform base for the final paint.
- Primer Quality: The quality of the primer used can affect the coverage and adhesion it provides. Low-quality primers may require multiple coats to achieve the desired results, while high-quality primers with better adhesion properties may require fewer coats.
- Coverage and Thickness: The coverage and thickness of the primer coat can also influence the number of coats needed. Thicker coats of primer typically provide better coverage, allowing for fewer coats. It’s important to follow the manufacturer’s guidelines regarding the recommended coverage and thickness for optimal results.
These factors are not mutually exclusive and may interact with each other. For example, a heavily damaged and porous surface may require multiple coats of a high-quality primer to achieve the desired results. On the other hand, a smooth and well-prepared surface may only require a single coat of primer for sufficient adhesion.
It’s important to assess these factors on a case-by-case basis and adjust the number of primer coats accordingly. Consulting with a professional painter or referring to the manufacturer’s instructions can provide further guidance in determining the appropriate number of coats for a specific project.
Now that we understand the factors influencing the number of coats of primer, let’s explore the different types of primer available and the expert recommendations for achieving the best results.
Type of Material
The type of material you are painting is a significant factor when determining the number of coats of primer needed. Different surfaces require different types of primer to achieve optimal adhesion and coverage. Let’s take a look at some common materials and their corresponding primer requirements:
- Drywall: Drywall is a popular interior wall material, and it typically requires at least one coat of primer before painting. Drywall primer helps to seal the porous surface, prevent the paint from being absorbed unevenly, and create a smooth base for paint application.
- Bare Wood: Unfinished or bare wood is highly porous and often requires multiple coats of primer. The first coat of primer helps to seal the wood and prevent it from absorbing too much paint. Subsequent coats help to build up the foundation for better adhesion and coverage.
- Masonry: When painting masonry surfaces like concrete or brick, it’s essential to use a specialized masonry primer. These primers are formulated to adhere to the porous surface of masonry, improve paint adhesion, and prevent moisture penetration.
- Metal: Priming metal surfaces is crucial to prevent rust and ensure proper paint adhesion. Metal primers are designed to resist corrosion and create a strong bond between the surface and the paint. In some cases, a specific type of metal primer may be required based on the type of metal being painted.
- Previously Painted Surfaces: If you are painting over a surface that has already been painted, the number of primer coats needed may vary. If the existing paint is in good condition, a single coat of primer may be sufficient. However, if the existing paint is peeling, stained, or in poor condition, additional coats of primer may be necessary to create a smooth and uniform base for the new paint.
It’s important to note that these are general guidelines, and there may be specific considerations based on the condition and quality of the materials you are working with. Consulting with a professional painter or referring to the manufacturer’s instructions for the primer can provide you with more specific recommendations for your project.
Now that we have covered the importance of primer and the factors that influence the number of coats required, it’s time to explore the quality of primer and its impact on achieving a flawless finish in our next section.
Surface Condition
The condition of the surface being painted is a crucial factor in determining the number of coats of primer needed. Surfaces that are damaged, uneven, or have existing paint that is in poor condition may require additional coats of primer to create a smooth and uniform base for the final paint. Let’s explore some common surface conditions and their primer requirements:
- Damaged Surfaces: If the surface has holes, cracks, or other forms of damage, it’s important to repair and prepare it before applying primer. Depending on the severity of the damage, you may need to use a filler or patching compound to level the surface. After the repairs are made, multiple coats of primer may be necessary to ensure proper coverage and hide any imperfections.
- Uneven Surfaces: Surfaces that are not smooth or have texture may require additional coats of primer to create a uniform base for painting. The primer helps to fill in the gaps and level out the surface, ensuring that the final paint job looks consistent and professional. It’s important to note that some textured surfaces may require specialized primers designed to adhere to the texture and improve paint adhesion.
- Peeling or Flaking Paint: If you are painting over a surface with existing paint that is peeling or flaking, additional coats of primer may be required. The primer helps to create a strong bond between the surface and the new paint, preventing further peeling or flaking. It also helps to create a smooth base for the final paint, ensuring a professional and durable finish.
- Stained Surfaces: Stains, such as watermarks or smoke damage, can be challenging to cover with paint alone. Using a primer specifically formulated to block stains can help prevent them from bleeding through the paint. Depending on the severity of the stains, multiple coats of stain-blocking primer may be necessary to achieve the desired results.
- Previously Painted Surfaces: If you are painting over a surface that has been previously painted, the condition of the existing paint will also impact the number of primer coats needed. If the previous paint is in good condition, a single coat of primer may be sufficient. However, if the paint is peeling, chipping, or in poor condition, additional coats of primer may be necessary to create a stable base for the new paint.
Assessing the condition of the surface and making any necessary repairs before applying primer is crucial for achieving a high-quality finish. It’s essential to ensure that the surface is clean, dry, and free from debris before applying primer to maximize its effectiveness.
Now that we have explored the factors related to the surface condition, let’s move on to discussing the quality of primer and its impact on achieving the desired results.
For most surfaces, one coat of primer is sufficient. However, for highly porous or uneven surfaces, two coats may be necessary for better coverage and adhesion. Always follow the manufacturer’s recommendations for the specific primer being used.
Primer Quality
The quality of the primer used can have a significant impact on the number of coats required for optimal results. High-quality primers typically provide better coverage, adhesion, and durability compared to lower-quality alternatives. Let’s delve into the importance of primer quality and its impact on your painting project:
Coverage: High-quality primers are formulated to provide excellent coverage, meaning they can cover a larger area with less product. This is especially important when dealing with porous or uneven surfaces that require multiple coats of primer. Using a high-quality primer can help reduce the number of coats needed, saving time and money in the long run.
Adhesion: One of the primary functions of a primer is to create a strong bond between the surface and the paint. Higher-quality primers contain additives that enhance adhesion, ensuring that the paint adheres well and doesn’t peel or chip over time. This can significantly improve the durability and longevity of your paint job.
Durability: The quality of the primer can also impact the overall durability of the paint job. Higher-quality primers are often more resistant to wear and tear, making them ideal for high-traffic areas or surfaces that are prone to moisture or other environmental factors. They can help protect your walls from stains, scratches, and other daily wear.
Stain Blocking: Some primers are specifically formulated to block stains, such as watermarks, smoke damage, or tannin bleed. These primers contain additional ingredients that prevent the stains from bleeding through the paint, ensuring a clean and professional finish. High-quality stain-blocking primers are more effective in hiding and preventing stains, reducing the need for multiple coats.
Ease of Application: High-quality primers often have better flow and leveling properties, making them easier to apply and resulting in a smoother finish. They have better coverage, reducing the chance of streaks or blotches, and are less prone to brush or roller marks. This can contribute to a more professional-looking paint job.
Investing in a high-quality primer is essential for achieving the best results in your painting project. While high-quality primers may have a higher upfront cost, they can save you time, effort, and even money in the long run by reducing the overall number of coats needed and ensuring a durable and professional finish.
Now that we understand the importance of primer quality, let’s move on to discussing coverage and thickness, which are crucial considerations when determining the number of coats needed.
Coverage and Thickness
When determining the number of coats of primer needed for optimal results, considering the coverage and thickness of the primer coat is essential. Let’s explore these factors in more detail:
Coverage: The coverage of a primer refers to the area it can cover with a single coat. Manufacturers typically provide guidelines on the coverage of their products, such as square footage per gallon. It’s important to follow these recommendations to ensure proper coverage and avoid applying too thin or too thick of a coat. Applying a primer with good coverage can help reduce the number of coats needed, saving time and materials.
Thickness: The thickness of the primer coat also plays a role in achieving the desired results. A thicker coat of primer provides better coverage, hides imperfections, and improves paint adhesion. Applying a thin coat may not offer sufficient coverage and may require additional coats to achieve the desired results. It’s important to follow the manufacturer’s recommendations regarding the thickness of the primer coat for optimal results.
When applying primer, it’s crucial to strike a balance between sufficient coverage and avoiding over-application. Applying too thick of a coat can lead to issues such as prolonged drying time, uneven drying, or even poor adhesion of the paint. It’s always best to follow the manufacturer’s instructions and apply the primer evenly and in the recommended thickness for the best outcome.
It’s also important to consider the type of surface you’re working with when determining the coverage and thickness. Porous surfaces, such as bare wood or drywall, may require multiple coats of primer to achieve adequate coverage and create a smooth base for paint adhesion. On the other hand, previously painted surfaces or less porous materials may require less primer and can be covered adequately with a single coat.
As a general rule, it’s best to start with a single coat of primer and assess the coverage and adhesion. Depending on the surface and desired outcome, additional coats may be necessary. It’s important to take your time and allow the primer to dry thoroughly between coats to ensure optimal results.
By considering the coverage and thickness of the primer coat, you can determine the appropriate number of coats needed for your specific project. Now, let’s move on to expert recommendations for achieving the best results in your painting endeavors.
Expert Recommendations
When it comes to achieving the best results in your painting project, expert recommendations can be invaluable. Here are some tips and insights from professionals in the field:
- Follow Manufacturer’s Instructions: Always read and follow the manufacturer’s instructions on the primer product label. Manufacturers provide specific guidelines on application, coverage, drying time, and recoat intervals for their products. Adhering to these instructions will ensure optimal results and help you determine the appropriate number of coats required.
- Assess Surface and Condition: Before applying primer, carefully assess the surface and its condition. Check for any damage, unevenness, or existing paint issues. Make any necessary repairs and prepare the surface properly before applying primer. This will help create a smooth and uniform base for the paint.
- Consider the Type of Material: Different materials require different types of primer. Use the appropriate primer for the surface you are working with, such as drywall primer for drywall, masonry primer for concrete, or metal primer for metal surfaces. Using the right primer will ensure proper adhesion and coverage.
- Use High-Quality Primer: Investing in a high-quality primer is essential for achieving a professional finish. High-quality primers offer better coverage, adhesion, and durability. They may require fewer coats compared to lower-quality alternatives. Spending a little more on a high-quality primer can save you time, effort, and material costs in the long run.
- Apply Primer Evenly: When applying primer, ensure it is applied evenly across the surface. Use a brush, roller, or sprayer to evenly distribute the primer and avoid excess pooling or streaks. Pay attention to corners, edges, and hard-to-reach areas to ensure consistent coverage.
- Allow Proper Drying Time: Give each coat of primer sufficient drying time as specified by the manufacturer. Rushing the drying process can lead to issues such as improper adhesion and uneven texture. Patience is key to achieving a smooth and flawless finish.
- Assess Coverage and Adhesion: After applying the primer coat(s), assess the coverage and adhesion. Look for any areas that may require additional coats for better coverage or hiding imperfections. If necessary, apply additional coats of primer to achieve the desired results.
- Consult with Professionals: If you are unsure about the number of coats of primer needed for your specific project or have any other concerns, don’t hesitate to consult with professional painters or experts in the field. They can provide guidance and recommendations based on their experience and expertise.
By following these expert recommendations, you can ensure a successful painting project with a flawless finish. Remember, each project is unique, and the number of primer coats needed may vary. Take the time to assess the surface, choose the right primer, and apply it properly for the best results.
Now that we have covered expert recommendations, let’s conclude our discussion on the importance of primer and the factors that influence the number of coats required.
Conclusion
In the world of interior design, primer is an essential element that should never be overlooked. Applying primer before painting provides numerous benefits, including enhanced adhesion, improved durability, even paint coverage, and stain blocking. It acts as a foundation for a successful paint job, ensuring a flawless and long-lasting finish.
When determining the number of coats of primer needed, several factors come into play. The type of material being painted, the surface condition, the quality of the primer, and the coverage and thickness of the primer coat all play a role in determining the optimal number of coats required.
Understanding these factors and following expert recommendations will help you achieve the best results in your painting project. Consider the type of material you are painting and select the appropriate primer accordingly. Assess the surface condition and make any necessary repairs before applying primer. Invest in a high-quality primer for better coverage, adhesion, and durability.
Apply primer evenly, allowing for proper drying time between coats. Assess the coverage and adhesion of the primer and apply additional coats if necessary. When in doubt, consult with professionals to ensure optimal results.
In conclusion, primer is a fundamental component of any successful interior design project. By recognizing its importance and considering the factors that influence the number of coats needed, you can achieve a flawless and long-lasting paint finish. So, grab your paintbrush and bring your interior design visions to life with the power of primer!
Frequently Asked Questions about How Many Coats Of Primer Do You Need? Pro Painters Explain
Was this page helpful?
At Storables.com, we guarantee accurate and reliable information. Our content, validated by Expert Board Contributors, is crafted following stringent Editorial Policies. We're committed to providing you with well-researched, expert-backed insights for all your informational needs.


0 thoughts on “How Many Coats Of Primer Do You Need? Pro Painters Explain”